

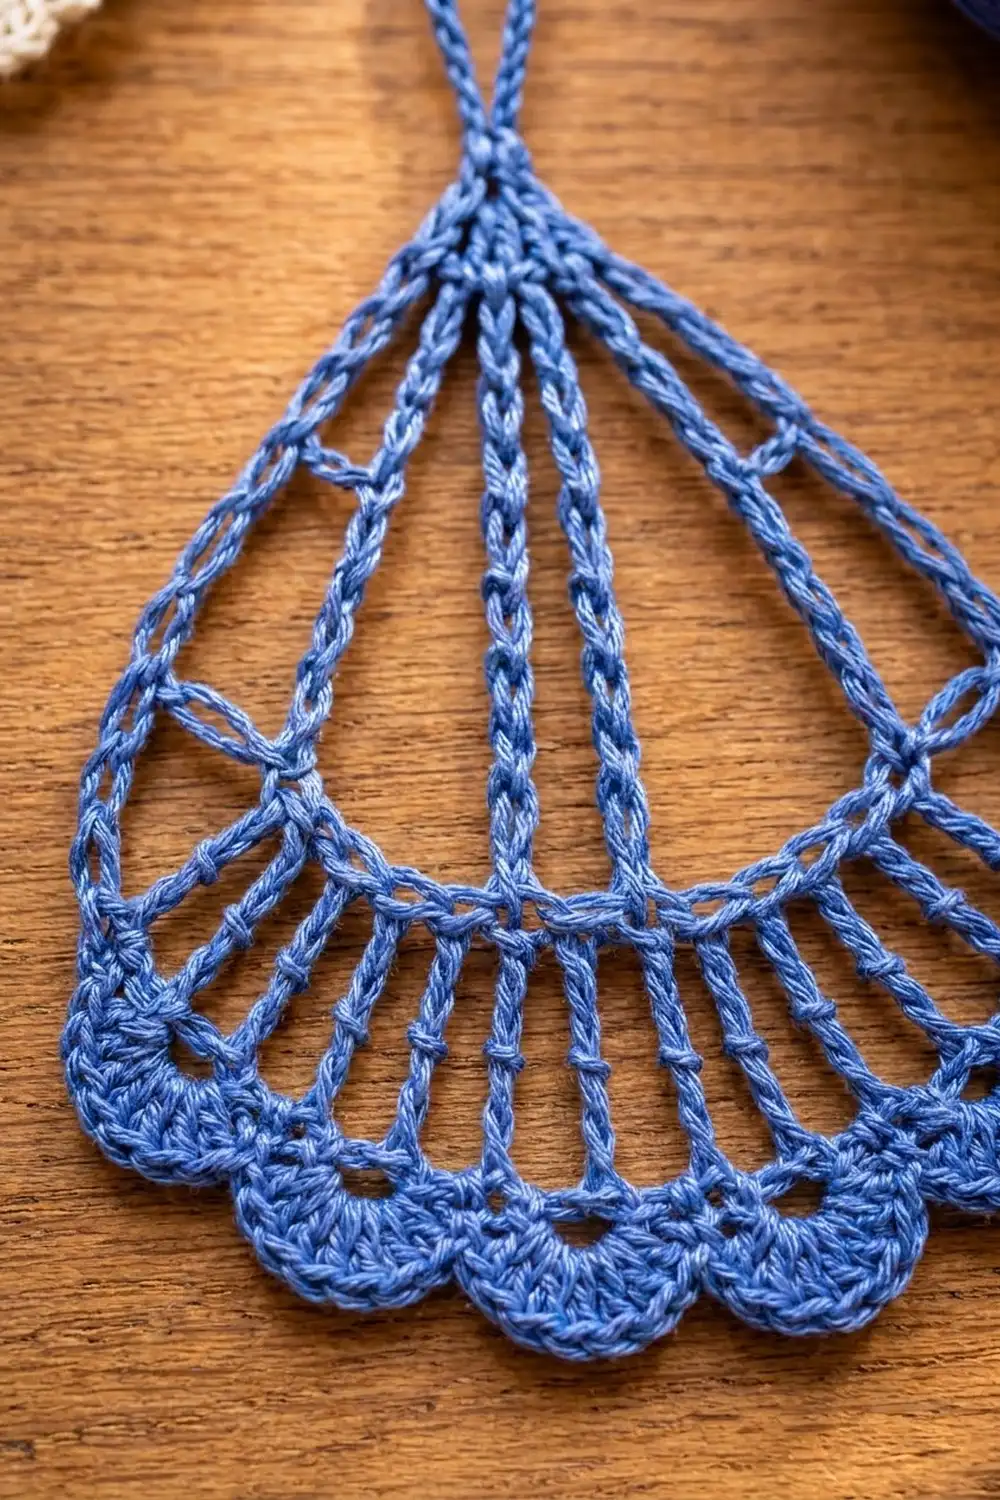
The Bluebell Teardrop is a light, lacy Christmas ornament shaped like a falling drop of frost. Five tall spokes spread out from a tiny ring at the top. Two curved chain bands cross them, and a lower fan of treble posts ends in a soft row of scallops. A long chain loop at the top lets it hang straight from a branch.
The sample is worked in cornflower blue cotton, and the same pattern looks lovely in lavender, mint green or cream. Make one in each color for a matching tree, or make one to tie onto a gift. Smooth, mercerized cotton shows the stitch lines best and keeps its shape after starching.
This pattern uses US crochet terms. The finished ornament is about 3.5″ (8.9 cm) wide and 4″ (10.2 cm) tall. With the 1.5″ (3.8 cm) hanging loop, it hangs about 5.5″ (14.0 cm) long.
Construction is simple. You start with a small ring at the top point and work six short rows back and forth, and each row spreads wider like a fan. One edging round then thickens the sides, makes the hanging loop and fills out the bottom scallops. It is one piece, with only two ends to weave in.
Finished Size and Construction
- Finished size: 3.5″ (8.9 cm) wide x 4″ (10.2 cm) tall, not including the loop
- Hanging loop: 1.5″ (3.8 cm) tall; total hanging length 5.5″ (14.0 cm)
- Skill level: Easy to intermediate (tall stitches and chain spaces)
- Terminology: US crochet terms
- Yarn weight: Super fine (#1), fingering-weight cotton
- Hook: 2.5 mm (US B/1 or C/2, depending on brand)
- Number of pieces: 1
- Layout: Single ornament, no joining
- Piece size before edging: 3.25″ (8.3 cm) wide x 3.75″ (9.5 cm) tall
- Edging depth: about 0.125″ (0.3 cm) along each side, 0.25″ (0.6 cm) at the top point
Materials
Yarn: Choose a smooth, mercerized fingering-weight cotton. It gives crisp, clear spokes and takes starch well. Avoid fuzzy or very soft acrylics, because the spokes will sag and the lace will look blurry.
- Cornflower blue (sample): 8 g, about 30 m per ornament
- Optional colors: lavender, mint green or cream, 8 g, about 30 m each per ornament
These quantities include a small margin for your test piece and for weaving in ends. One ornament actually uses about 6 g (about 23 m).
Tools:
- 2.5 mm crochet hook
- Tapestry needle
- Scissors
- Rustproof pins and a foam blocking mat
- Spray starch or fabric stiffener (optional but recommended)
- Small ruler or tape measure
Abbreviations (US Terms)
- ch – chain
- sl st – slip stitch
- sc – single crochet
- tr – treble crochet (yarn over twice)
- dtr – double treble crochet (yarn over three times)
- sp – space
- sk – skip
- RS – right side
- tc – turning chain
Special stitch – double treble (dtr): Yarn over 3 times, insert hook in the stitch, yarn over and pull up a loop (5 loops on hook), [yarn over and pull through 2 loops] 4 times. The dtr is the tall stitch that forms the upper spokes. Its stacked wraps make the small crossbars you see along each spoke.
Gauge and Checkpoints
Gauge matters less for an ornament than for a garment, but it still controls the final size and how straight the spokes stay. Make one complete ornament first and use it as your test piece.
Base gauge: 7 sc = 1″ (2.5 cm) with a 2.5 mm hook and fingering-weight cotton. One tr is about 0.6″ (1.5 cm) tall, and one dtr is about 0.9″ (2.3 cm) tall.
Measurement checkpoints (measured from the top of the ring, laid flat, unstretched):
- After Row 1: about 0.85″ (2.2 cm) tall
- After Row 3: about 2.65″ (6.7 cm) tall and 2.25″ (5.7 cm) wide across the band
- After Row 4: about 3.25″ (8.3 cm) tall
- After Row 6: about 3.75″ (9.5 cm) tall and 3.25″ (8.3 cm) wide
- After the edging: 4″ (10.2 cm) tall and 3.5″ (8.9 cm) wide
If your piece is too big, switch to a 2.25 mm hook or work your chains more tightly. If it is too small, try a 2.75 mm hook. Uneven spokes usually mean you are pulling through your tall stitches too fast. Keep each loop the same height as you work it off the hook.
Pattern
Top Ring
Ch 4, sl st in the first ch to form a ring. The ring becomes the pointed top of the ornament and will hold the hanging loop later.
Row 1 (RS) – Top Spokes
Ch 4 (counts as tr), [ch 1, tr in ring] 4 times.
Count: 5 tr and 4 ch-1 sp. The 5 tr are where the five spokes begin: two outer edges, two diagonals and the center spine. Do not join; this is a row, not a round.
Row 2 – First Band
Turn. Ch 5 (counts as dtr), [ch 3, dtr in next tr] 4 times, working the last dtr in the top of the tc.
Count: 5 dtr and 4 ch-3 sp. The ch-3 spaces form the first curved chain band across the spokes.
Row 3 – Second Band
Turn. Ch 5 (counts as dtr), [ch 5, dtr in next dtr] 4 times, working the last dtr in the top of the tc.
Count: 5 dtr and 4 ch-5 sp. The longer ch-5 spaces make the second, wider band. This band is the curved arc that separates the open upper section from the lower fan. Each spoke is now three stitches tall (tr + dtr + dtr).
Row 4 – Lower Fan
Turn. Ch 4 (counts as tr), ch 3, tr in next ch-5 sp, ch 3, tr in next dtr, [ch 3, tr in next ch-5 sp, ch 3, tr in next dtr] 3 times, working the last tr in the top of the tc.
Count: 9 tr and 8 ch-3 sp. This is a growth row. Five tr continue the spokes, and 4 new tr sit in the ch-5 spaces, so 9 posts fan out below the second band. The new posts split each wedge in half.
Row 5 – Bottom Line
Turn. Ch 1, sc in first tr, [3 sc in next ch-3 sp, sc in next tr] 8 times, working the last sc in the 4th ch of the tc.
Count: 33 sc = 9 sc (1 in each tr) + 24 sc (3 in each of the 8 ch-3 sp). This conversion row makes the solid curved line across the bottom of the fan.
Row 6 – Scallop Base
Turn. Ch 1, sc in first sc, [ch 5, sk 3 sc, sc in next sc] 8 times.
Count: 9 sc and 8 ch-5 loops. Check: 1 + (8 x 4) = 33 stitches used, which matches Row 5 exactly. Each sc lands directly below a tr post, so every scallop hangs between two posts.
Do not fasten off. Your piece should now measure about 3.75″ (9.5 cm) tall and 3.25″ (8.3 cm) wide.
Edging Round (Border)
You work the edging in one continuous round. It covers the outer spokes with sc, makes the hanging loop at the top and fills the scallops.
Border gauge: Along the row ends, aim for about 5 sc per 1″ (2.5 cm) of side edge. Each side edge measures about 3.25″ (8.3 cm), so 3.25 x 5 = 16.25, which rounds to 16 sc per side. The sides look denser than this because the sc are worked around tall posts, not into flat fabric.
Side A (up): Do not turn. Ch 1, sc in the last sc of Row 6 (the same stitch you just worked into). Now work over the row ends toward the top: 1 sc in the end of Row 5, 3 sc around the end post of Row 4, 4 sc around the end post of Row 3, 4 sc around the end post of Row 2, then 3 sc around the end post of Row 1.
Count for Side A: 16 sc (1 + 1 + 3 + 4 + 4 + 3).
Top point and hanging loop: Work (sc, ch 20, sc) in the top ring.
Count: 2 sc and 1 ch-20 loop.
Side B (down): Work over the row ends on the other side: 3 sc around the end post of Row 1, 4 sc around the end post of Row 2, 4 sc around the end post of Row 3, 3 sc around the end post of Row 4, 1 sc in the end of Row 5, then sc in the first sc of Row 6.
Count for Side B: 16 sc (3 + 4 + 4 + 3 + 1 + 1).
Bottom scallops: [6 sc in next ch-5 loop, sl st in next sc] 7 times, 6 sc in the last ch-5 loop. Sl st in the first sc of the round to join. Fasten off.
Count for bottom: 48 sc = 40 sc (1 per ch in the 8 ch-5 loops) + 8 sc (1 extra per loop), plus 7 sl st between the scallops.
Round total: 82 sc (16 + 2 + 16 + 48), 7 sl st and 1 ch-20 loop.
Why the math works: Both sides get the same number of stitches over the same row ends (1, 1, 3, 4, 4, 3), so the teardrop stays symmetrical. The two end sc of Row 6 are each counted once, inside the side counts, so the bottom corners are not doubled. The bottom uses 1 sc per chain plus 1 extra per loop, which gives each scallop just enough fullness to arch without ruffling. The edging adds about 0.125″ (0.3 cm) to each side, taking the width from 3.25″ (8.3 cm) to 3.5″ (8.9 cm). It also adds about 0.25″ (0.6 cm) at the top point, taking the height from 3.75″ (9.5 cm) to 4″ (10.2 cm). The ch-20 folds into a loop about 1.5″ (3.8 cm) tall.
Weave in both ends along the spokes, where they hide easily.
Final Blocking
Blocking turns a soft lace piece into a crisp ornament, and cotton blocks very well.
- Soak the ornament in cool water for a few minutes, then press the water out gently in a towel. Do not wring.
- Lay it RS up on a blocking mat.
- Pin the top point first, just below the hanging loop.
- Pin the bottom center of the middle scallop so the center spine runs straight, about 4″ (10.2 cm) below the top point.
- Pin the two bottom corners so the width is 3.5″ (8.9 cm) and both sides are the same length.
- Pin each scallop at its lowest point to open it into a smooth arch.
- Straighten the two diagonal spokes so they sit halfway between the center spine and the outer edges. Add a pin at the end of each one if needed.
- Gently open each chain band into an even curve.
- Spray with starch or brush on fabric stiffener, then let it dry completely, usually 6 to 12 hours.
- Remove the pins and hang the ornament by its loop to check that it hangs straight.
Final Quality-Control Checklist
- The ornament is 3.5″ (8.9 cm) wide and 4″ (10.2 cm) tall, plus a 1.5″ (3.8 cm) loop.
- Five spokes start at the top ring, and the center spine runs straight down the middle.
- Row 4 has 9 tr posts, evenly spaced.
- Row 5 has 33 sc and forms a smooth curve.
- There are 8 even scallops along the bottom.
- Each side edge has 16 sc, and both sides are the same length.
- The hanging loop sits exactly at the top point.
- All ends are woven in and can’t be seen from the front.
- The ornament hangs straight, without twisting or tilting.
Troubleshooting
The spokes curve or wobble. Your tall stitches may be uneven. Pull up each loop to the same height, then block again with a little more starch.
The bottom ruffles. Your Row 6 chains may be loose. Try ch 4 instead of ch 5, and work 5 sc per loop in the edging.
The bottom cups and won’t lie flat. Your chains may be too tight. Loosen your chain tension, or go up one hook size for Rows 5 and 6 only.
One side is longer than the other. Count the sc on both sides. Each side must have 16 sc, placed as 1, 1, 3, 4, 4, 3.
The hanging loop is too small for your tree. Work ch 25 or ch 30 instead of ch 20. This only makes the loop longer and does not change any other count.
The ornament tilts when hung. The loop is not centered. Make sure both top sc are worked into the ring and the loop starts between them.
Care
Hand wash in cool water with a mild soap, press dry in a towel and block again with starch. Store flat in a box between layers of tissue paper so the spokes stay straight.

Final Notes
Each stage builds on the one before, so the measurements work as a chain. The ring and Row 1 bring you to about 0.85″ (2.2 cm). Two rows of dtr take you to 2.65″ (6.7 cm), and the treble fan reaches 3.25″ (8.3 cm). The bottom line and scallops finish the body at 3.75″ (9.5 cm) tall and 3.25″ (8.3 cm) wide. The edging round adds 16 sc to each side and fills out the 8 scallops. That brings the final size to 3.5″ (8.9 cm) wide and 4″ (10.2 cm) tall, with a 1.5″ (3.8 cm) hanging loop, for a total length of 5.5″ (14.0 cm).
Once you have made one, the rest go quickly. A set in blue, lavender, mint and cream makes a calm, frosty display on any tree.
Happy crocheting!