

The Olive Pirouette Ballerina is a small, graceful lace figure. Her arms are raised high, her head is a tight spiral, and a fan-shaped tutu flares out from a neat ribbed bodice. Two slim legs come down to meet in a single pointed toe, as if she is dancing on pointe.
The motif uses two colors. Soft olive green makes the body, arms, legs, and the scalloped edging on the skirt. Pale butter yellow fills the tutu with long, open lace loops. The olive outline around the yellow lace gives the motif a crisp edge, so it reads clearly from across a room.
The pattern is written in US crochet terms. The finished motif measures about 4.5 in (11.4 cm) across the skirt and 8.5 in (21.6 cm) tall, from the top of the hanging ring to the tip of the toe.
Almost everything is worked as one piece. You start with a spiral head, then work the neck and bodice in rows straight down from it and add the yellow tutu at the waist. The olive skirt edging, the arm loop, and the leg cord are all worked onto the same piece, so the only finishing is weaving in ends.
Finished Size and Construction
- Finished size: 4.5 in (11.4 cm) wide x 8.5 in (21.6 cm) tall, blocked
- Skill level: Easy intermediate
- Terminology: US crochet terms
- Yarn weight: DK / light (3) cotton
- Hook: 3.0 mm (US C/2–D/3)
- Number of pieces: 1 motif, worked in one piece
- Layout: single standing figure with a hanging ring at the top
- Head size: 1.25 in (3.2 cm) diameter
- Bodice size: 1.2 in (3.0 cm) wide x 1 in (2.5 cm) tall
- Skirt width before border: 4 in (10.2 cm)
- Border depth: 0.25 in (0.6 cm) on each side, so 4 in + 0.25 in + 0.25 in = 4.5 in (11.4 cm)
Materials
Choose a smooth, mercerized or combed cotton in DK weight. Cotton holds the open loops of the tutu in shape and blocks crisply. Avoid fuzzy or very stretchy yarn, because the lace will lose its definition.
- Olive green: 8 g / 20 m (22 yd)
- Butter yellow: 5 g / 12 m (13 yd)
These amounts include about 25% extra for your gauge test and for weaving in ends.
Tools:
- 3.0 mm crochet hook
- Tapestry needle
- Scissors
- Stitch marker
- Rust-proof pins and a blocking mat or folded towel
- Spray bottle with clean water
- Ruler or tape measure
Abbreviations (US Terms)
- ch – chain
- sl st – slip stitch
- sc – single crochet
- hdc – half double crochet
- dc – double crochet
- inc – 2 sc in the same stitch
- FLO / BLO – front loop only / back loop only
- st(s) – stitch(es)
- sp – space
- RS / WS – right side / wrong side
Special stitch – Popcorn (pc): Work 5 dc in the stitch indicated. Take the hook out of the working loop, insert it from front to back into the top of the first dc of the group, pick up the dropped loop, and pull it through. Ch 1 tightly to close. This makes the rounded toe.
Gauge and Checkpoints
Gauge: 5 sc and 6 rows = 1 in (2.5 cm) with a 3.0 mm hook.
Make the head (Rounds 1–4) first and measure it before you go on. It is small and quick, and it shows whether your gauge is right.
Checkpoints:
- Head after Round 4: 1.25 in (3.2 cm) diameter.
- Bodice after Row 9: 1.2 in (3.0 cm) wide x 1 in (2.5 cm) tall (Rows 4–9).
- Skirt after Row 4: 4 in (10.2 cm) wide, blocked.
- Skirt after border: 4.5 in (11.4 cm) wide.
- Finished motif: 8.5 in (21.6 cm) tall.
If your head is too big (over 1.4 in / 3.6 cm), go down to a 2.75 mm hook. If it is too small (under 1.1 in / 2.8 cm), go up to a 3.25 mm hook. Measure again after changing hooks. Small gauge differences show more on a figure than on a square, because the arms and legs need to line up with the body.
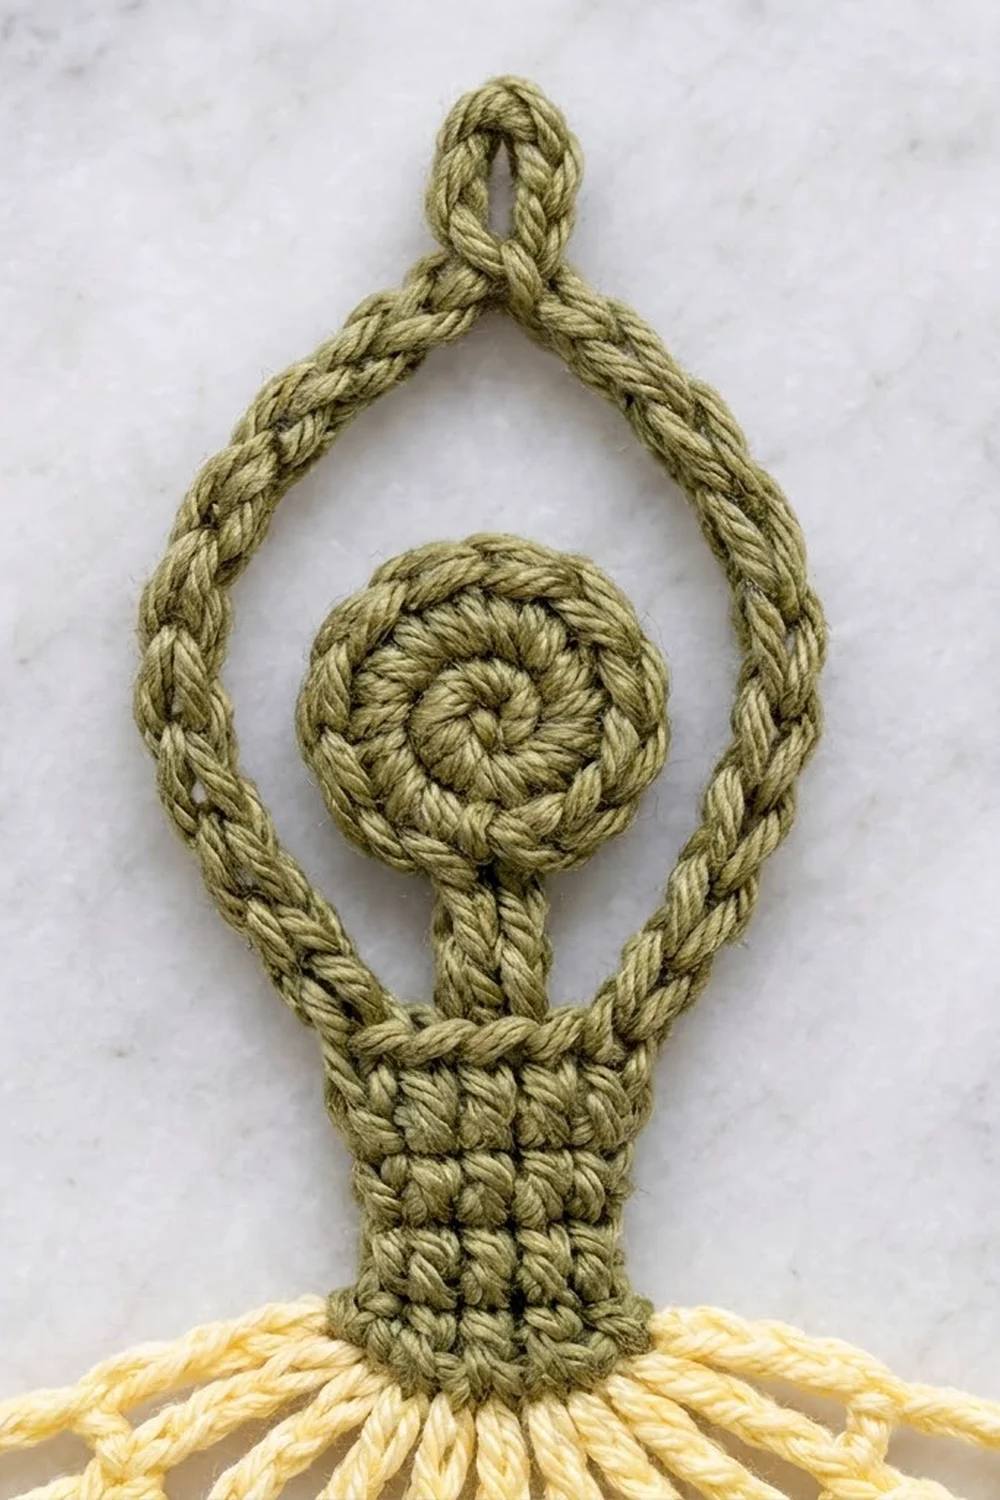
Head
Use olive green. Work in continuous rounds without joining. The small step at the start of each round forms the visible spiral line. Place a marker in the first stitch of each round and move it up as you go.
Round 1: Make a magic ring and work 6 sc into it. Pull the ring closed. (6 sc)
Round 2: Inc in each st around. (12 sc)
Round 3: Sc in next st, inc in next st; repeat from * 5 more times. (18 sc)
Round 4: Sc in next 2 sts, inc in next st; repeat from * 5 more times. (24 sc)
Sl st in the next st to smooth the step. Do not fasten off.
Checkpoint: Lay the head flat. It should measure 1.25 in (3.2 cm) across and lie flat without cupping or ruffling.
Neck and Bodice
Keep using olive green and work in rows straight down from the head. The sl st you just made sits at the bottom of the head, and this is where the neck starts.
Row 1 (neck): Ch 1, sc in next 2 sts of Round 4. (2 sc)
Rows 2–3: Ch 1, turn, sc in each st across. (2 sc)
The neck now measures about 0.5 in (1.3 cm) long and 0.4 in (1.0 cm) wide.
Row 4 (shoulders): Ch 1, turn, 3 sc in each st across. (6 sc)
Rows 5–9: Ch 1, turn, sc in each st across. (6 sc)
Rows 4–9 form the bodice. The stacked columns of sc make the neat ribbed texture of the dancer’s top.
Checkpoint: The bodice measures 1.2 in (3.0 cm) wide and 1 in (2.5 cm) tall. The top corners of Row 4 are the shoulders, where you will attach the arms later.
Fasten off olive green, leaving a 4 in (10.2 cm) tail.
Tutu
The tutu is worked into the front loops of Row 9, which is the waist. The back loops stay free for the legs.
Row 1 (RS): Turn so the RS faces you. Join butter yellow in the FLO of the first st of Row 9. Ch 1, work 2 sc in the FLO of each st across. (12 sc)
Row 2 (WS): Ch 1, turn, sc in first st, ch 11, sc in next st; repeat from * 10 more times. (12 sc, 11 ch-11 loops)
Both ends of each loop sit in neighboring stitches, so each loop forms a long, narrow petal. Gently spread the petals into a fan before you continue. Fasten off.
Row 3 (RS): With RS facing, join butter yellow with a sc around the tip of the first loop, catching the 6th ch of the ch-11. Ch 3, sc around the tip of the next loop; repeat from * 9 more times. (11 sc, 10 ch-3 sps)
This row links the loop tips into an even arch.
Row 4 (WS): Ch 1, turn, sc in first sc, (hdc, 2 dc, hdc) in next ch-3 sp, sc in next sc; repeat from * 9 more times. (11 sc + 40 hdc/dc = 51 sts, 10 scallops)
Fasten off butter yellow.
Checkpoint: Pin the tutu flat into a fan. At its widest point, it should measure 4 in (10.2 cm) from scallop tip to scallop tip.
Border (Olive Skirt Edging)
The border outlines the tutu in olive. It runs down the right side of the skirt, along all 10 scallops, and up the left side.
Border gauge: The edging is one row of sc, 0.25 in (0.6 cm) deep, worked at the same gauge of 5 sc = 1 in (2.5 cm).
Border Row (RS): With RS facing, join olive green at the right end of skirt Row 1, at the waist.
- Right side (4 sc): Work 1 sc in the end of Row 1, 2 sc around the outer side of the first ch-11 loop, and 1 sc in the end of Row 4.
- Scalloped edge (71 sc): Sc in first sc of Row 4. Sc in next hdc, 2 sc in each of next 2 dc, sc in next hdc, sc in next sc; repeat from * 9 more times.
- Left side (4 sc): Work 1 sc in the end of Row 4, 2 sc around the outer side of the last ch-11 loop, and 1 sc in the end of Row 1.
Total: 4 + 71 + 4 = 79 sc. Fasten off.
Why the math works: Row 4 has 11 sc in the dips between scallops and 10 scallops. Each scallop has 4 stitches (hdc, dc, dc, hdc). In the border, each scallop becomes 1 + 2 + 2 + 1 = 6 sc, because you increase in each of the 2 dc at the peak. So 10 scallops x 6 sc = 60 sc, plus the 11 sc in the dips = 71 sc. Because the increases sit only at the peaks, each scallop rounds out neatly while the dips stay tucked in. Each side edge is short, about 0.8 in (2.0 cm), so 4 sc covers it at gauge without puckering.
Checkpoint: The skirt now measures 4.5 in (11.4 cm) wide.
Arms
The arms are one continuous loop. It rises from one shoulder, frames the head, meets at a point with a small hanging ring, and comes back down to the other shoulder.
Foundation: With RS facing, join olive green with a sl st in the end of bodice Row 4 at the right shoulder. Ch 18 (right arm). Ch 6, sl st in the 6th ch from hook to form the ring. Ch 18 (left arm). Sl st in the end of Row 4 at the left shoulder.
Return row: Ch 1, turn. Sc in each of the 18 ch of the left arm, work 8 sc in the ring, then sc in each of the 18 ch of the right arm. Sl st in the right shoulder. (18 + 8 + 18 = 44 sc)
Fasten off. Each arm measures about 3.6 in (9.1 cm) along its curve. Working sc over the chain gives the arms their thick, braided, rope-like look. After blocking, the arms form a pointed oval, and the top point sits about 1 in (2.5 cm) above the head.
Legs
The legs are one cord. It runs down from the waist, makes the toe, and comes back up to the waist.
Foundation: Turn the motif so the WS faces you. Join olive green with a sl st in the free back loop of the 2nd st of bodice Row 9. Ch 20 (first leg). Ch 4, then work a pc in the 4th ch from hook (toe). Ch 20 (second leg). Sl st in the free back loop of the 5th st of Row 9.
Return row: Ch 1, turn. Sc in each of the 20 ch of the second leg, sl st in the chain at the base of the popcorn, then sc in each of the 20 ch of the first leg. Sl st in the back loop of the 2nd st of Row 9. (20 + 20 = 40 sc)
Fasten off. Each leg is 4 in (10.2 cm) long. The legs start 2 sts apart at the waist, hang behind the tutu, and taper together into the popcorn toe to form a long, narrow V.
Checkpoint: Measure from the top of the hanging ring to the tip of the toe. It should be about 8.5 in (21.6 cm).
Final Blocking
- Weave in all ends on the WS, running each tail through stitches of its own color.
- Lay the motif face up on a blocking mat or folded towel.
- Pin the head into a circle 1.25 in (3.2 cm) across.
- Pin the bodice square: 1.2 in (3.0 cm) wide and 1 in (2.5 cm) tall.
- Spread the tutu into a fan 4.5 in (11.4 cm) wide. Pin each border scallop at its peak.
- Shape each yellow loop into an even petal. Put a pin inside a loop if it needs help holding its shape.
- Pin the arms into a pointed oval around the head, with the ring centered at the top.
- Pin the legs into a straight, narrow V ending in the toe.
- Spray the motif with water until damp, not soaked.
- Let it dry completely, for at least 12 hours, before you remove the pins.
Final Quality-Control Checklist
- The head is flat and round, 1.25 in (3.2 cm) across, with a visible spiral.
- The neck is centered under the head and 2 sts wide.
- The bodice has 6 sts and 6 rows, with straight sides.
- The tutu has 11 yellow loops of equal length.
- The border has 10 olive scallops, all the same size.
- Both arms are the same length, and the ring is centered at the top.
- Both legs are the same length, and the toe hangs straight down.
- The finished size is 4.5 in (11.4 cm) wide x 8.5 in (21.6 cm) tall.
- All ends are woven in and can’t be seen from the RS.
Troubleshooting
The head cups like a bowl. Your increases are too tight. Go up a hook size or loosen your tension on the increase stitches.
The head ruffles. You may have added extra stitches. Recount each round: 6, 12, 18, 24.
The bodice flares at the shoulders. This is normal after Row 4. It settles after Row 5, and steaming or blocking will flatten it.
The tutu loops are uneven. Count the chains in each loop. If needed, mark every 11th ch as you go.
The border scallops ripple. Check that you worked 2 sc only into the 2 dc at each peak, not into the hdc.
The arms pull the head down. Your arm chains are too tight. Remake them with a slightly looser chain, or use a hook half a size larger for the arm foundation only.
The legs twist. Block them straight and pin every 1 in (2.5 cm).
Care
Hand wash in cool water with mild soap. Press out the water in a towel and dry flat, pinning the shape again if needed. Do not wring or tumble dry.
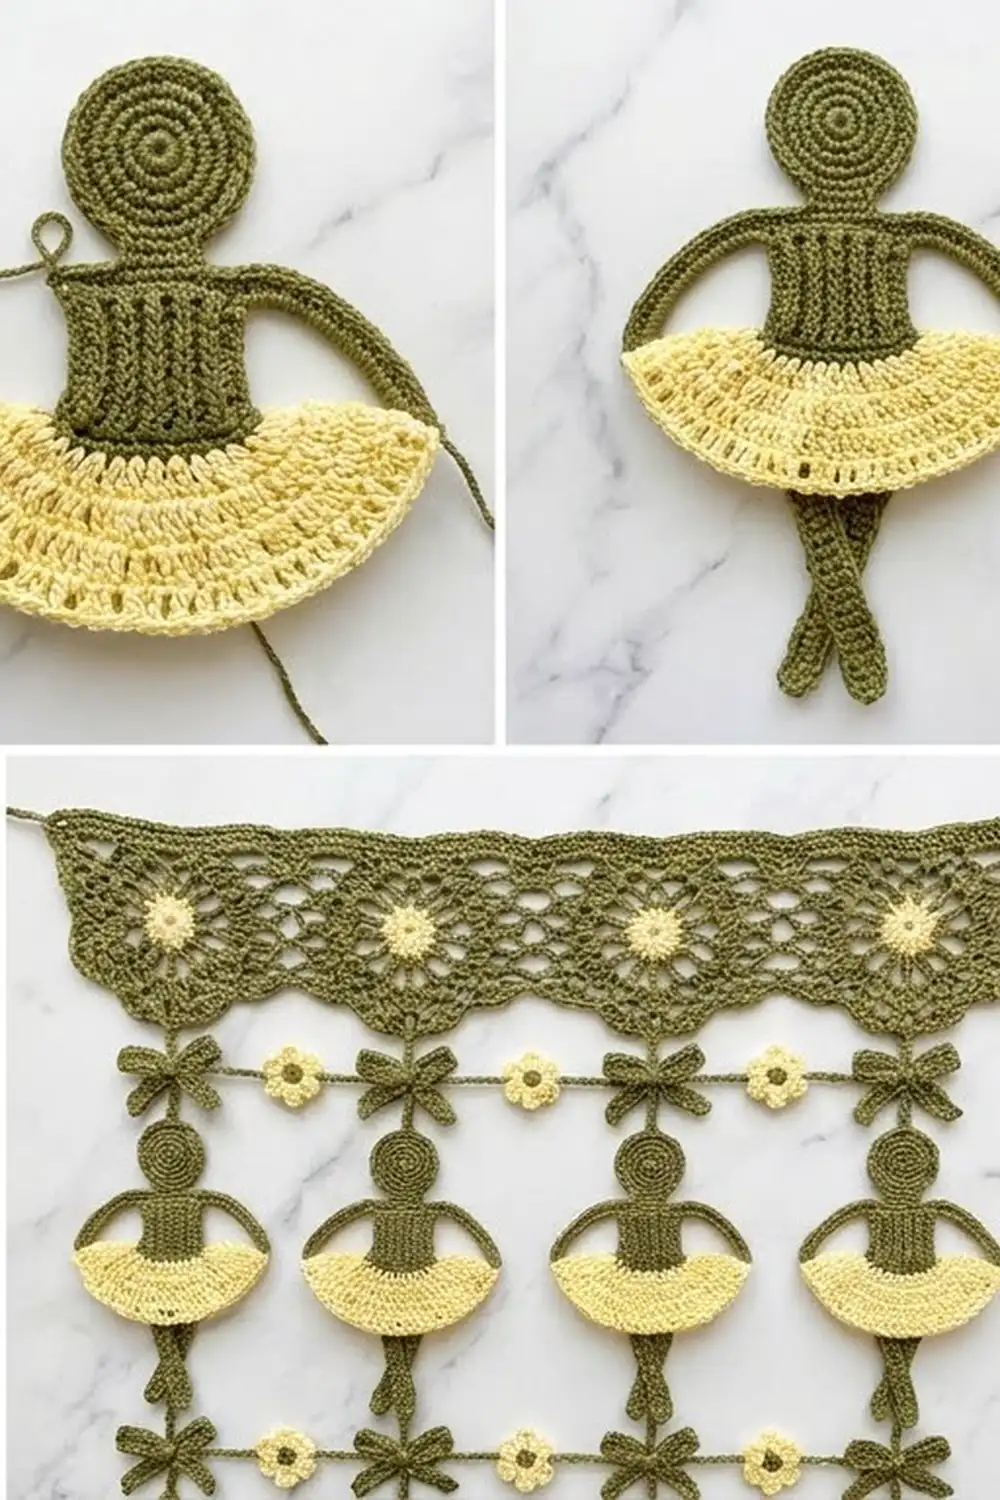
Final Notes
The motif’s measurements build in a simple chain. The head is 1.25 in (3.2 cm) across. The bodice below it is 1.2 in (3.0 cm) wide by 1 in (2.5 cm) tall. The tutu opens to 4 in (10.2 cm), and the 0.25 in (0.6 cm) border on each side brings it to 4.5 in (11.4 cm). The arms and legs add height, for a total of 8.5 in (21.6 cm).
If your head matches gauge, the rest will follow. Hang her alone in a window or tie her to a gift.
Happy crocheting!