

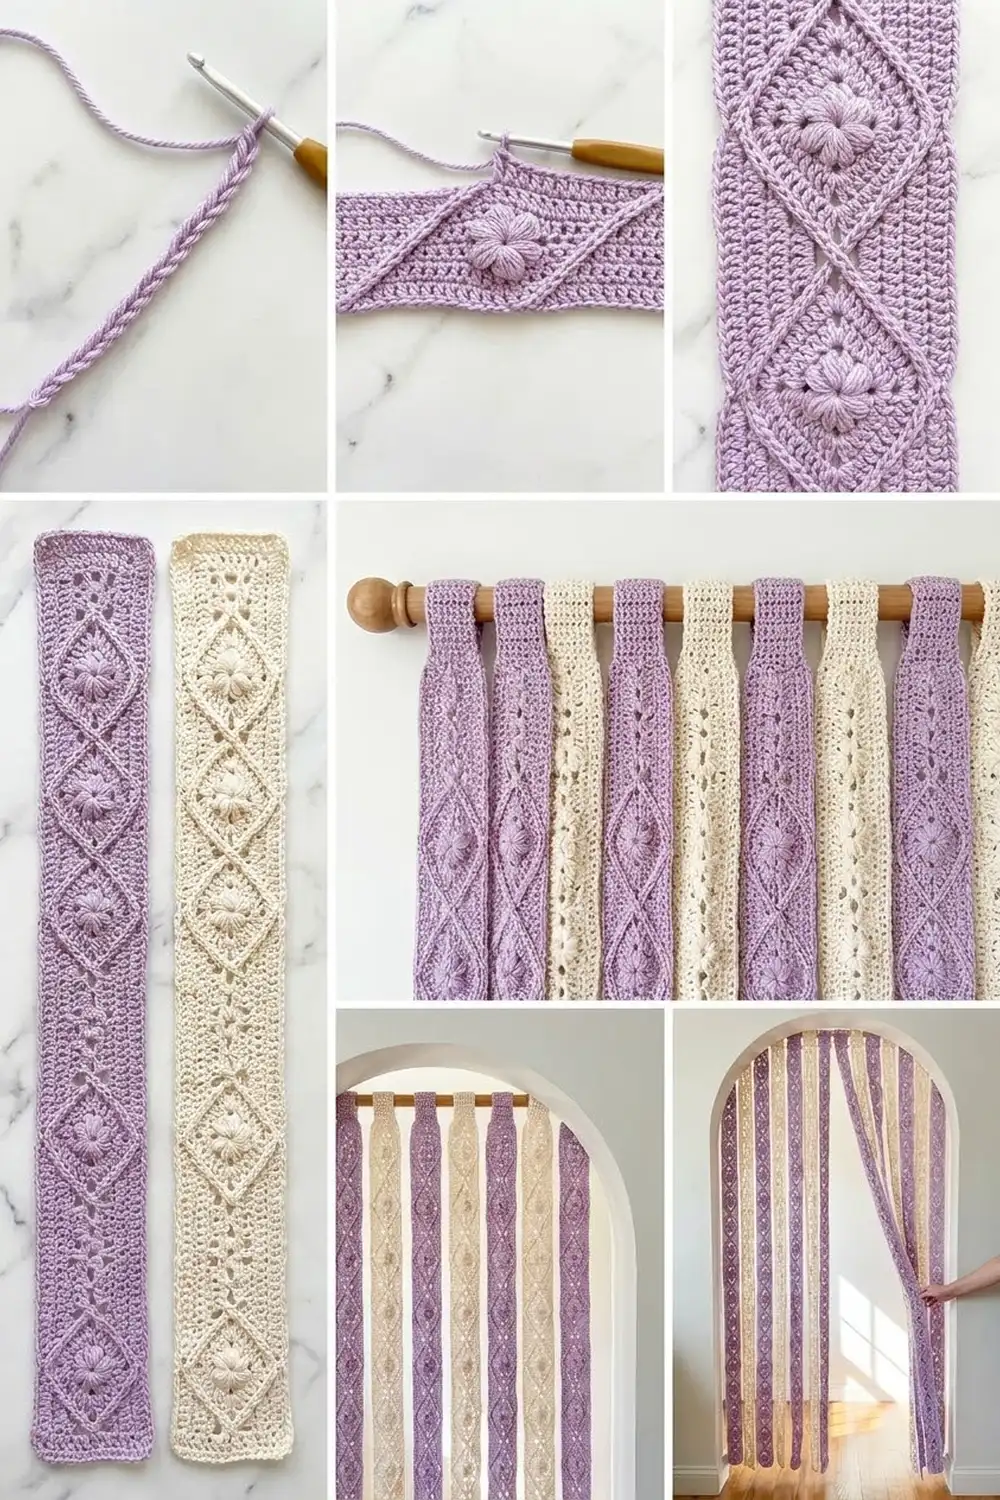
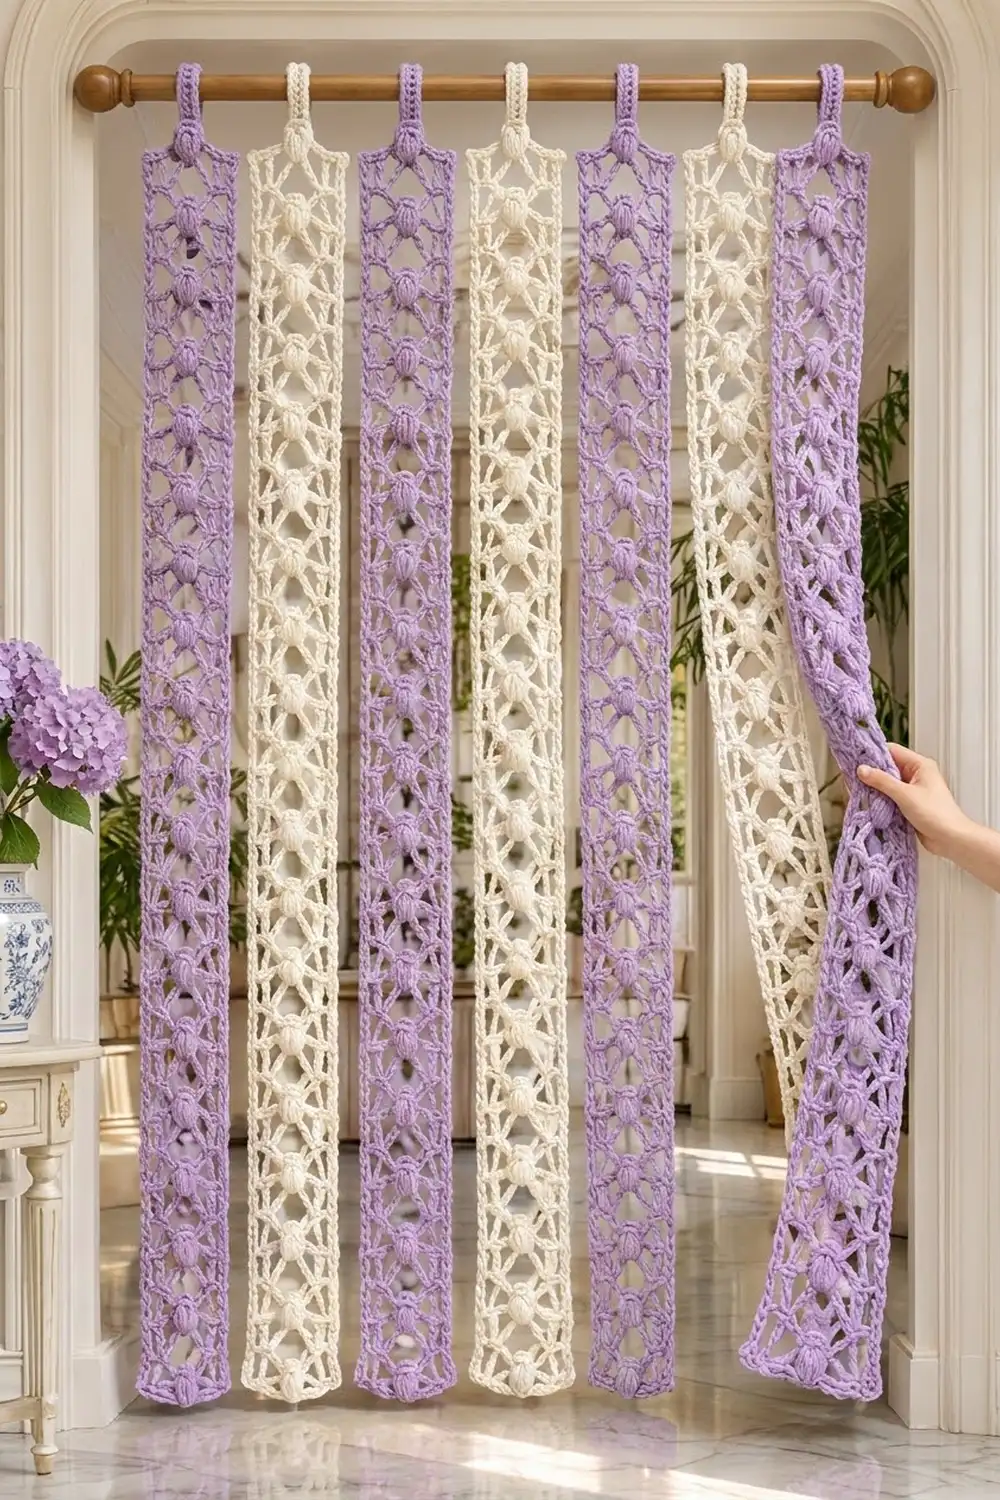
This door curtain is made of seven airy crochet strips that hang side by side from a rod. Each strip has a ladder of 3-double-crochet columns on both edges and a center line of plump puff stitches. Diagonal chains link them into a soft diamond lattice. When light comes through, the strips look like lace. Because they are separate, they sway and part when someone walks through.
The colors alternate lavender and cream: four lavender strips and three cream strips, starting and ending with lavender. The look is light, feminine, and calm. It suits a pantry doorway, a closet opening, or a sunny hallway arch.
This pattern uses US crochet terms. Each finished strip measures 4.5 in (11.4 cm) wide by 70.5 in (179.1 cm) long, and the hanging tab adds a 3 in (7.6 cm) loop above that. With 1.5 in (3.8 cm) gaps between strips, the full curtain spans 40.5 in (102.9 cm) on the rod.
Construction is simple. You work each strip flat in rows from a foundation chain and add one round of single crochet border. Then you work a tab at the top and fold it back into a loop. You don’t sew the strips to each other.
Finished Size and Construction
- Finished strip size: 4.5 in x 70.5 in (11.4 cm x 179.1 cm)
- Strip size before border: 4 in x 70 in (10.2 cm x 177.8 cm)
- Border depth: 0.25 in (0.6 cm) on every edge
- Hanging loop: 3 in (7.6 cm) deep after folding
- Total drop from top of rod: about 73.5 in (186.7 cm)
- Skill level: Easy-intermediate
- Terminology: US crochet terms
- Yarn weight: Worsted (#4) cotton or cotton blend
- Hook: 5 mm (US H-8)
- Number of pieces: 7 separate strips
- Layout: 7 strips in a single row, hung with 1.5 in (3.8 cm) gaps
- Curtain width on rod: 40.5 in (102.9 cm)
Materials
Choose a smooth, mercerized or combed worsted cotton. Cotton keeps its shape when it hangs and makes the puff stitches stand out. Avoid fuzzy or very stretchy acrylic: long strips of stretchy yarn can grow several inches under their own weight.
Yarn (100 g / 170 m balls):
- Lavender: 600 g / 1,020 m (6 balls) for 4 strips
- Cream: 500 g / 850 m (5 balls) for 3 strips
One strip uses about 135 g. These quantities include a safety margin of at least 10%. Buy all of each color from the same dye lot.
Tools:
- 5 mm (US H-8) crochet hook
- Tapestry needle
- Scissors
- Stitch markers (2-3)
- Measuring tape
- Rustproof pins and a long blocking surface (towels on the floor work)
- Spray bottle
- Curtain rod or tension rod up to 1.25 in (3.2 cm) in diameter
Abbreviations (US Terms)
- ch = chain
- sc = single crochet
- dc = double crochet
- sl st = slip stitch
- sk = skip
- sp = space
- st(s) = stitch(es)
- yo = yarn over
- RS / WS = right side / wrong side
Special stitch: Puff stitch (puff). (Yo, insert hook in indicated st or sp, yo, pull up a loop to about 0.75 in / 1.9 cm tall) 5 times, for 11 loops on the hook. Yo and pull through all 11 loops, then ch 1 to close. The puff counts as 1 stitch; the closing ch 1 does not count.
Turning chain: The ch 3 at the start of each row counts as the first dc.
Gauge and Checkpoints
Gauge: One strip width (19 stitches in pattern) = 4 in (10.2 cm). 8 rows in pattern = 5 in (12.7 cm), so each row is 0.625 in.
Test one piece first. Work Rows 1-16 of the first strip and measure before going further. Lay it flat without stretching. It should measure 4 in x 10 in (10.2 cm x 25.4 cm).
Checkpoints for one strip:
- After Row 1: width 4 in (10.2 cm)
- After Row 16: length 10 in (25.4 cm)
- After Row 64: length 40 in (101.6 cm)
- After Row 112: length 70 in (177.8 cm)
- After the border: 4.5 in x 70.5 in (11.4 cm x 179.1 cm)
Too big? Go down to a 4.5 mm (US 7) hook. If only the length is off, check your puffs: puffs pulled up too tall make the rows taller.
Too small? Go up to a 5.5 mm (US I-9) hook. Tight chains are the most common cause, so let the ch-6 spaces lie flat and relaxed.
Always measure length with the strip lying flat, never hanging. Cotton drops a little when hung, and the blocking step allows for that.
Strip Pattern
Every strip is worked the same way.
Foundation: Ch 21.
Row 1 (RS): Dc in 4th ch from hook and in next ch (3 dc, counting the skipped chs as the first dc), ch 6, sk next 6 ch, puff in next ch, ch 6, sk next 6 ch, dc in last 3 ch. Turn.
Count: 6 dc (3 at each edge), 1 puff, 2 ch-6 sps.
The two ch-6 lines run from the side columns down to the center puff, forming the first peak.
Row 2 (WS): Ch 3 (counts as dc), dc in next 2 dc, ch 4, sc in next ch-6 sp, ch 3, sk puff, sc in next ch-6 sp, ch 4, dc in last 2 dc and in top of turning ch. Turn.
Count: 6 dc, 2 sc, 2 ch-4 sps, 1 ch-3 sp.
This row pulls the chain lines back toward the edges. It forms the upper half of each diamond and leaves a small ch-3 bridge above the puff.
Row 3 (RS): Ch 3 (counts as dc), dc in next 2 dc, ch 6, puff in ch-3 sp, ch 6, dc in last 2 dc and in top of turning ch. Turn.
Count: 6 dc, 1 puff, 2 ch-6 sps.
The new puff sits directly above the one before it, so the puffs stack into one center line. The ch-6 lines form a new V.
Rows 4-111: Repeat Rows 2-3 fifty-four more times. You end on Row 111, a RS puff row.
Row 112 (WS): Work as Row 2. Don’t fasten off.
Count: 6 dc, 2 sc, 2 ch-4 sps, 1 ch-3 sp.
Row-count check: Rows 2-3 are worked 55 times in total, for 110 rows. Adding Row 1 and Row 112 gives 112 rows. At 0.625 in per row, 112 rows = 70 in (177.8 cm).
Width check: Every row covers the same 19-stitch width:
- Row 1: 3 + 6 + 1 + 6 + 3 = 19
- Row 2: 3 + 4 + 1 + 3 + 1 + 4 + 3 = 19
- Row 3: same as Row 1
Because no row gains or loses width, the edges stay straight. The 3-dc groups form the “ladders” along each edge, so keep the dc tall and even to line the columns up.
Make All Pieces
Make 7 strips in total:
- Lavender: 4 strips (Strips 1, 3, 5, 7)
- Cream: 3 strips (Strips 2, 4, 6)
Layout grid (left to right, as hung):
| L | C | L | C | L | C | L |
  1   2   3   4   5   6   7
L = lavender, C = cream
Before adding borders, lay the finished strips next to each other. All seven should match in length within 0.5 in (1.3 cm). If one is clearly longer, block it more firmly or rework it with a smaller hook.
Joining (Hanging the Strips)
You don’t seam the strips together. Each strip hangs on its own tab loop, so the curtain moves freely in the doorway. Work the tab after the border (see the next section).
Mark the tab position: With RS facing, find the 23 sc of the top border. Place markers in sc 9 and sc 15 to mark the center 7 sc.
Tab Row 1: Join yarn with a sl st in sc 9, ch 1, sc in the same st and in next 6 sc. Turn. (7 sc)
Tab Rows 2-24: Ch 1, sc in each sc across. Turn. (7 sc)
At 4 sc rows per inch, the tab measures 6 in (15.2 cm) long and about 1.5 in (3.8 cm) wide. Fasten off and leave a 12 in (30.5 cm) tail.
Stitch-to-stitch closure: Fold the tab to the WS. Line up the 7 sc of Tab Row 24 with the back of border sc 9-15, where the tab began. Whipstitch them together one to one, 7 stitches to 7, to make a 3 in (7.6 cm) loop.
Tension: Sew firmly but without puckering. The top edge should stay flat and straight when the strip hangs.
Size checkpoint: Slide all 7 strips onto the rod in grid order, spaced 1.5 in (3.8 cm) apart. The strips take up 31.5 in (80.0 cm), which is 7 x 4.5 in. The 6 gaps add 9 in (22.9 cm), which is 6 x 1.5 in. Together they make 40.5 in (102.9 cm).
Border
Work this border on each strip right after Row 112, before the tab.
Border gauge: Along the top and bottom, work 1 sc per stitch; 19 sc span 4 in (10.2 cm). Along the long sides, work 2 sc per row end. That’s 16 sc per 5 in (12.7 cm), or 3.2 sc per inch.
Round 1 (RS): Turn so the RS faces you. Ch 1, then work around the strip.
- Top edge: 3 sc in first dc (corner), sc in next 2 dc, 4 sc in ch-4 sp, sc in sc, 3 sc in ch-3 sp, sc in sc, 4 sc in ch-4 sp, sc in next 2 dc, 3 sc in top of turning ch (corner).
Top count: 19 sc worked 1 per existing stitch + 4 extra corner sc = 23 sc. - Long side 1: Work 2 sc in each of the 112 row ends down to the foundation.
Side count: 112 x 2 = 224 sc, between the corner groups. - Bottom edge: Work into the free loops of the foundation chain under Row 1. Make 3 sc at the base of the first stitch (corner). Next, work 17 sc across, 1 under each Row 1 position (2 dc, 6 skipped ch, puff, 6 skipped ch, 2 dc). Finish with 3 sc at the base of the last stitch (corner).
Bottom count: 19 sc worked 1 per existing stitch position + 4 extra corner sc = 23 sc. - Long side 2: 2 sc in each of the 112 row ends. (224 sc)
Join with a sl st to the first sc. Fasten off and weave in ends.
Round total: 23 + 224 + 23 + 224 = 494 sc.
Why the math works: Each corner adds 2 sc beyond the stitch it sits in, so each 19-stitch short edge becomes 23 sc. The long sides only count row ends. Two sc per 0.625 in row end is a little snug on purpose: it holds the long edges firm, so the strip doesn’t ripple or stretch as it hangs. The border adds 0.25 in (0.6 cm) on every edge. That takes the width from 4 in to 4.5 in (11.4 cm) and the length from 70 in to 70.5 in (179.1 cm).
Final Blocking
- Weave in all ends along the side columns, never through the open lattice.
- Lay each strip RS up on towels.
- Pin the four corners to 4.5 in x 70.5 in (11.4 cm x 179.1 cm).
- Pin along each long side every 4-5 in (10.2-12.7 cm), keeping the edges straight.
- Spray until the strip is evenly damp, not soaked.
- Shape each puff with your fingertips so it sits round and centered.
- Ease the diagonal chains so all the diamonds match in size.
- Let the strip dry completely, at least 24 hours.
- Unpin and hang for a day before the final spacing. Cotton may settle about 0.5 in (1.3 cm).
Final Quality-Control Checklist
- 7 strips: 4 lavender, 3 cream
- 112 rows per strip, with a puff on every odd row from 1 to 111 (56 puffs)
- Every row covers 19 stitches of width
- Border Round 1 totals 494 sc: 23 top, 23 bottom, 224 per side
- Each strip measures 4.5 in x 70.5 in (11.4 cm x 179.1 cm)
- Each tab is 7 sc wide by 24 rows, folded into a 3 in (7.6 cm) loop
- All strips match in length within 0.5 in (1.3 cm)
- No ends visible in the lattice
Troubleshooting
Puffs look flat or uneven: Pull every loop up to the same height, and always ch 1 to lock the puff.
Edges wave: The dc columns may be looser than the center. Pull each dc a little firmer, and check that you didn’t add extra sc in the side border.
Strip narrows: You may be missing the turning chain. Work into the top of it at the end of every row.
Diamonds lean to one side: Count your chains. Row 2 needs ch 4, ch 3, ch 4. Row 3 needs ch 6 on both sides.
Strip grew after hanging: Re-block it and dry it flat. If it still differs by more than 1 in (2.5 cm), use a smaller hook for the remaining strips.
Tab twists on the rod: Re-sew the fold stitch to stitch, lining up exactly with sc 9-15.
Care
Hand wash in cool water with mild soap. Roll each strip in a towel to remove water and dry it flat to the finished measurements; never hang the strips wet.
Final Notes
Each measurement builds on the last. A 19-stitch row gives 4 in (10.2 cm), and 112 rows give 70 in (177.8 cm). The 494-stitch border brings each strip to 4.5 in x 70.5 in (11.4 cm x 179.1 cm). A 3 in (7.6 cm) loop hangs each strip from the rod, and seven strips with 1.5 in (3.8 cm) gaps fill 40.5 in (102.9 cm). Check your first strip against these numbers, and the other six will follow.
Happy crocheting!