

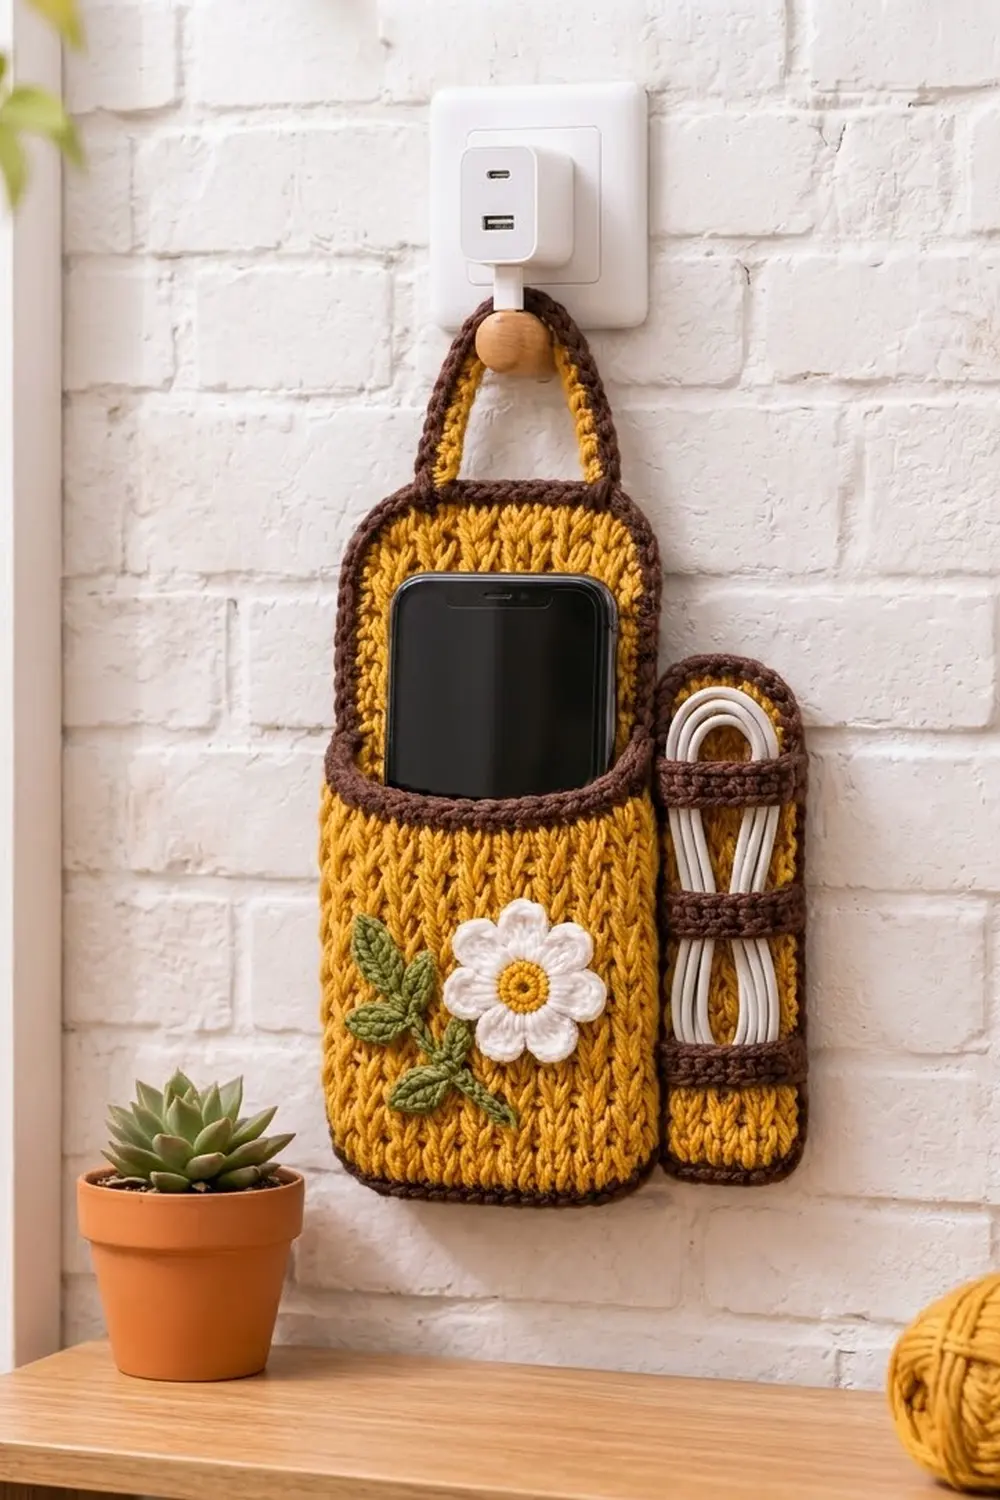
The Golden Daisy Charging Holder is a wall-hanging phone caddy that loops over a plug-in charger. Your phone rests in a front pocket while the cable coils in a slim side sleeve. The mustard fabric is worked in waistcoat stitch, so it looks like knitting, with neat columns of stacked V’s.
The palette is warm and earthy: mustard yellow for the body, dark chocolate brown for every edge and band, a white daisy with a mustard center, and an olive green leaf sprig. The brown outlines give the holder a crisp, illustrated look against the soft knit-look texture.
This pattern uses US crochet terms. The finished holder measures 8 in (20.3 cm) wide and 9 in (22.9 cm) tall without the handle, and about 12 in (30.5 cm) tall including the handle arch.
The construction is simple. You crochet the back panel, pocket and cord sleeve as flattened tubes in joined rounds, which makes each piece double-thick and sturdy. Next you add the brown borders and rims, make a separate handle, flower and leaf sprig, and sew everything together.
Finished Size and Construction
- Finished size: 8 in x 9 in (20.3 cm x 22.9 cm), plus a handle arch of about 3 in (7.6 cm)
- Skill level: Easy / advanced beginner
- Terminology: US crochet terms
- Yarn weight: Worsted (#4)
- Hooks: 5.0 mm (H-8) for the body pieces, 4.0 mm (G-6) for the appliqués
- Number of pieces: 6 (back panel, pocket, cord sleeve, handle, daisy, leaf sprig)
- Layout: Pocket on the lower front of the back panel, sleeve along the right edge, handle centered on top
- Back panel size before border: 5 in x 8 in (12.7 cm x 20.3 cm)
- Back panel size after border: 6 in x 9 in (15.2 cm x 22.9 cm)
- Border depth: 0.5 in (1.3 cm) on each side (2 rounds)
- Pocket: 5 in x 4.5 in (12.7 cm x 11.4 cm), including its rim
- Sleeve: 2 in x 6 in (5.1 cm x 15.2 cm), including its rim
Materials
Pick a smooth worsted yarn with good stitch definition, because the V columns need to show clearly. Cotton or a cotton-acrylic blend holds its shape well on the wall. Avoid fuzzy or very loosely plied yarn.
- Mustard yellow (MC): 60 g, about 120 m (131 yd)
- Dark brown (CC1): 20 g, about 40 m (44 yd)
- White (CC2): 5 g, about 10 m (11 yd)
- Olive green (CC3): 5 g, about 10 m (11 yd)
These quantities include a safety margin of roughly 20%.
Tools:
- 5.0 mm (H-8) and 4.0 mm (G-6) crochet hooks
- Tapestry needle
- 4 stitch markers
- Rust-proof pins
- Scissors
- Optional: plastic canvas cut to 4.75 in x 7.75 in (12.1 cm x 19.7 cm) to stiffen the back panel
Abbreviations (US Terms)
- ch – chain
- sl st – slip stitch
- sc – single crochet
- hdc – half double crochet
- dc – double crochet
- st(s) – stitch(es)
- rnd(s) – round(s)
- MR – magic ring
- MC / CC – main color / contrast color
Waistcoat stitch (wsc): Instead of going under the top two loops, insert the hook between the two vertical legs of the next sc in the previous round, below the horizontal top loops. Yarn over, pull up a loop, then yarn over and pull through both loops. Worked in rounds without turning, this makes knit-look V columns.
Joined rounds: At the end of every round, sl st into the first st and ch 1. The ch 1 is not a stitch. Never turn.
Gauge and Checkpoints
Gauge: 16 wsc and 16 rnds = 4 in (10.2 cm) with the 5.0 mm hook, measured on the flattened tube.
That works out to 4 sts and 4 rnds per 1 in (2.5 cm). Waistcoat stitch tends to tighten up, so keep your loops relaxed and pull each loop up to the full height of the hook shaft.
Make the pocket first, because it doubles as your gauge swatch. Check it at these points:
- After Rnd 1: The flattened piece is 5 in (12.7 cm) wide.
- After Rnd 8: It is 2 in (5.1 cm) tall.
- After Rnd 16: It is 4 in (10.2 cm) tall.
If the piece is too big: Change to a 4.5 mm hook and start again.
If the piece is too small: Change to a 5.5 mm hook, or loosen your tension on the pulled-up loop.
Width matters most here. If the pocket and the back panel don’t match in width, the pocket won’t sit flat.
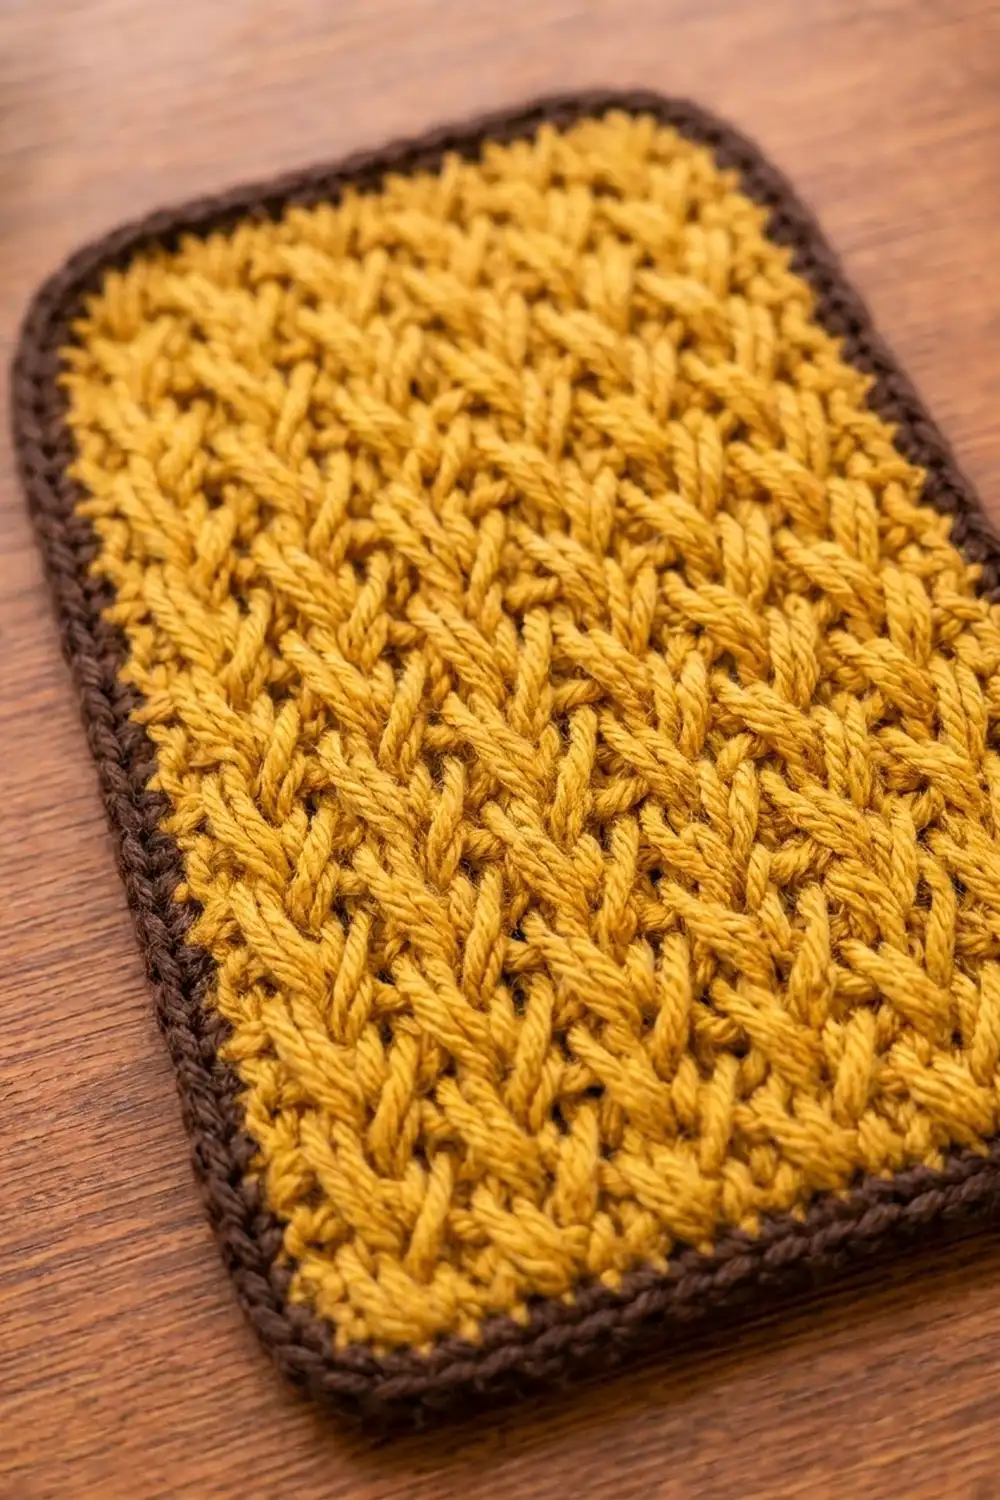
The pocket is made with MC and the 5.0 mm hook, and the top is left open.
Ch 21.
Rnd 1: Sc in 2nd ch from hook and in each ch across (20 sc). Rotate the work and sc in the bottom loop of each ch across (20 sc). Join. (40 sc)
Rnds 2–16: Wsc in each st around. Join. (40 sts per round)
Switch to CC1.
Rnds 17–18: Sc in each st around. Join. (40 sc per round) Fasten off.
The rim is made of normal sc (worked under both top loops), so it forms a firm brown ridge across the opening. The pocket now measures 5 in x 4.5 in (12.7 cm x 11.4 cm) when flattened.
Back Panel
This piece is made with MC and the 5.0 mm hook.
Ch 21.
Rnd 1: Work as for Rnd 1 of the pocket. (40 sc)
Rnds 2–31: Wsc in each st around. Join. (40 sts per round)
Checkpoint: The flattened panel is 5 in (12.7 cm) wide and 7.75 in (19.7 cm) tall. If you are using plastic canvas, slip it inside now.
Row 32 (closing row): Flatten the tube with the join at one side fold. Working through both layers at once, sc across. (20 sc) Fasten off.
The panel body is now 5 in x 8 in (12.7 cm x 20.3 cm), which is 20 sts wide and 32 rows tall.
Cord Sleeve
The sleeve starts with MC and the 5.0 mm hook.
Ch 9.
Rnd 1: Sc in 2nd ch from hook and in each ch across (8 sc). Rotate and sc in the bottom loop of each ch across (8 sc). Join. (16 sc)
Rnds 2–7: Wsc around. (16 sts)
Rnds 8–9 (CC1): Sc around. (16 sc)
Rnds 10–15 (MC): Wsc around. (16 sts)
Rnds 16–17 (CC1): Sc around. (16 sc)
Rnds 18–22 (MC): Wsc around. (16 sts)
Rnds 23–24 (CC1): Sc around. (16 sc) Fasten off.
Carry the unused color loosely up the inside of the tube. The sleeve measures 2 in x 6 in (5.1 cm x 15.2 cm) and has two raised brown bands plus a brown rim.
Handle
Use MC and the 5.0 mm hook.
Ch 41.
Row 1: Sc in 2nd ch from hook and in each ch across. Turn. (40 sc)
Row 2: Ch 1, sc in each st across. (40 sc) Fasten off.
Edging (CC1): Join CC1 at a corner. Sc in each st along the long side (40). On the short end, work 2 sc in the first row end and 1 sc in the next (3). Repeat along the second long side (40) and the second short end (3). Join. (86 sc) Fasten off.
The handle measures about 10 in x 0.75 in (25.4 cm x 1.9 cm).
Daisy
With MC and the 4.0 mm hook:
Rnd 1: Work 8 sc in a MR. Join. (8 sc) Fasten off.
Rnd 2 (CC2): Work 2 sc in each st. Join. (16 sc)
Rnd 3: (Hdc, 2 dc, hdc) in next st, sl st in next st. Repeat from * 7 more times. (8 petals: 32 petal sts + 8 sl st = 40 sts) Fasten off.
The daisy measures about 2.25 in (5.7 cm) across.
Leaf Sprig
Use CC3 and the 4.0 mm hook.
Ch 20.
Tip leaf: Sc in 2nd ch from hook, hdc in next ch, dc in next 2 ch, hdc in next ch, sc in next ch. This uses chains 2–7.
Stem: Sl st in the next 3 ch (chains 8–10).
Leaf pair 1: Ch 7, sc in 2nd ch from hook, hdc, 2 dc, hdc, sc, then sl st into the same stem ch. Repeat once more from * so the two leaves point in opposite directions.
Stem: Sl st in the next 4 ch (chains 11–14). Work Leaf pair 2 at chain 14.
Stem end: Sl st in the remaining 6 ch (chains 15–20). Fasten off.
Check your stem: 3 + 4 + 6 = 13 stem chains, plus 6 chains for the tip leaf and 1 skipped chain, adds up to 20. The finished sprig has 5 leaves and measures about 3.5 in (8.9 cm) long.
Make All Pieces
- MC: back panel, pocket, handle body, most of the sleeve, daisy center
- CC1: pocket rim, sleeve bands and rim, handle edging, back panel border
- CC2: daisy petals
- CC3: leaf sprig
Layout (front view):
          [===== HANDLE =====]
   [      BACK PANEL       ]
   [      BACK PANEL       ][SLV]
   [ POCKET  daisy + sprig ][SLV]
   [ POCKET                ][SLV]
Border (Back Panel)
Border gauge: 4 sc = 1 in (2.5 cm) along the edges, and 1 round adds 0.25 in (0.6 cm) of depth.
Use CC1 and the 5.0 mm hook. Each side count below already includes the corner groups.
Rnd 1: Join at the top right corner. On the top edge, work 3 sc in the first st, sc in the next 18, and 3 sc in the last st (24). Down the side, work 1 sc in the fold edge of each row (32). On the bottom, work 3 sc in the first foundation ch, sc in the next 18, and 3 sc in the last (24). Up the other side, work 1 sc per row (32). Join.
(104 sts worked 1-per-edge-st + 8 corner extras = 112 sc)
Rnd 2: Sc in each st, working 2 sc in the center sc of each corner group. Join.
(112 + 4 = 116 sc: top 26, sides 32 each, bottom 26) Fasten off.
Why the math works: The 20 top sts at 4 sts per in make 5 in, matching the 4 sc/in border gauge, so the edge lies flat. The 32 rows at 4 rows per in make 8 in, so 1 sc per row gives 32 sc. Using 2 sc rather than 3 in Rnd 2 keeps the corners softly rounded. Two rounds add 0.5 in (1.3 cm) on every side, which brings the panel to 6 in x 9 in (15.2 cm x 22.9 cm).
Joining
Use CC1 and a whipstitch, catching one loop from each piece.
- Pocket: Place it on the lower front of the back panel. Its bottom sits along back panel Rnd 1, just inside the border, and its sides line up with the panel sides. Because both pieces have 4 rnds per in, pocket rounds 1–18 match panel rows 1–18 one for one. Sew both sides and the bottom (20 sts to 20 sts) through the pocket’s back layer only. Leave the top open.
- Sleeve: Line up the sleeve bottom with the outer bottom edge of the panel. Sleeve rounds 1–2 sit next to the rounded corner. Sleeve rounds 3–24 match the 22 lowest stitches of the right side of border Rnd 2, one for one. Sew the full length.
- Handle: Overlap each end by 1 in (2.5 cm) behind the top edge, keeping the outer edges 1 in (2.5 cm) in from the panel sides. Sew through the back layer only.
- Appliqués: Sew the daisy slightly right of center on the pocket front. Place the sprig to its left, with the stem running under the daisy’s lower edge.
Keep your whipstitches snug but not tight. Pulling too hard will pucker the knit-look fabric.
Size checkpoint: The holder measures 8 in (20.3 cm) wide (6 in panel + 2 in sleeve) and 9 in (22.9 cm) tall, with the handle arching about 3 in (7.6 cm) above.
Final Blocking
- Pin the joined holder face up to a blocking mat, at 8 in x 9 in (20.3 cm x 22.9 cm).
- Shape the back panel corners into smooth curves.
- Hover a steam iron about 1 in (2.5 cm) above the fabric. Don’t press it down.
- Pin the handle into an even arch.
- Leave it to dry completely, at least 2 hours.
- Unpin it and fluff the daisy petals with your fingers.
Final Quality-Control Checklist
- Back panel border counts are 116 sc, with top 26, bottom 26 and sides 32.
- The V columns run straight and vertical on every piece.
- The pocket opens freely and the phone slides in easily.
- The sleeve bands line up horizontally.
- The handle is centered and both ends are hidden.
- All tails are woven into the double layers.
- Overall size is 8 in x 9 in (20.3 cm x 22.9 cm).
Troubleshooting
- The V’s slant diagonally: You’re working in a spiral. Join every round, and don’t turn.
- The fabric is too stiff to work: Pull up taller loops, or go up half a hook size.
- The border ruffles: You’ve added extra sts on the sides. Use exactly 1 sc per row.
- The border cups: You’ve skipped row ends. Recount to 32.
- The pocket gapes at the sides: Whipstitch through every round, not every other one.
- The phone is too wide: Add 2 ch to the pocket foundation (44 sts per round). Add the same 2 ch to the back panel, and add 2 sc to both the top and bottom border counts.
Care
Hand wash in cool water with mild soap, then gently squeeze it out and dry flat. Remove any plastic canvas first if possible, or spot clean only.
Final Notes
The whole design comes down to one measurement chain. At 4 sts and 4 rnds per 1 in (2.5 cm), 20 sts and 32 rows give a 5 in x 8 in (12.7 cm x 20.3 cm) back panel. Two border rounds make it 6 in x 9 in (15.2 cm x 22.9 cm). The 4.5 in (11.4 cm) pocket matches the panel row for row, and the 2 in x 6 in (5.1 cm x 15.2 cm) sleeve brings the width to 8 in (20.3 cm). Check your gauge on the pocket and everything else lines up.
Happy crocheting!