

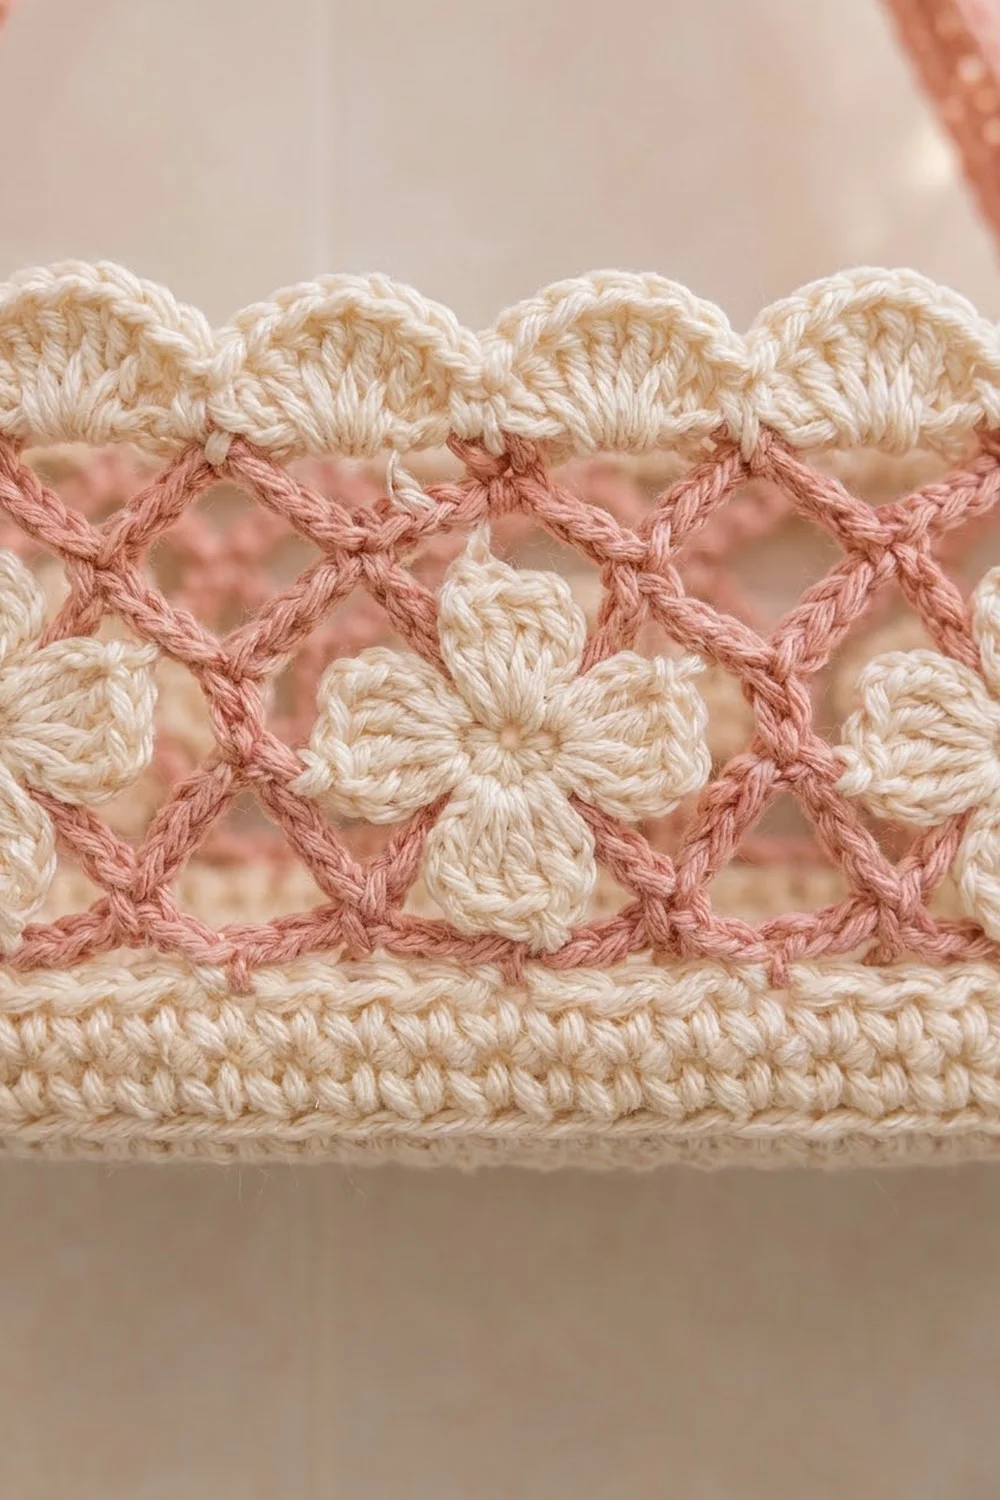
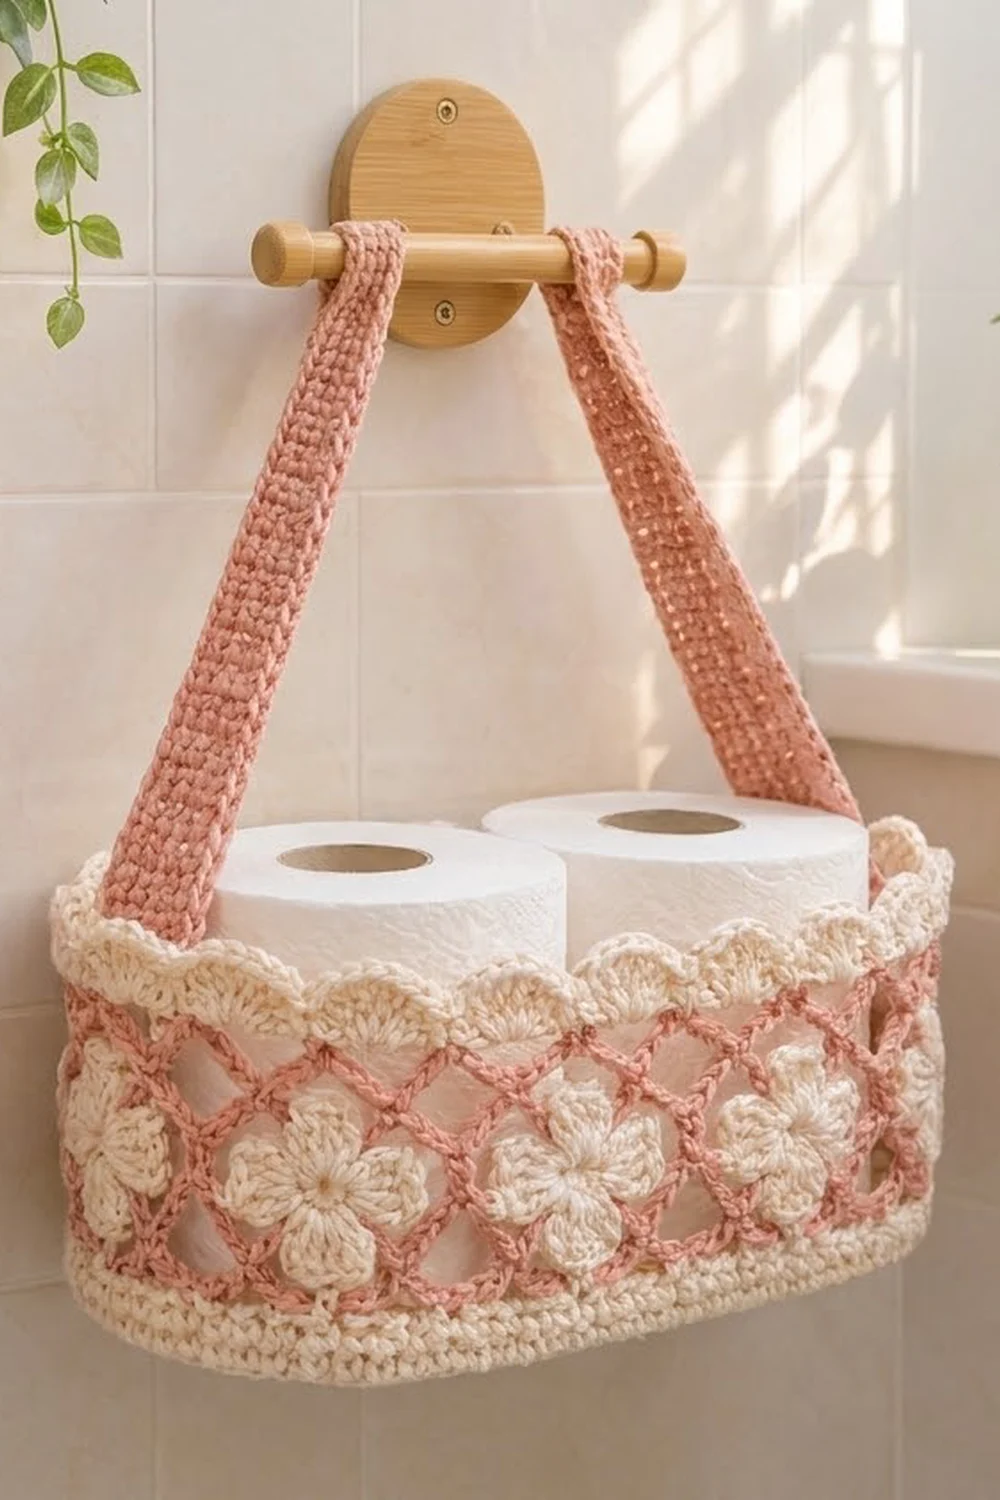
The Blossom Lattice basket is a soft, practical way to keep two spare toilet paper rolls within reach. A sturdy cream oval base supports an airy pink diamond lattice. Cream five-petal flowers sit on top of the lattice, and a row of cream scallops finishes the rim.
The palette is warm and gentle: dusty pink and natural cream in cotton yarn. The cotton holds its shape, wipes clean, and suits a bathroom. The look is cottage-style but still tidy, with a firm structure under the lacy wall.
The finished basket measures 10 in (25.4 cm) long, 4.75 in (12.1 cm) wide and 3.75 in (9.5 cm) tall. Two pink straps hang it from a towel rod or spare roll holder. This pattern uses US crochet terms throughout.
You build the basket from the bottom up in joined rounds. First comes the oval base, then a back-loop turning round and a solid cream band. Next is the pink chain-loop lattice, and last a cream scalloped border. The flowers and straps are made separately and sewn on.
Finished Size and Construction
- Finished size: 10 in (25.4 cm) long × 4.75 in (12.1 cm) wide × 3.75 in (9.5 cm) tall
- Skill level: Easy–Intermediate
- Terminology: US crochet terms
- Yarn weight: Worsted weight (#4) cotton
- Hook: 4 mm (G-6)
- Number of pieces: 1 basket body, plus 2 straps and 8 flowers sewn on
- Layout: Oval basket with 3 flowers on each long side and 1 on each end
- Base size: 10 in × 4.75 in (25.4 cm × 12.1 cm)
- Wall height before border: 3 in (7.6 cm)
- Border depth: 0.75 in (1.9 cm)
- Strap length: 14 in (35.6 cm) each
Materials
Use a smooth, firmly twisted 100% cotton worsted yarn. Cotton gives a firm base and crisp scallops. Acrylic will sag under the weight of the rolls.
- Cream (Color A): 120 g, about 190 m
- Dusty pink (Color B): 60 g, about 95 m
These quantities include a margin of about 20% for gauge differences and swatching.
Tools:
– 4 mm (G-6) crochet hook
– Tapestry needle
– 4 locking stitch markers
– Measuring tape
– Rust-proof pins and a blocking surface
– Spray bottle
– Two toilet paper rolls, to use as a shaping form
Abbreviations (US Terms)
- ch – chain
- sl st – slip stitch
- sc – single crochet
- dc – double crochet
- BLO – back loop only
- sp – space
- st(s) – stitch(es)
- rnd(s) – round(s)
- rep – repeat
Special stitches:
– Shell: 5 dc in the same st.
– Petal: (sl st, ch 2, 3 dc, ch 2, sl st) in the same st.
Gauge and Checkpoints
Gauge: 18 sc and 20 rnds = 4 in (10.2 cm) in single crochet with a 4 mm hook. That is 4.5 sts and 5 rnds per inch.
Test with the base itself. Work Rnds 1–6, then measure. The base should be about 7.75 in (19.7 cm) long and 2.4 in (6.1 cm) wide.
Checkpoints:
– After Rnd 12 (base): 10 in × 4.75 in (25.4 cm × 12.1 cm), lying flat
– After Rnd 17 (cream band): the wall stands 1 in (2.5 cm) tall
– After Rnd 21 (lattice): the wall is 3 in (7.6 cm) tall, with each lattice rnd adding about 0.5 in (1.3 cm)
– After the border: the wall is 3.75 in (9.5 cm) tall
If your base is too big, go down to a 3.75 mm hook. If it is too small, go up to a 4.5 mm hook. Don’t change the stitch counts, because the border math depends on 120 sts. If the base curls up like a bowl, your increases are too tight; loosen your tension at the ends. If it ruffles, you are working too loosely.
Base (Color A)
Work in joined rnds. Don’t turn unless told to. The ch 1 at the start of each rnd does not count as a st.
With Color A, ch 27.
Rnd 1: Work 3 sc in the 2nd ch from hook. Sc in each of the next 24 ch. Work 3 sc in the last ch. Turn the work so you are on the underside of the foundation chain, then sc in each of the next 24 ch. Join with a sl st to the first sc. (50 sts)
The rnd has four sections: End A (3 sts), Long Side 1 (24 sts), End B (3 sts) and Long Side 2 (24 sts). Each long side always stays at 24 sts. Each end grows by 3 sts per rnd.
Rnd 2: Ch 1. [2 sc in each of the next 3 sts, sc in each of the next 24 sts] twice. Join. (56 sts)
Rnd 3: Ch 1. [(Sc in the next st, 2 sc in the next st) 3 times, sc in each of the next 24 sts] twice. Join. (62 sts)
Rnds 4–12: Ch 1. [(Sc in each of the next X sts, 2 sc in the next st) 3 times, sc in each of the next 24 sts] twice. Join. X is the rnd number minus 2, so X = 2 in Rnd 4 and X = 10 in Rnd 12.
Rnd totals:
– Rnd 4: 68 sts
– Rnd 5: 74 sts
– Rnd 6: 80 sts
– Rnd 7: 86 sts
– Rnd 8: 92 sts
– Rnd 9: 98 sts
– Rnd 10: 104 sts
– Rnd 11: 110 sts
– Rnd 12: 116 sts
Wait — check the formula: each rnd’s total is (rnd number × 6) + 48. Rnd 12 is 72 + 48 = 120 sts. The correct totals are:
– Rnd 4: 72 sts
– Rnd 5: 78 sts
– Rnd 6: 84 sts
– Rnd 7: 90 sts
– Rnd 8: 96 sts
– Rnd 9: 102 sts
– Rnd 10: 108 sts
– Rnd 11: 114 sts
– Rnd 12: 120 sts
After Rnd 12, each end has 36 sts and each long side has 24 sts: 36 + 24 + 36 + 24 = 120. Check the base against the 10 in × 4.75 in (25.4 cm × 12.1 cm) checkpoint.
Wall Band (Color A)
Rnd 13: Ch 1, sc in BLO of each st around. Join. (120 sts) The unworked front loops make a clean fold line, so the wall stands up.
Rnds 14–17: Ch 1, sc in each st around. Join. (120 sts each rnd)
The band is now 1 in (2.5 cm) tall. Fasten off Color A.
Lattice Wall (Color B)
The lattice is a diamond net of ch-5 loops. Each loop covers 4 sts of the band, so 120 ÷ 4 = 30 loops.
Rnd 18: Join Color B with a sl st in any st. Ch 1, sc in the same st. Ch 5, skip 3 sts, sc in the next st. Rep from * 28 more times. Ch 2, then dc in the first sc to close the last loop. (30 loops)
The ch 2 plus dc counts as the 30th loop and leaves your hook at the top of the loop.
Rnds 19–20: Ch 1, sc around the post of the joining dc. Ch 5, sc in the next ch-5 sp. Rep from * 28 more times. Ch 2, dc in the first sc. (30 loops each rnd)
Rnd 21: Ch 1, sc around the post of the joining dc. Ch 5, sc in the next ch-5 sp. Rep from * 28 more times. Ch 5, join with a sl st to the first sc. (30 ch-5 loops)
Fasten off Color B. The wall now stands 3 in (7.6 cm) tall. Slip the two rolls inside to check that the lattice stands up evenly before you add the border.
Flowers (Color A, make 8)
Rnd 1: Make a magic ring. Ch 1, work 5 sc in the ring, and pull the ring closed. Join with a sl st to the first sc. (5 sts)
Rnd 2: Work 1 Petal in each sc around. Join with a sl st to the base of the first Petal. (5 petals)
Fasten off, leaving a 10 in (25.4 cm) tail for sewing. Each flower measures about 1.5 in (3.8 cm) across.
Straps (Color B, make 2)
Ch 6.
Row 1: Sc in the 2nd ch from hook and in each ch across. (5 sts)
Rows 2–70: Ch 1, turn. Sc in BLO of each st across. (5 sts each row)
Fasten off, leaving a 16 in (40.6 cm) tail. Each strap measures 1.1 in (2.8 cm) wide and 14 in (35.6 cm) long. The back-loop rows give the ridged texture.
Border (Color A)
Border gauge: One shell repeat uses 4 sts and measures about 0.9 in (2.3 cm).
Rnd 22 (conversion round): Join Color A in any ch-5 sp. Ch 1, work 4 sc in each ch-5 sp around. Join. Count: 30 loops × 4 sc = 120 sts, plus 0 extra = 120 sts.
Place markers to divide the rnd from your first st:
– End A: 36 sts
– Long Side 1: 24 sts
– End B: 36 sts
– Long Side 2: 24 sts
Line the markers up with the turning points of the base below.
Rnd 23 (scallops): Sc in the next st, skip 1 st, Shell in the next st, skip 1 st. Rep from * 29 more times. Join with a sl st to the first sc. (30 shells)
Shells per section:
– End A: 9 shells (36 sts)
– Long Side 1: 6 shells (24 sts)
– End B: 9 shells (36 sts)
– Long Side 2: 6 shells (24 sts)
Fasten off and weave in the ends.
Why the math works: The base finishes at 120 sts. The lattice uses those sts 4 at a time, giving 30 loops. The conversion round puts 4 sc back into each loop, which restores exactly 120 sts with no added or lost sts. Each shell repeat also uses 4 sts, so 120 ÷ 4 = 30 shells. Each section (36 and 24 sts) is divisible by 4, so every shell sits fully within one section and the scallops stay even around the curves.
Assembly
Flowers: Pin 3 flowers along each long side, centered over the lattice in Rnds 19–20. Space them about 1.75 in (4.4 cm) apart, center to center. Pin 1 flower to the center of each end. Sew each flower down through its center ring and at each petal tip. Catch the lattice chains, but don’t pull them tight.
Straps: Find the center of each end. Overlap the bottom 1.5 in (3.8 cm) of one strap on the inside of the wall, covering the band and the first lattice rnd. Whipstitch all four edges of the overlap through the band sts. Repeat for the other strap at the opposite end.
Hanging loop: Fold the top 2 in (5.1 cm) of each strap over the rod and whipstitch the fold closed. This leaves a free drop of about 10.5 in (26.7 cm) per strap. If your rod has fixed ends, sew the loops closed first and slide them on from one end.
Final Blocking
- Wet the basket in cool water and gently squeeze out the excess. Don’t wring it.
- Roll it in a towel and press to remove more water.
- Put the two rolls inside, wrapped in a plastic bag, to use as a form.
- Shape the base flat to 10 in × 4.75 in (25.4 cm × 12.1 cm).
- Pull the lattice diamonds up evenly so the wall stands 3 in (7.6 cm) tall below the border.
- Pin each scallop open on a towel-covered surface, or pinch them into shape by hand.
- Pin the straps flat and straight on a separate surface.
- Let everything dry completely before you hang it.
Final Quality-Control Checklist
- The base lies flat and measures 10 in × 4.75 in (25.4 cm × 12.1 cm).
- There is a clean fold line at Rnd 13.
- The wall stands 3.75 in (9.5 cm) tall in total.
- The lattice has 30 even loops in every rnd.
- The border has 30 shells: 9 on each end and 6 on each long side.
- All 8 flowers are sewn flat, with no puckering.
- The straps are the same length and are centered on the ends.
- All ends are woven in securely.
- Two rolls fit without stretching the lattice.
Troubleshooting
The base cups upward. Your end increases are too tight. Loosen the 2-sc sts or go up a hook size for the base only.
The base ruffles. You are working loosely or have added extra sts. Recount each rnd against the totals above.
The lattice leans or spirals. Make sure each sc goes into the ch-5 sp, not into a chain. Keep every loop exactly 5 chains.
The scallops don’t fit the sections. Your Rnd 22 count is off. Restore exactly 120 sts before working the shells.
The flowers pucker the wall. Sew with loose stitches, and don’t pull through more than one lattice chain at a time.
The straps stretch. Work them more tightly, or go down to a 3.75 mm hook for the straps.
Care
Hand wash in cool water with mild soap, reshape, and lay flat to dry. Don’t tumble dry. The straps and flowers can loosen.
Final Notes
Each stage depends on the one before it. A base of 120 sts at 10 in × 4.75 in (25.4 cm × 12.1 cm) supports a 1 in (2.5 cm) solid band. On top of that, 30 lattice loops add 2 in (5.1 cm) of height. A 120-st conversion round and 30 even shells then finish the wall at 3.75 in (9.5 cm). Hit each checkpoint and the basket will fit two rolls neatly.
Happy crocheting!