
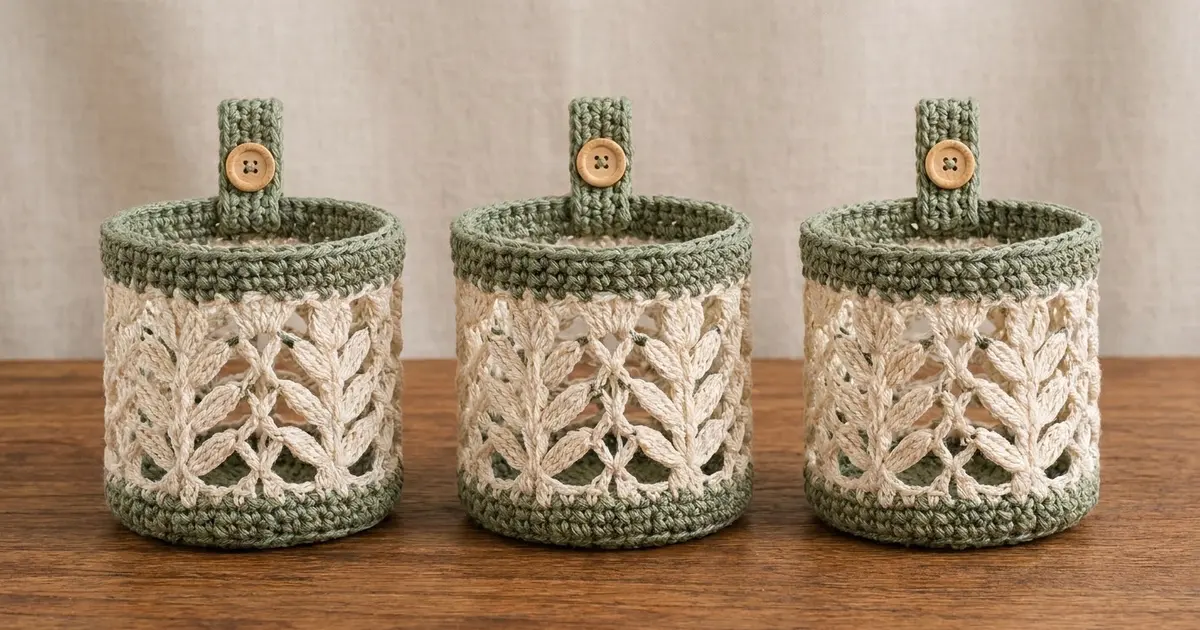
This set of three small hanging baskets pairs a cream leaf-lace wall with solid sage-green bands. Each basket hangs from a wooden rod on two button tabs. The baskets are a good size for cotton rounds, a soap pump, or a rolled washcloth.
The look is soft and botanical. Leaf columns run up the cream wall, and firm green single crochet frames the lace at the base, the rim, and the tabs. The wooden buttons pick up the color of the rod.
All instructions use US crochet terms. Each finished basket is 4.75 in (12.1 cm) in diameter and 5 in (12.7 cm) tall. The three baskets hung 1.5 in (3.8 cm) apart cover 17.25 in (43.8 cm) of rod.
Each basket has five pieces. First you crochet a flat base circle, then a flat lace panel that you seam into a tube. You work a green bottom band onto the tube and close it onto the base in the same round. Then you sew on a flat green top band and attach two button tabs. Every join uses one stitch for one stitch.
Finished Size and Construction
- Finished size (one basket): 4.75 in (12.1 cm) diameter × 5 in (12.7 cm) tall
- Skill level: Intermediate
- Terminology: US
- Yarn weight: Worsted (#4) cotton
- Hook: 4.5 mm (US 7)
- Number of pieces: 5 per basket (base, lace panel, top band, 2 tabs), 15 in total
- Layout: 3 baskets in a row on one rod
- Lace panel size: 15.25 in × 3 in (38.7 cm × 7.6 cm) flat
- Size before border: tube 15 in (38.1 cm) around × 3 in (7.6 cm) tall
- Border depth: bottom band 0.9 in (2.3 cm), top band 1.1 in (2.8 cm)
Materials
Use a smooth, firm worsted-weight cotton or cotton blend. Cotton holds its shape in a damp bathroom and shows the leaf stitches clearly. Avoid fluffy or very stretchy yarns.
- Sage green: 100 g, about 170 m (186 yd) – bases, bottom bands, top bands, tabs
- Cream: 60 g, about 102 m (112 yd) – lace panels
These quantities cover all three baskets and include a margin of about 15 percent for your gauge swatch and seaming.
Tools and notions:
- 4.5 mm (US 7) crochet hook
- 6 wooden buttons, 5/8 in (1.6 cm)
- Tapestry needle
- Sewing needle and matching cotton thread
- Stitch markers
- Scissors and a tape measure
- Rust-proof pins
- Optional: a 20 in (50.8 cm) wooden rod with 2 wall brackets
Abbreviations (US Terms)
- ch – chain
- sc – single crochet
- dc – double crochet
- sk – skip
- st(s) – stitch(es)
- sp – space
- sl st – slip stitch
- inc – 2 sc in the same st
- RS / WS – right side / wrong side
- CL (3-dc cluster): *Yarn over, insert hook in the indicated st, yarn over and pull up a loop, yarn over and draw through 2 loops; repeat from * 2 more times in the same st, then yarn over and draw through all 4 loops on the hook. A CL counts as 1 st.
Gauge and Checkpoints
Gauge: 16 sc × 18 rows = 4 in (10.2 cm) in sc with the 4.5 mm hook.
Make one full basket before you start the others. It shows whether your gauge holds across all three stitch types.
Checkpoints:
- Base after Rnd 5 (30 sts): 2.2 in (5.6 cm) across
- Base after Rnd 10 (60 sts): 4.75 in (12.1 cm) across
- Lace panel after Row 1 (61 sts): 15.25 in (38.7 cm) wide
- Lace panel after Row 9: 3 in (7.6 cm) tall
- Seamed tube: 15 in (38.1 cm) around
- Top band strip: 15 in × 1.1 in (38.1 cm × 2.8 cm)
If your pieces are too big, go down one hook size. If they are too small, go up one hook size. Do not change the stitch counts: every edge depends on 60 stitches around. If only the lace runs wide, use a hook 0.5 mm smaller for the lace panel alone.
Base (Make 3, Sage Green)
Work in continuous spiral rounds. Mark the first st of each round.
- Rnd 1: Magic ring, 6 sc in ring. (6 sts)
- Rnd 2: Inc in each st around. (12 sts)
- Rnd 3: Sc 1, inc; repeat around. (18 sts)
- Rnd 4: Sc 2, inc; repeat around. (24 sts)
- Rnd 5: Sc 3, inc; repeat around. (30 sts)
- Rnd 6: Sc 4, inc; repeat around. (36 sts)
- Rnd 7: Sc 5, inc; repeat around. (42 sts)
- Rnd 8: Sc 6, inc; repeat around. (48 sts)
- Rnd 9: Sc 7, inc; repeat around. (54 sts)
- Rnd 10: Sc 8, inc; repeat around. (60 sts)
Sl st in the next st and fasten off. The base should lie flat and measure 4.75 in (12.1 cm) across.
Leaf Lace Panel (Make 3, Cream)
Work flat in rows. The pattern is 1 st plus a 10-st repeat, worked 6 times. Each repeat makes one leaf column.
- Foundation: Ch 62.
- Row 1 (WS): Sc in 2nd ch from hook and in each ch across. Turn. (61 sts)
- Row 2 (RS, leaf row): Ch 1, sc in first st, ch 2, sk 2, CL in next st, ch 1, sk 1, dc in next st, ch 1, sk 1, CL in next st, ch 2, sk 2, sc in next st; repeat from * 5 more times. Turn. (61 sts: 7 sc, 12 CL, 6 dc, 24 ch counted as sts)
- Row 3 (WS): Ch 1, sc in first sc, 2 sc in ch-2 sp, sc in CL, sc in ch-1 sp, sc in dc, sc in ch-1 sp, sc in CL, 2 sc in ch-2 sp, sc in sc; repeat from * 5 more times. Turn. (61 sts)
- Rows 4, 6, 8: Repeat Row 2. (61 sts each)
- Rows 5, 7, 9: Repeat Row 3. (61 sts each)
Fasten off and leave a 12 in (30.5 cm) tail for seaming.
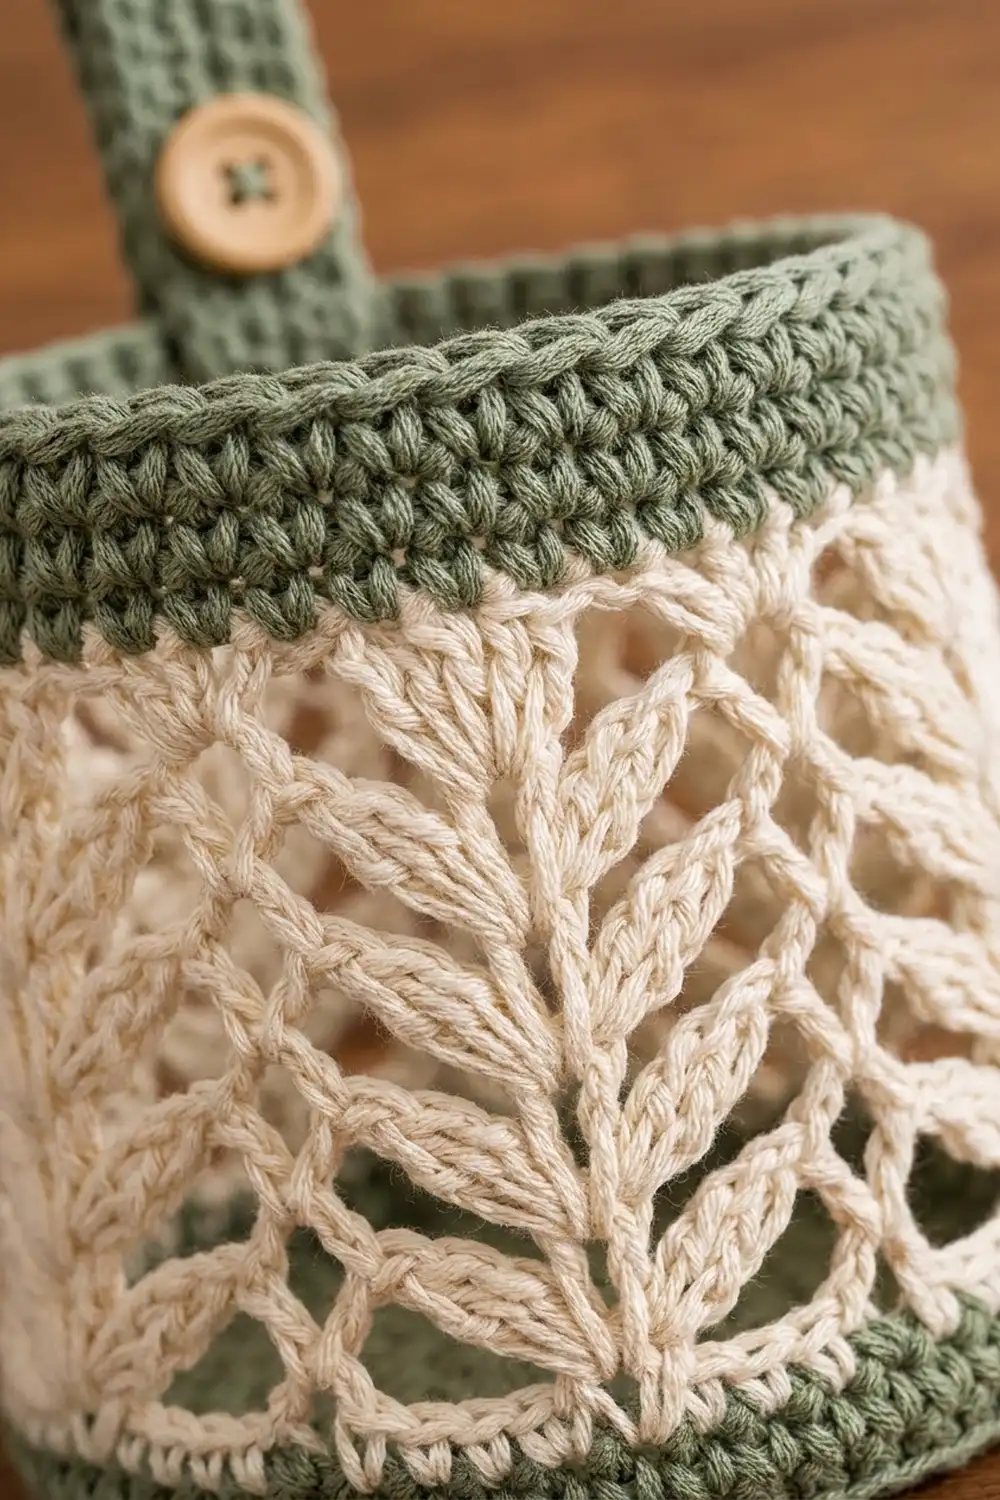
In every leaf row, the dc lands on stitch 5 of the repeat and the CLs land on stitches 3 and 7. Because they stack in the same columns each time, they build straight stems with paired leaves. The ch-2 spaces open into V-shaped windows.
Make All Pieces
Each basket needs 1 base, 1 lace panel, 1 top band, and 2 tabs. For the full set:
- Sage green: 3 bases, 3 top bands, 6 tabs (12 pieces)
- Cream: 3 lace panels (3 pieces)
The top band and tab instructions are in the Border section below.
Layout on the rod (B = basket):
[bracket]==========================================[bracket]
     | tabs |          | tabs |          | tabs |
     [  B1  ]  1.5 in  [  B2  ]  1.5 in  [  B3  ]
Joining
Seam the tube. Fold the lace panel RS out so the short edges meet. Lay the first-stitch column over the last-stitch column so they overlap by one stitch. With the cream tail, whipstitch through both layers.
Stitch-to-stitch logic. The panel is 61 sts wide. The overlapped edge columns now act as one stitch, so the tube has 60 working stitches around each edge. That matches base Rnd 10 exactly.
Tension advice. Whipstitch firmly, but do not pull the seam tight. A tight seam puckers the leaf column next to it.
Size checkpoint. The tube should measure 15 in (38.1 cm) around. Place the seam at the center back.
Border
The green bands are the border. Their gauge is the same as the base: 16 sc = 4 in (10.2 cm), so 60 sts = 15 in (38.1 cm). The math works because every edge involved has exactly 60 stitches: base Rnd 10, both edges of the tube, and the top band strip. Each join is one stitch to one stitch, with nothing added at the seam.
Bottom Band (Worked onto the Tube)
With the tube upside down, join sage green at the seam. Work into the free loops of the foundation chain. At the overlap, work through both layers as one stitch.
- Rnd 1: Ch 1, sc in each st around. Join with sl st to first sc. (60 sts)
- Rnds 2–3: Ch 1, sc in each st around. Join. (60 sts each)
- Rnd 4 (joining round): Set the base against the band, WS together. Ch 1. Insert the hook through the next band st and the next st of base Rnd 10, and sc. Repeat around. Join. (60 sts)
Fasten off. The bottom band measures 0.9 in (2.3 cm) deep.
Top Band (Make 3, Sage Green)
- Foundation: Ch 61.
- Row 1: Sc in 2nd ch from hook and in each ch across. Turn. (60 sts)
- Rows 2–5: Ch 1, sc in each st across. Turn. (60 sts each)
Fasten off and leave a 20 in (50.8 cm) tail. The strip measures 15 in × 1.1 in (38.1 cm × 2.8 cm).
Attach. Butt the short ends together and whipstitch them to form a ring of 60 sts. Line the ring’s seam up with the tube seam. Place the foundation edge of the band on Row 9 of the lace, RS out, and whipstitch one band stitch to each tube stitch (60 to 60).
Tabs (Make 6, Sage Green)
- Foundation: Ch 6.
- Row 1: Sc in 2nd ch from hook and in each ch across. Turn. (5 sts)
- Rows 2–19: Ch 1, sc in each st across. Turn. (5 sts each)
- Row 20 (buttonhole): Ch 1, sc 2, ch 2, sk 1, sc 2. Turn. (4 sc + ch-2 sp)
- Row 21: Ch 1, sc 2, sc in ch-2 sp, sc 2. Turn. (5 sts)
- Row 22: Ch 1, sc in each st across. (5 sts)
Fasten off. Each tab measures 1.25 in × 5 in (3.2 cm × 12.7 cm). Sew a button to the center of each tab, 1.5 in (3.8 cm) from the foundation end.
Attach the tabs. Each basket gets 2 tabs at the center back. Sew the foundation end of Tab A to the outside of the top band and Tab B to the inside, directly opposite. Overlap each one 1 in (2.5 cm) onto the band and whipstitch around the overlap. Each button now sits 0.5 in (1.3 cm) above the rim.
To hang a basket, bring each tab over the rod in the opposite direction and fasten it on the other tab’s button. Tab B’s button stays visible on the front.
Final Blocking
- Weave in all ends along seams or inside the bands.
- Soak each basket in cool water for 10 minutes. Press the water out in a towel; do not wring.
- Fill each basket with a jar or rolled towel 4.75 in (12.1 cm) across.
- Smooth the lace so the stems run straight, then pin the leaves and V openings open.
- Shape the top band so it stands upright at 1.1 in (2.8 cm).
- Pin the tabs flat at 1.25 in × 5 in (3.2 cm × 12.7 cm).
- Let everything dry completely, usually 24 hours.
Final Quality-Control Checklist
- [ ] Each base measures 4.75 in (12.1 cm) across and lies flat
- [ ] Each tube measures 15 in (38.1 cm) around, with the seam at center back
- [ ] Every round of the bottom band has 60 sts
- [ ] The top band is joined 60 to 60 with no puckers
- [ ] Each basket is 5 in (12.7 cm) tall, with six vertical leaf columns
- [ ] Buttons are secure and fit the buttonholes snugly
- [ ] All three baskets match within 0.25 in (0.6 cm)
Troubleshooting
Base ruffles: Your tension is loose, or there are extra increases. Recount, or try a smaller hook.
Base cups: You missed increases. Rnd 10 must have 60 sts.
Lace is narrower than 15.25 in (38.7 cm): Work the ch-2 spaces more loosely, or use a 5 mm (US H-8) hook for the panel.
Stems drift sideways: You miscounted the skips. Each dc must sit on the dc two rows below.
Bottom band flares: You added stitches at the seam. Treat the overlap as one stitch.
Care
Hand wash in cool water with mild soap, then reshape the baskets over a form and let them dry. Keep them away from direct heat.

Final Notes
At 16 sc = 4 in (10.2 cm), the 60-st base measures 4.75 in (12.1 cm) across. The 61-st panel seams into a 60-st tube 15 in (38.1 cm) around and 3 in (7.6 cm) tall. The 0.9 in (2.3 cm) bottom band and 1.1 in (2.8 cm) top band bring each basket to 5 in (12.7 cm). Check every link of that chain on your first basket, and the three baskets will match.
Happy crocheting!