

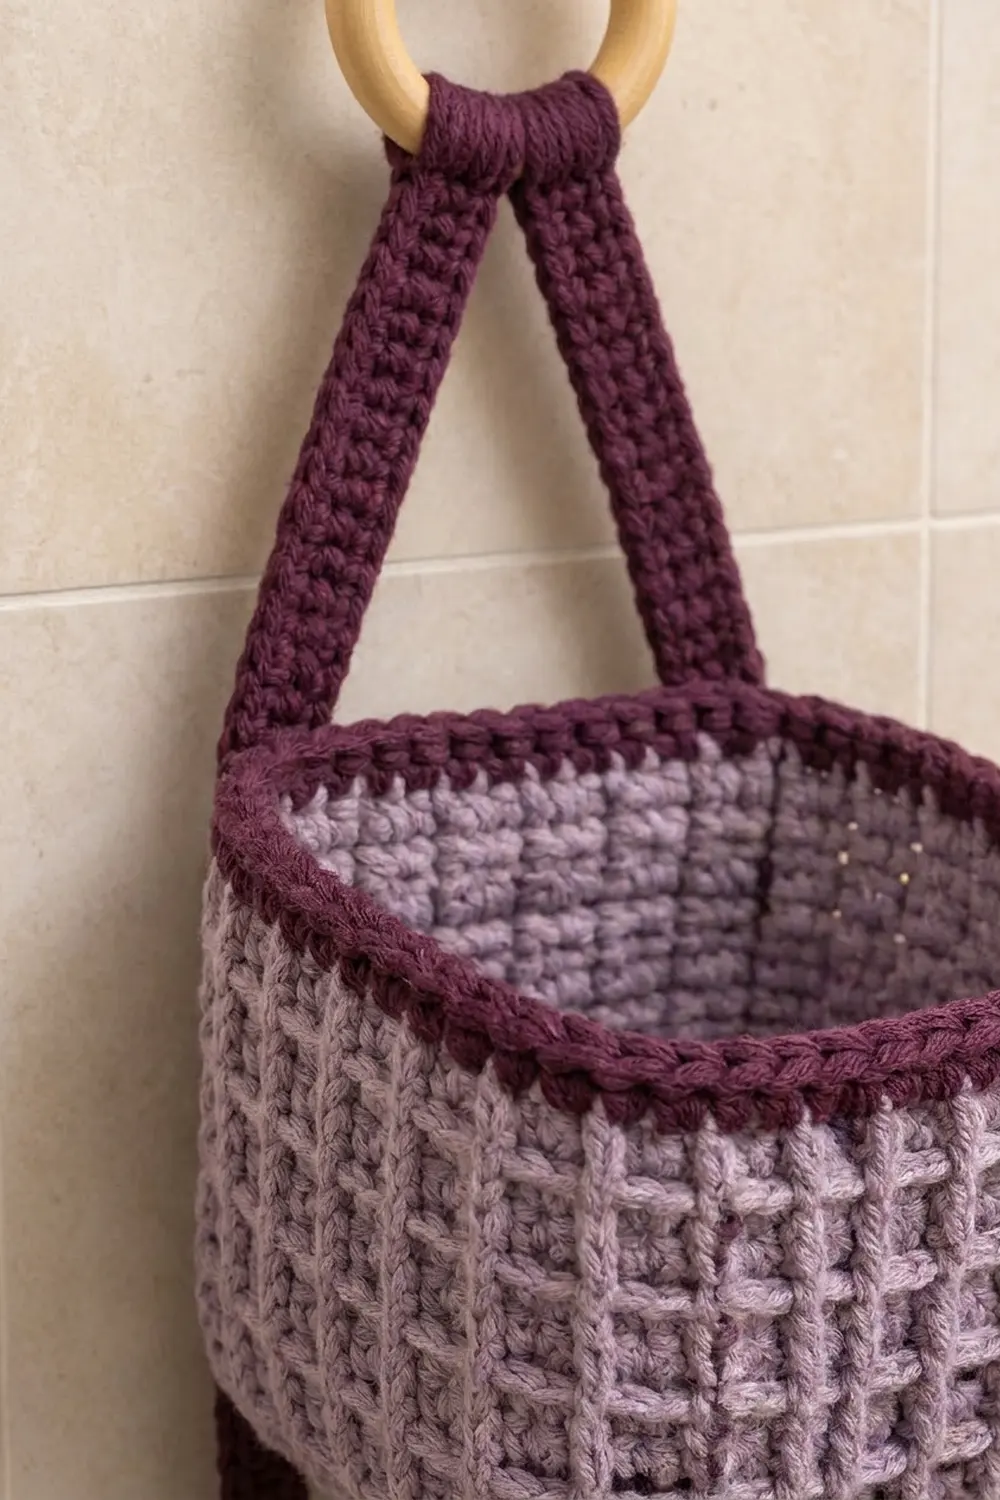
This two-tier hanging basket keeps spare toilet rolls, washcloths or small bathroom items off the counter and within reach. It has two matching square baskets with soft rounded corners. Each one sits on a firm cream base and has lavender walls in a deep waffle grid, finished with a thick plum rolled rim. Two plum straps link the baskets and meet at a wooden ring that hangs from a towel hook.
The colors are calm and a little vintage: cream at the bottom, lavender in the middle and plum to outline everything. The waffle texture gives the walls enough body to stand up on their own, so the baskets keep their shape even when they’re empty.
The pattern uses US crochet terms. Each basket is about 6 in (15.2 cm) square and 5 in (12.7 cm) tall, so a standard toilet roll fits. Each strap is 20 in (50.8 cm) long and 1.4 in (3.6 cm) wide. Once it’s hung, the organizer measures about 22 in (55.9 cm) from the top of the ring to the bottom of the lower basket.
Construction is simple. You crochet a flat rounded-square base in cream, then work the lavender walls straight up from it in rounds, and finish with a plum rim. Next you make two flat plum straps, fold them around the ring and sew them to the sides of both baskets.
Finished Size and Construction
- Finished size (each basket): 6 in x 6 in (15.2 cm x 15.2 cm) base, 5 in (12.7 cm) tall
- Hanging length: about 22 in (55.9 cm), including the ring
- Skill level: Intermediate (front post stitches, reverse single crochet)
- Terminology: US
- Yarn weight: Worsted (#4), cotton or cotton blend
- Hook: 5.0 mm (US H-8)
- Number of pieces: 2 baskets (base, walls and rim worked as one piece each), 2 straps, 1 wooden ring
- Layout: 2 baskets stacked vertically, linked by 2 side straps
- Base size: 6 in (15.2 cm) square, 84 sts around
- Wall height before the rim: about 4.3 in (10.9 cm)
- Rim (border) depth: about 0.7 in (1.8 cm)
Materials
Choose a firm worsted-weight cotton. Cotton holds the waffle texture well, doesn’t stretch much under the weight of the rolls, and stands up to humid bathrooms. The amounts below assume about 85 m per 50 g (93 yd per 50 g).
- Cream (bases): 70 g, about 119 m (130 yd)
- Lavender (walls): 250 g, about 425 m (465 yd)
- Plum (rims and straps): 90 g, about 153 m (167 yd)
All amounts include a safety margin of roughly 15%. The waffle rounds use much more yarn than plain single crochet, so don’t cut your lavender supply too close.
Tools:
- 5.0 mm (US H-8) crochet hook
- Wooden ring, 3 in (7.6 cm) outer diameter
- Tapestry needle
- Stitch markers (at least 4)
- Locking pins or clips for placing the straps
- Measuring tape
- Spray bottle and a box about 6 in (15.2 cm) square for blocking
Abbreviations (US Terms)
- ch – chain
- sl st – slip stitch
- sc – single crochet
- dc – double crochet
- BLO – back loop only
- FPdc – front post double crochet
- rev sc – reverse single crochet (crab stitch)
- st(s) – stitch(es)
- rep – repeat
- Rnd – round
FPdc: Yarn over and insert the hook from front to back to front around the post of the stitch. Yarn over and pull up a loop. Then (yarn over, pull through 2 loops) twice.
Rev sc: Work from left to right if you’re right-handed. Insert the hook in the next stitch to the right, pull up a loop, then yarn over and pull through both loops. This makes a rolled, cord-like edge.
Gauge and Checkpoints
- Single crochet: 14 sts and 14 rnds = 4 in (10.2 cm)
- Waffle pattern: 14 sts and 9 rnds = 4 in (10.2 cm)
Make one complete base before you start the second basket. The base works as your gauge swatch. If it measures right, the walls and rim will line up with it automatically.
Checkpoints:
- Base after Rnd 5 (40 sts): about 2.9 in (7.4 cm) across
- Base after Rnd 10 (80 sts): about 5.7 in (14.5 cm) across
- Base after Rnd 11 (84 sts): 6 in (15.2 cm) across
- Walls after Rnd 5: about 2 in (5.1 cm) tall, measured from the base fold
- Walls after Rnd 10: about 4.3 in (10.9 cm) tall
- Finished basket with rim: 5 in (12.7 cm) tall
If your base is larger than 6.2 in (15.7 cm), try a 4.5 mm hook. If it’s smaller than 5.8 in (14.7 cm), try a 5.5 mm hook. Don’t add or remove rounds. The count of 84 sts is what keeps the waffle grid even on all four sides.
Base (Make 2, Cream)
The base is worked in joined rounds. Each corner gets 3 sc, which makes each side 2 sts longer every round. The last round uses only 2 sc per corner to soften the corners.
Join each round with a sl st to the first sc. The ch-1 at the start of a round doesn’t count as a stitch. Place a marker in the center sc of each 3-sc corner group and move it up every round.
Rnd 1: Magic ring, ch 1, 8 sc in ring, join. (8 sts)
Rnd 2: Ch 1, *3 sc in next st (corner), sc in next st; rep from * 3 more times, join. (16 sts: 4 corner sts + 3 sts per side)
Rnd 3: Ch 1. Work sc in each side st and 3 sc in each marked corner st all the way around, join. (24 sts: 4 corner sts + 5 sts per side)
Rnds 4–10: Rep Rnd 3. Each round has 8 more sts than the round before:
- Rnd 4: 32 sts
- Rnd 5: 40 sts
- Rnd 6: 48 sts
- Rnd 7: 56 sts
- Rnd 8: 64 sts
- Rnd 9: 72 sts
- Rnd 10: 80 sts (4 corner sts + 19 sts per side)
Rnd 11 (rounding round): Ch 1, sc in each side st, 2 sc in each corner st, join. (80 sts worked 1 per stitch + 4 extra = 84 sts, 21 per side)
Fasten off the cream and weave in the tail on the wrong side. The base should lie flat. If it ripples, your corners are too loose. If it cups, your sides are too tight.
Walls (Make 2, Lavender)
The walls are worked up from the base without turning, with the right side facing you. Start each round at the first stitch after a corner so that every side begins with a full waffle repeat. Each side has 21 sts, which is exactly 7 waffle repeats of 3 sts.
Rnd 1 (turning round): Join lavender with a sl st in the first st after any corner. Ch 1, sc BLO in each st around, join. (84 sts)
Working in the back loops leaves the front loops of the base free. They form a crisp fold line, so the walls stand straight up.
Rnd 2: Ch 2 (doesn’t count as a stitch), dc in each st around, join to the first dc. (84 sts)
Rnd 3 (Waffle A): Ch 2, *FPdc around next st, dc in next 2 sts; rep from * around, join. (84 sts: 28 FPdc + 56 dc)
Rnd 4 (Waffle B): Ch 2, *dc in next st (the FPdc), FPdc around each of next 2 sts; rep from * around, join. (84 sts: 28 dc + 56 FPdc)
Rnds 5–10: Alternate the two waffle rounds. Work Waffle A on Rnds 5, 7 and 9, and Waffle B on Rnds 6, 8 and 10. (84 sts each round)
After Rnd 10 the walls should be about 4.3 in (10.9 cm) tall. Fasten off the lavender.
The FPdc stitches stack into raised bars, and the dc stitches sit back between them. That’s what creates the grid’s deep square pockets. Keep the FPdc stitches snug but not tight. If they’re too tight, the top of the basket will pull in narrower than the base.
Make All Pieces
Total pieces:
- Cream: 2 bases
- Lavender: 2 sets of walls (worked onto the bases)
- Plum: 2 rims (worked onto the walls) and 2 straps
Layout (front view, hanging):
          ( RING )
          /      \
     strap        strap
        |          |
   +--[ BASKET 1 ]--+
   |    6 x 6 in    |
   +----------------+
        |          |     3 in (7.6 cm) gap
   +--[ BASKET 2 ]--+
   |    6 x 6 in    |
   +----------------+
One strap goes on the left side wall of both baskets, and the other goes on the right side wall.
Straps (Make 2, Plum)
Each strap is worked flat in rows along its length.
Foundation: Ch 71.
Row 1: Sc in 2nd ch from hook and in each ch across, turn. (70 sts)
Rows 2–5: Ch 1, sc in each st across, turn. (70 sts)
Fasten off, leaving a 30 in (76.2 cm) tail for sewing.
Checkpoint: Each strap should measure 20 in (50.8 cm) long by 1.4 in (3.6 cm) wide. That length is used like this:
- 3.5 in (8.9 cm) folded around the ring
- 7 in (17.8 cm) hanging free above Basket 1
- 5 in (12.7 cm) sewn to Basket 1
- 3 in (7.6 cm) free between the baskets
- 1.5 in (3.8 cm) sewn to Basket 2
Border (Rolled Plum Rim)
The rim is worked directly onto Rnd 10 of the walls, so each basket gets its own rim.
Border gauge: 14 sc = 4 in (10.2 cm), the same as the base.
Rnd 1: Join plum with a sl st in the first st after any corner. Ch 1, sc in each st around, join. (84 sts, 21 per side)
Rnd 2: Ch 1, sc in each st around, join. (84 sts, 21 per side)
Rnd 3: Ch 1, rev sc in each st around, join. (84 sts, 21 per side)
Fasten off and weave in the ends.
Why the math works: The walls are vertical, so the rim needs no corner increases. Every stage has the same 84 sts: base Rnd 11, every wall round and every rim round. At 14 sts per 4 in (10.2 cm), 21 sts per side gives exactly 6 in (15.2 cm), so the rim and base match. The rev sc round rolls slightly outward, which gives the rim its plump, braided look.
Joining
In this step you attach the straps to the ring and sew them to the baskets.
1. Attach the ring. Fold the first 3.5 in (8.9 cm) of one strap around the wooden ring so the end lies against the strap’s wrong side. Whipstitch the end down across all 5 rows, then sew along both long edges of the doubled section. Repeat with the second strap, placing it right next to the first on the ring.
2. Position Basket 1. On each side wall, count the 21 sts and mark sts 9–13. These are the center 5 sts, which match the strap’s 5-row width. Measure 7 in (17.8 cm) down each strap from the ring and pin that point to the top of the rim. Then pin the strap flat down the wall over sts 9–13 to the base fold, a length of 5 in (12.7 cm).
3. Sew Basket 1. Use the strap tail to whipstitch both long edges of the strap to the wall. Each time, go through 1 strap edge stitch and the wall stitch next to it. Space the stitches about every 2 strap stitches, which works out to roughly 3 strap stitches for every 2 wall rounds.
4. Position and sew Basket 2. Leave 3 in (7.6 cm) of strap free below Basket 1. Pin the last 1.5 in (3.8 cm) of the strap to the outside of Basket 2’s side wall, centered over sts 9–13 and starting at the top of the rim. Whipstitch all edges.
Tension: Sew firmly, but don’t pucker the wall. The waffle under the strap should stay flat. If you pull too hard, the wall will dimple inward.
Size checkpoint: Hang the organizer from a hook. It should measure about 22 in (55.9 cm) from the top of the ring to the bottom of Basket 2, with both baskets hanging level. If one side sags, check that both straps have exactly 7 in (17.8 cm) free above Basket 1 and 3 in (7.6 cm) between the baskets.
Final Blocking
- Fill each basket with a box or folded towel about 6 in (15.2 cm) square so the walls stand straight.
- Mist the walls and rim with water until they’re damp but not soaked.
- Shape the corners round with your hands and press the rim so it rolls evenly outward.
- Lay the straps flat and pin them straight at 1.4 in (3.6 cm) wide.
- Let everything dry completely, usually about 24 hours.
- Remove the forms and check your measurements.
Final Quality-Control Checklist
- Both bases measure 6 in (15.2 cm) square, with 84 sts.
- The corners are softly rounded, not pointed.
- The walls stand straight at about 4.3 in (10.9 cm) before the rim.
- The waffle grid lines up vertically, with 7 repeats per side.
- Each rim has 84 sts and a smooth rolled edge.
- Both straps measure 20 in (50.8 cm).
- The straps are centered over sts 9–13 on each side.
- The baskets hang level, with a 3 in (7.6 cm) gap between them.
- All tails are woven in on the inside.
Troubleshooting
Walls flare outward: Your dc stitches are too loose. Go down one hook size for the wall rounds only.
Walls lean inward: Your FPdc stitches are too tight. Pull up a slightly taller loop around each post.
Waffle grid spirals: A round probably started in the wrong place. Always begin right after a corner, and check that each round has 28 repeats.
Base cups: Your corner stitches are too tight. Work the 3-sc corners more loosely.
Basket tilts when hung: The straps aren’t placed evenly. Measure again and re-pin before you sew.
Rim looks flat: Work the rev sc a little more loosely so each stitch can twist into a cord.
Care
Hand wash in cool water with mild soap, gently reshape, and dry over a form. Don’t tumble dry, because it can flatten the waffle texture.

Final Notes
Every measurement in this pattern builds on the one before it. The 11-round cream base finishes at 84 sts and 6 in (15.2 cm) per side. The walls keep those 84 sts for 10 rounds and reach about 4.3 in (10.9 cm). The plum rim adds 0.7 in (1.8 cm), for a finished height of 5 in (12.7 cm). The 20 in (50.8 cm) straps bring the hanging organizer to about 22 in (55.9 cm) overall. If your first base measures correctly, everything else will follow.
Happy crocheting!