

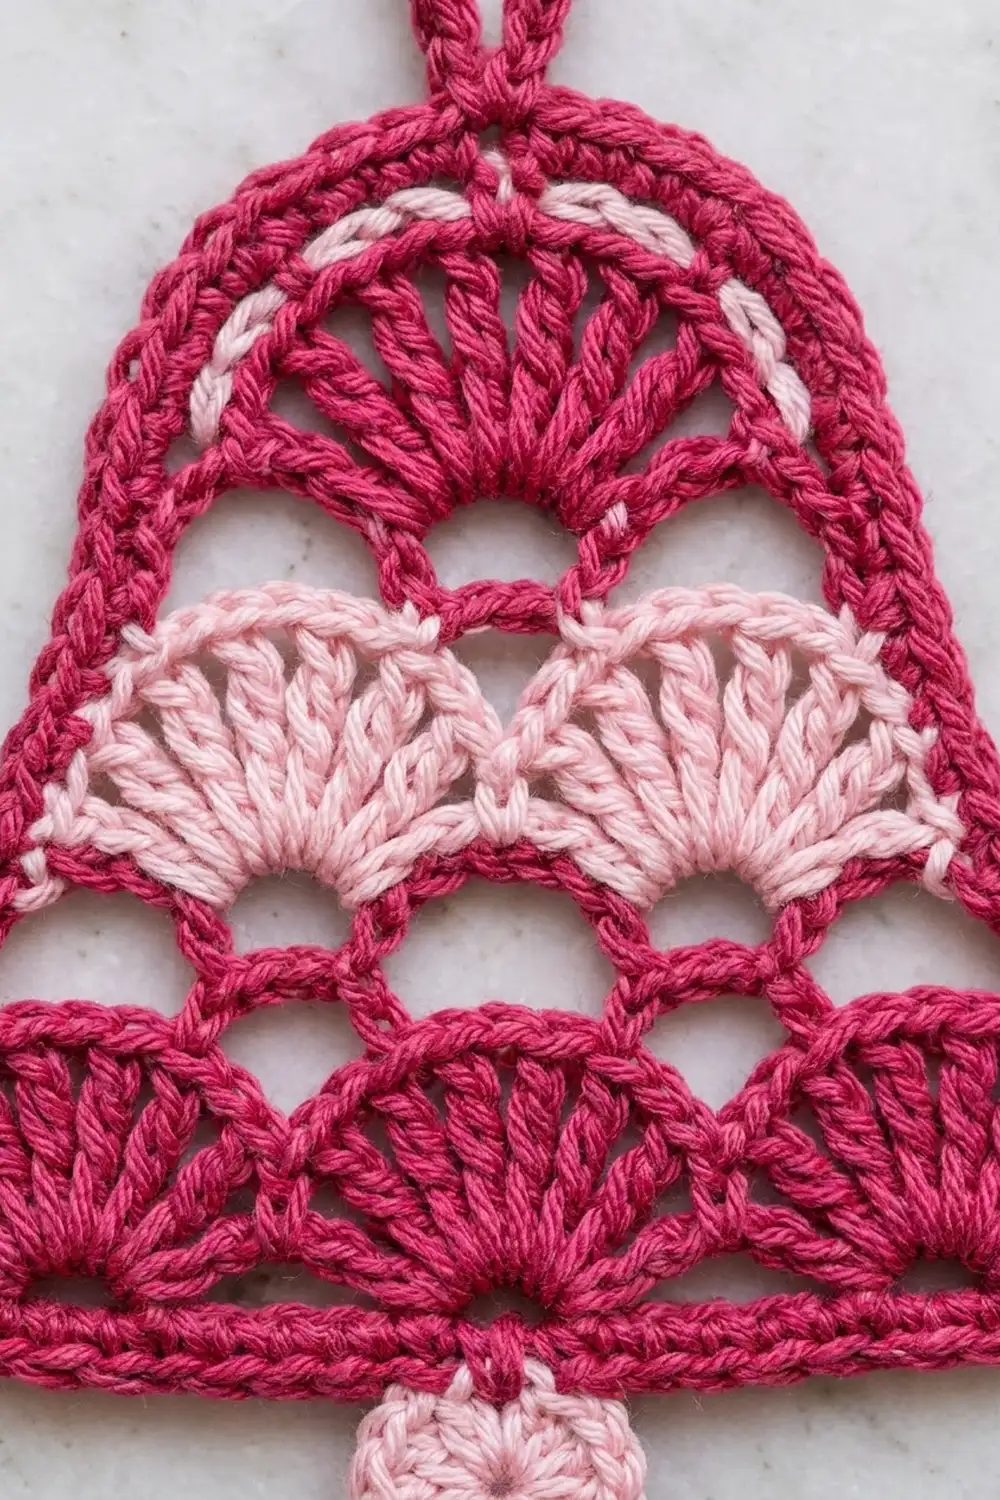
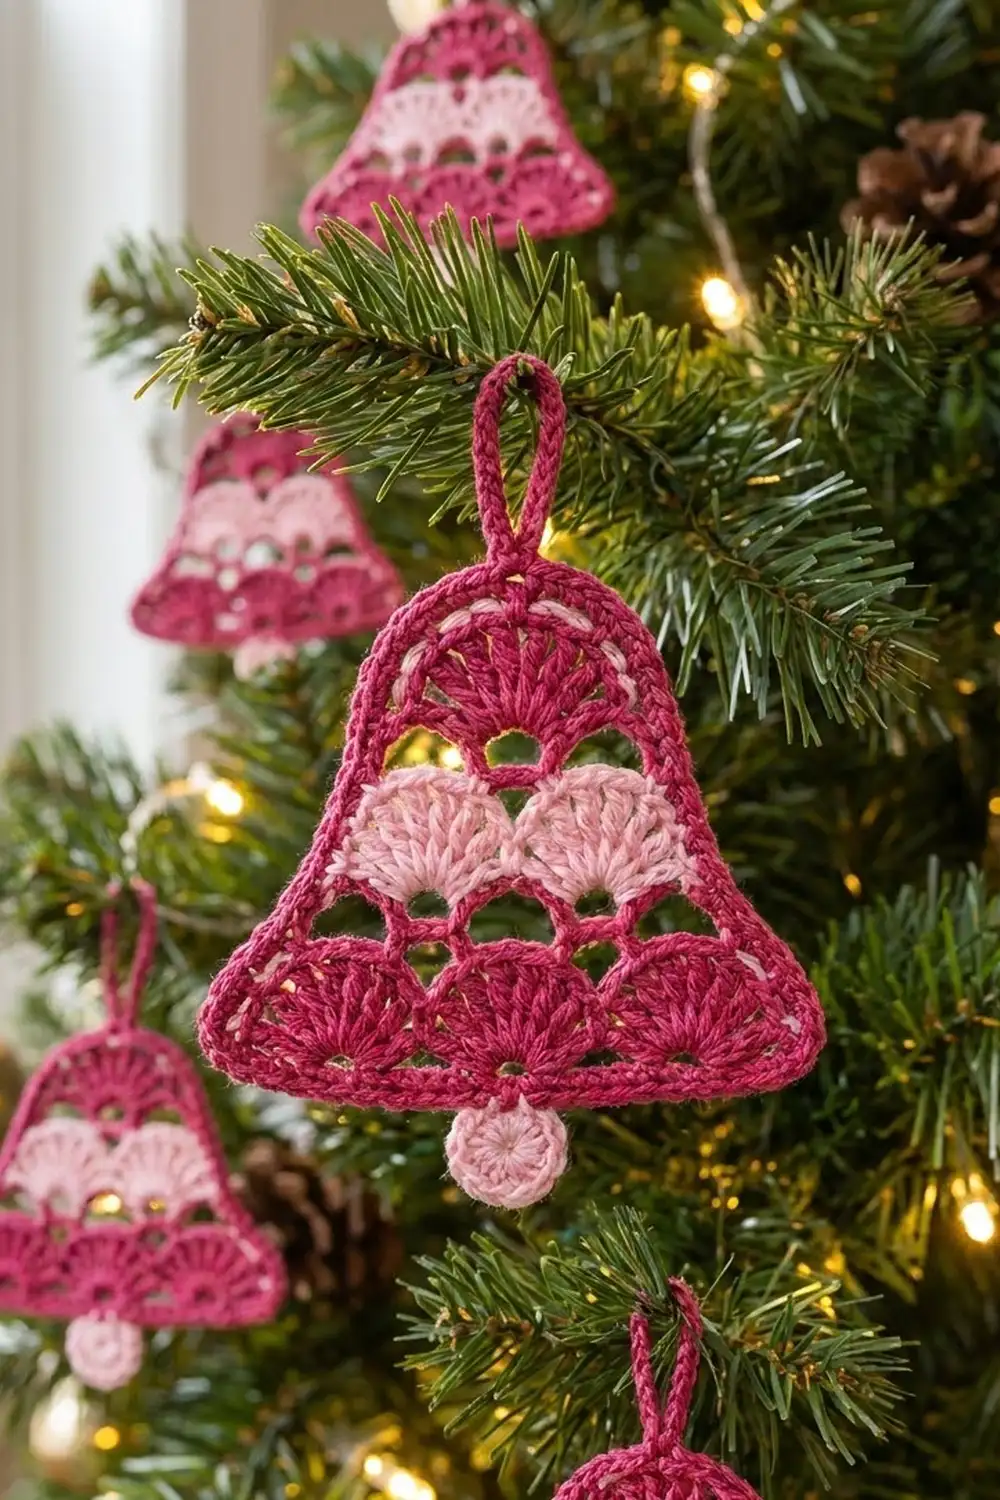
This little bell has a lacy, open look. It’s made from tiers of fan shells, with round windows between them that let the tree lights shine through. Raspberry pink frames the bell and fills the bottom and top tiers. A band of pale pink shells runs through the middle, and a tiny pale pink clapper hangs at the bottom.
The style is classic and cottage-sweet. A dashed line of pale pink stitching follows the inside of the border, so the bell looks outlined, like an iced sugar cookie. A thick crocheted loop at the top lets you hang it straight from a branch, a gift bag or a window latch.
The finished bell is 5.2 in (13.2 cm) wide and 4.5 in (11.4 cm) tall, not counting the loop and clapper. All terms are US crochet terms.
You work the bell in six flat rows, starting with the wide bottom and narrowing toward the top. Two rounds of single crochet border smooth the stepped sides into a bell outline. Last, you add the hanging loop, the accent stitching and the clapper.
Finished Size and Construction
- Finished size: 5.2 in (13.2 cm) wide x 4.5 in (11.4 cm) tall
- Total height with loop and clapper: about 6.8 in (17.3 cm)
- Skill level: Easy-intermediate
- Terminology: US
- Yarn weight: DK (light #3), cotton
- Hook: 3.5 mm (E-4)
- Number of pieces: 1 bell body + 1 small clapper
- Layout: Single ornament, no joining
- Bell body before border: 4.2 in (10.7 cm) wide x 3.5 in (8.9 cm) tall
- Border depth: 0.5 in (1.3 cm) on each edge (2 rounds)
- Clapper: 1 in (2.5 cm) across
Materials
Pick a smooth, mercerized or combed cotton DK. Cotton keeps the fans crisp and the windows open, and it blocks flat. Acrylic works too, but the windows will close up a little and the bell may need firmer blocking. The amounts below are for a yarn with about 120 m per 50 g.
- Raspberry pink (Color A): 10 g, about 24 m. This covers Rows 1–3, 5–6, the border and the loop.
- Pale pink (Color B): 4 g, about 10 m. This covers Row 4, the clapper and the accent stitching.
Both amounts include a margin of about 20% for gauge testing and weaving in ends.
Tools:
– 3.5 mm (E-4) crochet hook
– Tapestry needle
– Scissors
– 2 stitch markers
– Rustproof pins and a blocking mat or folded towel
– Spray bottle with water
– Ruler or tape measure
Abbreviations (US Terms)
- ch – chain
- sl st – slip stitch
- sc – single crochet
- dc – double crochet
- sk – skip
- sp – space
- st(s) – stitch(es)
- RS / WS – right side / wrong side
Special stitch – Shell: Work 7 dc in the same stitch or space. The 4th dc is the center of the shell.
Gauge and Checkpoints
Gauge: about 6 sc = 1 in (2.5 cm) with a 3.5 mm hook. Ornaments don’t need perfect gauge, but the size checkpoints only work if you’re close.
Make one bell all the way through before you start a batch. Check these measurements as you go:
- Row 1 (25 sc): 4.2 in (10.7 cm) wide
- After Row 2: body is 1 in (2.5 cm) tall
- After Row 4: body is 2.3 in (5.8 cm) tall
- After Row 6: body is 3.5 in (8.9 cm) tall and 4.2 in (10.7 cm) wide at the base
- After Border Rnd 1: 4.7 in (11.9 cm) wide x 4 in (10.2 cm) tall
- After Border Rnd 2: 5.2 in (13.2 cm) wide x 4.5 in (11.4 cm) tall
Too big? Go down to a 3.25 mm hook and try again. Too small? Go up to a 3.75 mm hook. If only the shells look tight or cupped, keep the same hook and pull up the dc loops slightly taller. If only the border ruffles, see Troubleshooting.
Bell Body
Every row is worked flat. In the stitch counts, each shell counts as 7 stitches and each sc counts as 1 stitch. Chain spaces are listed separately and are not counted as stitches.
Foundation (Color A): Ch 26.
Row 1 (Color A): Sc in 2nd ch from hook and in each ch across. Turn. (25 sc)
Row 2 (Color A): Ch 3 (counts as dc). Sk 3 sts, shell in next st, sk 3 sts, sc in next st. Repeat from * to * once more. Then sk 3 sts, shell in next st, sk 3 sts, dc in last st. Turn.
(25 sts: 3 shells (21 dc) + 2 sc + 2 edge dc)
The shells go into the 5th, 13th and 21st sts, and the sc’s go into the 9th and 17th sts. This uses all 25 sts of Row 1 exactly.
Row 3 (Color A): Ch 1, sc in first dc. Ch 3, sc in center dc of first shell. Ch 5, sc in center dc of next shell. Ch 5, sc in center dc of last shell. Ch 3, sc in 3rd ch of turning ch. Fasten off.
(5 sc, 2 ch-3 sps, 2 ch-5 sps)
Each ch-5 arch crosses the low point between two bottom shells. These arches make the round windows. The ch-3 sps at the ends become the small openings at the sides.
Row 4 (Color B): With RS facing, join Color B with sc in the 2nd sc of Row 3 (the sc on the first shell’s center). Shell in next ch-5 sp, sc in next sc, shell in next ch-5 sp, sc in next sc. Leave the last ch-3 sp and end sc unworked. Fasten off.
(17 sts: 2 shells (14 dc) + 3 sc)
The two pale pink shells are centered over the gaps between the three raspberry shells below. To keep the color change neat, leave 4 in (10.2 cm) tails and weave them into the raspberry stitches of the same color so they don’t show.
Row 5 (Color A): With RS facing, join Color A with sc in the first sc of Row 4. Ch 2, sc in center dc of first shell. Ch 5, sc in center dc of next shell. Ch 2, sc in last sc. Turn.
(4 sc, 2 ch-2 sps, 1 ch-5 sp)
Row 6 (Color A): Ch 1, sc in first sc, 2 sc in ch-2 sp, sc in next sc, shell in ch-5 sp, sc in next sc, 2 sc in ch-2 sp, sc in last sc. Do not fasten off.
(15 sts: 1 shell (7 dc) + 8 sc)
The top fan is centered over the window between the two pink shells. The 4 sc on each side of it form the shoulders that give the bell its narrow, rounded crown.
Border
The border is 2 rounds of sc in Color A. Its gauge is the same as the body: about 6 sc = 1 in (2.5 cm). Each round adds about 0.25 in (0.6 cm) to every edge.
For counting, the corner sts belong to the top and bottom edges. The side counts are only the sts between the corners.
Border Rnd 1: Ch 1 and turn, so you are working back across the top of Row 6.
- Top: 2 sc in first st, sc in next 13 sts, 2 sc in last st. (15 worked 1 per st + 2 extra = 17 sc)
- First side: Working down the side edge: sc in end of Row 5, sc in end of Row 4, 4 sc in ch-3 sp of Row 3, sc in end of Row 3, 2 sc around the edge dc post of Row 2, sc in end of Row 1. (10 sc)
- Bottom: 3 sc in the free loop of the first foundation ch, sc in each of the next 23 free loops, 3 sc in the last free loop. (25 worked 1 per loop + 4 extra = 29 sc)
- Second side: Mirror the first side as you work up: sc in end of Row 1, 2 sc around the edge dc post of Row 2, sc in end of Row 3, 4 sc in ch-3 sp, sc in end of Row 4, sc in end of Row 5. (10 sc)
- Join with sl st to first sc.
Rnd 1 total: 17 + 10 + 29 + 10 = 66 sc
Border Rnd 2: Ch 1. Place a marker in the center sc of each 3-sc bottom corner.
- Top: 2 sc in first st, sc in next 15 sts, 2 sc in last st. (17 worked 1 per st + 2 extra = 19 sc)
- Side: Sc in each of the 10 side sts. (10 sc)
- Bottom: Sc in each st up to the marker, 3 sc in the marked st, sc in each st up to the next marker, 3 sc in the marked st, sc in the last st. (29 worked 1 per st + 4 extra = 33 sc)
- Side: Sc in each of the 10 side sts. (10 sc)
- Join with sl st to first sc.
Rnd 2 total: 19 + 10 + 33 + 10 = 72 sc
Why the math works: The bottom has 25 foundation loops, matching Row 1’s 25 sc. In both rounds, 2 extra sts at each bottom corner keep the corners square without cupping. The sides follow the steps of the rows. The 4 sc in each ch-3 sp fill the outward step at Row 3, and that step creates the bell’s flare. The top gets only 1 extra st at each corner, so it stays gently rounded. Rnd 2 adds 6 sts (66 + 6 = 72), which is just enough for one more sc round to lie flat around the outside.
Hanging Loop: Find the 10th sc of the 19 top sts (the center) and join with a sl st. Ch 20, sl st in the same st. Ch 1, work 26 sc into the ch-20 loop, then sl st into the base st. Fasten off. The loop stands about 1.5 in (3.8 cm) tall. Working the sc over the chain makes the loop thick and strong.
Accent Stitching (Color B): Thread about 20 in (50.8 cm) of Color B onto a tapestry needle. Starting at one bottom corner, work a running stitch through Border Rnd 1, going over 2 sts and under 1 st. Go up the side, across the top and down the other side. Leave the bottom edge plain. Keep the stitches relaxed so the border doesn’t pucker, then weave the ends in on the WS.
Clapper
Rnd 1 (Color B): Make a magic ring. Ch 3 (counts as dc), work 11 dc in the ring. Pull the ring closed and join with a sl st to the top of the ch-3. Leave a 6 in (15.2 cm) tail. (12 dc)
The clapper is 1 in (2.5 cm) across. Line it up with the 17th sc of the 33 bottom sts. Tuck 0.25 in (0.6 cm) of its top edge behind the border, so 0.75 in (1.9 cm) hangs below the bell. Sew it on through 2 dc.
Final Blocking
- Weave in all ends along the border or through the backs of the shells. Never run them across the windows.
- Spray the bell lightly so it’s damp, not soaked.
- Lay it flat on the mat, RS up.
- Pin the bottom edge straight to 5.2 in (13.2 cm).
- Pin the height to 4.5 in (11.4 cm), with the crown centered over the bottom edge.
- Ease each fan into an even half circle and open each window with a fingertip.
- Pin the clapper flat and the loop straight up.
- Let it dry completely, about 6–8 hours.
Final Quality-Control Checklist
- Row 1 has 25 sc, and Row 2 has 3 complete 7-dc shells.
- The pale pink shells are centered over the raspberry gaps below them.
- One raspberry fan sits at the top, centered.
- Border Rnd 1 has 66 sc and Border Rnd 2 has 72 sc.
- Both sides have exactly 10 sc and match in shape.
- The bell measures 5.2 in (13.2 cm) wide and 4.5 in (11.4 cm) tall.
- The loop is centered and stands about 1.5 in (3.8 cm) tall.
- The clapper is centered and hangs 0.75 in (1.9 cm) below the bell.
- The accent dashes are even and lie flat.
- All ends are hidden from the front.
Troubleshooting
The bottom edge curls up: The foundation chain is too tight. Chain with a hook one size larger, then switch back for Row 1.
The shells cup or ruffle: Your dc is too tall or too short for the ch-5 arch. Adjust your dc height, or work the arches as ch 6 if the shells are crowded.
The windows look squished: Your arches are too tight. Relax the chains so each one curves slightly upward before you work into it.
The sides look jagged: Check that you worked all 4 sc into each ch-3 sp. Spread them evenly and block firmly.
The border waves: Count the sts on each side of Rnd 1. More than 10 sc per side will make the edge flute. If the counts are right, use a hook one size smaller for the border.
The border pulls in: Check that you added the 2 extra sts at each bottom corner in both rounds.
The loop twists: Space the 26 sc evenly and pin the loop straight while blocking.
Care
Hand wash in cool water with mild soap, roll in a towel to remove the water, and dry flat. Between holidays, store the bell flat or hang it by its loop so the fans keep their shape.
Final Notes
Here is how the measurements build on each other. Twenty-five sc make a 4.2 in (10.7 cm) base. Six rows of fans and arches make a body 3.5 in (8.9 cm) tall. Two border rounds add 0.5 in (1.3 cm) to every edge, for a finished bell of 5.2 in (13.2 cm) x 4.5 in (11.4 cm). If your Row 1 measures correctly, the rest of the bell will come out to size. Once your first bell checks out, you can make a whole tree’s worth in an evening or two.
Happy crocheting!