
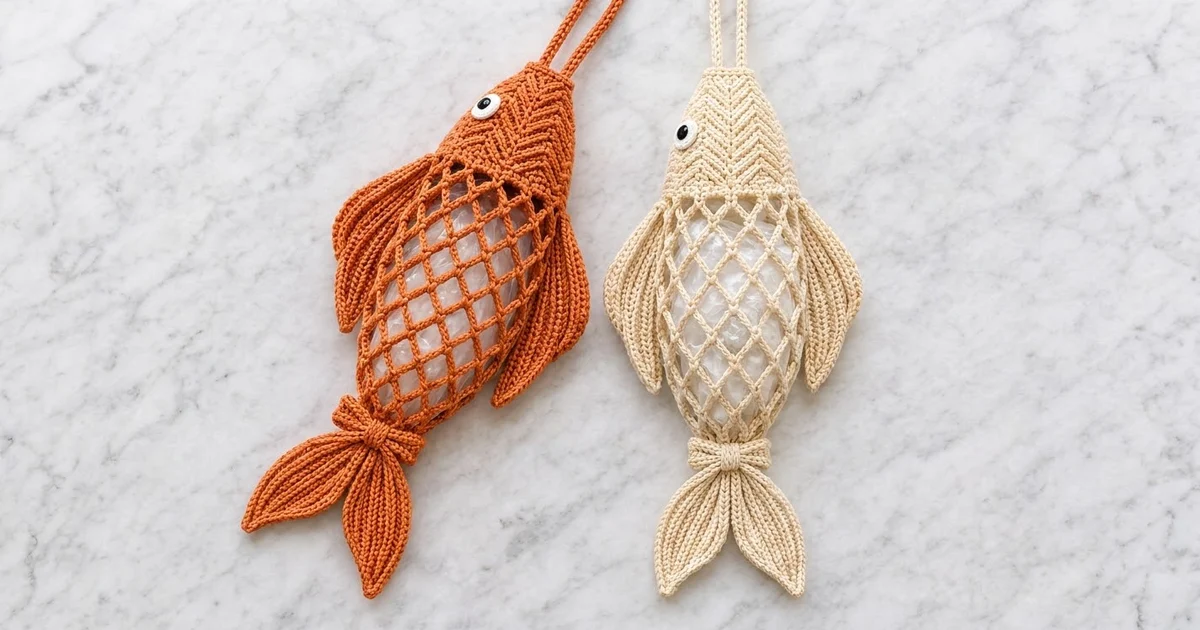
The Koi Catch is a hanging plastic bag holder shaped like a plump fish. A solid, knit-look head sits on top of a wide diamond mesh belly, which narrows into a ribbed cuff. A bow-tied tail hangs below the cuff, two leaf-shaped fins sit on the sides, and a round eye finishes the face. Push bags in at the top and pull them out at the tail.
The sample is worked in warm terracotta orange, and the same pattern works well in cream. The eye is white with a black center. Through the mesh you can see the bags stored inside, so the holder is useful and decorative at once.
This pattern uses US crochet terms. The finished body is 17.5″ (44.5 cm) long and 6.5″ (16.5 cm) wide at the belly when flat. With the tail attached, the holder is about 21″ (53.3 cm) long, not counting the hanging cords.
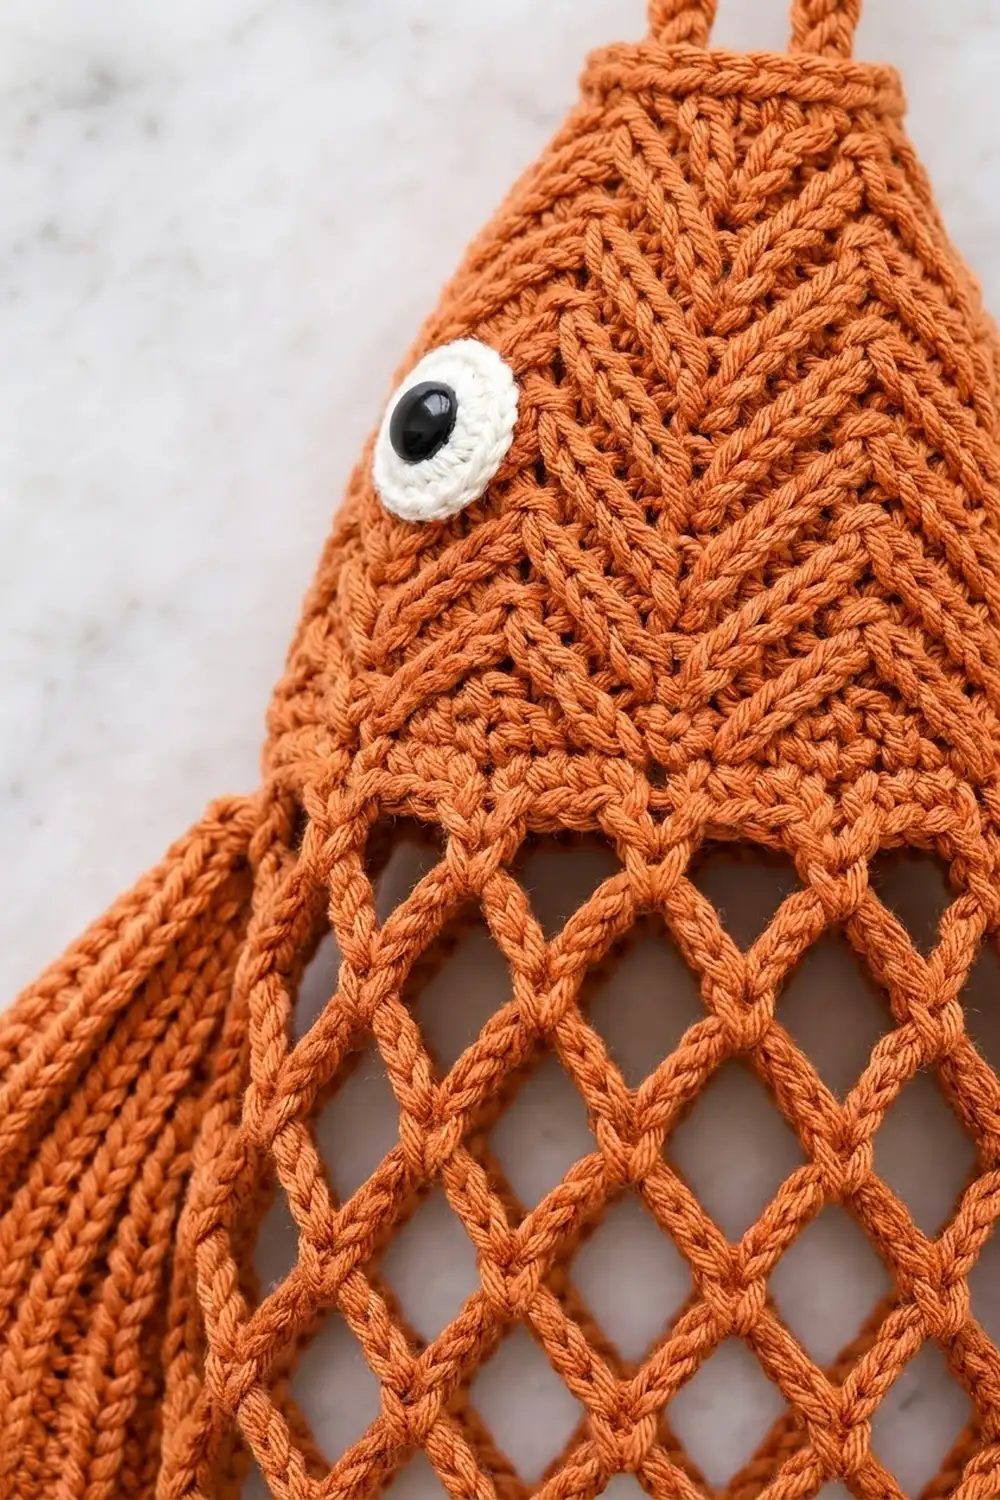
The body is one tube worked top-down in joined rounds: a waistcoat-stitch head, chain-loop mesh rounds, a conversion round, and a post-stitch rib cuff. You then make the fins, tail lobes, bow, cords, and eye separately and sew them on.
Finished Size and Construction
- Finished size: 17.5″ (44.5 cm) body; 21″ (53.3 cm) including tail; 6.5″ (16.5 cm) wide at the belly
- Skill level: Intermediate
- Terminology: US
- Yarn weight: Worsted (#4) cotton
- Hook: 5.0 mm (H-8)
- Number of pieces: 10 (body, 2 fins, 2 tail lobes, bow strip, bow band, 2 cords, eye)
- Layout: One vertical tube with the pieces sewn on; this is a single assembled holder, not a set of joined motifs
- Piece size: Fin 6″ (15.2 cm); tail lobe 4.5″ (11.4 cm); bow 3.5″ (8.9 cm) wide
- Size before border: Top opening 4″ (10.2 cm) flat
- Border depth: 0.5″ (1.3 cm) at the top opening
Materials
Choose a smooth, firm cotton or cotton blend. Cotton holds the mesh open and doesn’t stretch out when the holder is full. Avoid fuzzy yarn because it hides the stitch texture.
- Main color (terracotta orange or cream): 150 g / 270 m
- White: 5 g / 9 m (eye)
- Black: 2 g / 4 m (eye center)
Tools: 5.0 mm (H-8) hook, tapestry needle, 6 locking stitch markers, scissors, measuring tape, rust-proof pins, and a blocking mat.
The quantities include a margin of about 15% for your gauge swatch and seams.
Abbreviations (US Terms)
- ch – chain
- sl st – slip stitch
- sc – single crochet
- hdc – half double crochet
- dc – double crochet
- sc2tog – single crochet 2 together
- FPdc / BPdc – front post / back post double crochet
- BLO – back loop only
- MR – magic ring
- sp – space
- st(s) – stitch(es)
Waistcoat stitch (ws): Insert the hook between the two vertical legs of the next stitch, under the horizontal bars and through to the back. Yarn over, pull up a loop, then yarn over and pull through both loops. The stacked stitches form knit-look V columns that read as a herringbone chevron. To increase, work 2 ws in the same stitch.
Gauge and Checkpoints
Gauge: 16 ws and 16 rounds = 4″ (10.2 cm). In sc worked flat, 4 sts = 1″ (2.5 cm).
Before you start the full holder, test the head by working Rounds 1–9. If the gauge is off, the mesh and cuff will be off too.
- After Round 1: The ring measures 4″ (10.2 cm) when laid flat.
- After Round 18: The head measures 6″ (15.2 cm) flat and 4.5″ (11.4 cm) tall.
- After Round 31: The body measures 14.5″ (36.8 cm) from the foundation edge, and the mesh is 6.5″ (16.5 cm) wide when gently opened.
- After Round 39: The cuff is 2″ (5.1 cm) wide and 2″ (5.1 cm) long.
If your piece is too big: Go down 0.5 mm in hook size. If it’s too small: Go up 0.5 mm. Waistcoat stitch usually comes out tight, so keep your loops relaxed.
Body
Work in joined rounds. Don’t turn. Place a marker in the first stitch of each round.
Head
Round 1: Ch 32. Join with a sl st to the first ch, taking care not to twist the chain. Ch 1, then sc in each ch around. Join. (32 sts)
Round 2: Ch 1, ws in each st around. Join. (32 sts)
Round 3: Ch 1, ws in next 7 sts, 2 ws in next st; repeat from * 4 times. Join. (36 sts)
Round 4: Ch 1, ws in each st. Join. (36 sts)
Round 5: Ch 1, ws in next 8 sts, 2 ws in next st; repeat from * 4 times. Join. (40 sts)
Round 6: Ch 1, ws in each st. Join. (40 sts)
Round 7: Ch 1, ws in next 9 sts, 2 ws in next st; repeat from * 4 times. Join. (44 sts)
Round 8: Ch 1, ws in each st. Join. (44 sts)
Round 9: Ch 1, ws in next 10 sts, 2 ws in next st; repeat from * 4 times. Join. (48 sts)
Rounds 10–18: Ch 1, ws in each st. Join. (48 sts)
Mesh
Round 19: Ch 1, sc in first st, ch 5, skip 3 sts, sc in next st; repeat from * 10 more times. Ch 5, skip 3 sts, and join to the first sc. (12 sc, 12 ch-5 loops; 12 × 4 = 48 sts used)
Round 20: Sl st to the center of the first loop. Ch 1, then sc in the same loop. Ch 5, sc in next loop; repeat from * 10 times. Ch 5 and join. (12 loops)
Rounds 21–22: Repeat Round 20. (12 loops)
Rounds 23–26: Work as Round 20, but ch 6 for every loop. (12 ch-6 loops) This is the widest part of the belly.
Rounds 27–28: Work as Round 20 with ch-5 loops. (12 loops)
Rounds 29–30: Work as Round 20 with ch-4 loops. (12 loops)
Round 31: Work as Round 20 with ch-3 loops. (12 loops)
The diamonds get shorter as the chains shorten. The loop count stays at 12, so the taper is smooth and has no puckers.
Conversion and Cuff
Round 32 (conversion): Ch 1. Sc in the same st as the join, then sc in the next ch-3 sp. Sc in next sc, sc in next ch-3 sp; repeat from * 11 times. Join. (12 sc worked 1-per-sc + 12 sc added in spaces = 24 sts)
Round 33: Ch 1, sc in next st, sc2tog; repeat from * 8 times. Join. (16 sts)
Round 34: Ch 2 (doesn’t count as a st), dc in each st. Join. (16 sts)
Rounds 35–39: Ch 2, FPdc in next st, BPdc in next st; repeat from * 8 times. Join. (16 sts)
Fasten off. The cuff is the dispensing opening, so leave it open.
Fins (Make 2)
The fins are worked lengthwise in BLO, which creates raised ridges along their length.
Foundation: Ch 23.
Row 1: Starting in the 2nd ch from the hook, sl st in next 2 ch, sc in next 4, hdc in next 5, dc in next 6, hdc in next 3, sc in next 2. (22 sts)
Row 2: Ch 1 and turn. Working in BLO: sc in next 2, hdc in next 3, dc in next 6, hdc in next 5, sc in next 4, sl st in last 2. (22 sts)
Rows 3–4: Repeat Rows 1 and 2, in BLO. (22 sts)
Round 5 (edging): Ch 1. Sc in first 21 sts of Row 4, then 3 sc in the tip st. Sc in 21 ch along the foundation side, then 4 sc across the row-ends at the base. Join. (49 sts) Fasten off and leave a 12″ (30.5 cm) tail for sewing. Each fin measures 6″ (15.2 cm) long and 2.25″ (5.7 cm) wide.
Tail Lobes (Make 2)
Foundation: Ch 17.
Row 1: Starting in the 2nd ch from the hook, sl st in next 2 ch, sc in next 3, hdc in next 4, dc in next 5, hdc in next 2. (16 sts)
Row 2: Ch 1 and turn. In BLO: hdc in next 2, dc in next 5, hdc in next 4, sc in next 3, sl st in last 2. (16 sts)
Rows 3–4: Repeat Rows 1 and 2. (16 sts)
Round 5 (edging): Ch 1. Sc in 15 sts, 3 sc in the tip st, sc in 15 foundation ch, then 4 sc across the base. Join. (37 sts) Each lobe measures 4.5″ (11.4 cm) long and 2.25″ (5.7 cm) wide.
Bow, Cords, and Eye
Bow strip: Ch 29. Row 1: Sc in the 2nd ch from the hook and in each ch across. (28 sts) Rows 2–4: Ch 1, turn, sc in BLO across. (28 sts) The strip measures 7″ (17.8 cm) by 1″ (2.5 cm). Fold both ends to the center, overlapping them by 0.5″ (1.3 cm), and stitch them down. The bow is now 3.5″ (8.9 cm) wide.
Bow band: Ch 9. Row 1: Sc in the 2nd ch from the hook and across. (8 sts) Rows 2–3: Ch 1, turn, sc across. (8 sts) Wrap the band around the bow’s center, pull it snug, and sew the short ends together at the back.
Cords (make 2): Ch 36. Sl st in the back bump of the 2nd ch from the hook and in each ch across. (35 sts) Each cord measures 8″ (20.3 cm).
Eye: With black, Round 1: 6 sc in a MR. (6) Change to white. Round 2: 2 sc in each st. (12) Round 3: sc in next st, 2 sc in next st; repeat 6 times. (18) Join and fasten off. The eye is 1.25″ (3.2 cm) across.
Make All Pieces
You need these pieces for one holder, all in the main color unless noted:
- Body ×1, fins ×2, tail lobes ×2, bow strip ×1, bow band ×1, cords ×2
- Eye ×1 (black center with white outer rounds)
Assembly layout, top to bottom:
        [cord][cord]
     [ head  + eye  ]
[fin][   mesh belly ][fin]
        [ rib cuff ]
          [ bow ]
     [lobe]     [lobe]
Assembly
Use whipstitch with the main color. Work stitch to stitch: pick up one stitch on the piece and one stitch on the body for each pass, so the seams stay flat.
- Flatten the body so that the Round 1 join sits at one side fold. Mark the center front and center back.
- Fins: Line up the 4-st base edge of each fin with 4 sts of Round 18 at a side fold. Sew across those 4 sts. Then tack the fin’s edge to the first mesh loop below so it angles outward.
- Eye: Center the eye on the front of Rounds 6–9, 1″ (2.5 cm) in from the side fold. Sew around Round 3.
- Tail: Sew the 4-st base of each lobe to the front of the cuff at Round 39, one lobe to the left and one to the right of center, with the lobes angled outward. Don’t close the opening.
- Bow: Center the bow over Rounds 34–36 of the cuff, covering the lobe bases. Stitch it through the band only.
- Cords: Sew one cord end inside the top edge at center front and the other at center back. Overlap the free ends by 0.5″ (1.3 cm) and stitch them together.
Tension: Draw each stitch until it is snug but not tight. A tight seam will pucker the mesh. Size checkpoint: The assembled holder measures 21″ (53.3 cm) from the top edge to the lobe tips.
Border
The border goes around the top opening. Gauge is 4 sc = 1″ (2.5 cm). For this tube, a “side” means the front half or the back half when the tube is laid flat.
Border Round 1: Join the yarn at the Round 1 join. Working into the remaining loops of the foundation chain, ch 1, sc in each ch around. Join. (32 sts: 16 front + 16 back)
Border Round 2: Ch 1, sc in each st. Join. (32 sts: 16 per side)
Why the math works: The foundation has 32 ch, and the border works exactly 1 sc into each one. At 4 sc per inch, 16 sts per side gives 4″ (10.2 cm), the same as the checkpoint for Round 1. The tube has no corners, so you add no extra stitches. The two rounds add 0.5″ (1.3 cm) of depth and keep the opening firm.
Final Blocking
- Weave in all ends along stitches of the same color.
- Spritz the holder with water until it is evenly damp.
- Stuff the body with a rolled towel so the mesh opens to 6.5″ (16.5 cm).
- Pin the fins and lobes flat to 6″ (15.2 cm) and 4.5″ (11.4 cm).
- Let everything dry completely before you remove the towel.
Final Quality-Control Checklist
- The head has 48 sts and measures 6″ (15.2 cm) flat
- There are 12 loops in every mesh round
- The cuff has 16 sts, and the opening is clear
- The fins sit level with each other
- The eye is secure and centered
- The cords take the weight of a full holder
Troubleshooting
- Head is cone-shaped and tight: Your ws loops are too short. Go up a hook size.
- Mesh spirals: You skipped or added a loop. Count to 12 each round.
- Cuff flares: Recheck Round 33. It should have 16 sts.
- Fins curl: Block them pinned flat, or loosen the edging round.
Care
Hand wash cold and reshape while damp. Lay flat to dry.

Final Notes
Everything follows one measurement chain. A 4″ (10.2 cm) top ring grows to a 6″ (15.2 cm) head, opens into a 6.5″ (16.5 cm) mesh belly, and narrows to a 2″ (5.1 cm) cuff. The border matches the foundation exactly at 16 sts per side. If you check each stage as you go, the holder will finish at 21″ (53.3 cm).
Happy crocheting!