
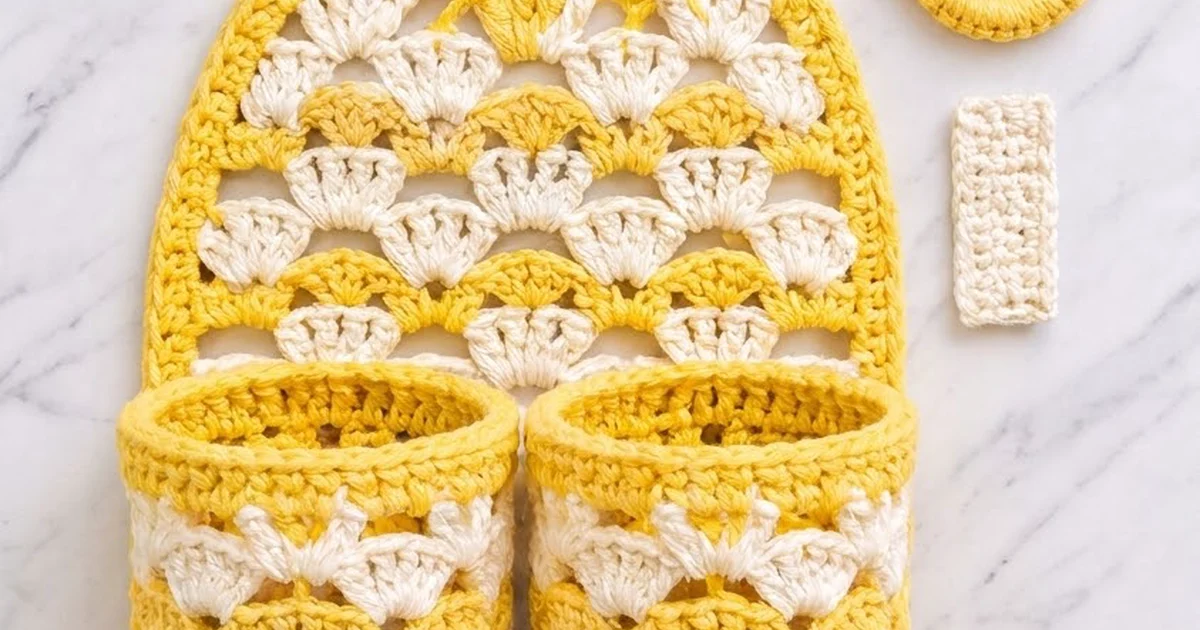
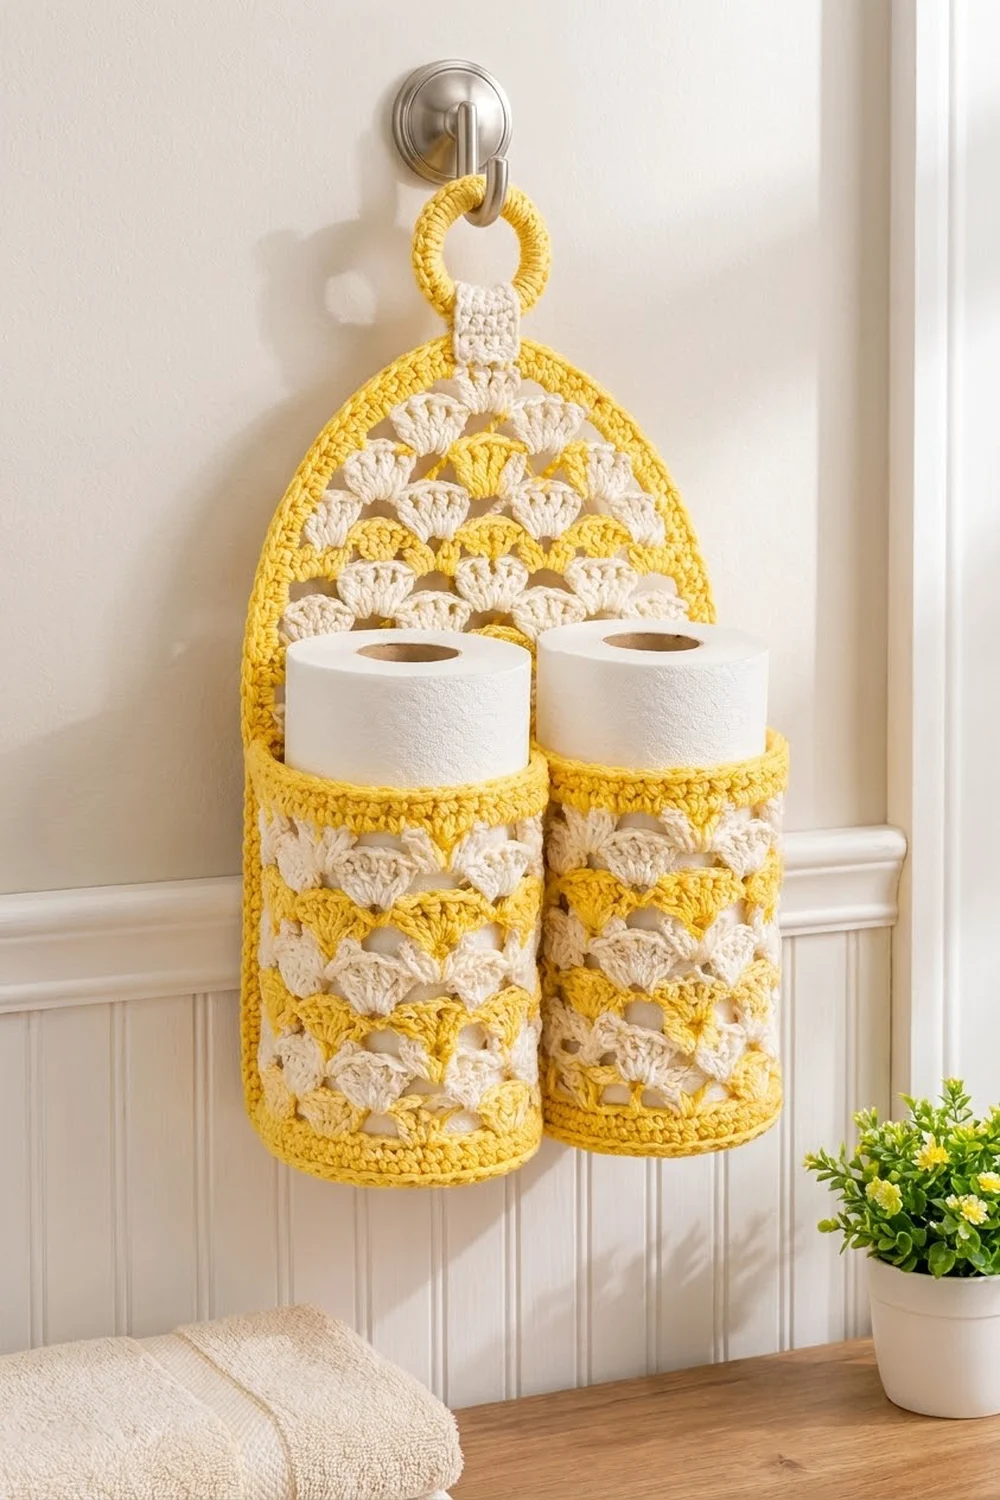
This cheerful holder hangs from a hook and keeps two spare rolls in view. It has an arched back panel and two round cups, all edged in butter yellow, with rows of cream and yellow shells that look like small fans.
The style is clean farmhouse with a vintage touch. The shells give the piece some texture, and the solid yellow bands keep the edges neat. It works well in a bright bathroom or a powder room with neutral towels.
The pattern uses US crochet terms. The holder measures 10.25 in (26.0 cm) wide and 13.6 in (34.3 cm) tall, not counting the ring. Each cup is 4.75 in (12.1 cm) across and 6 in (15.2 cm) tall.
You will crochet one flat panel from the bottom up and two cups worked in the round from a flat base. Then you make a small tab and cover a wooden ring with stitches. Finally, you sew the cups and the hanger onto the panel.
Finished Size and Construction
- Finished size: 10.25 in wide x 13.6 in tall (26.0 x 34.5 cm), plus the ring
- Skill level: Intermediate
- Terminology: US
- Yarn weight: Worsted (#4) cotton
- Hook: US H-8 (5.0 mm)
- Number of pieces: 5 (1 panel, 2 cups, 1 tab, 1 covered ring)
- Layout: two cups side by side across the bottom of the panel
- Cup size: 4.75 in (12.1 cm) diameter x 6 in (15.2 cm) tall
- Panel size before border: 9.25 x 12.6 in (23.5 x 32.0 cm)
- Border depth: 0.5 in (1.3 cm) on every side
Materials
Use a smooth, firm 100% cotton worsted yarn. Cotton holds its shape against the weight of the rolls and copes well with bathroom humidity. Avoid acrylic blends that stretch a lot, because the cups would sag.
- Yellow (main color): 200 g, about 308 m
- Cream (contrast color): 100 g, about 154 m
These amounts include a margin of about 15%.
Tools:
– US H-8 (5.0 mm) crochet hook
– One 2.5 in (6.4 cm) unfinished wooden ring
– Tapestry needle
– Stitch markers (at least 6)
– Scissors
– Rust-proof pins and a blocking mat
– Measuring tape
Abbreviations (US Terms)
- ch – chain
- sc – single crochet
- hdc – half double crochet
- dc – double crochet
- tr – treble crochet
- sl st – slip stitch
- st(s) – stitch(es)
- sk – skip
- BLO – back loop only
- MR – magic ring
- RS – right side
Special stitch – Shell: work 5 dc in the same stitch. The 3rd dc of a shell is its “center dc.”
Gauge and Checkpoints
Gauge in sc: 16 sts x 18 rows = 4 in (10.2 cm).
Gauge in shells: one shell repeat (6 sts) = 1.5 in (3.8 cm), and 2 shell rows = 1.1 in (2.8 cm).
Make one cup before you start the panel. It is a fast, practical gauge swatch.
Checkpoints:
– Base after Round 10: 4.75 in (12.1 cm) across
– Cup circumference: 15 in (38.1 cm)
– Cup height when finished: 6 in (15.2 cm)
– Panel after Row 27: 9.25 in (23.5 cm) wide x 6 in (15.2 cm) tall
– Panel after Shell Row 7: 9.85 in (25.0 cm) tall
– Panel after Shell Row 12: 12.6 in (32.0 cm) tall
If your cup is wider than 4.75 in (12.1 cm) by more than 0.25 in (0.6 cm), go down half a hook size. If a roll will not fit easily, go up half a hook size. Change the hook, not the stitch counts.
Cups (make 2)
Base
Use yellow. Join each round with a sl st to the first sc, then ch 1. The ch 1 does not count as a stitch.
- Round 1: 6 sc in MR. (6)
- Round 2: 2 sc in each st. (12)
- Round 3: sc in next st, 2 sc in next st 6 times. (18)
- Round 4: sc in next 2 sts, 2 sc in next st 6 times. (24)
- Round 5: sc in next 3 sts, 2 sc in next st 6 times. (30)
- Round 6: sc in next 4 sts, 2 sc in next st 6 times. (36)
- Round 7: sc in next 5 sts, 2 sc in next st 6 times. (42)
- Round 8: sc in next 6 sts, 2 sc in next st 6 times. (48)
- Round 9: sc in next 7 sts, 2 sc in next st 6 times. (54)
- Round 10: sc in next 8 sts, 2 sc in next st 6 times. (60)
Checkpoint: the base should be flat and 4.75 in (12.1 cm) across.
Bottom Band
- Round 11: sc BLO in each st. (60) The unused front loops form a crisp ridge where the wall turns upward.
- Rounds 12–14: sc in each st. (60)
Fasten off yellow.
Shell Rounds
Each round is a new color, so join the new color at the start of the round and fasten off at the end. You can weave in the tails as you go.
- Round 15 (cream): Join in any st with a sl st, ch 1, sc in the same st. Then sk 2, Shell in next st, sk 2, sc in next st 9 times, sk 2, Shell in next st, sk 2, and join to the first sc. (10 shells + 10 sc = 60 sts)
- Round 16 (yellow): Join in the center dc of any shell, ch 1, sc in the same st. Then Shell in next sc, sc in center dc of next shell 9 times, Shell in last sc, and join. (10 shells + 10 sc = 60 sts)
- Rounds 17–21: Repeat Round 16, changing color every round: cream, yellow, cream, yellow, cream. (60 sts each)
Every round places its shells on the sc of the round below, so the fans stagger like a brick pattern. You now have 7 shell rounds: 4 cream and 3 yellow.
Leveling Round and Top Band
- Round 22 (yellow): Join in the center dc of any shell, ch 1, sc in the same st. Then hdc in next dc, dc in next dc, tr in next sc, dc in next dc, hdc in next dc, sc in center dc of next shell around. Skip the final sc and join. (10 repeats of 6 sts = 60)
- Rounds 23–26: sc in each st. (60)
Fasten off and leave an 18 in (45.7 cm) tail for sewing.
Checkpoint: the cup is 6 in (15.2 cm) tall and a roll slides in easily.
Back Panel
Work the panel in turned rows, starting at the bottom. Ch 1 at the start of sc rows does not count as a stitch. Ch 3 at the start of a row does count as a dc.
Solid Section
With yellow, ch 38.
– Row 1: sc in 2nd ch from hook and in each ch across. (37)
– Rows 2–27: ch 1, turn, sc in each st. (37)
On the last stitch of Row 27, change to cream.
Checkpoint: 9.25 in (23.5 cm) wide x 6 in (15.2 cm) tall. The cups will cover this section.
Shell Section
- Shell Row 1 (cream, RS): ch 1, turn, sc in first st, sk 2, Shell in next st, sk 2, sc in next st 6 times. (6 shells + 7 sc = 37)
- Shell Row 2 (yellow): ch 3, turn, 2 dc in first sc for a half shell. Then sc in center dc of next shell, Shell in next sc 5 times, sc in center dc of last shell, 3 dc in last sc. (3 + 30 + 1 + 3 = 37)
- Shell Row 3 (cream): ch 1, turn, sc in first dc, Shell in next sc, sc in center dc of next shell 5 times, Shell in last sc, sc in top of turning ch. (37)
- Shell Rows 4–7: Repeat Rows 2 and 3 twice, alternating yellow and cream. Row 7 is cream with 6 full shells. (37)
Checkpoint: 9.85 in (25.0 cm) tall.
Arch Shaping
Each shaping row begins with sl sts and leaves 3 stitches unworked at each end. That moves the edge in 0.75 in (1.9 cm) per side on every row and creates the stepped dome.
- Shell Row 8 (yellow): Turn, sl st in first 3 sts, ch 1, sc in the same st (the center dc). Then Shell in next sc, sc in center dc of next shell 5 times. (5 shells, 31 sts)
- Shell Row 9 (cream): Turn, sl st in first 3 sts, ch 1, sc in the same st, Shell in next sc, sc in center dc of next shell 4 times. (4 shells, 25 sts)
- Shell Row 10 (yellow): Repeat the same steps with 3 shells. (19 sts)
- Shell Row 11 (cream): Repeat with 2 shells. (13 sts)
- Shell Row 12 (yellow): Repeat with 1 shell. (7 sts)
Fasten off. Checkpoint: 12.6 in (32.0 cm) tall.
Border
Border gauge: the 2 sc rounds measure 0.5 in (1.3 cm) deep and follow the sc gauge.
Round 1 (yellow, RS): Join at the bottom right corner (the first ch of the foundation), ch 1. Work the sides in this order:
- Bottom edge: 3 sc in the first ch, sc in the next 35 ch, 3 sc in the last ch. (41)
- First straight side: 1 sc in each end of Rows 2–27 (26), then 2 sc in each end of Shell Rows 1–7 (14). (40)
- First side of the arch, 5 steps: on each ledge of 3 unworked sts, work sc, hdc, dc. Then work 2 sc up the end of the next shaping row. (5 sts per step x 5 = 25)
- Top: sc in each of the 7 sts of Shell Row 12. (7)
- Second side of the arch, 5 steps: going down, work 2 sc in the end of the shaping row, then dc, hdc, sc across the ledge. (25)
- Second straight side: 40 sc, worked as on the first side.
Join. Total: 41 + 40 + 25 + 7 + 25 + 40 = 178 sts.
Round 2: ch 1, sc in each st. Work 3 sc in the center st of each bottom corner group. Join and fasten off. (178 + 4 = 182 sts)
Why the math works: The bottom edge has 37 stitches across the 37-stitch foundation, plus 2 extra at each corner so the corners lie flat. The 26 sc rows add 1 border stitch per row, which matches the 16:18 stitch-to-row ratio closely enough to stay flat. Each shell row is about two sc rows tall, so it gets 2 sc. On the arch, the taller stitches next to each step fill the inside corner, so Round 2 runs as a smooth curve.
Hanging Tab and Ring
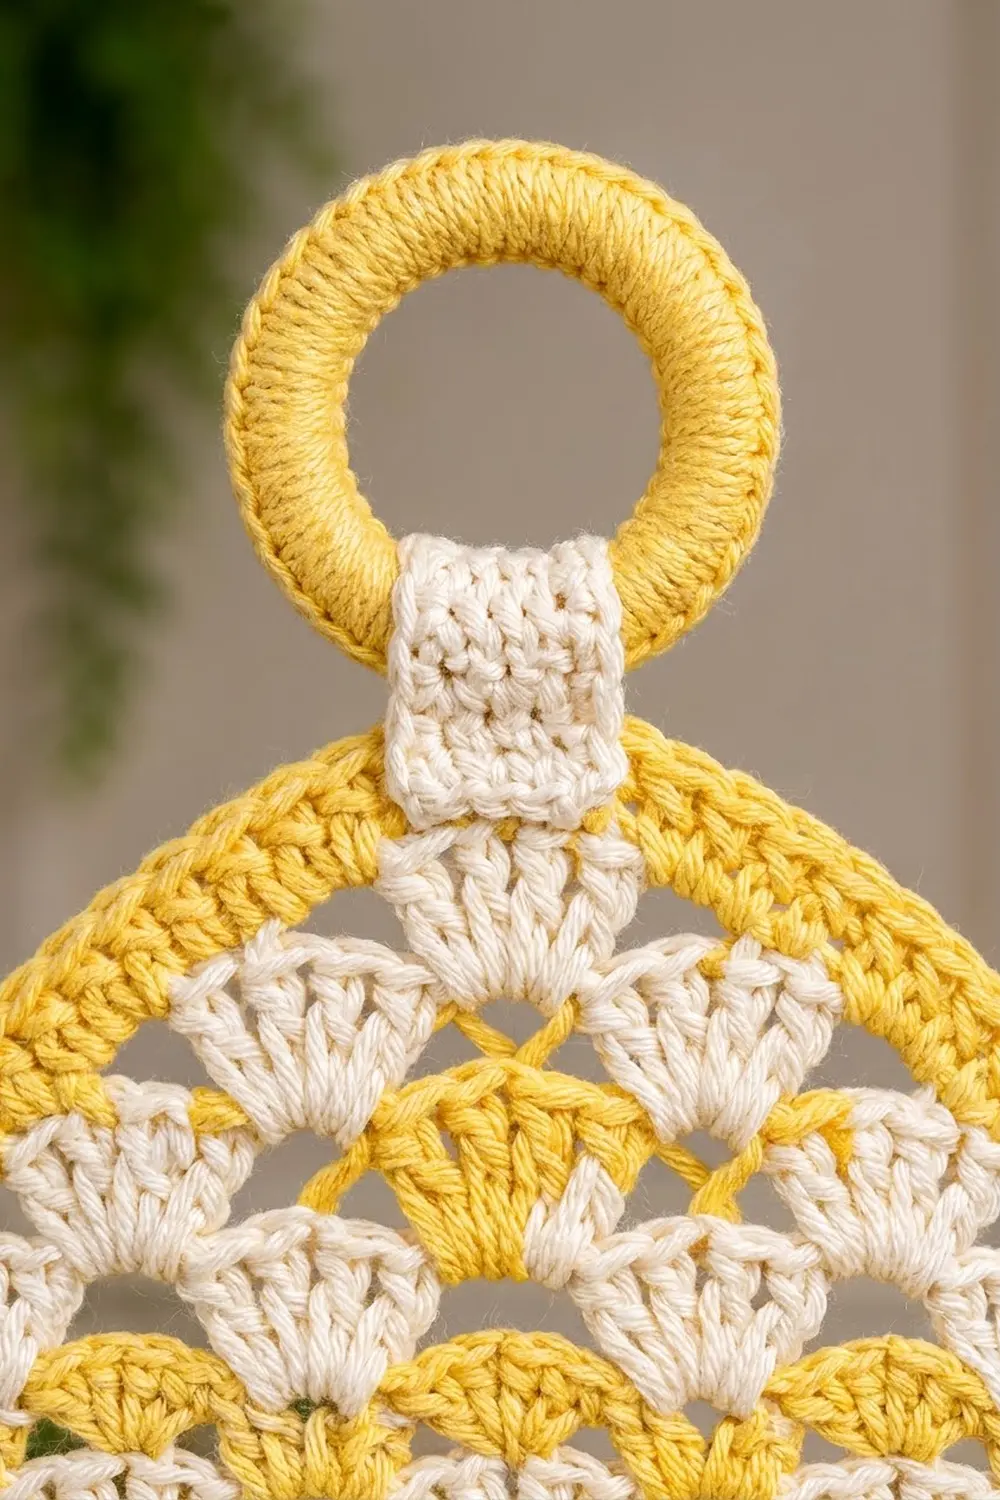
Covered ring (yellow): Join the yarn around the wooden ring. Work sc over the ring until no wood shows, about 44 sc. Sl st to the first sc and fasten off.
Tab (cream): Ch 6.
– Row 1: sc in 2nd ch from hook and across. (5)
– Rows 2–18: ch 1, turn, sc across. (5)
The tab measures 1.25 x 4 in (3.2 x 10.2 cm). Leave a 12 in (30.5 cm) tail.
Make All Pieces
- Yellow: 1 panel solid section, the yellow shell rows, and the border; 2 cup bases, bands, and leveling rounds; ring cover
- Cream: cream shell rows on the panel and both cups; 1 tab
        [ ring ]
        [ tab  ]
   /---------------\
  |   shell arch    |
  |                 |
  | [cup 1] [cup 2] |
   -----------------
Joining
Method: whipstitch with yellow, using the long tails from the cups.
- Lay the panel RS up. Place both cups so their bottom ridges line up with the panel’s bottom border. Together the cups are 9.5 in (24.1 cm) wide, which leaves about 0.35 in (0.9 cm) of border showing on each side.
- On each cup, mark the 10 back stitches of Round 26 and the 10 back stitches of Round 11’s ridge. These are the stitches that touch the panel.
- Stitch-to-stitch: sew each of the 10 marked top stitches to one panel stitch directly behind it. Do the same with the 10 bottom ridge stitches.
- Sew a line of running stitches up the center back of each cup, through the sc bands, to keep the middle from bulging.
- Where the two cups touch, whipstitch 4 sts of Round 26 together, and 4 sts of Round 11 together.
- Fold the tab over the covered ring. Sew one end to the front of the panel at the top center and the other end to the back.
Tension: pull each stitch snug but do not pucker the panel. Measure the panel’s width again after sewing.
Size checkpoint: the panel should still be 10.25 in (26.0 cm) wide.
Final Blocking
- Wet the holder in cool water and gently squeeze out the extra. Do not wring it.
- Roll it in a towel to remove more moisture.
- Pin the panel flat at 10.25 x 13.6 in (26.0 x 34.5 cm). Pin out the curve of the arch.
- Stuff each cup with a dry roll wrapped in plastic so it dries round.
- Open each shell with your fingertips so the fans spread evenly.
- Leave it to dry completely, which takes about 24 hours.
Final Quality-Control Checklist
- Panel is 10.25 x 13.6 in (26.0 x 34.5 cm)
- Each cup has 60 sts and is 4.75 in (12.1 cm) across and 6 in (15.2 cm) tall
- Shells are staggered and the colors alternate correctly
- Border Round 2 has 182 sts and the arch is smooth
- Cups sit level with the bottom edge
- Ring is fully covered and the tab is sewn securely on both sides
- All tails are woven in
Troubleshooting
- Cup is too tight for a roll: go up half a hook size. Do not add stitches, because the shell repeat needs a multiple of 6.
- Arch steps look jagged: check that each ledge has sc, hdc, dc in that order.
- Panel ripples at the sides: reduce the sc on the sides of the shell rows from 2 to 1 on every other row.
- Shells lean: you may have missed a center dc. Count the shells (10 per cup round).
- Cups tilt forward: add a second running-stitch line on the back.
Care
Hand wash cool and lay flat to dry, putting the cups back on rolls to dry. If it loses its shape, reshape it while damp.
Final Notes
Everything depends on the gauge of 16 sc = 4 in (10.2 cm). That gives 60-stitch cups that are 15 in (38.1 cm) around and 4.75 in (12.1 cm) across. It also gives a 37-stitch panel that is 9.25 in (23.5 cm) wide. A 0.5 in (1.3 cm) border brings the panel to 10.25 x 13.6 in (26.0 x 34.5 cm), which frames the two 9.5 in (24.1 cm) cups. Check each measurement as you reach it, and the pieces will line up when you join them.
Happy crocheting!