
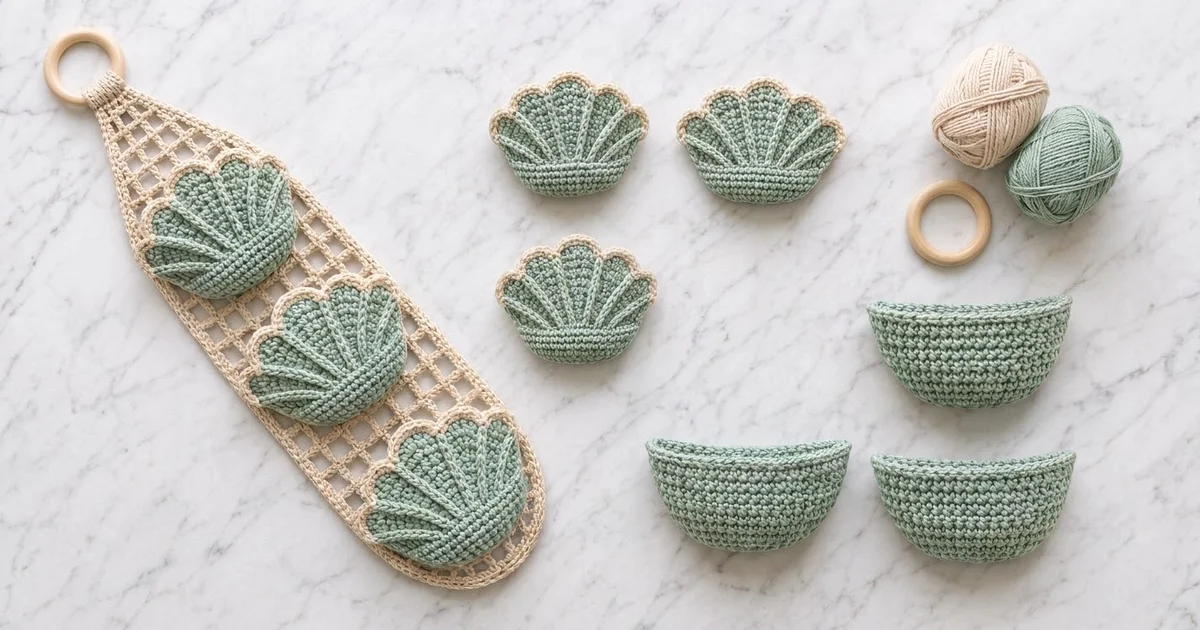
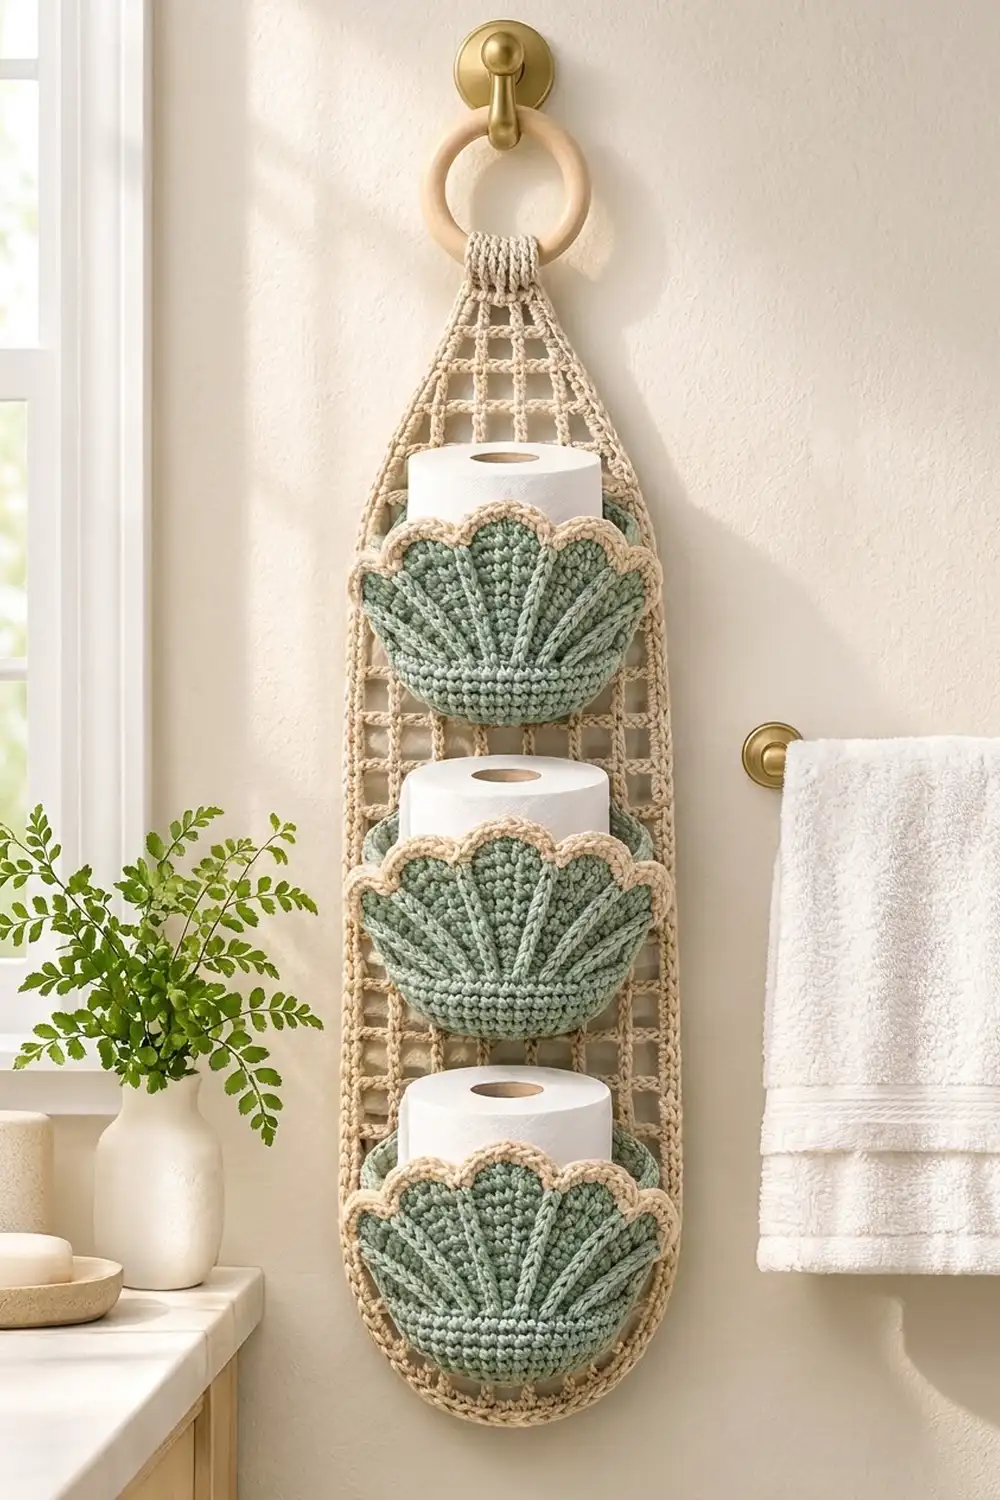
This holder has a long, open cream mesh panel and three sage-green shell pockets. Each pocket holds one standard toilet roll. The holder hangs from a wooden ring, so you can use a towel hook, a door hook, or a small wall knob.
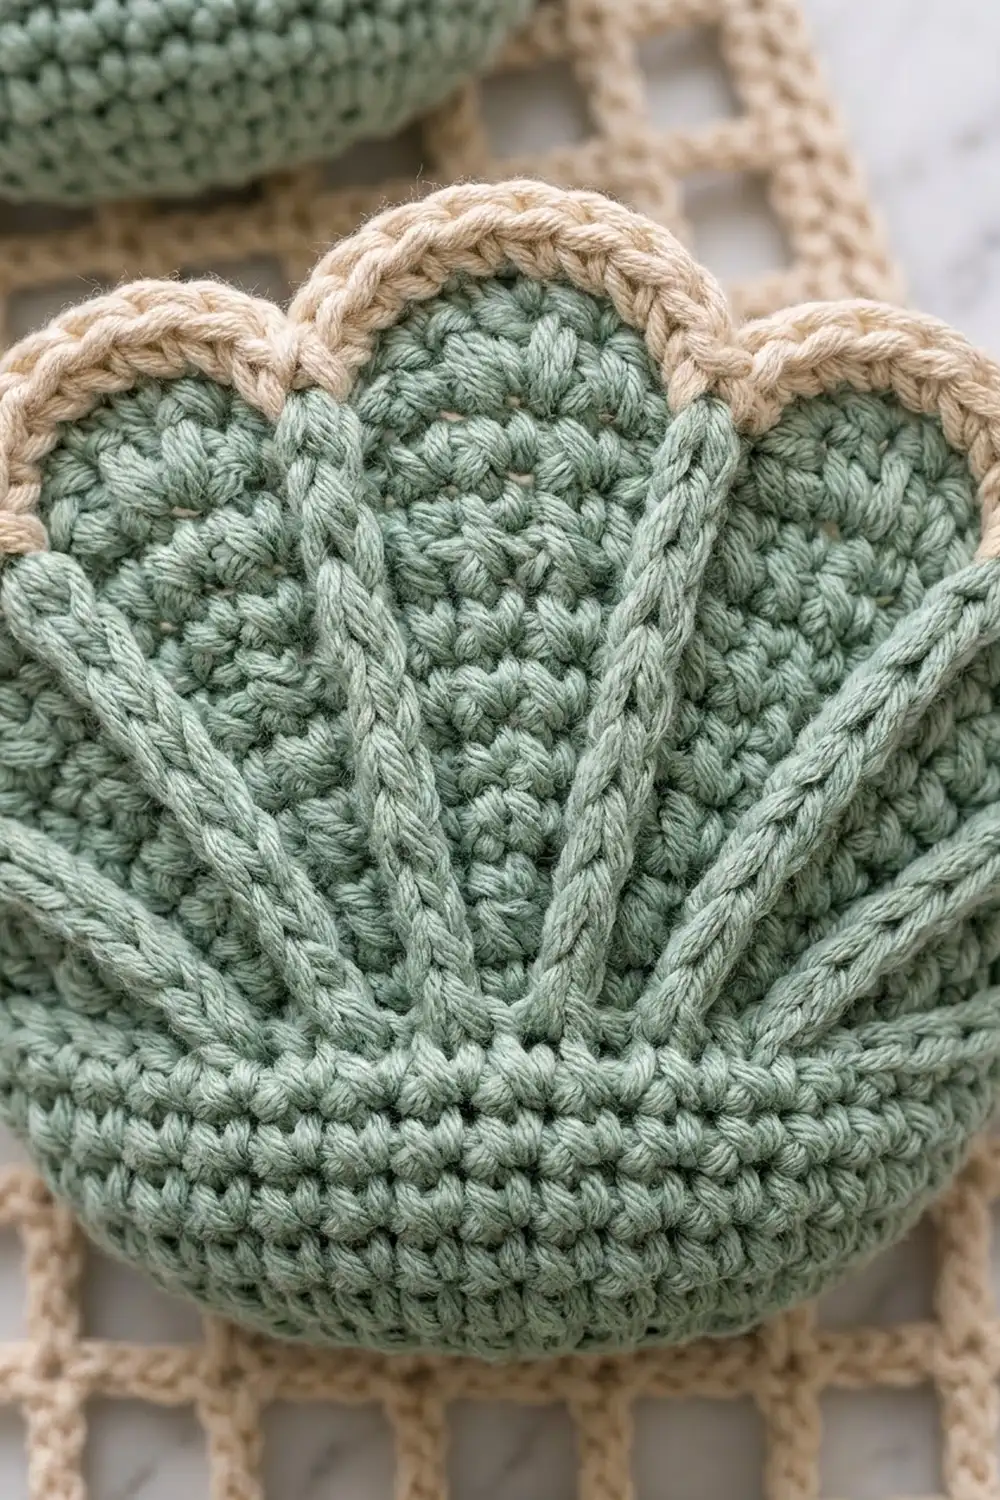
Each pocket is a round basket with a fan-shaped shell front. The shell has seven rounded scallops, six raised ribs that spread upward from a plain band, and a corded cream edge. The panel is a filet grid with a rounded bottom, a tapered top, and a corded cream border.
The pattern uses US crochet terms. The finished panel is 6.8 in (17.3 cm) wide and 25.9 in (65.8 cm) long. With the tab and ring, the holder hangs about 30 in (76.2 cm) long.
The construction is modular. You crochet the panel in rows, the three baskets in rounds, and the three shell fronts in rows. Then you sew each shell to a basket and sew the baskets to the panel.
Finished Size and Construction
- Finished panel: 6.8 in x 25.9 in (17.3 cm x 65.8 cm)
- Overall hanging length: about 30 in (76.2 cm), including tab and ring
- Skill level: Intermediate
- Terminology: US
- Yarn weight: Worsted (#4) cotton
- Hook: 4.5 mm (US 7)
- Number of pieces: 7 (1 panel, 3 baskets, 3 shell fronts), plus 1 wooden ring
- Layout: 1 column of 3 pockets, stacked vertically
- Basket size: 5.25 in (13.3 cm) diameter x 3.1 in (7.9 cm) tall
- Shell front size: about 7 in (17.8 cm) wide x 4.1 in (10.4 cm) tall
- Panel size before border: 6 in x 25.5 in (15.2 cm x 64.8 cm)
- Border depth: 0.4 in (1.0 cm)
Materials
Use a smooth, firm worsted-weight yarn in 100% cotton or a cotton blend. Cotton holds the basket shape and doesn’t stretch much under the weight of the rolls. Don’t use soft acrylic for the pockets, because the walls will sag.
- Cream (panel, border, shell edging): 100 g, about 180 m (197 yd)
- Sage green (baskets and shell fronts): 150 g, about 270 m (295 yd)
Tools:
- 4.5 mm (US 7) crochet hook
- Wooden ring, 3 in (7.6 cm) outer diameter
- Tapestry needle
- Stitch markers
- Rust-proof pins
- Scissors and a measuring tape
The quantities include about 20% extra for your gauge swatch and small differences in tension.
Abbreviations (US Terms)
- ch – chain
- sl st – slip stitch
- sc – single crochet
- hdc – half double crochet
- dc – double crochet
- BLO – back loop only
- MR – magic ring
- sp – space
- sk – skip
- st(s) – stitch(es)
- RS / WS – right side / wrong side
- rev sc – reverse single crochet (crab stitch): working left to right, insert the hook in the next st to the right, yo, pull up a loop, yo, pull through both loops.
- FPdc – front post double crochet: yo, insert the hook from front to back to front around the post of the given st, yo, pull up a loop, [yo, pull through 2 loops] twice.
Rib FPdc: On RS rows, work the FPdc around the st 2 rows below (the rib st of the previous RS row). Skip the sc behind it on the current row. This keeps the stitch count the same and builds a raised line.
Mesh square: 1 dc + ch 1 = one open square. A row of n squares has n + 1 dc and n ch-1 sps, for 2n + 1 sts.
Gauge and Checkpoints
- Single crochet: 16 sts and 18 rows = 4 in (10.2 cm)
- Mesh: 11 squares = 6 in (15.2 cm) wide; 8 rows = 4 in (10.2 cm)
Make one basket first. It’s the best gauge test because the shell front uses the same sc fabric.
Checkpoints:
- Basket base after Rnd 11: 5.25 in (13.3 cm) across
- Basket wall after Rnd 25: 3.1 in (7.9 cm) tall
- Shell band after Row 4: 5 in (12.7 cm) wide
- Shell after Row 14: 6.75 in (17.1 cm) wide
- Panel after Row 4: 6 in (15.2 cm) wide
- Panel after Row 36: 18 in (45.7 cm) long
- Panel after Row 48: 24 in (61.0 cm) long
If your pieces are too big, go down 0.5 mm. If they’re too small, go up 0.5 mm. For the baskets, a little too big is safer than too small. A roll is 4.5 in (11.4 cm) across and needs room to drop in.
Basket (make 3, sage green)
Work in joined rounds and don’t turn. Join each round with a sl st to the first sc. Ch 1 to start the next round (the ch 1 doesn’t count as a st).
Rnd 1: In a MR, 6 sc. (6)
Rnd 2: 2 sc in each st around. (12)
Rnd 3: [Sc 1, 2 sc in next st] 6 times. (18)
Rnd 4: [Sc 2, 2 sc in next st] 6 times. (24)
Rnds 5–11: Keep increasing 6 sts per round, with 1 more sc between increases each round. Rnd 5 has 30 sts, Rnd 6 has 36, Rnd 7 has 42, Rnd 8 has 48, Rnd 9 has 54, Rnd 10 has 60, and Rnd 11 has 66.
Checkpoint: the base is flat and 5.25 in (13.3 cm) across.
Rnd 12: Sc in BLO of each st around. (66)
This round makes a crisp ridge where the wall turns upward.
Rnds 13–25: Sc in each st around. (66)
Fasten off and leave a 24 in (61.0 cm) tail for sewing. The wall has 14 rounds (Rnds 12–25) and is 3.1 in (7.9 cm) tall.
Shell Front (make 3)
Work in rows with sage green. Start each row with ch 1, turn. The ch 1 doesn’t count as a st.
Band
Row 1 (RS): Ch 21, sc in 2nd ch from hook and in each ch across. (20)
Rows 2–4: Sc in each st across. (20)
The band is 5 in (12.7 cm) wide and about 0.9 in (2.3 cm) tall.
Fan with Ribs
The fan has 7 lobes of sc separated by 6 Rib FPdc.
Row 5 (RS): Sc 2, [Rib FPdc around next sc of Row 3, sc 2] 6 times. (20: 14 sc + 6 FPdc)
Row 6 (WS): Sc in each st across. (20)
Row 7 (RS): In lobes 1, 3, 5, and 7, work 2 sc in the first st and 1 sc in the next st. In lobes 2, 4, and 6, work sc 2. Work a Rib FPdc between lobes. (24: 18 sc + 6 FPdc)
Row 8 (WS): Sc in each st across. (24)
Row 9 (RS): Sc in each lobe st, with a Rib FPdc between lobes. (24)
Row 10 (WS): Sc in each st across. (24)
Row 11 (RS): In lobes 2, 4, and 6, work 2 sc in the first st and 1 sc in the next st. Work the odd lobes as sc 3. Work a Rib FPdc between lobes. (27: 21 sc + 6 FPdc)
Row 12 (WS): Sc in each st across. (27)
Row 13 (RS): Sc in each lobe st, with a Rib FPdc between lobes. (27)
Row 14 (WS): Sc in each st across. (27)
Checkpoint: the fan is 6.75 in (17.1 cm) wide. Every lobe has 3 sts, and the 6 ribs lean outward from the band.
Scallops
Row 15 (RS): Sc in first lobe st, (hdc, 5 dc, hdc) in center lobe st, sc in last lobe st, sl st in top of next rib. Repeat from * to * 6 more times, leaving off the final sl st. (69: 7 scallops of 9 sts + 6 sl sts)
Each scallop sits right over a lobe, and each rib ends in a valley between two scallops. Fasten off green.
Cream Edging
Edging Row 1: With RS facing, join cream in the first st of Row 15. Sc in each st across, with 2 sc in the center (3rd) dc of each scallop. (69 + 7 = 76)
Edging Row 2: Ch 1 and don’t turn. Rev sc in each sc across. (76)
Fasten off and weave in the ends. The shell is about 7 in (17.8 cm) wide at the scallops and 4.1 in (10.4 cm) tall.
Panel (cream)
Straight Section
Row 1 (RS): Ch 26, dc in 6th ch from hook. The skipped 5 ch count as the first dc, a ch-1, and a skipped base ch. [Ch 1, sk 1 ch, dc in next ch] 10 times. (11 squares: 12 dc + 11 ch-1 sps = 23 sts)
Rows 2–36: Ch 4 (counts as dc + ch 1), turn, dc in next dc, [ch 1, dc in next dc] across. In Rows 3–36, work the last dc in the 3rd ch of the turning ch. (11 squares, 23 sts)
Checkpoint: 6 in (15.2 cm) wide and 18 in (45.7 cm) long.
Top Taper
Decrease row: Turn, then sl st in the first ch-1 sp and in the next dc. Ch 4, dc in next dc, [ch 1, dc in next dc] across, leaving the last square unworked. This removes 1 square from each side.
Row 37: Decrease row. (9 squares, 19 sts)
Rows 38–39: Work even. (9 squares)
Row 40: Decrease row. (7 squares, 15 sts)
Rows 41–42: Work even. (7 squares)
Row 43: Decrease row. (5 squares, 11 sts)
Rows 44–45: Work even. (5 squares)
Row 46: Decrease row. (3 squares, 7 sts)
Rows 47–48: Work even. (3 squares)
Checkpoint: the panel is 24 in (61.0 cm) long.
Hanging Tab
Row 49: Ch 1, turn, sc in each dc and ch-1 sp across. (7 sc)
Rows 50–62: Ch 1, turn, sc in each st. (7 sc)
The tab is 14 rows: about 3.1 in (7.9 cm) long and 1.75 in (4.4 cm) wide. Fasten off and leave a 12 in (30.5 cm) tail.
Rounded Bottom
Turn the panel upside down so the free loops of the foundation chain face up.
Row B1: Join cream in the free loop at the base of the 2nd dc of Row 1. Ch 4, dc in the base of the next dc, [ch 1, dc in base of next dc] until you have 9 squares. Leave the last base unworked. (9 squares, 19 sts)
Row B2: Decrease row. (7 squares, 15 sts)
Row B3: Decrease row. (5 squares, 11 sts)
Fasten off. Not counting the tab, the panel is now 6 in x 25.5 in (15.2 cm x 64.8 cm). The stepped rows become a smooth curve once the border is added.
Make All Pieces
- Cream: 1 panel
- Sage green: 3 baskets and 3 shell fronts, each shell edged in cream
Layout from top to bottom:
      ( ring )
       [tab]
      / mesh \
     | Pocket 3 |   base on Row 30
     |  mesh    |
     | Pocket 2 |   base on Row 16
     |  mesh    |
     | Pocket 1 |   base on Row 2
      \ mesh /
Joining
Shell to Basket
Center the shell front on the basket’s front. Line up its 20 band sts with 20 front loops of the Rnd 12 ridge.
Whipstitch the band to the ridge, matching 1 st to 1 st. Then sew each side edge of the shell (Rows 1–14) to the basket wall, moving up 1 wall round for each shell row. Shell Row 14 lines up with basket Rnd 25. The seam line moves outward as you go up because the shell widens from 20 to 27 sts. The scallops and edging stand about 1 in (2.5 cm) above the rim.
Basket to Panel
Flatten the back of the basket. Mark the center 22 sts at the back of the rim (Rnd 25) and the matching 22 sts on the Rnd 12 ridge. These make a flat back 5.5 in (14.0 cm) wide.
Center each basket on the panel. Whipstitch its marked ridge sts along the top of the row shown in the layout. Then whipstitch the marked rim sts along the row 6 rows (3 in / 7.6 cm) higher, which is Row 8, 22, or 36. Catch the dc posts and chains of the mesh, not just the open spaces.
Keep your tension snug but not tight. A tight seam will pucker the mesh.
Checkpoint: the pockets are 14 rows (7 in / 17.8 cm) apart. The panel still lies flat and measures 6 in (15.2 cm) wide between the seams.
Border
Border gauge: 16 sc = 4 in (10.2 cm). That works out to 2 sc per 0.5 in (1.3 cm) mesh row and 2 sc per square across each step.
Round 1: With RS facing, join cream at the right edge of Row 48, just below the tab. Work sc down the right side as follows:
- Rows 48–1: 2 sc per row end (96 sc)
- The 4 taper steps: 2 sc across each (8 sc)
- Rows B1–B3: 2 sc per row end (6 sc)
- The 3 bottom steps: 2 sc across each (6 sc)
That gives 116 sc on the right side. Across the bottom of Row B3, work 2 sc in the first dc, 1 sc in each of the next 9 sts, and 2 sc in the last dc (13 sc). Work up the left side the same way (116 sc), ending at the left edge of Row 48. (245 sc)
Round 2: Ch 1 and don’t turn. Rev sc in each sc back to the start. (245)
Fasten off. The border forms a U shape and stays open at the tab.
Why the math works: each mesh row is 0.5 in (1.3 cm) tall, and 2 sc at gauge are also 0.5 in (1.3 cm), so the long sides lie flat. The 2 sc per step fill each ledge, and the 2 extra corner sc ease the bottom into a smooth curve. The 0.4 in (1.0 cm) border on both sides and the bottom brings the panel to 6.8 in x 25.9 in (17.3 cm x 65.8 cm).
Ring
Fold the tab through the ring to the back. Sew Row 62 to the back of Row 49. Wrap cream yarn tightly around the tab base 10 times, 0.5 in (1.3 cm) below the ring, and secure it with a few stitches.
Final Blocking
- Pin the panel flat to 6.8 in x 25.9 in (17.3 cm x 65.8 cm), keeping the mesh lines straight.
- Mist the panel with water until it’s damp.
- Pin each shell’s scallops into even, rounded points.
- Put a toilet roll wrapped in a plastic bag in each basket so the walls dry upright.
- Let everything dry completely before you hang it.
Final Quality-Control Checklist
- The panel is 6.8 in (17.3 cm) wide and 25.9 in (65.8 cm) long.
- The mesh columns run straight, with no twisted squares.
- Each basket has 66 sts and is 5.25 in (13.3 cm) across.
- Each shell has 7 scallops and 6 ribs, and each rib ends in a valley.
- Both border rounds have 245 sts.
- The pockets sit 14 rows apart, centered and level.
- The ring wrap is firm, and the tab can’t slip.
Troubleshooting
- The basket base ruffles: Your tension is loose. Go down 0.5 mm and stagger the increases.
- The base cups too early: Your tension is tight. Go up 0.5 mm.
- The ribs look flat: Work each FPdc fully around the post, and don’t pull the loops tight.
- The scallops curl inward: Re-block the shells flat and pin each scallop tip.
- The border waves: Check your sc gauge. If it’s loose, work the border with a 4.0 mm hook.
- The panel stretches under weight: Use a firmer cotton, or also sew the side edges of each basket to the panel.
Care
Hand wash in cool water and press out the water in a towel. Reshape the baskets and dry flat, and don’t tumble dry.
Final Notes
Each stage sets up the next measurement. The basket base is 66 sts (5.25 in / 13.3 cm) across, and the wall is 14 rounds (3.1 in / 7.9 cm) tall. The shell grows from a 20-st band (5 in / 12.7 cm) to 27 sts (6.75 in / 17.1 cm) and then adds 7 scallops. The panel is 11 squares (6 in / 15.2 cm) wide by 51 rows (25.5 in / 64.8 cm) long, and the 245-st border brings it to 6.8 in x 25.9 in (17.3 cm x 65.8 cm). If every checkpoint matches, the finished holder will match too.
Happy crocheting!