
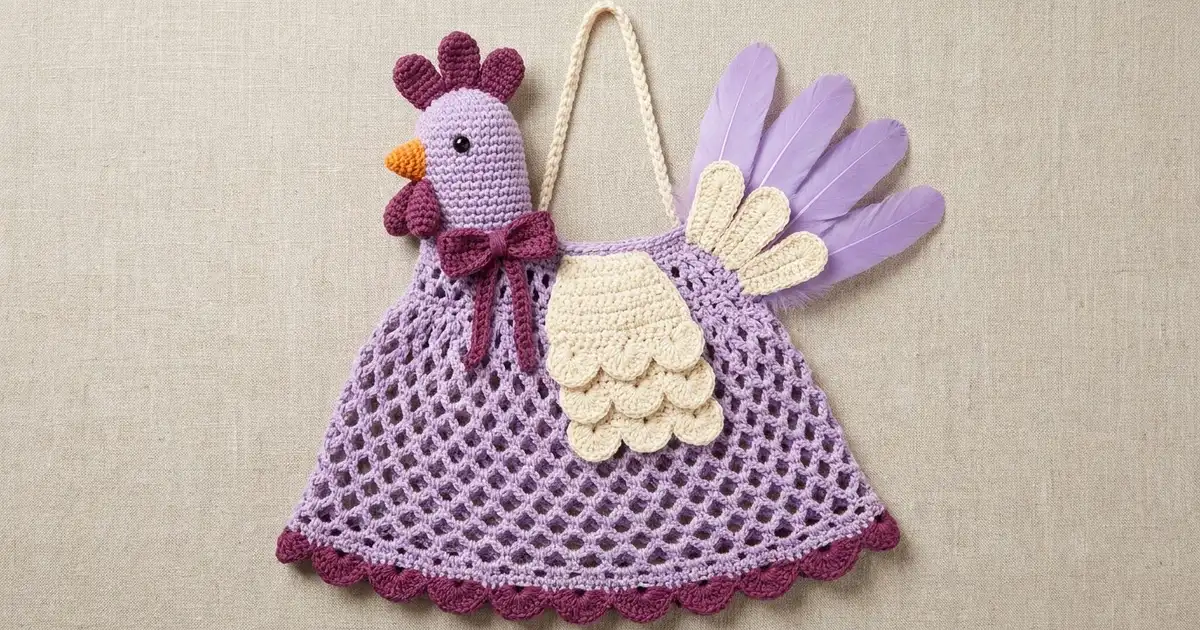
This lavender hen is a hanging grocery bag holder with a lot of personality. Her teardrop body is a stretchy, staggered V-stitch mesh, so you can see the bags inside. You pull the bags out one at a time through the bottom opening, which has a plum scalloped trim.
The colors are soft lavender for the body, head, and back tail feathers. Cream is for the layered wings, front tail feathers, and hanging loop. Plum is for the comb, wattles, bow, and bottom trim, with a small orange beak and black safety eyes. The style is cottage-kitchen cute.
This pattern uses US crochet terms. The hen is about 15 in (38.1 cm) tall from the bottom trim to the top of the head, not counting the comb and loop. The body is 8 in (20.3 cm) wide, and the hen is about 11 in (27.9 cm) across including the wings and tail.
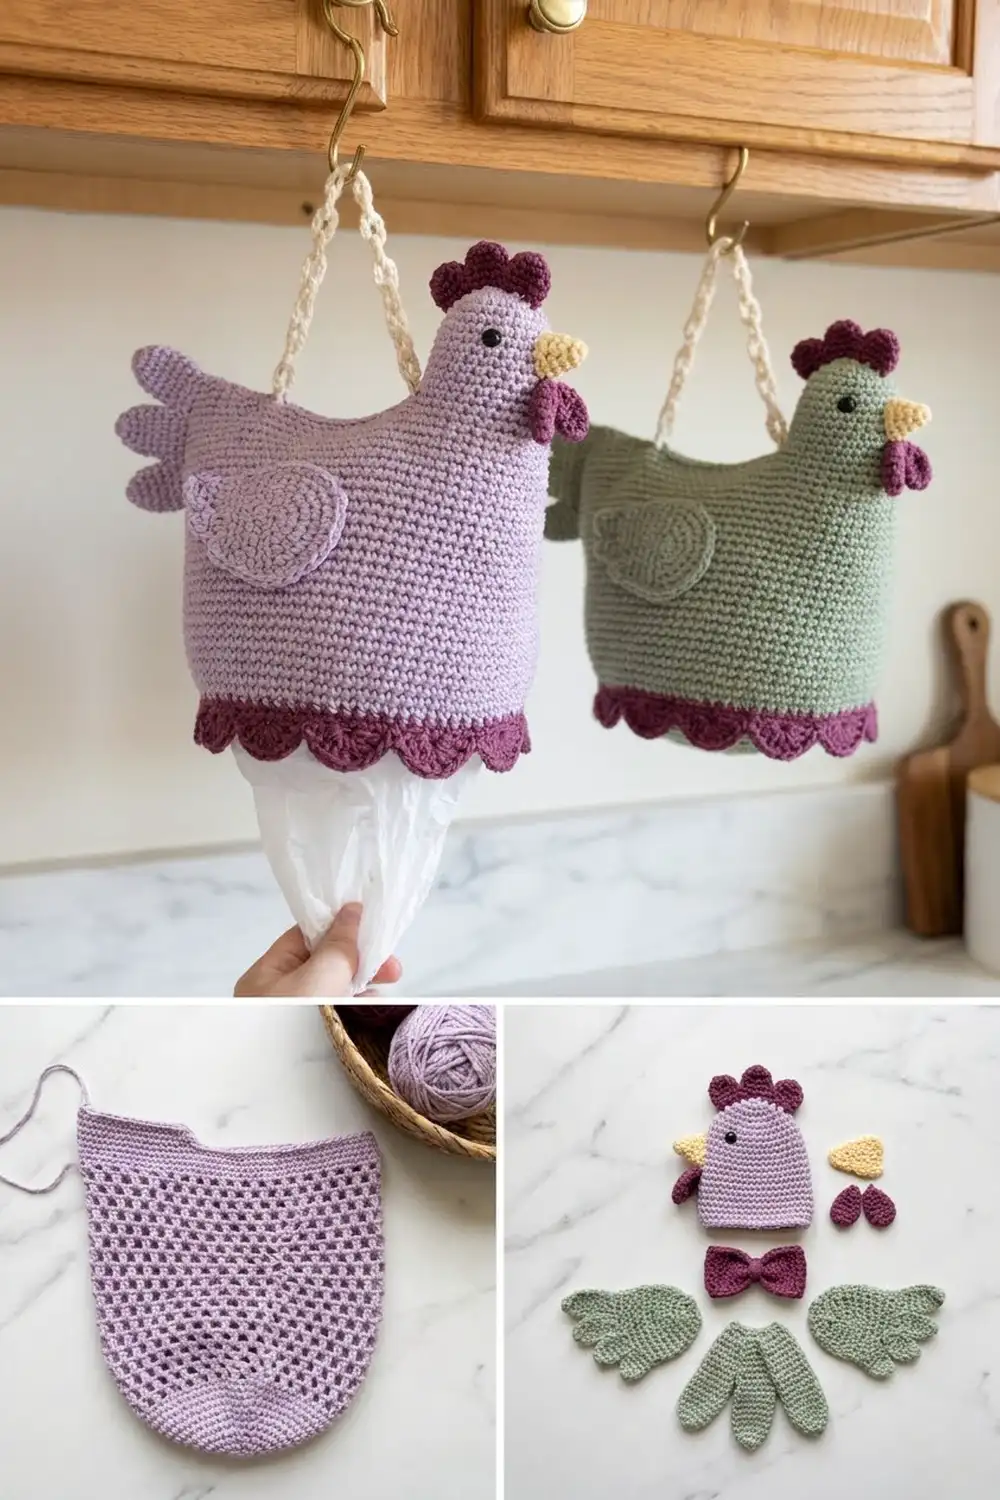
You’ll work the body in the round from the bottom opening up to a narrow neck. The head is an open cap that slips over the neck. The comb, beak, wattles, bow, two scaled wings, and fan tail are small flat appliqués that you sew on.
Finished Size and Construction
- Finished size: about 15 in (38.1 cm) tall x 11 in (27.9 cm) wide
- Skill level: Intermediate
- Terminology: US crochet terms
- Yarn weight: Worsted (#4) cotton
- Hook: 4.5 mm (US 7)
- Number of pieces: 19 crocheted parts sewn into one hen
- Layout: head on top of the body, a wing on each side, tail behind the right shoulder, bow at the neck
- Body size: 12 in (30.5 cm) tall x 8 in (20.3 cm) flat width
- Size before border: 12 in (30.5 cm) tall, with a 4 in (10.2 cm) bottom opening laid flat
- Border depth: 0.75 in (1.9 cm)
Materials
Choose a smooth worsted cotton. It holds the mesh shape, doesn’t stretch out under the weight of the bags, and survives washing. These amounts assume about 85 m per 50 g.
- Lavender: 100 g / 170 m
- Cream: 30 g / 51 m
- Plum: 20 g / 34 m
- Orange: 5 g / 9 m
- Optional sage green: 100 g / 170 m if you want a sage body and head
All quantities include a margin of about 15%.
Tools: 4.5 mm (US 7) hook, two 9 mm black safety eyes, a tapestry needle, stitch markers, pins, scissors. Optional: a small ball of fiberfill wrapped in tulle.
Abbreviations (US Terms)
ch – chain; sl st – slip stitch; sc – single crochet; hdc – half double crochet; dc – double crochet; tr – treble crochet; sc2tog – single crochet 2 together; MR – magic ring; BLO – back loop only; sp – space; st(s) – stitch(es); RS – right side.
Special stitches:
– Wide V-st: (dc, ch 2, dc) in the same space.
– V-st: (dc, ch 1, dc) in the same space.
– Shell: 5 dc in the same stitch.
Gauge and Checkpoints
Gauge: 16 sc and 16 sc rounds = 4 in (10.2 cm). In the mesh, 4 wide V-sts with their ch-1 spaces = 4 in (10.2 cm), and 5 mesh rounds = 3 in (7.6 cm).
Make the head first as your test piece. After Rnd 7 it should be about 3.25 in (8.3 cm) across, laid flat.
Body checkpoints (laid flat):
– After Rnd 5: 8 in (20.3 cm) wide, 1.25 in (3.2 cm) tall
– After Rnd 13: 8 in (20.3 cm) wide, about 6 in (15.2 cm) tall
– After Rnd 17: top edge 7 in (17.8 cm) wide
– After Rnd 21: top edge 6 in (15.2 cm) wide, about 11 in (27.9 cm) tall
– After Rnd 25: neck 3 in (7.6 cm) wide, body 12 in (30.5 cm) tall
If your work is too big, go down 0.5 mm in hook size. If it’s too small, go up 0.5 mm. Don’t change the stitch counts, because the trim and head fit depend on them.
Body (Lavender)
Work in joined rounds and don’t turn.
Rnd 1: Ch 32 and join with a sl st to the first ch, without twisting. Ch 1, sc in each ch, then join. (32 sc) Leave the free loops of the foundation chain for the trim.
Rnd 2: Ch 1, sc in next 3, 2 sc in next 8 times, join. (40 sc)
Rnd 3: Ch 1, sc in next 4, 2 sc in next 8 times, join. (48 sc)
Rnd 4: Ch 1, sc in next 5, 2 sc in next 8 times, join. (56 sc)
Rnd 5: Ch 1, sc in next 6, 2 sc in next 8 times, join. (64 sc) These quick increases make the rounded base cup outward.
Rnd 6: Ch 5 (counts as dc and ch 2), dc in the same st, ch 1, skip 3. Wide V-st in next st, ch 1, skip 3 15 times. Join to the 3rd ch of ch-5. (16 wide V-sts, 16 ch-1 sps)
Rnd 7: Sl st into the ch-2 sp, the next dc, and the next ch-1 sp. Ch 5, dc in the same sp, ch 1. Wide V-st in next ch-1 sp, ch 1 15 times. Join. (16 wide V-sts)
Each V-st now sits between two V-sts of the round below. This creates the staggered honeycomb holes.
Rnds 8–13: Repeat Rnd 7. (16 wide V-sts each round)
Rnd 14: Sl st into the ch-2 sp, the next dc, and the next ch-1 sp. Ch 4 (counts as dc and ch 1), dc in the same sp, ch 1. V-st in next ch-1 sp, ch 1 15 times. Join to the 3rd ch of ch-4. (16 V-sts)
Rnds 15–17: Sl st into the V-st center, the next dc, and the next ch-1 sp. Ch 4, dc in the same sp, ch 1. V-st in next ch-1 sp, ch 1 15 times. Join. (16 V-sts each round)
Rnd 18: Work the same as Rnd 15, but leave out the ch 1 between V-sts. (16 V-sts, set side by side)
Rnds 19–21: Sl st into the V-st center, the next dc, and the gap before the next V-st. Ch 4, dc in the same gap. V-st in next gap between V-sts 15 times. Join. (16 V-sts each round)
The V-sts get smaller and closer together over these rounds, which tapers the body toward the shoulders.
Rnd 22 (conversion): Ch 1. Sc in next V-st center, sc in next gap 16 times. Join. (16 centers x 1 sc + 16 gaps x 1 sc = 32 sc)
Rnd 23: Ch 1, sc in next 2, sc2tog 8 times, join. (24 sc)
Rnds 24–25: Ch 1, sc in each st, join. (24 sc)
Fasten off. The neck is now a solid tube 3 in (7.6 cm) wide.
Head (Lavender)
Work in continuous rounds and mark the first stitch of each round.
Rnd 1: 6 sc in MR. (6)
Rnd 2: 2 sc in each st. (12)
Rnd 3: Sc in next st, 2 sc in next 6 times. (18)
Rnd 4: Sc in next 2, 2 sc in next 6 times. (24)
Rnd 5: Sc in next 3, 2 sc in next 6 times. (30)
Rnd 6: Sc in next 4, 2 sc in next 6 times. (36)
Rnd 7: Sc in next 5, 2 sc in next 6 times. (42)
Rnds 8–11: Sc around. (42)
Rnd 12: Sc in next 5, sc2tog 6 times. (36)
Rnd 13: Sc around, then sl st in the next st. (36)
Fasten off and leave a 20 in (50.8 cm) tail. Insert the eyes between Rnds 9 and 10, with 6 sts between them. The cap is 3.25 in (8.3 cm) tall.
Comb, Beak, and Wattles
Comb (plum): Ch 7, then sc in the 2nd ch from the hook and in each ch across. (6 sc) Turn. Shell in the first sc, sl st in the next, (2 dc, 3 tr, 2 dc) in the next, sl st in the next, shell in the next, sl st in the last. (3 lobes, with the center lobe tallest)
Beak (orange): Ch 5, then sc in the 2nd ch from the hook and in each ch across. (4) Ch 1, turn, sc2tog twice. (2) Ch 1, turn, sc2tog. (1) You now have a triangle 1 in (2.5 cm) wide.
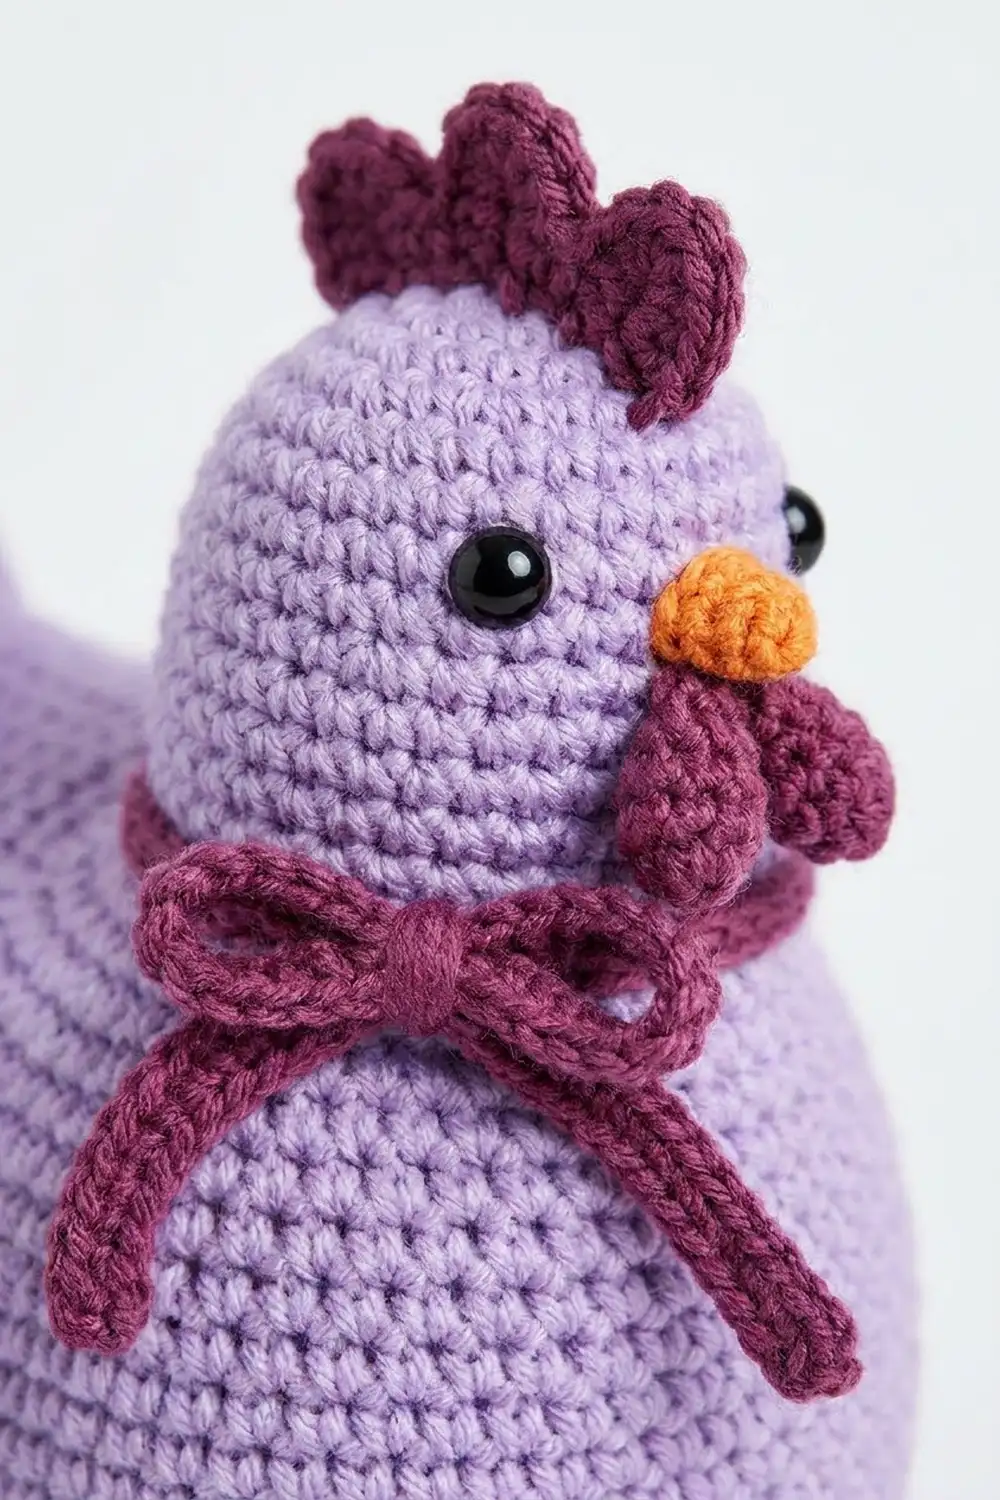
Wattle (plum, make 2): Ch 5. Sl st in the 2nd ch from the hook, then sc, hdc, and 5 dc in the last ch. Working along the other side of the chain, hdc, sc, and sl st. (11 sts, a teardrop)
Bow (Plum)
Band: Ch 16, then sc in the 2nd ch from the hook and across. (15 sc) Work 4 more rows of 15 sc. The band is 3.75 in x 1.25 in (9.5 cm x 3.2 cm).
Tails: Ch 16, then sc in the 2nd ch from the hook and across. (15 sc)
Center wrap: Ch 6, then sc in the 2nd ch from the hook and across. (5 sc)
Fold both ends of the band to the center back. Fold the tail strip into an upside-down V behind the band. Wrap the center strip around both pieces and sew it closed at the back.
Wings (Cream, make 2)
The wing is a flat sc base with tiers of shells worked into leftover front loops, so the scallops overlap like feathers. Row 1 is the top of the wing.
Ch 1 and turn at the start of every row. Work through both loops unless a row says BLO. To increase, work 2 sc in the first and last st. To decrease, sc2tog at each end.
- Row 1 (RS): Ch 4, then sc in the 2nd ch from the hook and across. (3)
- Row 2: Increase. (5)
- Rows 3–4: Even. (5)
- Row 5 (BLO): Even. (5)
- Rows 6–7: Increase. (7, 9)
- Row 8: Even. (9)
- Row 9 (BLO): Even. (9)
- Rows 10–11: Increase. (11, 13)
- Row 12: Even. (13)
- Row 13 (BLO): Even. (13)
- Row 14: Even. (13)
- Rows 15–16: Decrease. (11, 9)
- Row 17 (bottom tier): Sc in next st, skip 1, shell in next st, skip 1 2 times, sc in last st. (2 shells)
The BLO rows are all RS rows, so the free front loops of Rows 4, 8, and 12 sit on the RS. With the RS facing and the bottom edge pointing away from you, join cream and work these tiers so each one grows down over the rows below it:
- Tier 1, in the Row 4 loops (5): Sc, skip 1, shell, skip 1, sc. (1 shell)
- Tier 2, in the Row 8 loops (9): Sc, skip 1, shell, skip 1 2 times, sc. (2 shells)
- Tier 3, in the Row 12 loops (13): Sc, skip 1, shell, skip 1 3 times, sc. (3 shells)
Each tier uses a multiple of 4 sts plus 1, so no stitches are left over. From top to bottom the tiers have 1, 2, 3, and 2 shells. The finished wing is 3.25 in (8.3 cm) x 4.5 in (11.4 cm).
Tail Feathers
Long feather (lavender, make 4): Ch 14. Sc in the 2nd ch from the hook, hdc in the next 2, dc in the next 9, and 5 dc in the last ch. On the other side of the chain, dc in the next 9, hdc in the next 2, and sc in the last. (12 + 5 + 12 = 29 sts, 3.25 in / 8.3 cm)
Short feather (cream, make 3): Ch 11. Work the same as the long feather, with dc in the next 6 on each side. (9 + 5 + 9 = 23 sts, 2.5 in / 6.4 cm)
Fan out the long feathers and lay a short feather over each gap. Sew the bases together into a fan 5 in (12.7 cm) wide.
Hanging Loop (Cream)
Ch 29. Sl st in the back bump of each ch from the 2nd ch from the hook. (28 sl sts, 7 in / 17.8 cm) Fold the strip in half and knot it 0.5 in (1.3 cm) from the ends.
Make All Pieces
- Lavender: body, head, 4 long feathers
- Cream: 2 wings, 3 short feathers, loop
- Plum: comb, 2 wattles, bow (3 parts), bottom trim
- Orange: beak
            [loop]
            [comb]
        [ head + eyes ]
           [beak]
       [wattles + bow]      [tail fan]
[wing]  [ body mesh ]  [wing]
       [plum scallops]
Joining (Assembly)
Whipstitch every piece with a matching yarn tail. Keep the stitches snug but not tight, because the mesh puckers easily.
- Head: Slip the head over the neck. Sew its 36 sts to the 32 sc of body Rnd 22, easing in 1 extra head st about every 8 sts (4 in total). For a firmer head, tuck the optional fiberfill ball into the crown before you sew.
- Comb: Sew it across the top of the head, over Rnds 1–3.
- Loop: Sew the knot just behind the comb.
- Beak: Center it 1 round below the eyes.
- Wattles: Sew them under the beak.
- Bow: Sew it to the front of the neck seam.
- Wings: Sew the top 1.5 in (3.8 cm) of each wing to the sides of the body at Rnds 15–18.
- Tail: Sew it to the back right shoulder at Rnds 16–18.
Checkpoint: The hen should measure about 11 in (27.9 cm) across.
Border: Plum Scallop Trim
Border gauge: 1 shell repeat covers 4 sts and is 1 in (2.5 cm) wide and 0.75 in (1.9 cm) deep.
Hold the body upside down and join plum to a free loop of the foundation chain.
Rnd 1: Ch 1, sc in each free loop, join. (32 sc, which is 16 per side when flattened)
Rnd 2: Ch 1. Sc in next st, skip 1, shell in next st, skip 1 8 times. Join. (8 shells, which is 4 per side when flattened)
Why the math works: 8 repeats x 4 sts = 32 sts, so the repeat uses every stitch of the foundation. 8 shells x 1 in (2.5 cm) = 8 in (20.3 cm), the circumference of the opening, so the trim lies flat without flaring.
Final Blocking
- Mist the body until it’s damp.
- Fill it with bags or a rolled towel to shape the teardrop.
- Pin it to 8 in (20.3 cm) wide x 12 in (30.5 cm) tall.
- Pin the wing shells so they point downward.
- Shape the comb and tail feathers with your fingers.
- Let everything dry completely.
Final Quality-Control Checklist
- Each mesh round has 16 V-sts, and the holes are staggered.
- The neck has 24 sc and is 3 in (7.6 cm) wide.
- The trim has 8 even shells.
- The eyes are level, and the beak is centered.
- The wing tiers have 1, 2, 3, and 2 shells.
- The tail has 4 lavender and 3 cream feathers.
- The loop is anchored firmly.
- All ends are woven in.
Troubleshooting
- Twisting mesh: Start each round in a ch-1 sp or gap, not in a V-st center.
- Ruffled base: Rnds 2–5 are too loose. Go down a hook size for those rounds.
- Loose head: Ease in more head sts as you sew.
- Shells flipping up: Steam them and pin them down until dry.
- Flaring trim: Use 4 dc per shell.
Care
Hand wash in cool water. Reshape the hen and lay it flat to dry.
Final Notes
The measurement chain is simple. A gauge of 16 sc per 4 in (10.2 cm) gives a 64-st round that is 8 in (20.3 cm) wide. The 16 V-sts of the mesh hold that width, then taper to a 24-sc neck that is 3 in (7.6 cm) wide. The 32-st foundation supports exactly 8 shells around a 4 in (10.2 cm) opening. If you check each stage, the head, wings, and trim will fit without adjustment.
Happy crocheting!