

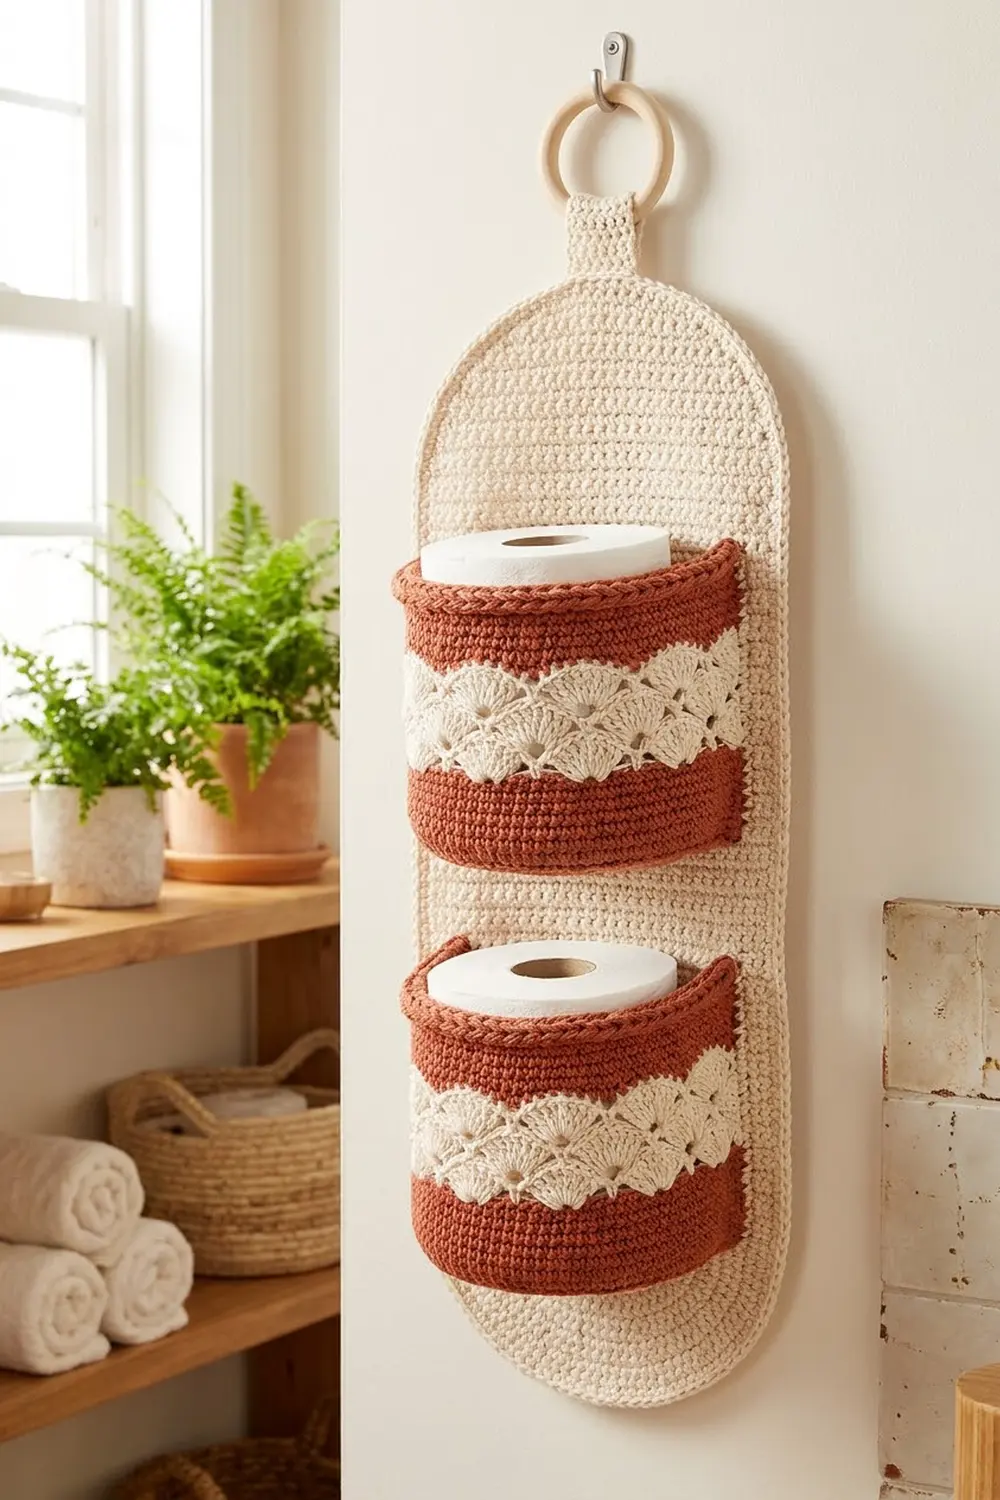
This hanging organizer has a tall oval back panel in warm terracotta and two half-round pockets. Each pocket has a band of cream fan shells. The organizer hangs from a natural wooden ring and holds spare toilet rolls, washcloths, or small bathroom supplies.
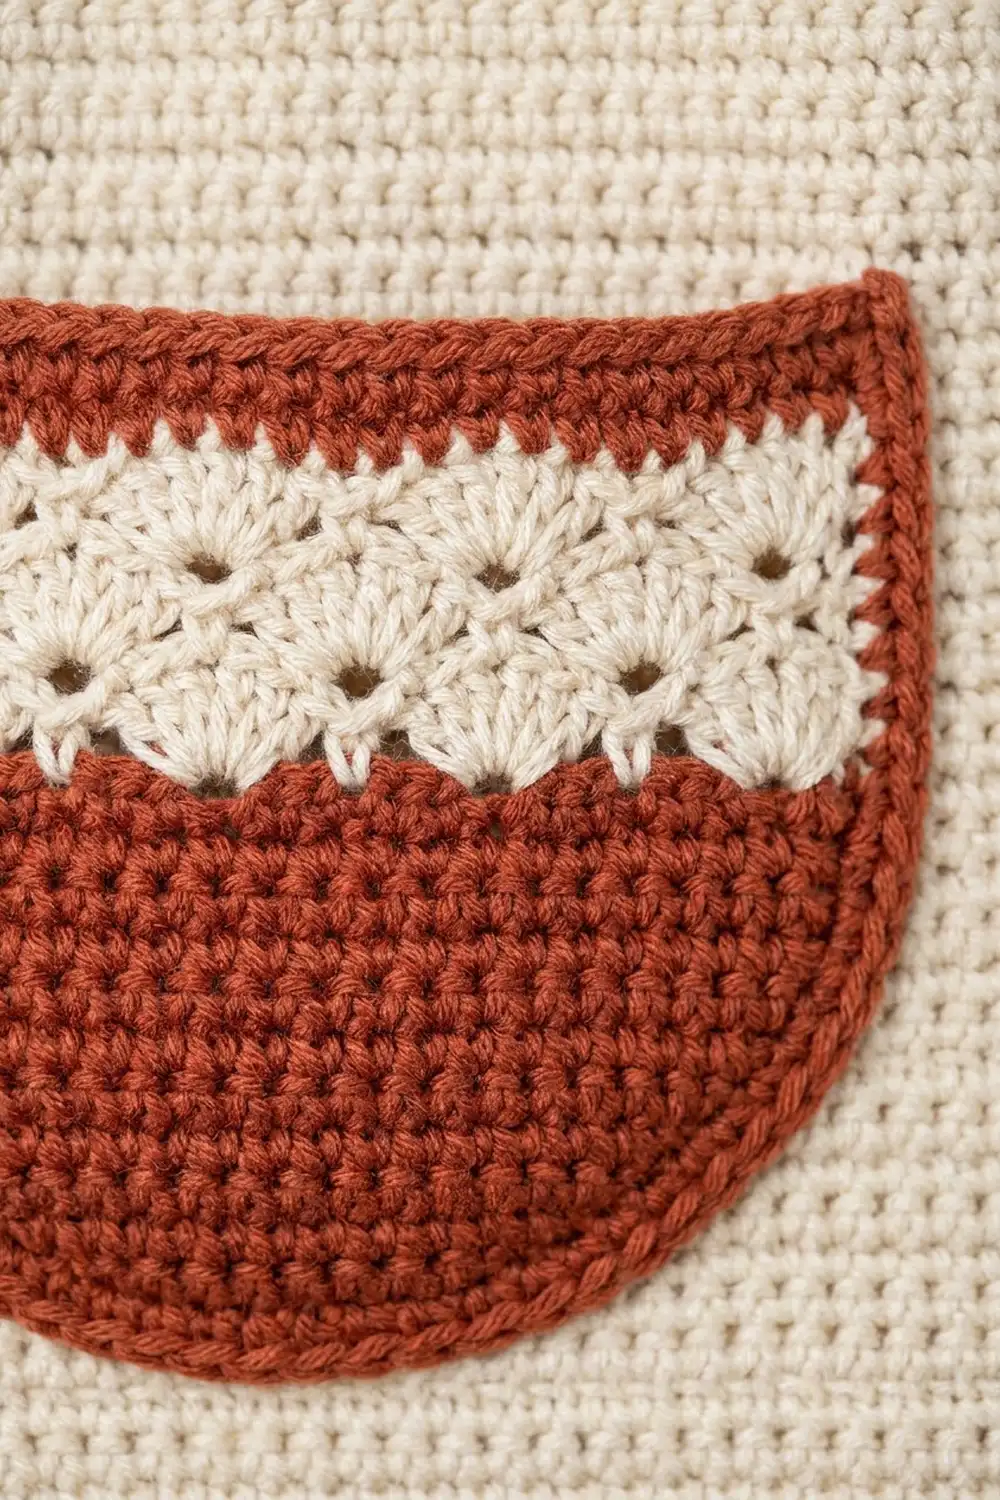
The pockets have terracotta bottoms, a two-tier cream shell band, and a terracotta top with a rope-like crab-stitch rim. The panel is plain single crochet, so the shells stand out.
The pattern uses US crochet terms. The finished organizer is 9.8 in (24.9 cm) wide and 25.8 in (65.5 cm) tall, not counting the ring. Each pocket stands out 4.4 in (11.2 cm) from the panel and is 4.2 in (10.7 cm) tall.
You make four crocheted pieces: the oval panel (worked in rounds around a chain), two pockets (each one starts as a flat semicircle, then the walls are worked up from the curved edge in rows), and a small tab. The pockets and tab are sewn onto the panel at the end.
Finished Size and Construction
- Finished size: 9.8 in × 25.8 in (24.9 cm × 65.5 cm)
- Skill level: Intermediate
- Terminology: US
- Yarn weight: Worsted (#4) cotton
- Hook: 5.0 mm (H-8)
- Number of pieces: 4 crocheted (1 panel, 2 pockets, 1 tab) plus 1 wooden ring
- Layout: Pockets stacked one above the other, centered on the panel
- Pocket size: 8.9 in (22.6 cm) across the back, 4.4 in (11.2 cm) deep, 4.2 in (10.7 cm) tall
- Panel size before border: 8.9 in × 24.9 in (22.6 cm × 63.2 cm)
- Border depth: 2 rounds, about 0.45 in (1.1 cm) per side
Materials
Use a smooth, firm worsted-weight cotton or cotton blend. Cotton holds the pockets upright and copes with bathroom humidity. Avoid fuzzy or stretchy yarn, because it lets the pockets sag.
- Terracotta (main color): 420 g, about 650 m
- Cream (contrast color): 45 g, about 70 m
Both quantities include a margin of about 15%.
Tools:
- 5.0 mm (H-8) crochet hook
- Wooden ring, 3 in (7.6 cm) outer diameter
- Tapestry needle
- 8 locking stitch markers
- Rustproof pins and tape measure
- Spray bottle or steamer
Abbreviations (US Terms)
- ch – chain
- sl st – slip stitch
- sc – single crochet
- dc – double crochet
- inc – 2 sc in the same stitch
- BLO – back loop only
- st(s) – stitch(es)
- RS / WS – right side / wrong side
- rep – repeat
Special stitches
- Shell: 7 dc in the same stitch.
- Half shell: at the start of a row, ch 3 (counts as dc) plus 3 dc in the same stitch (4 sts). At the end of a row, 4 dc in the same stitch (4 sts).
- Reverse sc (crab stitch): with the RS facing, work sc from left to right, inserting the hook into the next stitch to the right each time.
Gauge and Checkpoints
Gauge: 16 sc × 18 rows = 4 in (10.2 cm). The two shell rows together measure 1.25 in (3.2 cm) tall.
Make one pocket base first as your gauge test.
Checkpoints:
- Base, Row 10: straight edge 4.4 in (11.2 cm), depth 2.2 in (5.6 cm)
- Base, Row 20: straight edge 8.9 in (22.6 cm), depth 4.4 in (11.2 cm)
- Wall, Row 7: 1.6 in (4.1 cm) tall
- Wall, Row 14: 4.2 in (10.7 cm) tall
- Panel, Rnd 10: 4.4 in × 20.4 in (11.2 cm × 51.8 cm)
- Panel, Rnd 20: 8.9 in × 24.9 in (22.6 cm × 63.2 cm)
If the base comes out too big, go down one hook size. If it’s too small, go up one. Within ±0.25 in (0.6 cm) is fine. Every later measurement depends on this one.
Back Panel
Use terracotta. Join each round with a sl st to the first sc, then ch 1. The ch 1 does not count as a stitch. Each round has four sections in this order: End A, Side 1, End B, Side 2. You only increase at the two ends, so each straight side stays at 64 sts in every round.
Ch 67.
Rnd 1: Work 3 sc in the 2nd ch from the hook (End A), sc in the next 64 ch (Side 1), and 3 sc in the last ch (End B). Rotate and sc in the next 64 loops on the underside of the chain (Side 2). Join. (134 sts: 3 + 64 + 3 + 64)
Rnd 2: Work 2 sc in each of the next 3 sts (End A), sc in the next 64, 2 sc in each of the next 3 sts (End B), and sc in the next 64. Join. (140 sts: 6 + 64 + 6 + 64)
Rnds 3–20: In Rnd k, work (sc in the next k − 2 sts, inc) 3 times for End A, sc in the next 64, (sc in the next k − 2 sts, inc) 3 times for End B, and sc in the next 64. Join. Each end ends up with 3 × k sts.
Stitch totals: Rnd 3: 146. Rnd 4: 152. Rnd 5: 158. Rnd 10: 188 sts (30 per end). Rnd 15: 218. Rnd 20: 248 sts (60 + 64 + 60 + 64).
Don’t fasten off. Check that the panel measures 8.9 in × 24.9 in (22.6 cm × 63.2 cm), then go straight on to the Border section.
Pocket (Make 2)
Base
Use terracotta. Work back and forth in rows. The row ends form the straight back edge.
Row 1: Make a magic ring, ch 1, and work 3 sc in the ring. Turn. (3 sts)
Row 2: Ch 1, work 2 sc in each st, turn. (6 sts)
Rows 3–20: In Row k, ch 1, work (sc in the next k − 2 sts, inc) 3 times, turn. Each row has 3 × k sts.
Stitch totals: Row 3: 9. Row 10: 30 sts. Row 15: 45. Row 20: 60 sts.
Pull the ring closed. The straight edge has 40 row ends and measures 8.9 in (22.6 cm). Don’t fasten off.
Walls
Turn. The side now facing you is the RS (outside) of the pocket.
Row 1 (RS): Ch 1, sc in the BLO of each st along the curved edge, turn. (60 sts) This makes a crisp fold where the wall rises from the base.
Rows 2–6: Ch 1, sc in each st, turn. (60 sts)
Row 7 (RS, conversion row): Ch 1, sc in each of the first 59 sts, then 2 sc in the last st. (60 worked one per st + 1 added = 61 sts) Fasten off terracotta.
Row 8 (WS, Shell Row A): Join cream in the first st. Ch 1, sc in the first st, skip 2 sts, shell in the next st, skip 2 sts, sc in the next st. Rep from * 9 more times. Turn. (10 shells + 11 sc = 81 sts)
Row 9 (RS, Shell Row B): Work a half shell in the first sc, then skip 3 dc, sc in the center dc of the shell, skip 3 dc, shell in the next sc. Rep from * 8 more times. Skip 3 dc, sc in the center dc of the last shell, skip 3 dc, and work a 4-dc half shell in the last sc. (8 + 63 + 10 = 81 sts) Fasten off cream.
The Row 9 fans sit between the Row 8 fans, which leaves small triangular gaps between the two tiers. The wall should now measure about 2.9 in (7.4 cm).
Row 10 (WS, leveling row): Join terracotta. Ch 1, sc in the first 3 dc, skip the next dc, dc in the next sc. Then skip the next dc, sc in the next 5 dc, skip the next dc, dc in the next sc. Rep from * 8 more times. Skip the next dc, then sc in the last 2 dc and in the top of the turning ch. Turn. (3 + 1 + 54 + 3 = 61 sts) The dc stitches fill the dips between the shells, so the edge comes out level.
Rows 11–13: Ch 1, sc in each st. Turn after Rows 11 and 12 only. (61 sts)
Row 14 (rim): Don’t turn. Ch 1 and work reverse sc in each st. (61 sts) Fasten off, leaving a 24 in (61.0 cm) tail for sewing.
The extra stitches in the base let the wall bulge gently into a soft, bowl-like curve.
Hanging Tab
Use terracotta. Ch 7.
Row 1: Sc in the 2nd ch from the hook and in each remaining ch. Turn. (6 sts)
Rows 2–24: Ch 1, sc in each st, turn. (6 sts)
Fasten off, leaving a long tail. The tab measures 1.5 in × 5.3 in (3.8 cm × 13.5 cm).
Make All Pieces
- Terracotta only: 1 panel, 1 tab
- Terracotta and cream: 2 pockets
        ( ring )
          [tab]
   .-----------------.
   |   panel top     |
   |  [ POCKET 2 ]   |  base at 13 in (33.0 cm)
   |                 |
   |  [ POCKET 1 ]   |  base at 5 in (12.7 cm)
   |  panel bottom   |
   '-----------------'
Joining
Finish the border before you sew anything. Lay the panel RS up with the foundation chain running down the center. On both straight sides, place markers 5 in (12.7 cm) and 13 in (33.0 cm) up from the bottom edge.
Base edge. Each pocket’s straight edge has 40 row ends. A line across the panel’s straight section crosses exactly 40 body rounds: Rnds 1–20 on each side of the chain. Match these one to one. Line up the pocket’s magic-ring point with the chain, then whipstitch each row end to one panel round. Leave the border rounds free.
Wall edges. Stand the wall up. Sew each back edge (14 row ends) along the column of Rnd 20 stitches, which takes about 17 panel stitches, or 4.2 in (10.7 cm).
Pocket 1 sits on the 5 in (12.7 cm) line, so its rim is at 9.2 in (23.4 cm). Pocket 2 sits on the 13 in (33.0 cm) line, so its rim is at 17.2 in (43.7 cm). That leaves a 3.8 in (9.7 cm) gap between them.
Tension. Keep the stitches snug but don’t let the panel pucker. Sew through both loops of each panel stitch so the seam can carry weight.
Tab. Thread the tab through the ring and fold it in half. Center both ends on the front of the panel at the top. Sew down the bottom 1.5 in (3.8 cm), leaving about 1 in (2.5 cm) showing above the edge.
Size checkpoint: the panel should still lie flat at 9.8 in × 25.8 in (24.9 cm × 65.5 cm).
Border
Work the border at the same gauge, 16 sc per 4 in (10.2 cm). Continue from the end of Rnd 20.
Rnd 21: End A: (sc in the next 19 sts, inc) 3 times (63 sts). Side 1: sc in the next 64. End B: (sc in the next 19 sts, inc) 3 times (63 sts). Side 2: sc in the next 64. Join. (63 + 64 + 63 + 64 = 254 sts)
Rnd 22: End A: (sc in the next 20 sts, inc) 3 times (66 sts). Side 1: sc in the next 64. End B: (sc in the next 20 sts, inc) 3 times (66 sts). Side 2: sc in the next 64. Join. (66 + 64 + 66 + 64 = 260 sts) Fasten off and weave in the ends.
Why the math works: The straight sides never get increases, so they stay at 64 sts, which is 16 in (40.6 cm). Each end gains 3 sts per round, the same rate as the pocket bases, so the curves stay flat. The two border rounds widen the panel from 8.9 in (22.6 cm) to 9.8 in (24.9 cm). The height is 16 in plus 9.8 in, which gives 25.8 in (65.5 cm).
Final Blocking
- Mist the organizer lightly, or steam it without touching the yarn.
- Pin the panel to 9.8 in × 25.8 in (24.9 cm × 65.5 cm), keeping both curved ends smooth.
- Stuff each pocket with a toilet roll so it holds its round shape.
- Ease the cream fans open so they’re even.
- Let it dry for at least 12 hours before hanging.
Final Quality-Control Checklist
- Panel: 248 sts after Rnd 20 and 260 sts after Rnd 22
- Each base: 60 sts, with an 8.9 in (22.6 cm) straight edge
- Walls: 61 sts in Rows 7, 10, and 13, and 81 sts in each shell row
- Each pocket has 10 lower fans, plus 9 full fans and 2 half fans above them
- Pocket bases are level, at 5 in (12.7 cm) and 13 in (33.0 cm)
- The tab is centered and the ring hangs straight
- All ends are woven in
Troubleshooting
- Panel ends ruffle: check your gauge, or go down one hook size.
- Panel ends cup: loosen your tension on the increase rounds, or go up one hook size.
- Shell count is off: you need exactly 61 sts before Row 8.
- Wavy top edge: in Row 10, make sure every dip between shells gets a dc.
- Pocket sags: tighten the wall seams, or slide a piece of plastic canvas into the base.
- Panel puckers behind a pocket: sew the base again, matching the 40 row ends to the 40 rounds one to one.
Care
Hand wash in cool water and lay flat to dry, reshaping the pockets while they’re damp.
Final Notes
Every measurement follows from the gauge. At 16 sc × 18 rows = 4 in (10.2 cm), each pocket base is 8.9 in (22.6 cm) across and the panel body is 8.9 in × 24.9 in (22.6 cm × 63.2 cm). The border brings the panel to 9.8 in × 25.8 in (24.9 cm × 65.5 cm). Each base’s 40 row ends match the panel’s 40 body rounds. Check each measurement as you go and the pieces will fit together.
Happy crocheting!