

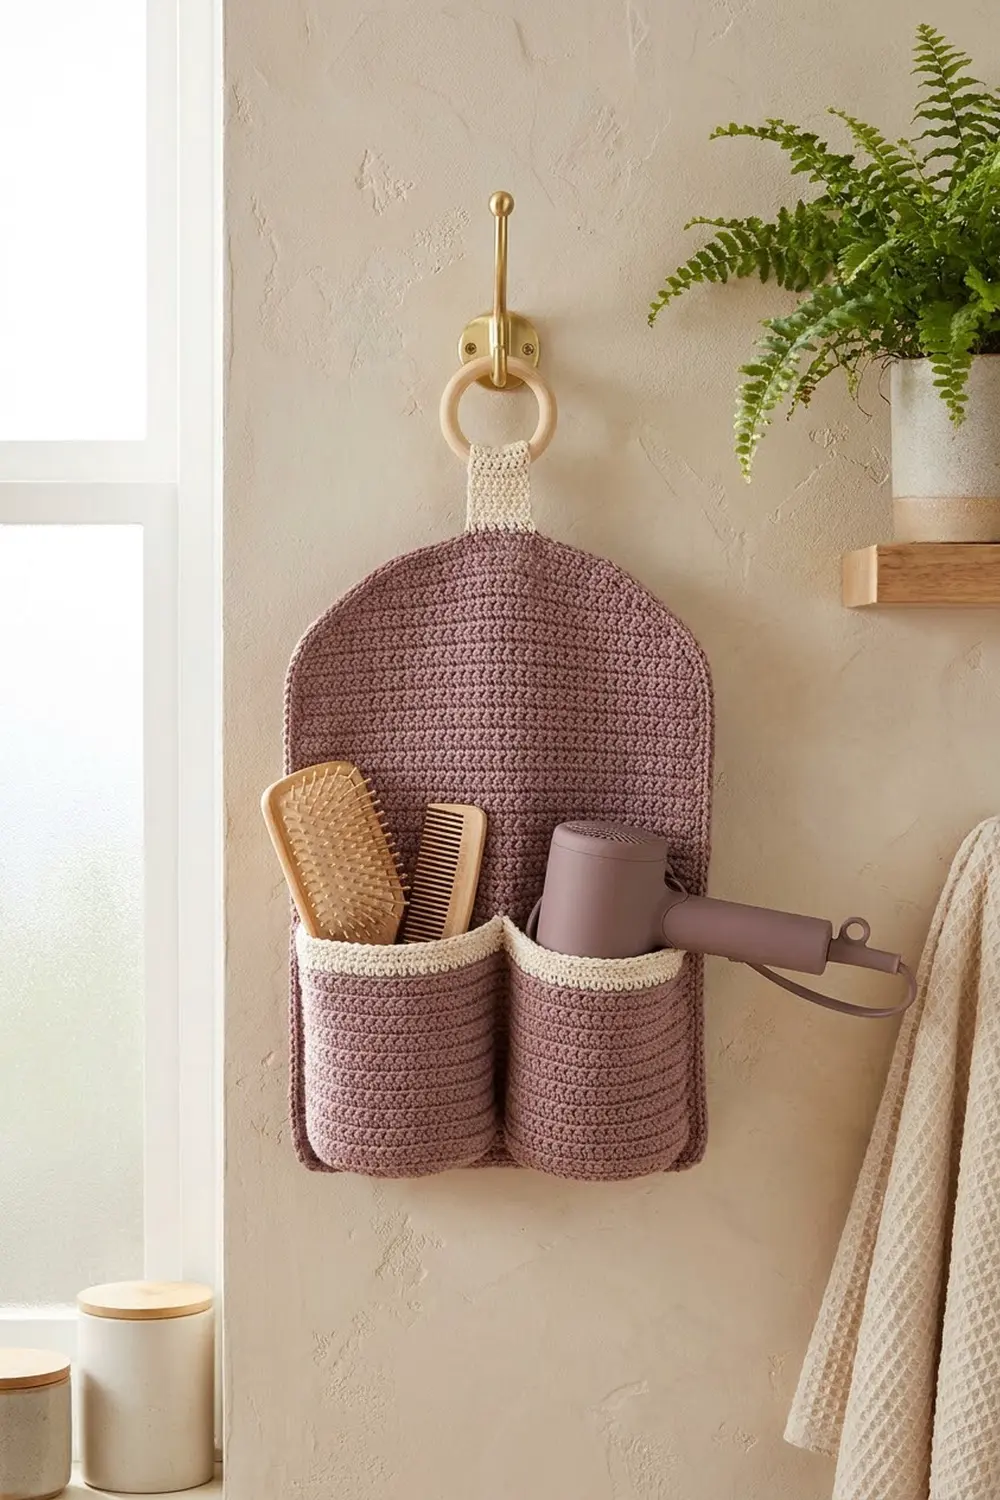
The Rosewood Duo is a bathroom organizer that hangs on the wall. It has an arched back panel and two deep ribbed cups, which hold a hairbrush, a comb, a hair dryer or a coiled styling cord. It hangs from a natural wooden ring and keeps the counter clear.
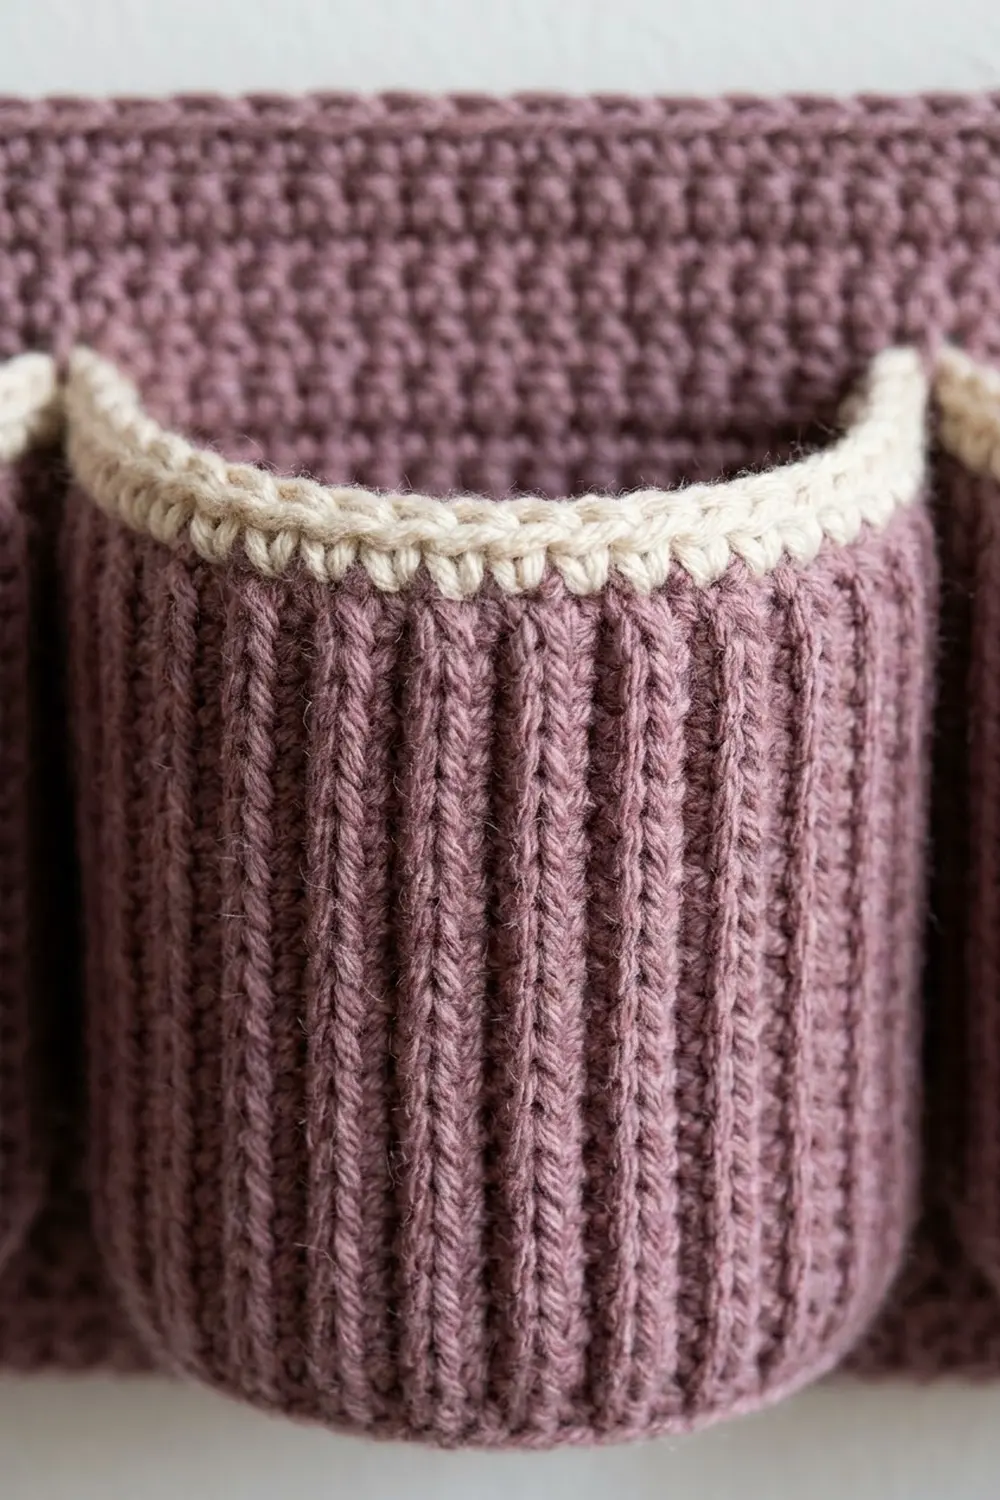
The main color is a soft, heathered dusty mauve. Cream rims finish each cup, and a matching cream tab holds the ring. The panel is plain single crochet with fine horizontal lines. The cups use back-loop ribbing, which makes vertical columns that look knitted.
This pattern uses US terms. The finished organizer measures 9 in (22.9 cm) wide x 11 in (27.9 cm) tall. It is about 14 in (35.6 cm) tall to the top of the ring. Each cup is 3.75 in (9.5 cm) across and 6.75 in (17.1 cm) tall.
You make six pieces: an arched panel worked in rows, two round bases, two ribbed tubes worked sideways and seamed, and one hanging tab. You join each tube to a base and add a cream rim. Then you sew the cups to the panel. A two-round border and the ring tab finish the piece.
Finished Size and Construction
- Finished size: 9 in (22.9 cm) x 11 in (27.9 cm); about 14 in (35.6 cm) to the top of the ring
- Skill level: Intermediate (shaping, seaming, sewing pieces together)
- Terminology: US
- Yarn weight: Aran / heavy worsted (#4)
- Hook: 5.0 mm (H-8)
- Number of pieces: 6 (1 panel, 2 bases, 2 tubes, 1 tab), plus 1 wooden ring
- Layout: 2 cups side by side on the lower panel; tab centered at the top
- Cup size: 3.75 in (9.5 cm) diameter x 6.75 in (17.1 cm) tall
- Panel size before border: 8 in (20.3 cm) x 10 in (25.4 cm)
- Border depth: 2 rounds, 0.5 in (1.3 cm) on every edge
Materials
Choose a smooth, firm cotton or cotton blend in aran weight. Cotton holds its shape under a brush or hair dryer and copes with bathroom humidity. Acrylic also works, but the cups will sag more. The amounts below assume 100 g = about 170 m.
- Dusty mauve (main color): 120 g, about 204 m
- Cream (rims and tab): 20 g, about 34 m
Tools:
- 5.0 mm (H-8) crochet hook
- Wooden ring, 2 in (5.1 cm) outer diameter
- Tapestry needle
- 8–10 locking stitch markers
- Ruler or measuring tape
- Pins and a blocking mat or folded towel
These amounts include a margin of about 20% for swatching and seaming.
Abbreviations (US Terms)
- ch – chain
- sl st – slip stitch
- sc – single crochet
- sc2tog – single crochet 2 together (1 decrease)
- sc3tog – single crochet 3 together (2 decreases)
- BLO – back loop only
- st(s) – stitch(es)
- rnd – round
- rep – repeat
- RS – right side
Special stitch – sc3tog: Insert the hook in the next st, yarn over and pull up a loop. Do this 3 times in total (4 loops on hook). Yarn over and pull through all 4 loops.
Sc in BLO: A normal sc worked under the back loop only. When you work it in turned rows, it makes deep ridges. On the cups, these ridges become the vertical ribs.
Gauge and Checkpoints
Plain sc: 14 sts x 16 rows = 4 in (10.2 cm)
BLO rib: 14 sts x 14 rows = 4 in (10.2 cm), with rows measured across the ridges
Make one whole cup (base and tube) before you start the panel. It tests both gauges and confirms that the base and tube join 42 to 42.
- Base after Rnd 7: 3.75 in (9.5 cm) across, 42 sts
- Tube after Row 42, laid flat: 6 in (15.2 cm) x 12 in (30.5 cm)
- Panel after Row 32: 8 in (20.3 cm) x 8 in (20.3 cm)
- Panel after Row 40: 8 in (20.3 cm) x 10 in (25.4 cm)
- Panel after border: 9 in (22.9 cm) x 11 in (27.9 cm)
Too big? Go down half a hook size. Too small? Go up half a hook size. Never change the stitch counts. The pieces only fit together if the counts stay the same.
Cup Base (Make 2)
Use mauve. Join each rnd with a sl st to the first sc. Do not turn.
Rnd 1: Make a magic ring. Ch 1, 6 sc in ring. (6 sts)
Rnd 2: Ch 1, 2 sc in each st. (12 sts)
Rnd 3: Ch 1, sc in next st, 2 sc in next st; rep around. (18 sts)
Rnd 4: Ch 1, sc in next 2 sts, 2 sc in next st; rep around. (24 sts)
Rnd 5: Ch 1, sc in next st, 2 sc in next st, sc in next 3 sts, 2 sc in next st; rep from * 4 more times, sc in next 2 sts. (30 sts)
Rnd 6: Ch 1, sc in next 4 sts, 2 sc in next st; rep around. (36 sts)
Rnd 7: Ch 1, sc in next 3 sts, 2 sc in next st, sc in next 5 sts, 2 sc in next st; rep from * 4 more times, sc in next 2 sts. (42 sts)
Fasten off. The base should lie flat and measure 3.75 in (9.5 cm) across. Its outer edge is 12 in (30.5 cm) around.
Cup Tube (Make 2)
Use mauve. The tube is worked sideways, so each row runs from the bottom of the cup to the top. That makes the BLO ridges stand up as vertical ribs.
Foundation: Ch 22.
Row 1: Sc in 2nd ch from hook and in each ch across. (21 sts)
Rows 2–42: Ch 1, turn, sc in BLO of each st. (21 sts)
Checkpoint: 6 in (15.2 cm) tall x 12 in (30.5 cm) wide, with 21 ridges.
Seam: Fold the piece so Row 42 meets the foundation chain. Sl st through each st of Row 42 and the matching chain loop (21 sl sts). Turn the tube so the seam is on the inside.
Join the base: Hold the base inside the bottom opening with its RS facing out. Join mauve at the seam. Ch 1, then sc through each Rnd 7 st of the base and the matching row-end of the tube (42 sc). Sl st to join. Both edges have 42 sts, so they join exactly 1 to 1 and form a rounded ridge along the bottom.
Cream rim:
Rnd 1: Join cream at the seam on the top edge. Ch 1, sc in each row-end. (42 sts)
Rnds 2–3: Ch 1, sc in each st. (42 sts)
Fasten off. The rim is 0.75 in (1.9 cm) deep, so each cup is 6 + 0.75 = 6.75 in (17.1 cm) tall.
Back Panel
Use mauve. Work in turned rows. The ch 1 at the start of each row does not count as a st.
Foundation: Ch 29.
Row 1 (RS): Sc in 2nd ch from hook and in each ch across. (28 sts)
Rows 2–32: Ch 1, turn, sc in each st. (28 sts)
Checkpoint: 8 in (20.3 cm) x 8 in (20.3 cm).
Arch shaping: The decreases start slowly and then speed up. This gives rounded shoulders and a gently flattened top.
Row 33: Ch 1, sc2tog, sc in next 24 sts, sc2tog. (26 sts)
Row 34: Ch 1, sc in each st. (26 sts)
Row 35: Ch 1, sc2tog, sc in next 22 sts, sc2tog. (24 sts)
Row 36: Ch 1, sc in each st. (24 sts)
Row 37: Ch 1, sc2tog, sc in next 20 sts, sc2tog. (22 sts)
Row 38: Ch 1, sc2tog, sc in next 18 sts, sc2tog. (20 sts)
Row 39: Ch 1, sc2tog, sc in next 16 sts, sc2tog. (18 sts)
Row 40: Ch 1, sc3tog, sc in next 12 sts, sc3tog. (14 sts)
Fasten off. The panel now measures 8 in (20.3 cm) x 10 in (25.4 cm), with a flat top 4 in (10.2 cm) wide.
Hanging Tab (Make 1)
Use cream. Ch 4.
Row 1: Sc in 2nd ch from hook and in each ch across. (3 sts)
Rows 2–14: Ch 1, turn, sc in each st. (3 sts)
Fasten off and leave a long tail. The tab measures about 0.9 in (2.3 cm) x 3.5 in (8.9 cm).
Make All Pieces
- Mauve: 1 panel, 2 bases, 2 tubes
- Cream: 2 rims (worked onto the cups), 1 tab
- Hardware: 1 wooden ring
Layout (front view, with panel sts numbered 1–28 from left to right on Row 1):
          [ ring ]
          [ tab  ]
     .--------------.
    /    arched      \
   |      top         |
   | [CUP A]  [CUP B] |
   | ctr st 8 ctr st21|
   | rows 1-27        |
   '------------------'
      2-rnd border
Joining
Method: Whipstitch with mauve and a tapestry needle. Sew each cup along two vertical rib lines and across the back of its base.
Orientation: Turn each cup so its tube seam faces the panel. Mark tube Rows 40 and 3, which are the third row on each side of the seam.
Placement:
- Cup A: sew the Row 40 line along panel st 5 and the Row 3 line along st 11. The cup’s center falls on st 8.
- Cup B: sew the Row 40 line along st 18 and the Row 3 line along st 24. The cup’s center falls on st 21.
These positions mirror each other (28 − 5 + 1 = 24; 28 − 11 + 1 = 18). The cup centers are 13 sts apart, which is 3.75 in (9.5 cm), so the cups just touch.
Stitch-to-stitch logic: Each rib line has 21 tube sts, 6 in (15.2 cm) tall, which matches panel Rows 1–24. Join 7 tube sts to every 8 panel rows, three times along each line. Then join the 3 rim rnds 1 to 1 to panel Rows 25–27. That is 27 rows, or 6.75 in (17.1 cm), which is exactly the cup height. Last, tack the base ridge to Row 1 across the 7 sts between the two lines.
Tension: Pull each stitch snug enough to close the gap, but never enough to pucker the panel. Every 2 in (5.1 cm), lay the piece flat and check.
Size checkpoint: The cups cover almost the full 8 in (20.3 cm) width of the panel, and both rims end level at Row 27.
Border
Border gauge: 14 sc = 4 in (10.2 cm). Each rnd adds 0.25 in (0.6 cm) of depth.
Rnd 1: With the RS facing, join mauve in the first foundation loop at the bottom right corner.
- Bottom: Ch 1, 3 sc in the same st, sc in next 26 sts, 3 sc in last st. (32 sts)
- Side, Rows 1–32: Sc in next 7 row-ends, skip 1 row-end; rep 3 more times. (28 sts)
- Arch, Rows 33–40: Sc in each row-end of Rows 33–36, then 2 sc in each row-end of Rows 37–40. (12 sts)
- Top: Sc in each st of Row 40. (14 sts)
- Arch, Rows 40–33: 2 sc in each row-end of Rows 40–37, then sc in each row-end of Rows 36–33. (12 sts)
- Side, Rows 32–1: Skip 1 row-end, sc in next 7 row-ends; rep 3 more times. (28 sts)
- Sl st to the first sc.
Total: 32 + 28 + 12 + 14 + 12 + 28 = 126 sts.
Rnd 2: Ch 1. Sc in each st around, but work 3 sc in the center sc of each bottom corner and 2 sc in the 6th sc of each 12-st arch section. Sl st to join. Count: 126 sts worked 1 per st + 4 extra at the corners + 2 extra on the arches = 132 sts.
Rnd 2 by section: bottom 36 (including both corner groups), each side 28, each arch 13, top 14. Check: 36 + 28 + 28 + 13 + 13 + 14 = 132.
Why the math works: Rows are denser than stitches: 16 rows but only 14 sts per 4 in (10.2 cm). So 7 sc in every 8 row-ends puts 28 sts along 32 rows, and both measure 8 in (20.3 cm). The arch edge curves for about 3.4 in (8.6 cm). At 3.5 sts per inch, 12 sts cover that 3.4 in. The extra sts go on Rows 37–40, where the curve is sharpest. Two rnds add 0.5 in (1.3 cm) all around, so 8 x 10 in becomes 9 x 11 in (22.9 x 27.9 cm).
Attach the tab: Fold the tab around the ring and center it on the top edge, with one end on the front and one on the back. Each end overlaps the panel by 0.5 in (1.3 cm), leaving 1 in (2.5 cm) of doubled tab below the ring. Sew through all layers.
Final Blocking
- Weave in all ends along stitch columns of the same color.
- Lay the organizer face up on a blocking mat or folded towel.
- Pin the panel to 9 in (22.9 cm) x 11 in (27.9 cm). Check that the arch is even on both sides and the flat top is 4 in (10.2 cm) wide.
- Stuff each cup firmly with a rolled hand towel so it measures 3.75 in (9.5 cm) across.
- Steam from about 1 in (2.5 cm) above the fabric. Do not press.
- Let it dry completely, at least 12 hours, before you remove the pins.
Final Quality-Control Checklist
- Panel is 9 in (22.9 cm) x 11 in (27.9 cm), and the arch is even on both sides
- Border has 132 sts, and the edges lie flat
- Cups are 3.75 in (9.5 cm) across and 6.75 in (17.1 cm) tall
- Tube seams are hidden against the panel
- Cup centers are on sts 8 and 21, and the rims end level at Row 27
- Each rim is 3 rnds of 42 sc and lies flat
- Tab is centered and sewn through both layers, and the ring hangs straight
- All ends are secure
Troubleshooting
Base cups or ruffles: Change the hook size for the base only. Keep 42 sts.
Tube doesn’t fit the base: The tube needs exactly 42 rows. Add or remove rows.
Ribs look flat: Work in the BLO and turn on every row.
Side border ruffles: Keep to 7 sc per 8 row-ends.
Arch looks pointed: Rows 34 and 36 must have no decreases.
Cups lean forward: Add a third whipstitch line at the tube seam, or tack the rims more firmly to Rows 25–27.
Panel puckers: Remove the stitching and resew with looser whipstitches.
Care
Hand wash in cool water and roll in a towel to press out the water. Reshape the cups over rolled towels and dry flat.
Final Notes
Here is the measurement chain. A 42-st base is 12 in (30.5 cm) around and matches the tube’s 42 rows. The tube’s 21 sts plus 3 rim rnds make a 6.75 in (17.1 cm) cup. Two cups 3.75 in (9.5 cm) across fit on an 8 in (20.3 cm) panel. A border of 126 and then 132 sts brings the panel to 9 x 11 in (22.9 x 27.9 cm). If every checkpoint matches, the organizer will come out right.
Happy crocheting!