
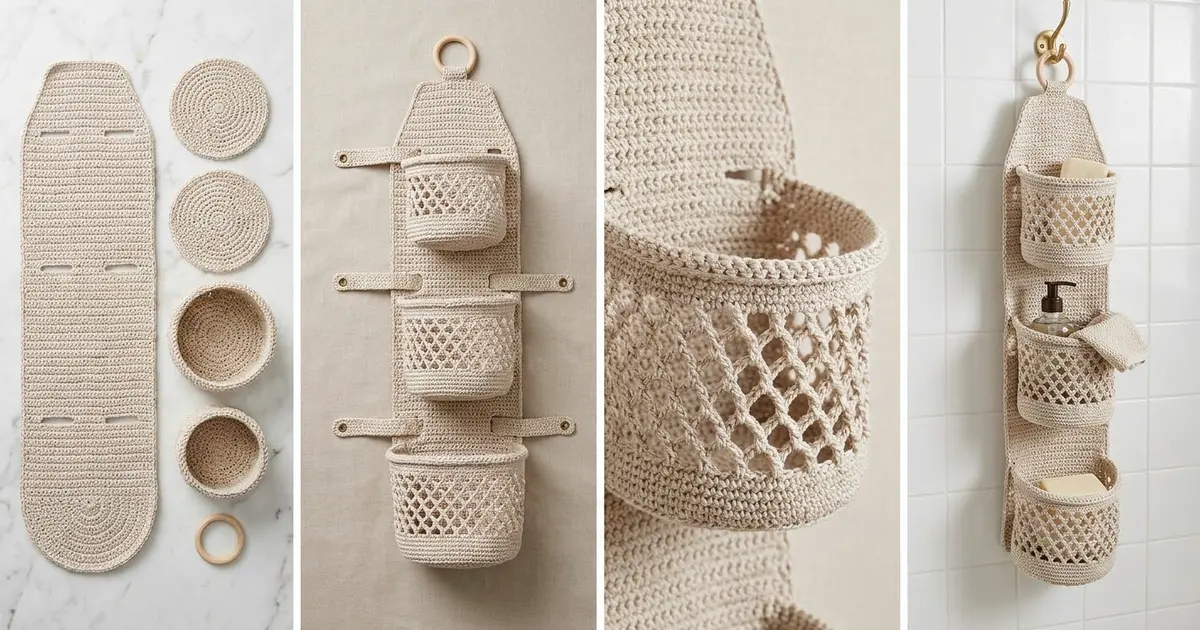
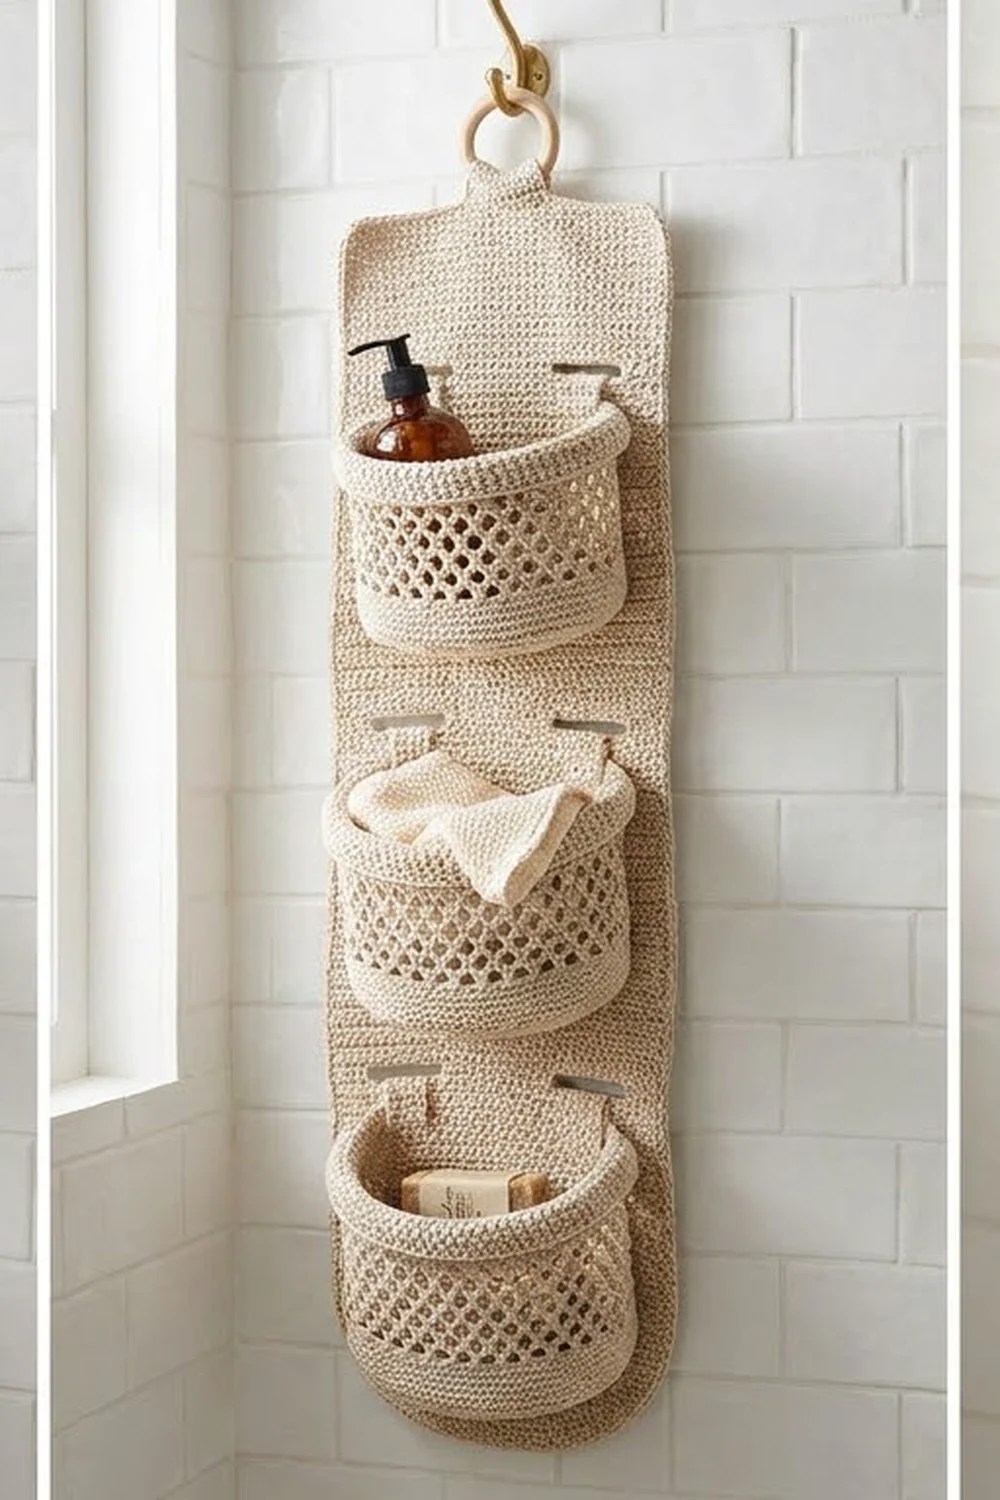
The Lattice Cascade organizer is a three-tier hanging caddy. A long, tapered back panel holds three open-lattice baskets stacked down its front, and the whole thing hangs from a smooth wooden ring. It works well in a shower, beside a sink, or on a door.
Everything is worked in one warm oatmeal-beige cotton. Each basket has a solid round base, a short solid band, a diamond lattice of chain loops, and a thick rolled rim. The back panel is plain single crochet, so its row ridges contrast quietly with the open baskets.
The pattern uses US terms. The finished panel measures 6.8 in (17.3 cm) wide and 22.4 in (56.9 cm) tall, not counting the 2 in (5.1 cm) ring. The baskets are 3.8 in (9.7 cm), 4.8 in (12.2 cm), and 5.7 in (14.5 cm) across.
You’ll make seven pieces: one panel, three baskets, and three straps. The panel is worked bottom-up in rows and has built-in slots. The baskets are worked in rounds from the base up. Then the baskets are sewn to the panel and secured with straps.
Finished Size and Construction
- Finished size: 6.8 in x 22.4 in (17.3 cm x 56.9 cm) panel, plus a 2 in (5.1 cm) ring
- Skill level: Easy-intermediate
- Terminology: US
- Yarn weight: Worsted (#4) cotton
- Hook: 5.0 mm (H-8)
- Number of pieces: 7 (1 panel, 3 baskets, 3 straps)
- Layout: Three baskets stacked vertically, small at the top and large at the bottom
- Basket sizes (diameter x height): 3.8 in x 4 in (9.7 cm x 10.2 cm); 4.8 in x 4.5 in (12.2 cm x 11.4 cm); 5.7 in x 5 in (14.5 cm x 12.7 cm)
- Size before border: 6 in x 22 in (15.2 cm x 55.9 cm), with the tab folded
- Border depth: 0.4 in (1.0 cm), 2 rounds
Materials
Use a smooth, firmly twisted worsted-weight cotton. It holds its shape under load, handles humidity, and shows the lattice crisply. Very soft or splitty yarns make the baskets sag.
- Oatmeal beige: 250 g, approx. 450 m (492 yd)
Tools: 5.0 mm (H-8) hook, a 2 in (5.1 cm) wooden ring, a tapestry needle, 6 locking stitch markers, rustproof pins, a blocking mat, scissors, and a measuring tape.
The yarn quantity includes a margin of about 15% for swatching and gauge differences.
Abbreviations (US Terms)
- ch – chain
- sl st – slip stitch
- sc – single crochet
- inc – 2 sc in the same stitch
- sc2tog – single crochet 2 together
- BLO – back loop only
- sk – skip
- sp – space
- MR – magic ring
- st(s) – stitch(es)
Crab stitch (reverse sc): Work from left to right. Insert the hook into the next stitch to the right, yarn over, pull up a loop, yarn over, and pull through both loops. This makes the rolled, cord-like edge.
Gauge and Checkpoints
Gauge: 16 sc x 18 rows = 4 in (10.2 cm). In other words, 4 sts and 4.5 rows per inch.
Make the small basket base first as your test piece.
- Base: After Round 8, it should be 3.8 in (9.7 cm) across and lie flat.
- Panel: Row 1 (16 sts) should be 4 in (10.2 cm) wide. After Row 45, the panel should be 6 in (15.2 cm) wide and 10 in (25.4 cm) tall.
- Baskets: Each one should be within 0.25 in (0.6 cm) of its listed size.
If your pieces are too big, go down half a hook size. If they’re too small, go up half a size. If the base cups, go up half a size for the bases only. If it ruffles, go down half a size.
Basket Bases (Make 3)
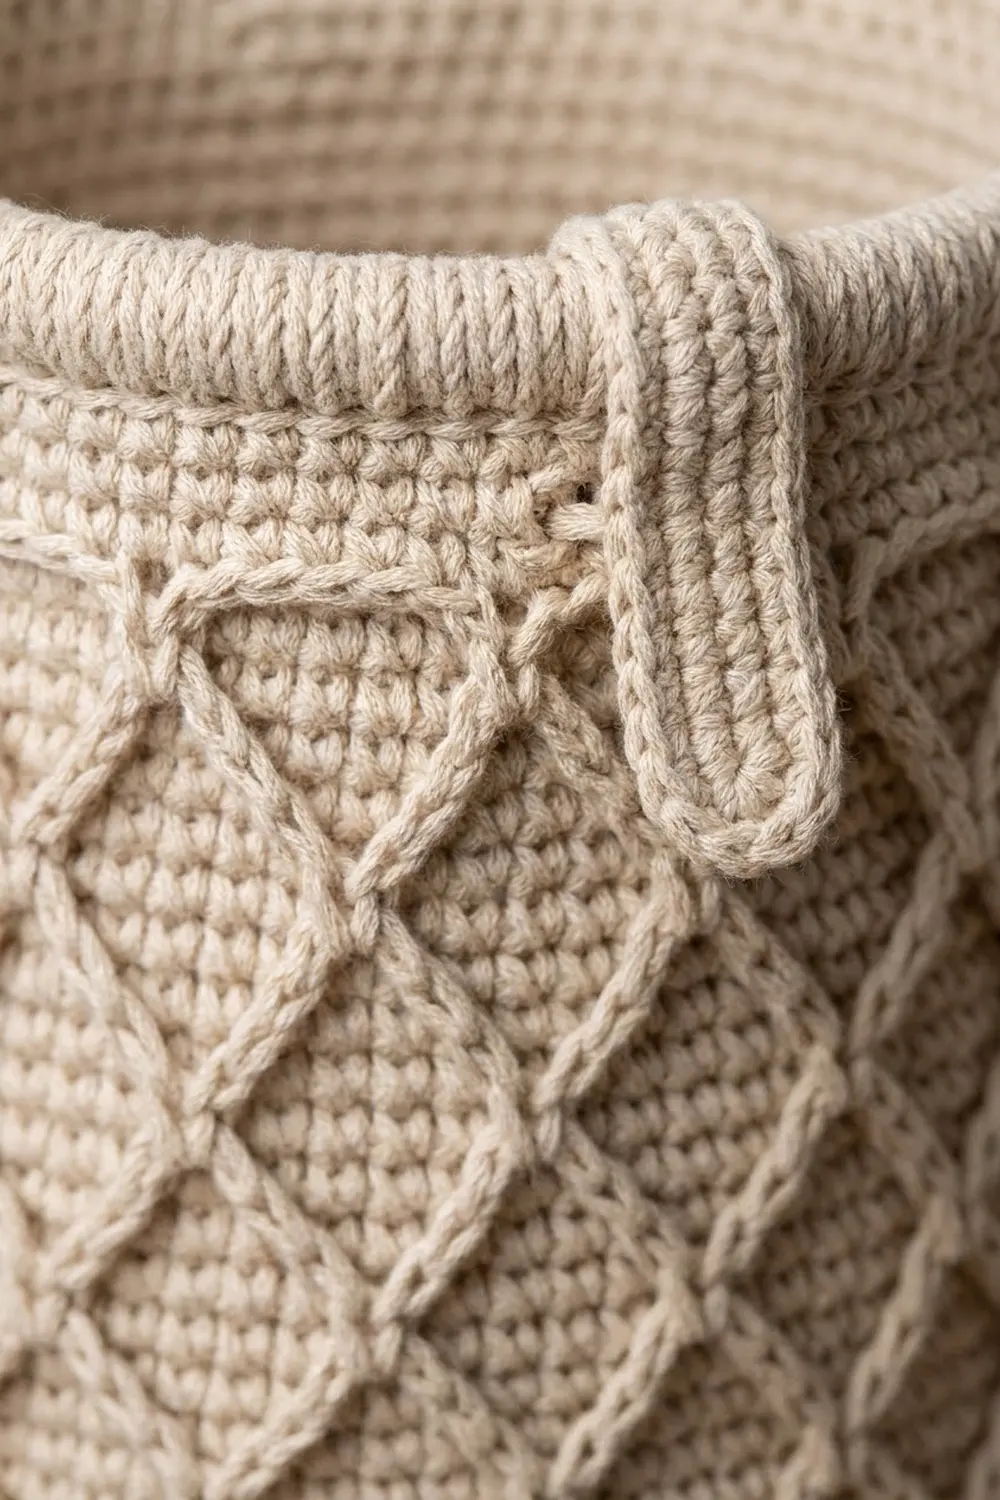
Work in continuous spiral rounds and move a marker up each round. Stagger the increases so the circle stays round.
- Round 1: 6 sc in MR. (6)
- Round 2: Inc in each st. (12)
- Round 3: Sc 1, inc 6 times. (18)
- Round 4: Sc 1, inc, sc 1 6 times. (24)
- Round 5: Sc 3, inc 6 times. (30)
- Round 6: Sc 2, inc, sc 2 6 times. (36)
- Round 7: Sc 5, inc 6 times. (42)
- Round 8: Sc 3, inc, sc 3 6 times. (48)
Small: Stop here. The base has 48 sts, a 12 in (30.5 cm) circumference, and measures 3.8 in (9.7 cm) across.
- Round 9: Sc 7, inc 6 times. (54)
- Round 10: Sc 4, inc, sc 4 6 times. (60)
Medium: Stop here. The base has 60 sts, a 15 in (38.1 cm) circumference, and measures 4.8 in (12.2 cm) across.
- Round 11: Sc 9, inc 6 times. (66)
- Round 12: Sc 5, inc, sc 5 6 times. (72)
Large: Stop here. The base has 72 sts, an 18 in (45.7 cm) circumference, and measures 5.7 in (14.5 cm) across.
Sl st to the next st. Don’t fasten off. From here on, every round is joined.
Basket Walls
Counts are written small / medium / large. The base count (B) is 48 / 60 / 72.
Solid band
– Wall Round 1: Ch 1, sc in BLO of each st, sl st to the first sc. (B) The unused front loops form a ridge that turns the base into the wall. You’ll also use this ridge for sewing later.
– Wall Rounds 2–3: Ch 1, sc in each st, sl st to join. (B)
Diamond lattice
– Mesh Round 1: Ch 1, sc in the first st, ch 5, sk 3, sc in next st, repeat around, ending with ch 5, sk the last 3 sts, sl st to the first sc. Each loop uses 4 sts, so you have B ÷ 4 = 12 / 15 / 18 loops.
– Mesh Round 2: Sl st into the first 3 ch of the next loop, ch 1, sc in the same loop, ch 5, sc in the next ch-5 sp, repeat around, ending with ch 5, sl st to the first sc. (12 / 15 / 18 loops) Each sc sits at the center of a loop below it. That staggers the loops and creates the diamond lattice.
– Repeat Mesh Round 2 until you have 5 / 6 / 7 mesh rounds in total.
Rim
– Rim Round 1 (conversion): Sl st into the next loop, ch 1, work 4 sc in each ch-5 sp, sl st to join. The count is (12 / 15 / 18 loops x 4 sc) = 48 / 60 / 72. That’s exactly the base count again, so the rim can’t flare.
– Rim Rounds 2–3: Ch 1, sc in each st, sl st to join. (48 / 60 / 72)
– Rim Round 4: Ch 1, crab stitch in each st, sl st to join. (48 / 60 / 72)
Fasten off and weave in the ends.
Height check: The baskets should be 4 / 4.5 / 5 in (10.2 / 11.4 / 12.7 cm) tall. Each mesh round adds about 0.5 in (1.3 cm), so add or remove one if needed.
Back Panel (Make 1)
Ch 1 at the start of each row (it doesn’t count as a stitch), and turn at the end.
Rounded bottom
– Row 1: Ch 17, sc in the 2nd ch from the hook and in each ch across. (16)
– Row 2: Inc, sc 14, inc. (18)
– Row 3: Inc, sc 16, inc. (20)
– Row 4: Inc, sc 18, inc. (22)
– Row 5: Inc, sc 20, inc. (24)
Straight section
– Rows 6–32: Sc across. (24)
– Row 33 (slot 1): Sc 10, ch 4, sk 4, sc 10. (20 sc + 4 ch = 24)
– Row 34: Sc 10, 4 sc in the ch-4 sp, sc 10. (24)
– Rows 35–49: Sc across. (24)
Taper
On decrease rows, work sc2tog, sc to the last 2 sts, sc2tog. All rows not listed below are sc across at the current count.
- Row 50: Decrease. (22)
- Row 55: Decrease. (20)
- Row 60: Decrease. (18)
- Row 61 (slot 2): Sc 7, ch 4, sk 4, sc 7. (18)
- Row 62: Sc 7, 4 sc in the ch-4 sp, sc 7. (18)
- Row 65: Decrease. (16)
- Row 70: Decrease. (14)
- Row 75: Decrease. (12)
- Row 80: Decrease. (10)
- Row 85: Decrease. (8)
- Row 86 (slot 3): Sc 2, ch 4, sk 4, sc 2. (8)
- Row 87: Sc 2, 4 sc in the ch-4 sp, sc 2. (8)
- Row 90: Decrease. (6)
Tab
– Rows 91–108: Sc across. (6)
Don’t fasten off. Go straight into the border.
Checkpoint: Unfolded, the panel is 108 rows, which is 24 in (61.0 cm). The body (Rows 1–90) is 20 in (50.8 cm), and the tab is 4 in (10.2 cm).
Straps (Make 3)
- Row 1: Ch 5, sc in the 2nd ch from the hook and across. (4)
- Rows 2–10: Ch 1, sc across, turn. (4)
- Row 11 (eyelet): Ch 1, sc 1, ch 2, sk 2, sc 1, turn. (2 sc + 2 ch = 4)
- Row 12: Ch 1, sc 1, 2 sc in the ch-2 sp, sc 1, turn. (4)
- Rows 13–14: Ch 1, sc across, turn. (4)
- Row 15: Ch 1, sc2tog twice. (2)
Fasten off and leave a 10 in (25.4 cm) tail. Each strap is 1 in (2.5 cm) wide and 3.3 in (8.4 cm) long, which matches the 4-st slots exactly.
Make All Pieces
Everything is in the single oatmeal-beige color:
- Panel with border: 1, about 75 g
- Large basket: 1, about 55 g
- Medium basket: 1, about 42 g
- Small basket: 1, about 32 g
- Straps: 3, about 2 g each
That’s about 210 g in total, well inside the 250 g you have.
Layout (front view, panel rows):
          ( ring )
        [ tab, folded ]        Rows 91-108
     === slot 3 ===            Row 86 -> strap 3
    [  SMALL basket  ]         Rows 64-82
      === slot 2 ===           Row 61 -> strap 2
   [   MEDIUM basket   ]       Rows 36-56
      === slot 1 ===           Row 33 -> strap 1
  [     LARGE basket     ]     Rows 6-28
  \______________________/     Row 1, rounded bottom
Joining
Border and block the panel first (see below), then assemble.
- Ring: Fold Rows 100–108 over the ring to the back of the panel so Row 108 lies on Row 91. Whipstitch the 6 top sts to the 6 sts of Row 91, one to one, then close the sides.
- Baskets: Center 8 sts at the back of each basket. Sew them stitch to stitch to the center 8 sts of a panel row, along two lines:
- Large: Sew the base ridge to Row 6 and Rim Round 2 to Row 28.
- Medium: Sew the ridge to Row 36 and the rim to Row 56.
- Small: Sew the ridge to Row 64 and the rim to Row 82.
Each line is 8 sts against 8 sts, so nothing gathers.
3. Straps: Push the plain end through the slot from behind, bring it down over the rim, and tuck it inside the basket. Sew strap Rows 1–3 to the inside of the rim. Sew the eyelet end flat to the back of the panel, stitching around the eyelet.
Tension: Make one whipstitch per stitch and pull each one just snug. If they’re too tight, the panel puckers. If they’re too loose, loaded baskets tilt forward.
Size checkpoint: The assembled panel should still measure 6.8 in x 22.4 in (17.3 cm x 56.9 cm), and the rims should sit level.
Border
The border goes around the unfolded panel at body gauge: 4 sc per inch.
Round 1 (conversion): Ch 1, then work:
- Top of tab: 1 sc in each st. (6)
- First side: 8 sc over every 9 row ends. That’s 108 ÷ 9 x 8 = 96 sc.
- Bottom: 1 sc in each foundation ch. (16)
- Second side: 8 sc over every 9 row ends. (96)
At each of the 4 corners, work 3 sc in the corner st. The corner st is already counted in its side, so this adds 2 extra sts per corner.
Total: (6 + 96 + 16 + 96 = 214) + (4 corners x 2 extra = 8) = 222 sts. Sl st to join.
Round 2: Ch 1, crab stitch in each st. (222) Sl st to join and fasten off.
Why the math works: The rows run 4.5 per inch, but sc lies at 4 per inch. If you worked 1 sc per row end, you’d put 108 sc into 24 in (61.0 cm), and the edge would ruffle. With 96 sc over the same 24 in, you get exactly 4 per inch, so the edge stays flat.
The border adds 0.4 in (1.0 cm) to each edge. That takes the width from 6 in to 6.8 in (15.2 cm to 17.3 cm). The folded height goes from 22 in to 22.4 in (55.9 cm to 56.9 cm), because only the bottom edge adds depth.
Final Blocking
- Weave in all ends.
- Spray the panel until it’s evenly damp, pin it unfolded to 6.8 in x 24.8 in (17.3 cm x 63.0 cm), and let it dry.
- Dampen each basket and stuff it firmly with a rolled towel or a jar of the right diameter. Flatten the base and straighten the lattice.
- While the baskets are damp, gently open each diamond with your fingertips.
- Let everything dry for 24 hours, then assemble.
- After assembly, lightly spritz the organizer and hang it to settle the seams.
Final Quality-Control Checklist
- The bases measure 3.8 / 4.8 / 5.7 in (9.7 / 12.2 / 14.5 cm) and lie flat.
- The baskets have 12 / 15 / 18 loops and 48 / 60 / 72 rim sts.
- The panel has 108 rows, slots at Rows 33, 61, and 86, and 6 tab sts.
- The border has 222 sts, with 96 on each side.
- The folded panel measures 6.8 in x 22.4 in (17.3 cm x 56.9 cm).
- The ring is secure, the baskets are level and centered, and the straps lie flat.
Troubleshooting
- The lattice twists: Put each sc into the center of the loop.
- The rim flares: Recount Rim Round 1. It should have exactly 4 sc per loop.
- The base cups: Go up a hook size for the bases.
- The panel edges ruffle: Each side needs 96 sc, not 108.
- The straps won’t pass through: Add one chain to each slot.
- The baskets tip forward: Add a second whipstitch line at the base ridge.
Care
Hand wash in cool water with mild soap and roll it in a towel. Dry it flat, with the baskets stuffed to hold their shape. Don’t tumble dry.
Final Notes
The organizer depends on one measurement chain: 4 sts and 4.5 rows per inch. That gives you bases of 48 / 60 / 72 sts and lattice rounds of 12 / 15 / 18 loops. Converting back at 4 sc per loop returns each rim to its base count. The 24-st panel tapers to a 6-st tab, and the border of 96 sc per side keeps the 6.8 in x 22.4 in (17.3 cm x 56.9 cm) panel flat. If you check each stage before you move on, the pieces will fit together without any adjustments.
Happy crocheting!