

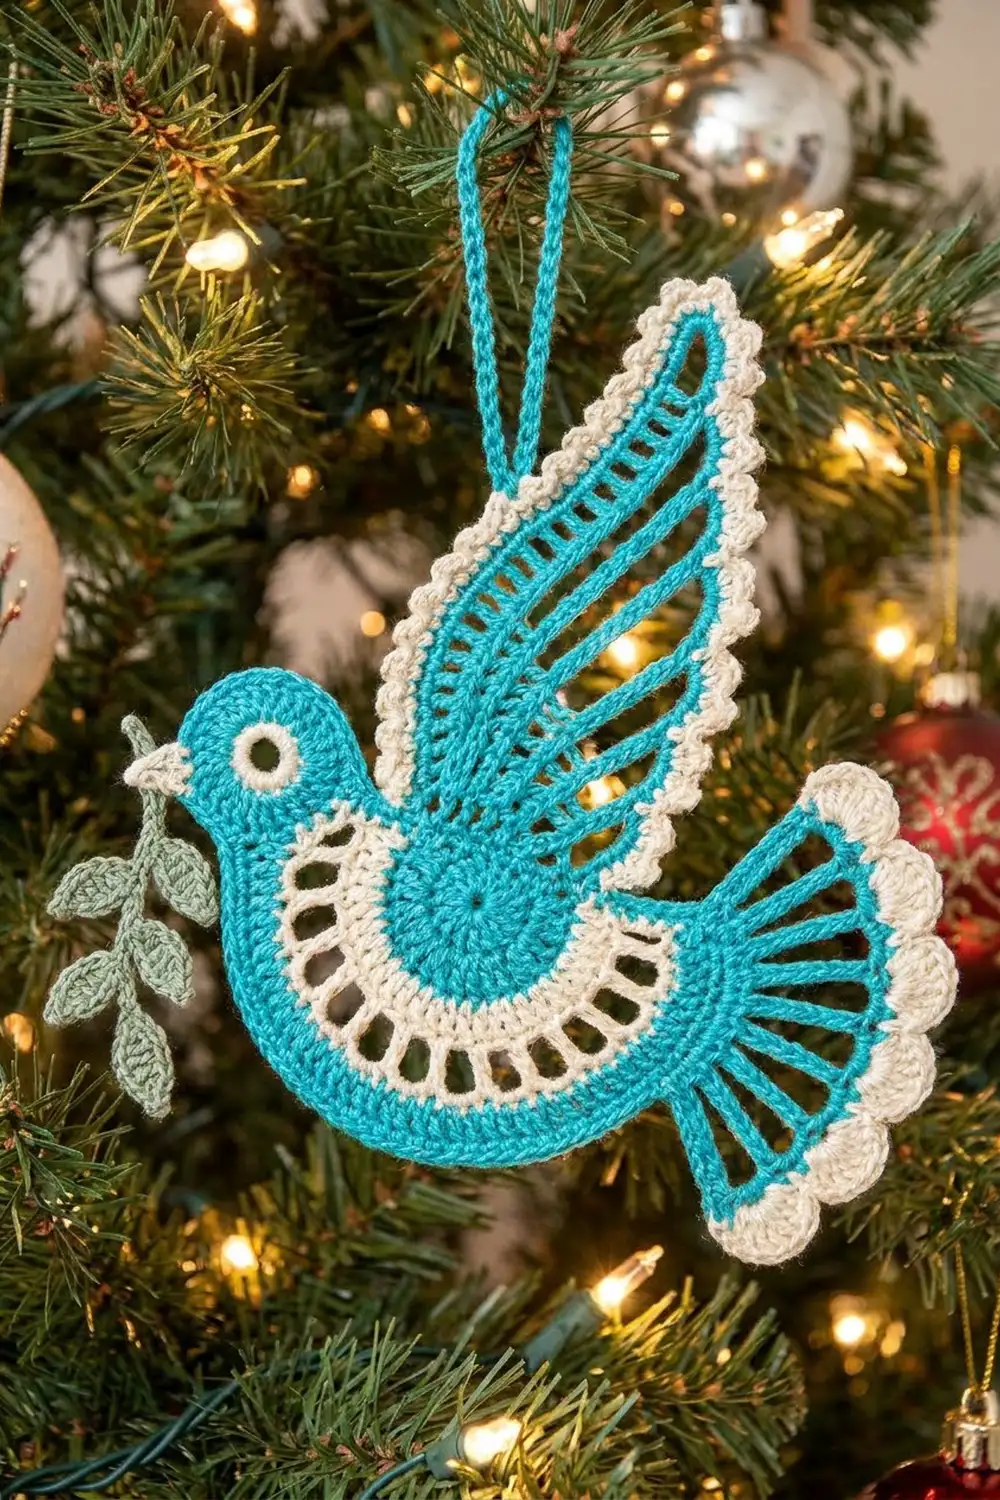
The Lacy Peace Dove is a flat Christmas ornament crocheted in thread. It has a turquoise body, a sweeping turquoise wing outlined in cream, a fan-shaped tail with a cream picot edge, and a small sage-green olive sprig tucked into the beak. A turquoise chain loop at the wing tip lets it hang level on the tree.
It has a classic lace look: open windows across the belly, ladder-style feathers and crisp cream outlines that catch the light. Turquoise and cream give it a fresh, wintry feel, and the green sprig adds a small pop of color.
This pattern uses US crochet terms. The finished ornament measures about 6 in (15.2 cm) wide and 5 in (12.7 cm) tall, plus a 2 in (5.1 cm) hanging loop. That makes the total hanging height about 7 in (17.8 cm).
You will crochet six small parts: head, body, wing, tail, sprig and loop. The body is a half circle worked in rows. The wing is a base row with chain-based ladder feathers, and the tail is a small fan. You add the cream outlines as a border, then sew everything together appliqué-style into one ornament.
Finished Size and Construction
- Finished size: 6 in (15.2 cm) wide x 5 in (12.7 cm) tall, plus 2 in (5.1 cm) loop
- Skill level: Intermediate
- Terminology: US crochet terms
- Yarn weight: Size 3 crochet cotton thread (super fine)
- Hook: 2.25 mm (US B-1)
- Number of pieces: 6, sewn into one ornament
- Layout: head at the front, body below, wing rising from the body’s straight edge, tail at the back, sprig at the beak, loop at the wing tip
- Piece sizes: head 1.5 in (3.8 cm) across; body 3.75 in (9.5 cm) along the straight edge and 1.9 in (4.8 cm) deep
- Size before border: wing 2.75 in (7.0 cm) tall, tail 2.25 in (5.7 cm) wide
- Border depth: about 1/8 in (0.3 cm), plus picots
Materials
Choose a mercerized size 3 cotton thread. It holds a crisp shape after starching and shows the lace clearly. Avoid fuzzy cotton, because it fills in the windows.
- Color A, Turquoise: 8 g, about 24 m (head, body, wing, tail, loop)
- Color B, Cream: 4 g, about 12 m (body band, wing and tail border)
- Color C, Sage Green: 2 g, about 6 m (sprig)
Tools:
- 2.25 mm (US B-1) crochet hook
- Tapestry needle
- Small scissors
- Stitch markers
- Blocking board and rust-proof pins
- Spray starch or fabric stiffener
All quantities include a margin for a gauge test and weaving in ends.
Abbreviations (US Terms)
- ch: chain
- sl st: slip stitch
- sc: single crochet
- hdc: half double crochet
- dc: double crochet
- tr: treble crochet
- sp: space
- st(s): stitch(es)
Special stitches:
- Picot: ch 3, sl st in 3rd ch from hook.
- Beak: ch 4, sl st in 2nd ch from hook, sc in next ch, hdc in next ch.
- Leaf: ch 5, sl st in 2nd ch from hook, sc in next ch, hdc in next ch, sc in next ch, sl st in the stem ch where the leaf began.
Gauge and Checkpoints
Gauge: 14 dc and 7 dc rows = 2 in (5.1 cm). Chains: about 8 ch = 1 in (2.5 cm).
Make the head first and use it as your gauge test. Check each stage:
- Head after Rnd 3: 1.5 in (3.8 cm) across
- Body after Row 3: straight edge about 2 in (5.1 cm)
- Body after Row 8: straight edge 3.75 in (9.5 cm), depth 1.9 in (4.8 cm)
- Wing before border: 2.75 in (7.0 cm) tall
- Tail after Row 3: 2.25 in (5.7 cm) wide
If your pieces come out too big, switch to a 2.0 mm hook. If they come out too small, switch to a 2.5 mm hook. Use the same hook for every part so the pieces fit together.
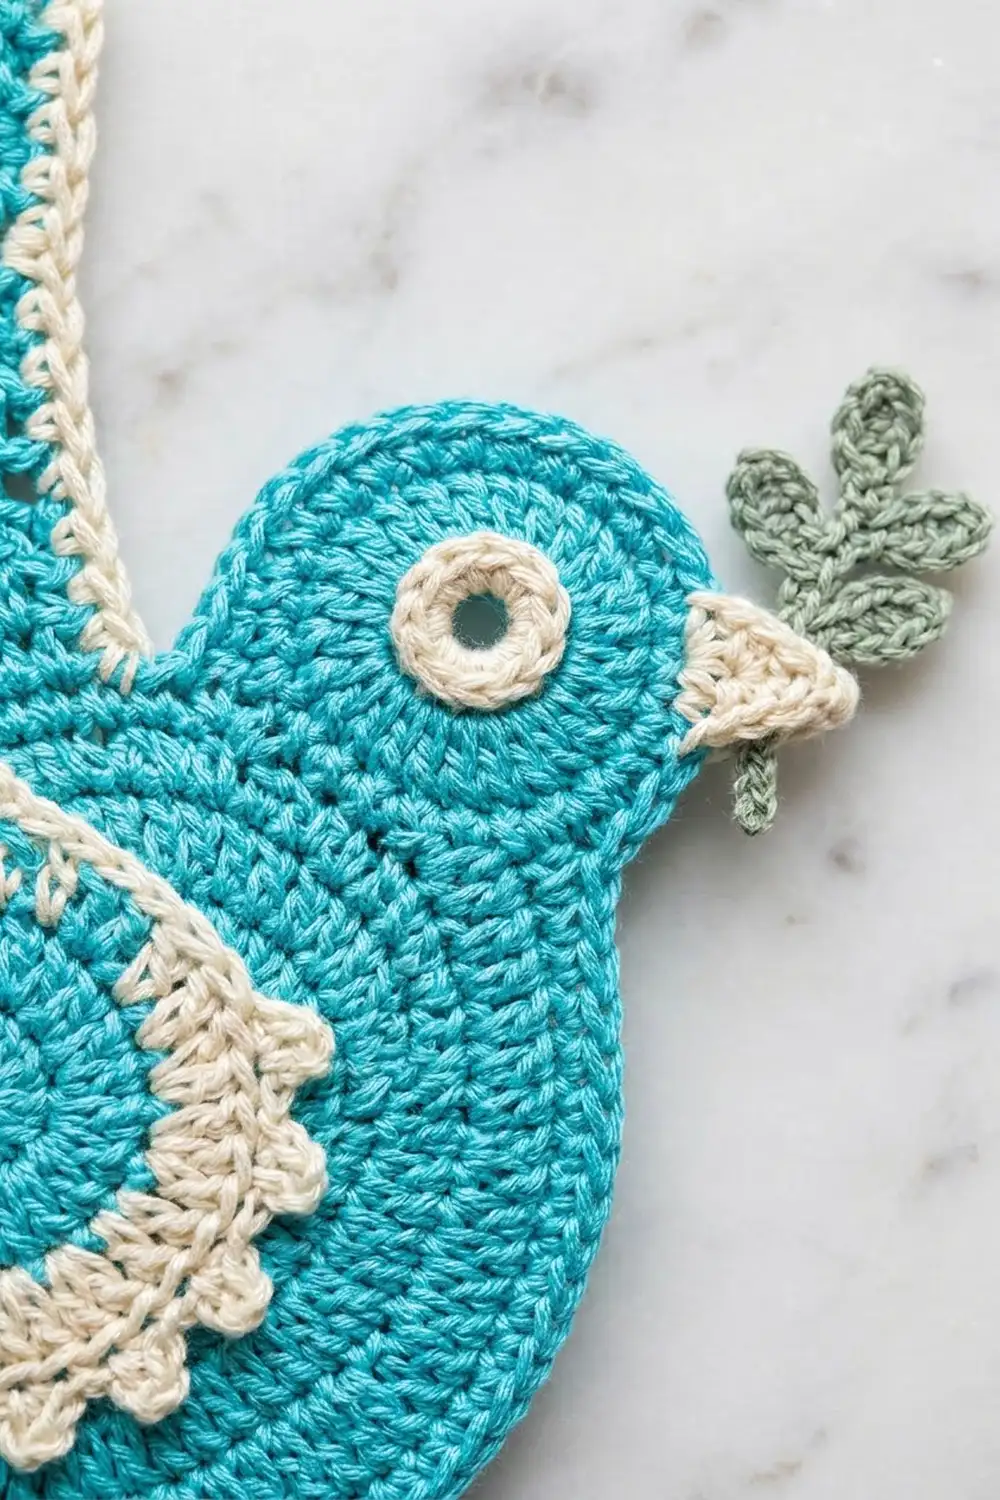
Head
With Color A.
Rnd 1: Ch 5, sl st in first ch to form a ring. Ch 1, 12 sc in ring, sl st to first sc. (12 sc) The ring stays open as the eye.
Rnd 2: Ch 3 (counts as dc), dc in same st, 2 dc in each of next 11 sts, sl st to top of ch-3. (24 dc)
Rnd 3: Ch 1, (sc in next 2 sts, 2 sc in next st) 7 times, sc in next st, (sc, Beak, sc) in next st, 2 sc in last st, sl st to first sc. (33 sc, plus beak)
That is 24 sts worked once each, plus 9 increases. Fasten off and leave a 10 in (25.4 cm) tail for sewing.
Body
The body is a half circle worked in rows. The magic ring sits at the middle of the straight top edge.
Row 1 (A): Make a magic ring. Ch 3 (counts as dc), 6 dc in ring. Turn. (7 dc)
Row 2 (A): Ch 3 (counts as dc), dc in same st, 2 dc in each remaining st. Change to B in the last yarn-over. Turn. (14 dc)
Row 3 (B): Ch 3 (counts as dc), dc in same st, dc in next st, (2 dc in next st, dc in next st) 6 times. Change to A in the last yarn-over and cut B. Turn. (21 dc)
This row forms the cream band that curves just under the wing.
Row 4 (A, windows): Ch 4 (counts as tr), (ch 2, skip next st, tr in next st) 10 times. Turn. (11 tr and 10 ch-2 sps = 31 sts)
The tr posts fan outward and form 10 tall open windows.
Row 5 (A): Ch 1, sc in first tr, (2 sc in next ch-2 sp, sc in next tr) 10 times. Work the last sc in the top of the ch-4. Turn. (31 sc)
Row 6 (A): Ch 3 (counts as dc), (2 dc in next st, dc in next 3 sts) 7 times, dc in last 2 sts. Turn. (38 dc)
Row 7 (A): Ch 1, sc in each st across. Do not turn. (38 sc)
Row 8 (A, straight edge): Ch 1 and rotate to work across the row ends. Work 1 sc in each sc row end, 2 sc in each dc row end, 3 sc in each tr row end, and 1 sc in the magic ring at the center. (27 sc)
Each half gets 13 sc: Row 7 (1) + Row 6 (2) + Row 5 (1) + Row 4 (3) + Rows 3, 2 and 1 (2 each). That gives 13 + 1 + 13 = 27 sc. Fasten off and leave a 10 in (25.4 cm) tail.
Checkpoint: straight edge 3.75 in (9.5 cm), depth 1.9 in (4.8 cm).
Wing
The wing is a short base row with five ladder feathers. Each feather is a chain with dc worked back down it, which makes a narrow strip of open windows.
Feather rule: Ch N, dc in 6th ch from hook, (ch 1, skip next ch, dc in next ch) R times. The 5 skipped chs form the tip loop (ch-5 sp). The last dc lands in the first ch, next to the base row.
| Feather | Chain (N) | Repeats (R) | dc (D) | Sts per long edge (2D − 1) |
|---|---|---|---|---|
| 1 | 12 | 3 | 4 | 7 |
| 2 | 14 | 4 | 5 | 9 |
| 3 | 16 | 5 | 6 | 11 |
| 4 | 18 | 6 | 7 | 13 |
| 5 | 20 | 7 | 8 | 15 |
Chain check: 5 tip chs + 1 ch for the first dc + 2 chs per repeat = N. For example, Feather 1 is 5 + 1 + 6 = 12.
Row 1 (A): Ch 11, sc in 2nd ch from hook and in each ch across. Turn. (10 sc)
Row 2 (A): Ch 1, sc in first sc, Feather 1, sc in next 2 sc, Feather 2, sc in next 2 sc, Feather 3, sc in next 2 sc, Feather 4, sc in next 2 sc, Feather 5, sc in last sc. (10 sc and 5 feathers)
Base check: 1 + 2 + 2 + 2 + 2 + 1 = 10 sc. Fasten off.
Checkpoint: base 1.5 in (3.8 cm). Feather 5 should be about 2.5 in (6.4 cm) long, and the wing 2.75 in (7.0 cm) tall with the feathers fanned upward.
Tail
With Color A.
Row 1: Make a magic ring. Ch 4 (counts as tr), (ch 2, tr in ring) 6 times. Pull the ring closed. Turn. (7 tr and 6 ch-2 sps)
Row 2: Ch 4 (counts as tr), (ch 3, tr in next tr) 6 times. Work the last tr in the top of the ch-4. Turn. (7 tr and 6 ch-3 sps)
Row 3: Ch 1, sc in first tr, (7 dc in next ch-3 sp, sc in next tr) 6 times. (6 shells; 7 sc + 42 dc = 49 sts)
Fasten off. Checkpoint: 2.25 in (5.7 cm) wide.
Sprig and Hanging Loop
Sprig (C): Ch 12. Sl st in 2nd ch from hook, then work a Leaf in the same ch (tip leaf). (Sl st in next 2 chs, Leaf) 4 times, sl st in last 2 chs. (5 leaves)
That works all 11 chs: 1 + (4 x 2) + 2. Bend the leaves so they alternate sides. The sprig should be about 1.5 in (3.8 cm) long.
Hanging loop (A): Ch 32, about 4 in (10.2 cm). Fasten off and leave long tails at both ends. Folded in half, it makes a 2 in (5.1 cm) loop.
Make All Pieces
Before you add the border, you should have:
- Color A: 1 head, 1 body (with cream Row 3), 1 wing, 1 tail, 1 loop
- Color C: 1 sprig
Layout (front view):
              [ loop ]
            [  W I N G  ]
 [sprig][HEAD][== BODY ==][TAIL]
Border
Border gauge: Color B and the same hook, 1 sc per st or ch, about 7 sc = 1 in (2.5 cm). Keep your tension slightly firm so the outlines stay crisp.
Wing Border
Join B with a sl st in the first base sc of Row 2. Ch 1, sc in same sc. Then work these steps for each feather in turn:
- Up the chain edge: sc in the free loop of each foundation ch, from base to tip (2D − 1 sc).
- Tip: (2 sc, Picot, 2 sc) in the ch-5 tip loop.
- Down the dc edge: (sc in next 2 sts, Picot) D − 1 times, sc in last dc (2D − 1 sc). Count each ch-1 sp as a st.
- Between feathers: sc in next 2 base sc. After Feather 5, sc in the last base sc only.
Each feather gets (2D − 1) + 4 + (2D − 1) = 4D + 2 sc and D picots:
- Feather 1: 18 sc, 4 picots
- Feather 2: 22 sc, 5 picots
- Feather 3: 26 sc, 6 picots
- Feather 4: 30 sc, 7 picots
- Feather 5: 34 sc, 8 picots
Base sc: 1 + 2 + 2 + 2 + 2 + 1 = 10. Total: 140 sc and 30 picots. Fasten off.
Tail Border
Row 4 (B): Join B in the first sc of Row 3. Ch 1, sc in same sc. Sc in next 3 dc, (sc, Picot, sc) in next dc, sc in next 3 dc, sc in next sc; repeat from * 5 more times. (49 sts worked once each + 6 extra sc = 55 sc, plus 6 picots)*
Fasten off.
Why the Math Works
Every border st sits on exactly one existing st or ch, so the edges stay flat. Both long edges of each feather carry the same 2D − 1 sts, so each outline is symmetrical. On the tail, the only extra sts are 6 increases, one at the center of each shell. They give each picot room to point outward without cupping.
Assembly (Joining)
Sew with the long tails and a tapestry needle. Use small whipstitches through the back loops only, so the stitches don’t show on the front.
- Head to body: Overlap the lower right quarter of the head about 1/4 in (0.6 cm) onto the front end of the body’s straight edge, with the beak pointing forward. Whipstitch around the overlap, 1 stitch per sc.
- Wing to body: Lay the wing’s foundation edge along the body’s straight edge, starting 1 in (2.5 cm) from the head end. Match the 10 base sts 1 to 1 with the 7th through 16th sc of Row 8. The feathers should sweep up and back.
- Tail to body: Tuck the tail’s ring end 1/2 in (1.3 cm) behind the rear of the body, with the fan pointing down and back. Tack it in 4 to 5 places.
- Sprig: Tuck the stem end behind the beak and tack it to the back of the head.
- Loop: Fold the chain in half and sew both ends to the back of the Feather 5 tip.
Keep your sewing tension relaxed, because tight seams pucker the lace. Checkpoint: 6 in (15.2 cm) wide and 5 in (12.7 cm) tall.
Final Blocking
- Weave in all ends along stitches of the same color.
- Soak the ornament in cool water for 5 minutes, then press out the water in a towel.
- Pin it face up to 6 in x 5 in (15.2 cm x 12.7 cm).
- Pin out each feather tip, tail picot and leaf.
- Use a pin tip to open the body windows and the eye.
- Spray with starch and let it dry fully. Repeat for a stiffer finish.
Final Quality-Control Checklist
- Head is 1.5 in (3.8 cm) across, with an open eye and a clear beak.
- Body has one cream band and 10 even windows.
- Wing has 5 feathers, each with a cream picot outline.
- Tail has 6 cream picot scallops.
- Sprig has 5 leaves.
- Loop is 2 in (5.1 cm) and the dove hangs level.
- No ends or seams show on the front.
Troubleshooting
- Body cups: Your tension is too tight. Relax it or use a larger hook.
- Body ruffles: Recount Row 6. It should have 38 sts.
- Feathers twist: Block them flat and pin the tips while they dry.
- Windows close up: Stretch Row 4 while blocking and add more starch.
- Tail border waves: Make sure only the center dc of each shell gets 2 sc.
- Dove tips forward: Move the loop slightly toward the tail.
Care
Hand wash in cool water, press dry in a towel and re-starch as needed. Store the ornament flat between seasons.
Final Notes
Here is how the measurements build up. Gauge is 14 dc = 2 in (5.1 cm). That gives a 1.5 in (3.8 cm) head, a body with a 3.75 in (9.5 cm) straight edge, a 2.75 in (7.0 cm) wing before the border and a 2.25 in (5.7 cm) tail. Once you add the border and assemble the pieces, you have a 6 in x 5 in (15.2 cm x 12.7 cm) dove with a 2 in (5.1 cm) loop.
Happy crocheting!