
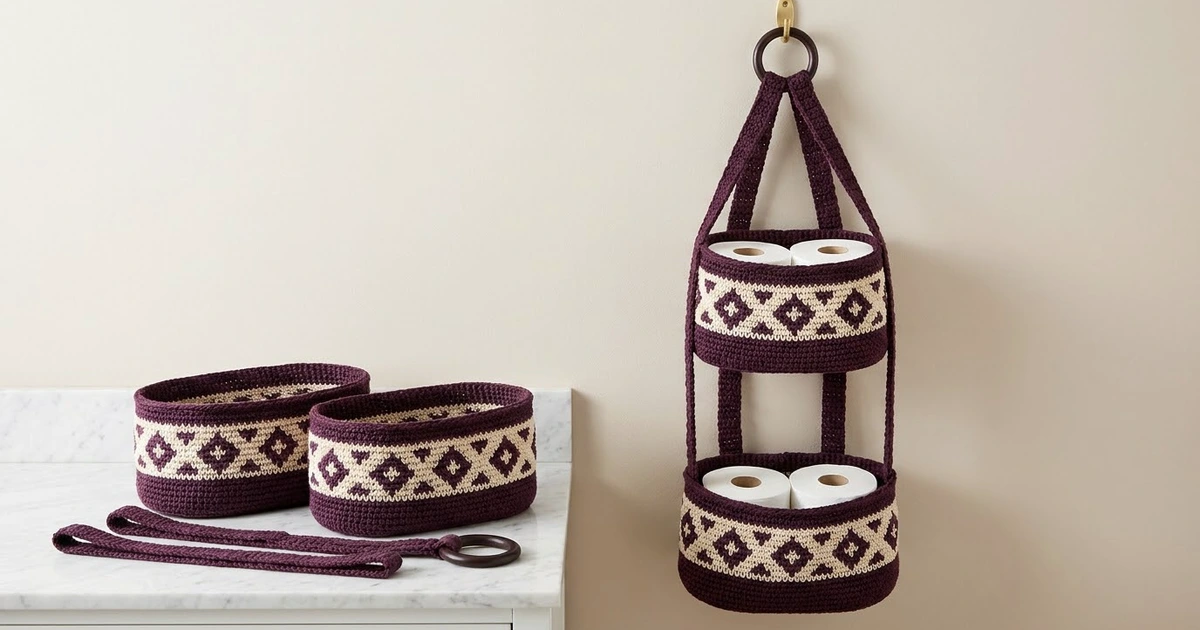
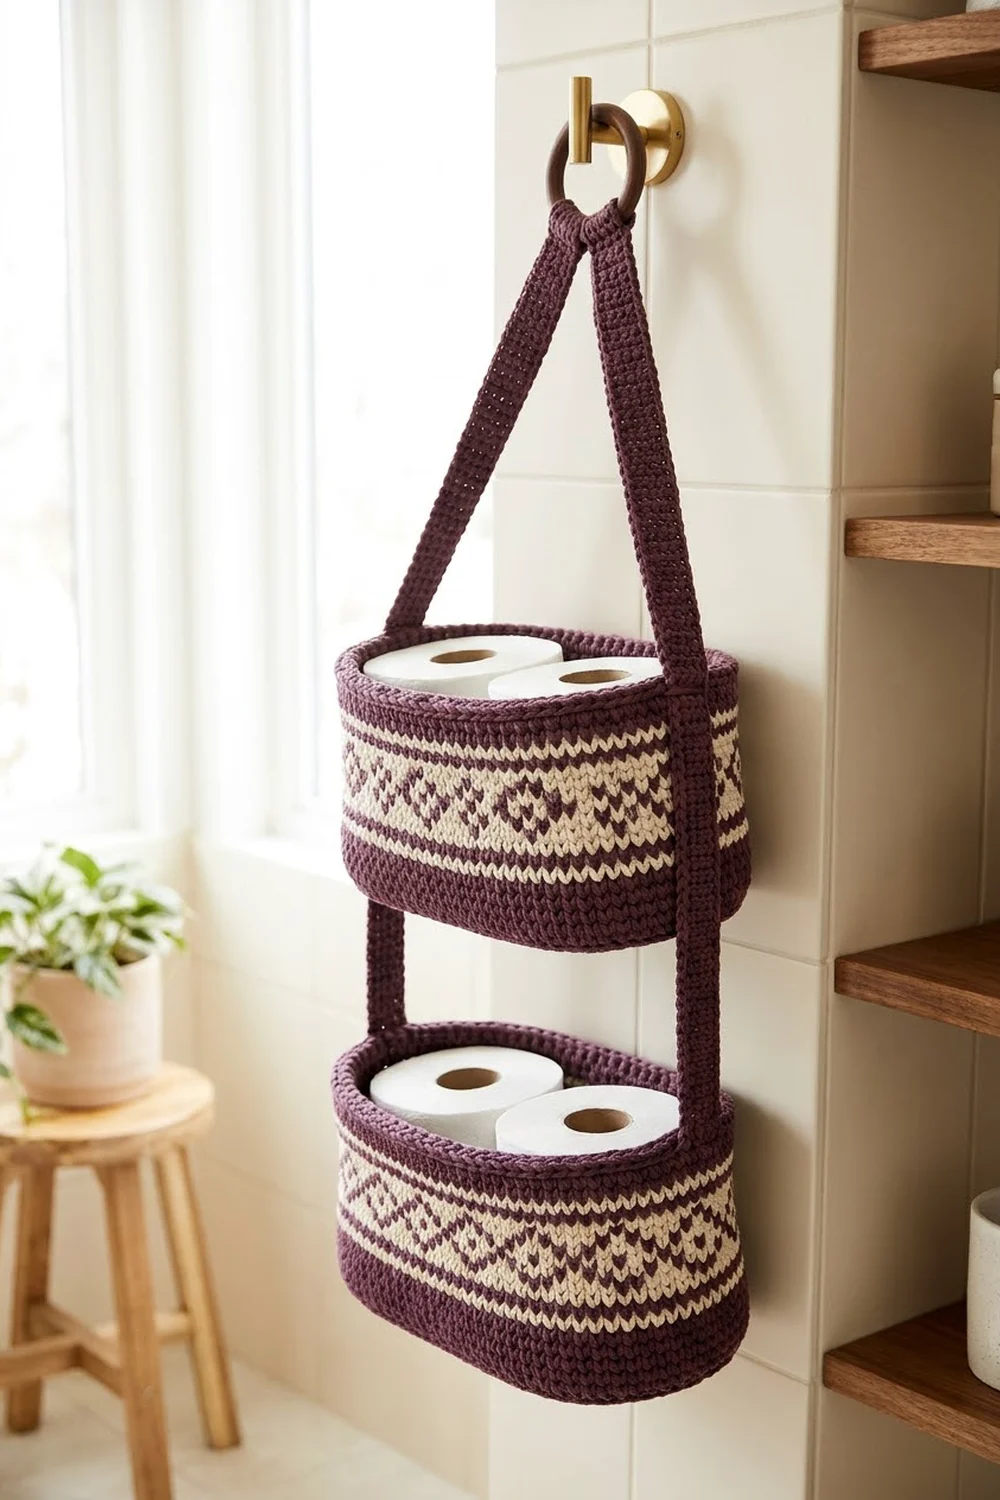
This two-tier hanging basket is a practical wall organizer with a graphic look. Two oval baskets hang one above the other on a pair of solid straps that meet at a wooden ring. Each basket holds two standard toilet paper rolls side by side, but it works just as well for towels, toiletries or craft supplies.
The colors are deep plum and natural cream. Each basket has:
- a solid plum base
- a narrow plum band at the bottom of the wall
- a cream tapestry band of plum diamonds and X-shaped triangles
- a rolled plum rim
The straps are solid plum.
This pattern uses US crochet terms. Each basket measures about 10 in (25.4 cm) long, 5 in (12.7 cm) wide and 4.75 in (12.1 cm) tall. The assembled organizer hangs about 25 in (63.5 cm) from the top of the ring to the bottom of the lower basket.
The construction is simple:
- Work an oval base in spiral rounds.
- Turn up the wall with a back-loop round.
- Work the diamond band in tapestry single crochet.
- Work two straps flat in rows.
- Loop the straps through the ring and sew them to the short ends of both baskets.
Finished Size and Construction
- Finished size (each basket): 10 in (25.4 cm) long x 5 in (12.7 cm) wide x 4.75 in (12.1 cm) tall
- Assembled height: about 25 in (63.5 cm)
- Skill level: Intermediate (tapestry crochet, working in spiral rounds)
- Terminology: US
- Yarn weight: Worsted weight (#4) cotton
- Hook: 4.0 mm (G-6)
- Number of pieces: 4 crocheted pieces (2 baskets and 2 straps), plus 1 wooden ring
- Layout: A vertical stack: ring, strap triangle, upper basket, 4 in (10.2 cm) gap, lower basket
- Basket wall height before border: about 4.25 in (10.8 cm)
- Border (rim) depth: about 0.5 in (1.3 cm)
- Strap size: 1.5 in (3.8 cm) wide x 25 in (63.5 cm) long
Materials
Choose a smooth, firm worsted weight cotton or cotton blend with about 200 m per 100 g. Cotton holds the basket shape well and keeps the color changes crisp. Avoid fuzzy or very soft acrylics, because they make the walls slump.
- Plum (P): 140 g / 280 m (bases, plain wall rounds, rims, straps and diamonds)
- Cream (C): 60 g / 120 m (tapestry background)
These amounts include a margin of about 15% to cover gauge swatches and carried strands.
Tools:
- 4.0 mm (G-6) crochet hook
- 1 wooden ring, 3 in (7.6 cm) outer diameter
- 4 stitch markers
- Tapestry needle
- Scissors
- Sewing clips or pins
- Measuring tape
- Spray bottle
Abbreviations (US Terms)
- ch: chain
- sc: single crochet
- sl st: slip stitch
- st(s): stitch(es)
- Rnd: round
- BLO: back loop only
- rev sc: reverse single crochet (crab stitch)
- P / C: plum / cream
- [ ]: repeat the instructions in brackets as directed
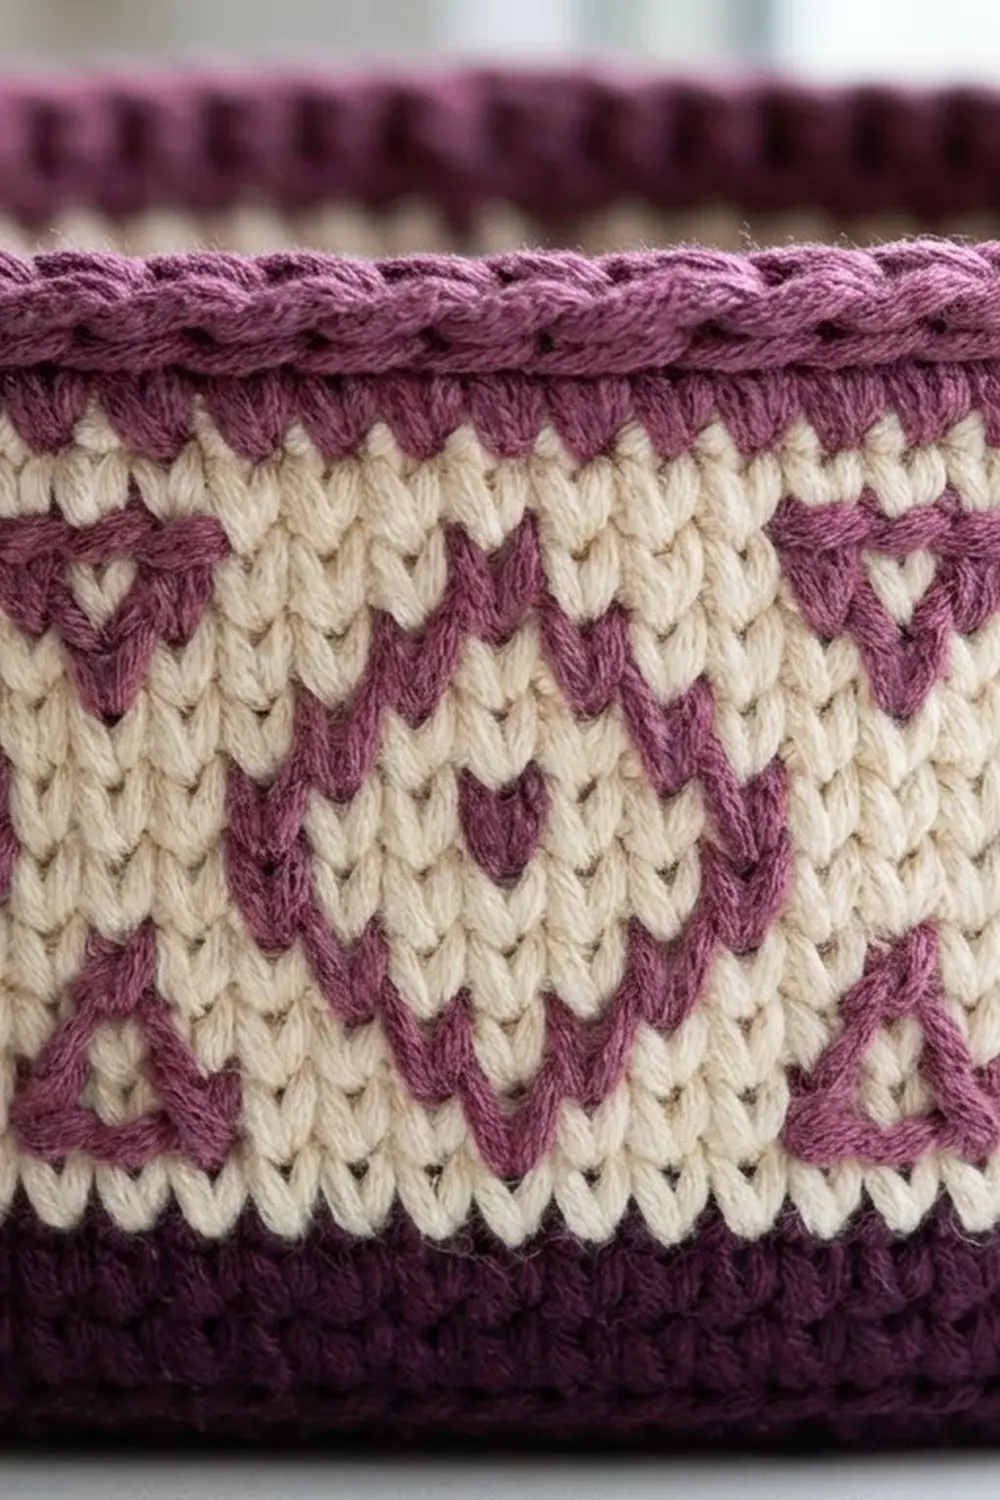
Tapestry sc: Work sc with the color in use. Lay the other color along the tops of the stitches so each sc encloses it. To change color, work the last sc before the change until 2 loops remain on the hook. Then yarn over with the new color and pull through. Keep the carried strand relaxed.
Rev sc: Work from left to right. Insert the hook in the next st to the right, pull up a loop, yarn over and pull through both loops.
Gauge and Checkpoints
Gauge: 16 sc x 18 rnds = 4 in (10.2 cm) in sc worked in the round. Tapestry rounds should match plain rounds.
Make one full basket first and check it before you make the second basket or the straps. Every later measurement depends on this piece.
- After base Rnd 6 (78 sts): about 8 in (20.3 cm) x 2.75 in (7.0 cm)
- After base Rnd 11 (108 sts): about 10 in (25.4 cm) x 5 in (12.7 cm), lying flat
- After Rnd 27 (end of the diamond band): wall about 3.5 in (8.9 cm) tall
- After Rnd 30: wall about 4.25 in (10.8 cm) tall
- After the rim: wall about 4.75 in (12.1 cm) tall
If the base is too big or the walls lean outward, switch to a 3.75 mm hook. If the base is too small or cups upward, try a 4.5 mm hook.
Tapestry rounds usually work up tighter. Check that the wall doesn’t narrow at the diamond band. If it does, go up one hook size for Rnds 15-27 only.
Basket (Make 2)
Work in continuous spiral rounds. Do not join or turn. Place a marker in the first st of each round and move it up as you go.
Base
With P, ch 24.
Rnd 1: Sc in 2nd ch from hook, then sc in next 21 ch. Work 3 sc in last ch. Working along the opposite side of the foundation chain, sc in next 21 ch, then work 2 sc in last ch (the same ch as the first sc). (48 sts)
This gives each short end 3 sts and each straight side 21 sts. In Rnd 1, End A is the first st plus the last 2 sts. End B is the 3-sc group in the middle. The straight sides stay at 21 sts for the whole base, and all increases are made on the ends.
For Rnds 2-11, use the formula below. Here, k is the round number minus 2.
Rnd n: [Sc in next k sts, 2 sc in next st] once, sc in next 21 sts, [sc in next k sts, 2 sc in next st] 3 times, sc in next 21 sts, [sc in next k sts, 2 sc in next st] 2 times.
Each round adds 6 sts, 3 at each end.
- Rnd 2 (k = 0): 54 sts
- Rnd 3 (k = 1): 60 sts
- Rnd 4 (k = 2): 66 sts
- Rnd 5 (k = 3): 72 sts
- Rnd 6 (k = 4): 78 sts
- Rnd 7 (k = 5): 84 sts
- Rnd 8 (k = 6): 90 sts
- Rnd 9 (k = 7): 96 sts
- Rnd 10 (k = 8): 102 sts
- Rnd 11 (k = 9): 108 sts
After Rnd 11, each end has 33 sts and each straight side has 21 sts: 33 + 21 + 33 + 21 = 108. Check the base against the gauge checkpoints.
Wall
Rnd 12: With P, sc in BLO of each st around. (108 sts) The unused front loops make a crisp fold, so the wall stands upright.
Rnds 13-14: With P, sc in each st around. (108 sts)
Diamond Band (Tapestry)
Join C on the first st of Rnd 15 and carry P throughout. Each round below is a 12-st repeat worked 9 times around (12 x 9 = 108). The numbers show how many sts to work in each color, in order. Every round has 108 sts.
- Rnd 15: [3 P, 7 C, 2 P] 9 times
- Rnd 16: [2 P, 9 C, 1 P] 9 times
- Rnd 17: [1 P, 5 C, 1 P, 5 C] 9 times
- Rnd 18: [5 C, 3 P, 4 C] 9 times
- Rnd 19: [4 C, 2 P, 1 C, 2 P, 3 C] 9 times
- Rnd 20: [3 C, 2 P, 1 C, 1 P, 1 C, 2 P, 2 C] 9 times
- Rnd 21: [2 C, 2 P, 2 C, 1 P, 2 C, 2 P, 1 C] 9 times
- Rnd 22: Repeat Rnd 20.
- Rnd 23: Repeat Rnd 19.
- Rnd 24: Repeat Rnd 18.
- Rnd 25: Repeat Rnd 17.
- Rnd 26: Repeat Rnd 16.
- Rnd 27: Repeat Rnd 15.
The design is symmetrical. Each diamond is a plum outline with a plum center dot on a cream background. Plum triangles at the top and bottom of the band frame the diamonds, and between the diamonds the triangles and outlines line up into X shapes.
Fasten off C at the end of Rnd 27. You’ll weave in the tail later.
Rnds 28-30: With P only, sc in each st around. (108 sts)
The wall now measures about 4.25 in (10.8 cm). Go straight on to the Border section below, then make a second basket the same way.
Straps (Make 2)
With P, ch 7.
Row 1: Sc in 2nd ch from hook and in each ch across. Turn. (6 sts)
Rows 2-112: Ch 1 (does not count as a st), sc in each st across. Turn. (6 sts)
Fasten off. Each strap should measure 1.5 in (3.8 cm) x 25 in (63.5 cm).
Make All Pieces
- Baskets: 2. Each uses about 58 g P and 30 g C.
- Straps: 2. Each uses about 12 g P.
Layout (front view):
            ( RING )
            /      \
     Strap A        Strap B
       |  UPPER BASKET  |
       |   4 in gap     |
       |  LOWER BASKET  |
Joining
Method: Whipstitch with P through both layers, using a tapestry needle.
Strap row map (counted from the bottom of each strap):
- Rows 1-21: sewn to the lower basket (Rnds 12-32)
- Rows 22-39: free, forming the 4 in (10.2 cm) gap
- Rows 40-60: sewn to the upper basket (Rnds 12-32)
- Rows 61-105: free slanted section, about 10 in (25.4 cm)
- Rows 106-112: folded over the ring, about 1.5 in (3.8 cm)
Stitch-to-stitch logic: Strap rows and wall rounds have the same gauge of 18 per 4 in (10.2 cm), so one strap row sits on exactly one wall round. Center each strap on the outside of a short end, over sts 14-19 of that end’s 33 sts. Line up Strap Row 1 with Rnd 12 (the fold line), so the strap covers the full wall height up to the rim.
- Sew Strap A to End A and Strap B to End B of the lower basket. Whipstitch both long edges of each strap to the wall, one stitch per row.
- Clip Rows 40-60 of each strap to the ends of the upper basket. Make sure the gap is exactly 18 rows, then sew the same way.
- Pass Rows 106-112 of each strap through the ring from front to back. Fold them down behind Row 105 and whipstitch across the end and both sides.
Tension advice: Sew firmly, but don’t pull the stitches tight. Tight stitches pucker the strap and shorten the gap.
Size checkpoint: Hang the piece. The gap between the baskets should be 4 in (10.2 cm), and the total height should be about 25 in (63.5 cm).
Border (Basket Rims)
Work the rim on each basket after Rnd 30 and before joining.
Border gauge: The same as the body, 4 sc per inch (2.5 cm). Both rim rounds are worked 1 st per st, so the rim doesn’t ruffle or pull in.
Rnd 31: With P, sc in each st around (108 worked 1 per existing st + 0 added). Sl st in the first sc. (108 sts: 33 per end, 21 per straight side)
Rnd 32: Ch 1, rev sc in each st around (108 worked 1 per existing st + 0 added). Sl st in the first st and fasten off. (108 sts: 33 per end, 21 per straight side)
Why the math works: The wall has had exactly 108 sts since Rnd 11, so the rim keeps the same count. The 33 sts on each end and 21 sts on each side carry straight up from the base, so the rim matches the base outline. Adding stitches would make the rim flare, and skipping stitches would pull it inward. The rev sc round gives the rounded, corded edge.
Final Blocking
- Weave in all tails on the inside of the walls, through stitches of the matching color.
- Mist each basket lightly with water until damp.
- Fill each basket firmly with folded towels or two toilet paper rolls, so the walls stand straight and the oval is even.
- Press the base flat on a towel and shape the rim with your fingers.
- Let the baskets dry completely, about 24 hours.
- Mist the straps, pin them flat at 25 in (63.5 cm) and let them dry.
Final Quality-Control Checklist
- Each base lies flat at about 10 in (25.4 cm) x 5 in (12.7 cm).
- Every wall round has 108 sts.
- There are 9 complete diamond repeats and no broken motifs.
- No carried strands show on the front.
- Both rims are smooth and even, with 108 rev sc.
- The straps are centered on the short ends and stitched down through every row.
- The gap is 4 in (10.2 cm), and the baskets hang level.
- The ring fold is secure.
Troubleshooting
- The base curls into a bowl: The increases are too tight. Go up a hook size for the base.
- The base ruffles: Your tension is too loose. Go down a hook size.
- Plum flecks show through the cream: Keep the carried strand at the back of the stitch, and tilt your hook slightly as you enclose it.
- The diamonds drift sideways: This is normal spiral lean. Because the round starts on End A, the color jog stays on a short end, next to the strap.
- The baskets hang crooked: Unpick one strap and recount the rows. Both straps must follow the same row map.
- The walls slump: Block them over towels, or put an oval of plastic canvas cut to size inside the base.
Care
Hand wash in cool water with mild soap, gently press out the water, and dry flat, reshaped over towels. Don’t tumble dry, because heat can shrink cotton unevenly.
Final Notes
Every size in this project follows from the gauge:
- A gauge of 16 sc x 18 rnds per 4 in (10.2 cm) gives a 108-stitch oval base of 10 in (25.4 cm) x 5 in (12.7 cm).
- That base gives a 108-stitch wall that reaches 4.25 in (10.8 cm) before the 0.5 in (1.3 cm) rim.
- Strap rows match wall rounds one to one, so each 112-row strap fits both baskets, the 4 in (10.2 cm) gap and the ring exactly.
Check the first basket, and the rest will fall into place.
Happy crocheting!