

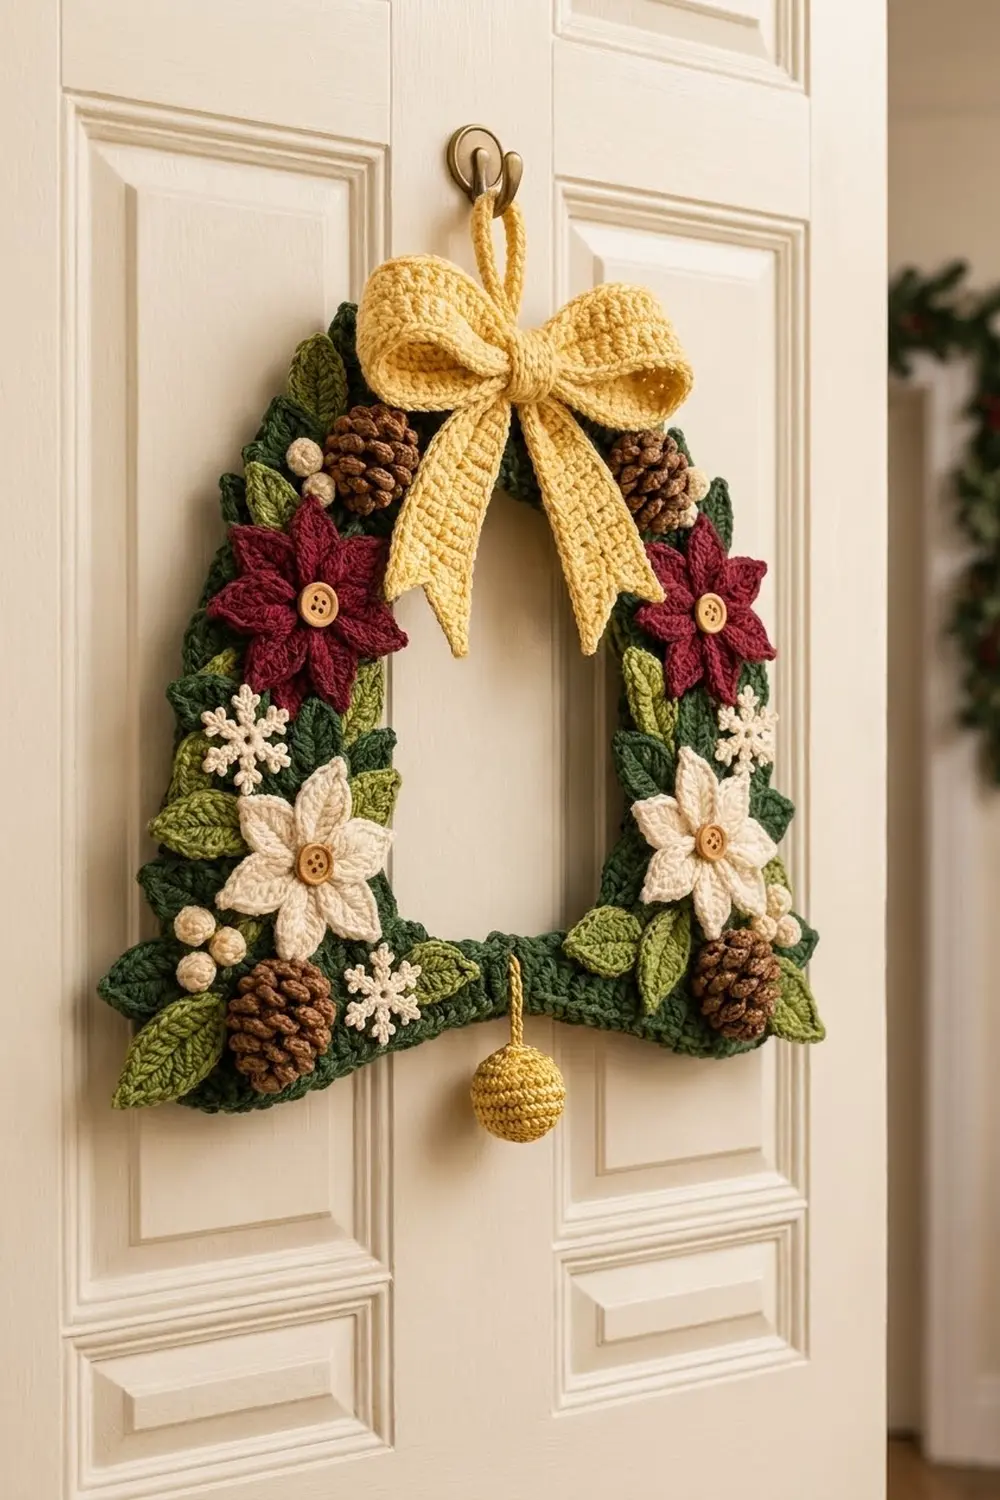
This bell-shaped wreath brings a classic holiday look to a door or wall. Leaves in two shades of green cover a dark green frame. On top of the leaves are poinsettias, pinecones, snowflakes, and berry clusters. A light yellow bow sits at the top, and a small gold clapper swings below.
The colors are traditional and warm: dark green, olive green, burgundy, cream, brown, light yellow, and gold. Wooden buttons finish the flower centers.
The pattern uses US crochet terms. The finished frame measures 13 in wide x 14 in tall (33.0 x 35.6 cm). With the loop and clapper, it is about 18 in (45.7 cm) long.
You crochet a straight bottom bar and a shaped arch, sew them into a bell, and add a two-round border. Then you make the appliqués, layer them in place, and sew them down.
Finished Size and Construction
- Finished frame size: 13 x 14 in (33.0 x 35.6 cm)
- Overall hanging length: about 18 in (45.7 cm)
- Skill level: Intermediate
- Terminology: US crochet terms
- Yarn weight: Worsted (#4)
- Hook: 4.5 mm (US 7)
- Number of pieces: One wreath frame (bottom bar + arch, sewn together) plus sewn-on appliqués
- Layout: One bell shape, with matching decorations on the left and right
- Size before border: 12 x 13 in (30.5 x 33.0 cm)
- Frame width: 2 in (5.1 cm)
- Border depth: 0.5 in (1.3 cm)
Materials
Use a smooth worsted-weight acrylic or wool blend with about 200 m per 100 g. Smooth yarn shows the leaf veins and bobbles clearly.
- Dark green: 60 g / 120 m (frame, border, 14 leaves)
- Olive green: 20 g / 40 m (14 leaves)
- Burgundy: 15 g / 30 m (2 poinsettias)
- Cream: 35 g / 70 m (2 poinsettias, 6 snowflakes, 18 berries)
- Brown: 20 g / 40 m (4 pinecones)
- Light yellow: 30 g / 60 m (bow, tails, band, hanging loop)
- Gold: 5 g / 10 m (clapper and cord)
All quantities include a margin of about 15-20 percent.
Tools: 4.5 mm (US 7) hook, 4 wooden buttons 0.75 in (1.9 cm), tapestry needle, a little fiberfill, rust-proof pins, blocking mat, stitch markers, scissors.
Abbreviations (US Terms)
- ch – chain
- sl st – slip stitch
- sc – single crochet
- hdc – half double crochet
- dc – double crochet
- inc – 2 sc in the same stitch
- sc2tog – single crochet 2 together
- MR – magic ring
- st(s) – stitch(es)
- RS / WS – right side / wrong side
Bobble (bo): [Yarn over, insert hook in st, pull up a loop, yarn over, pull through 2 loops] 3 times in the same st, then yarn over and pull through all 4 loops. If you work it on a WS row, it pops out on the RS.
Picot: Ch 3, sl st in 3rd ch from hook.
Gauge and Checkpoints
Gauge: 16 sc and 16 rows = 4 in (10.2 cm), blocked. That is 4 sts and 4 rows per inch.
Make the bottom bar first. It works as your gauge swatch.
Checkpoints:
– Bottom bar: 12 x 2 in (30.5 x 5.1 cm)
– Arch Row 1 (inner edge): 20 in (50.8 cm)
– Arch Row 8 (outer edge): 25.25 in (64.1 cm), width 2 in (5.1 cm)
– Assembled frame: 12 x 13 in (30.5 x 33.0 cm)
– After border: 13 x 14 in (33.0 x 35.6 cm)
If the bar is too big, go down a hook size. If it is too small, go up a hook size. Keep the stitch counts as written, because the border depends on them.

Frame
Bottom Bar (dark green)
Ch 49.
Row 1 (RS): Sc in 2nd ch from hook and in each ch across, turn. (48 sts)
Rows 2-8: Ch 1, sc in each st across, turn. (48 sts)
Fasten off. The bar is 12 x 2 in (30.5 x 5.1 cm).
Mark sts 8 and 41 of Row 8. The arch legs attach to sts 1-8 and 41-48. Sts 9-40 (32 sts, 8 in / 20.3 cm) form the bottom of the opening.
Arch (dark green)
You work the arch in rows along its length, and Row 1 becomes the inner edge. Only the center 24 sts (the curve) get increases, which is what lets the curve lie flat.
Ch 81.
Row 1 (RS): Sc in 2nd ch from hook and in each ch across, turn. (80 sts: 28 leg + 24 curve + 28 leg)
Row 2: Ch 1, sc 28, [sc 7, inc] 3 times, sc 28, turn. (83 sts; curve 27)
Row 3: Ch 1, sc 28, [sc 8, inc] 3 times, sc 28, turn. (86 sts; curve 30)
Row 4: Ch 1, sc 28, [sc 9, inc] 3 times, sc 28, turn. (89 sts; curve 33)
Row 5: Ch 1, sc 28, [sc 10, inc] 3 times, sc 28, turn. (92 sts; curve 36)
Row 6: Ch 1, sc 28, [sc 11, inc] 3 times, sc 28, turn. (95 sts; curve 39)
Row 7: Ch 1, sc 28, [sc 12, inc] 3 times, sc 28, turn. (98 sts; curve 42)
Row 8: Ch 1, sc 28, [sc 13, inc] 3 times, sc 28. (101 sts; curve 45)
Fasten off, leaving a 16 in (40.6 cm) tail.
Assemble the Frame
- Lay the bar flat with Row 8 at the top.
- Bend the arch into an upside-down U, RS up, and flare the legs outward.
- Each leg end has 8 row ends, 2 in (5.1 cm) wide. Whipstitch the left leg end to bar sts 1-8 and the right leg end to sts 41-48, one row end per stitch.
- Pin the frame to 12 x 13 in (30.5 x 33.0 cm). The opening should be 8 in (20.3 cm) wide at the bottom, about 4 in (10.2 cm) wide at the top, and 9 in (22.9 cm) tall.
Appliqués
Leaves (make 14 dark green, 14 olive green)
Ch 10. Sc in 2nd ch from hook, hdc in next ch, dc in next 4 ch, hdc in next ch, sc in next ch, 3 sc in last ch. Then work along the other side of the chain: sc, hdc, dc in next 4 ch, hdc, sc in last ch. Ch 2, sl st in first sc. (19 sts + ch-2 tip)
The foundation chain forms a raised center vein. Each leaf is about 2.5 x 1.25 in (6.4 x 3.2 cm).
Burgundy Poinsettia (make 2)
Rnd 1: MR, 8 sc, sl st to first sc. (8 sts)
Rnd 2: *Ch 8, sc in 2nd ch from hook, hdc, dc in next 3 ch, hdc, sc in last ch, sl st in next sc; repeat from * 7 more times. (8 petals)
Each poinsettia is about 4 in (10.2 cm) across. Sew a button to the center.
Cream Poinsettia (make 2, two layers each)
Back layer: MR, 12 sc, sl st to first sc. (12 sts) *Ch 9, sc in 2nd ch from hook, hdc, dc in next 3 ch, hdc, sc, sl st in last ch, skip 1 sc, sl st in next sc; repeat from * 5 more times. (6 petals)
Front layer: MR, 6 sc, sl st to first sc. (6 sts) *Ch 6, sc in 2nd ch from hook, hdc, dc, hdc, sl st in last ch, sl st in next sc; repeat from * 5 more times. (6 petals)
Stack the front layer on the back layer so the petals sit between each other, then sew a button through both centers. Each flower is about 4.5 in (11.4 cm) across.
Pinecones (brown, make 4)
Ch 5.
Row 1 (RS): Sc in 2nd ch from hook and each ch across, turn. (4 sts)
Row 2 (WS): Ch 1, 2 sc in first st, bo, sc, 2 sc in last st, turn. (6 sts)
Rows 3, 5, 7, 9, 11 (RS): Ch 1, sc in each st across, turn. (same count as previous row)
Row 4: Ch 1, 2 sc in first st, [bo, sc] 2 times, 2 sc in last st, turn. (8 sts)
Row 6: Ch 1, sc 2, [bo, sc] 3 times, turn. (8 sts)
Row 8: Ch 1, sc, [bo, sc] 3 times, sc, turn. (8 sts)
Row 10: Ch 1, sc2tog, [bo, sc] 2 times, sc2tog, turn. (6 sts)
Row 12: Ch 1, sc2tog, bo, sc, sc2tog, turn. (4 sts)
Row 13: Ch 1, [sc2tog] 2 times. (2 sts)
Sl st evenly around the whole edge, then fasten off. Each pinecone is about 2 x 3 in (5.1 x 7.6 cm).
Snowflakes (cream, make 6)
Rnd 1: MR, 6 sc, sl st to first sc. (6 sts)
Rnd 2: *Ch 5, picot 3 times, sl st in each of the 5 ch back toward the center, sl st in next sc; repeat from * 5 more times. (6 arms)
Each snowflake is about 2 in (5.1 cm) across.
Berries (cream, make 18)
MR, 6 sc. [Sc2tog] 3 times. (3 sts) Pull the ring tight and tuck the tails inside. Each berry is about 0.5 in (1.3 cm). Group them into 6 clusters of 3.
Bow (light yellow)
Bow body: Ch 57. Sc in 2nd ch from hook and each ch across. (56 sts) Work 9 more rows of 56 sc. The strip is 14 x 2.5 in (35.6 x 6.4 cm). Sew the short ends into a ring and flatten it so the seam is at the back center. It is 7 in (17.8 cm) wide.
Tails (make 2): Ch 7. Sc in 2nd ch from hook and each ch across. (6 sts) Rows 2-16: 6 sc. Rows 17-20: Ch 1, sc across, leaving the last st unworked. (5, 4, 3, 2 sts) Each tail is 1.5 x 5 in (3.8 x 12.7 cm), with a slanted tip.
Center band: Ch 5. Sc in 2nd ch from hook and each ch across. (4 sts) Rows 2-12: 4 sc. It measures 1 x 3 in (2.5 x 7.6 cm).
Pinch the bow body at the center and place the tails behind it in a V. Wrap the band around all the layers and sew it closed at the back.
Hanging loop: Ch 30, sc in 2nd ch from hook and each ch across. (29 sts, 7.25 in / 18.4 cm) Fold it in half and sew both ends behind the bow.
Clapper (gold)
Rnd 1: MR, 6 sc. (6 sts)
Rnd 2: Inc in each st. (12 sts)
Rnd 3: [Sc, inc] 6 times. (18 sts)
Rnds 4-6: Sc in each st. (18 sts)
Rnd 7: [Sc, sc2tog] 6 times. (12 sts) Stuff firmly.
Rnd 8: [Sc2tog] 6 times. (6 sts) Close the opening. The ball is about 1.5 in (3.8 cm) across.
Cord: Ch 13, sl st in 2nd ch from hook and each ch across. (12 sts, 3 in / 7.6 cm) Sew one end to the ball.
Border
Border gauge: 4 rounds per inch, so 2 rounds add 0.5 in (1.3 cm) on each outer side.
Work the border around the outer edge only. Join dark green at the bottom-left corner with the RS facing you.
Rnd 1: 3 sc in first bottom st, sc in next 46 sts, 3 sc in last bottom st (bottom 52). Sc in each of the 8 row ends of the bar’s right side (8). Sc in each right-leg st (28). Across the curve, [sc 14, inc] 3 times (48). Sc in each left-leg st (28). Sc in each of the 8 row ends of the bar’s left side (8). Sl st to first sc.
Count: 165 sts worked 1 per st or row end + 4 corner extras + 3 curve increases = 172 sts.
Rnd 2: Ch 1. Sc in each st, working 3 sc in the center st of each corner group (bottom 56). Across the curve, work [sc 15, inc] 3 times (51). The side counts stay at 8, 28, 28, and 8. Sl st to first sc.
Count: 172 + 4 corner extras + 3 curve increases = 179 sts.
Inner edge: Sl st in each st around the opening: 32 bar sts + 80 arch sts = 112 sl sts. This neatens the edge without changing the size.
Why the math works: 48 bottom sts at 4 sts per inch give 12 in (30.5 cm). Two rounds at 4 rounds per inch add 0.5 in (1.3 cm) per side, which gives 13 in (33.0 cm) wide and 14 in (35.6 cm) tall. The curve keeps the same 3 increases per round as the arch rows, so it stays flat.
Final Blocking
- Pin the frame RS up to 13 x 14 in (33.0 x 35.6 cm).
- Check that the opening is 8 in (20.3 cm) wide at the bottom and centered.
- Spritz with water or steam lightly. Never press acrylic with an iron.
- Pin the leaves, petals, and snowflake picots flat, then let everything dry completely.
- Fan 3 leaves out from each bottom corner. Sew the remaining leaves in overlapping pairs up both legs and across the top, alternating the two greens.
- Place the same decorations on each side, working from top to bottom: a pinecone, berry cluster, and snowflake beside the bow; the burgundy poinsettia; a snowflake; the cream poinsettia with a berry cluster; a pinecone at the bottom corner; and a snowflake and berry cluster on the bar.
- Sew the bow to the top center. Sew the cord to bar st 24 so the clapper hangs below the bottom edge.
Final Quality-Control Checklist
- Frame measures 13 x 14 in (33.0 x 35.6 cm).
- Arch Row 8 has 101 sts, and border Rnd 2 has 179 sts.
- The legs sit evenly on bar sts 1-8 and 41-48.
- The decorations on the left and right match each other.
- No frame shows between the leaves.
- Buttons are secure, the clapper hangs centered, and all tails are woven in.
Troubleshooting
- Curve ruffles: The increases are bunched together. Re-check the bracket repeats.
- Curve cups: Your tension is too tight. Go up a hook size for the arch.
- Legs uneven: Count 28 sts at both ends of every row.
- Corners curl: Work each 3-sc corner into the center st of the group.
- Bow droops: Tack the bow loops to the frame from behind.
Care
Spot clean with a damp cloth and mild soap. Dry flat and reshape the petals and leaves.
Final Notes
Here is how the measurements build. The 12 x 2 in (30.5 x 5.1 cm) bar and the 2 in (5.1 cm) wide arch make a 12 x 13 in (30.5 x 33.0 cm) frame. The two border rounds bring it to 13 x 14 in (33.0 x 35.6 cm), and the loop and clapper bring the total length to about 18 in (45.7 cm). Check your gauge on the bar, count every row, and the rest will fall into place.
Happy crocheting!