
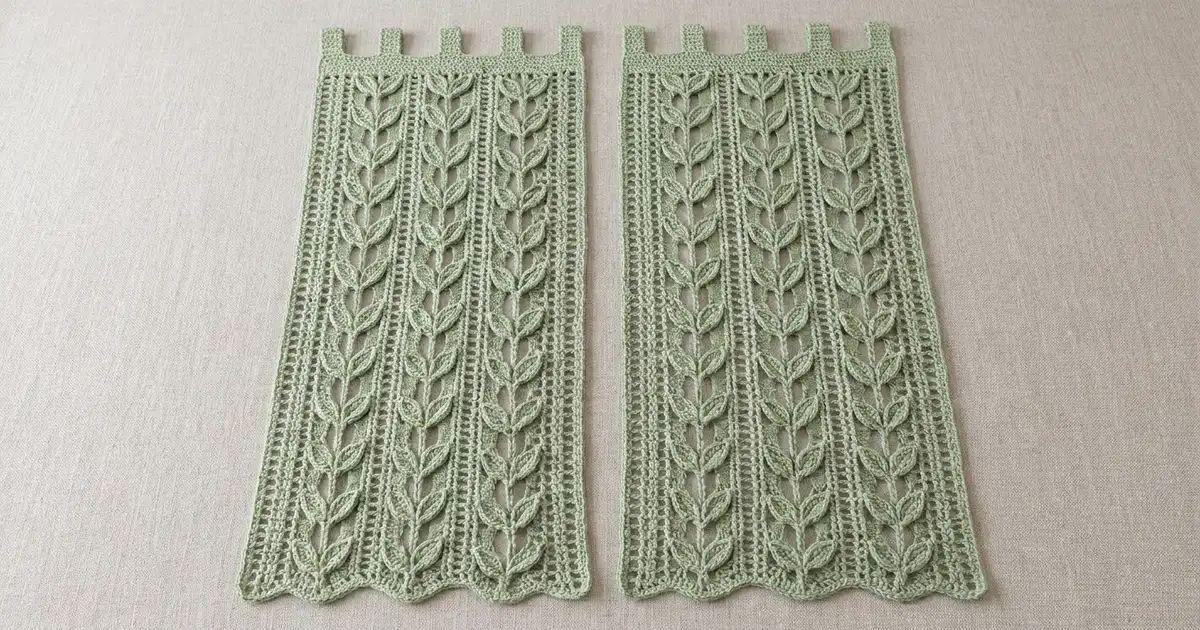
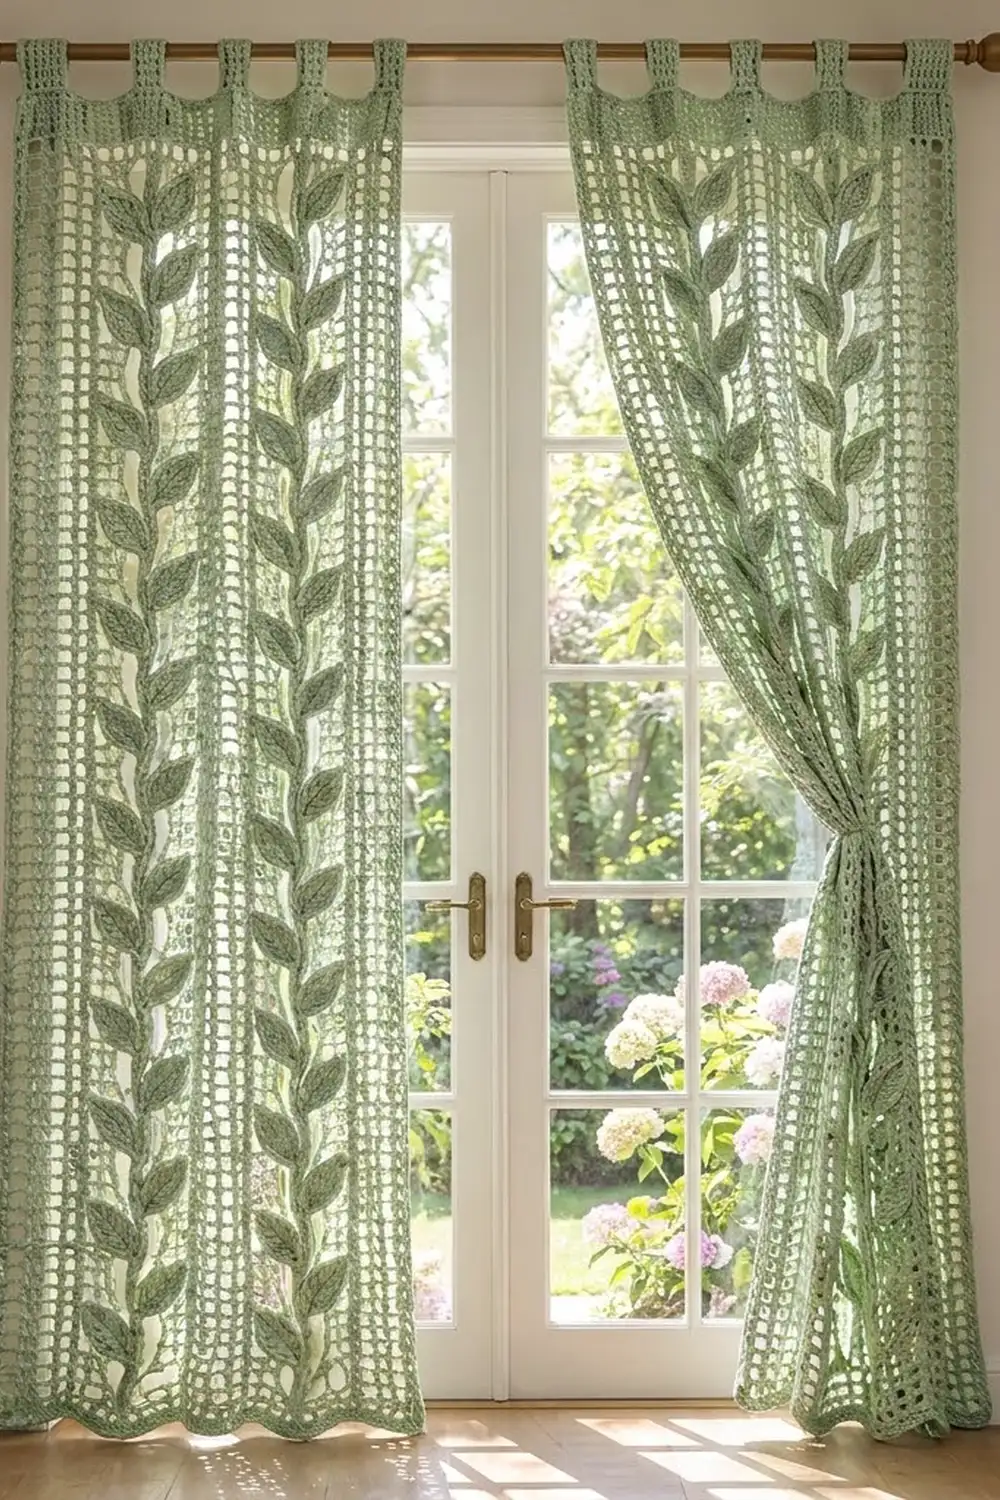
These tab-top curtain panels pair airy filet mesh with raised leaf vines. Light comes through the open squares, and the sewn-on leaves give the fabric depth and a soft garden look. The whole set is worked in one calm sage green, so the texture carries the design.
The pattern makes two identical panels. Each panel has two vertical vines, solid stripes along the edges and center, four folded hanging tabs, and a scalloped hem. Each finished panel measures 30.75 in × 81.75 in (78.1 cm × 207.6 cm) flat, not counting the tabs. Hanging from the top of the tab loops, each panel is 84.75 in (215.3 cm) long.
All instructions use US crochet terms.
Construction is simple. You work each panel body in rows from the hem up, following a fixed sequence of mesh and solid blocks. Then you add a single crochet border round, a scallop row along the bottom, and four tabs at the top. Finally, you sew the separately made leaves along the stem columns.
Finished Size and Construction
- Finished panel size (flat, without tabs): 30.75 in × 81.75 in (78.1 cm × 207.6 cm)
- Hanging length to top of tab loops: 84.75 in (215.3 cm)
- Skill level: Intermediate
- Terminology: US
- Yarn weight: Worsted (#4)
- Hook: 5.0 mm (H-8)
- Number of pieces: 2 panels, not joined to each other, plus 76 leaf appliqués per panel (152 total)
- Layout: Panels hang side by side on one rod
- Panel body before border: 30.25 in × 80 in (76.8 cm × 203.2 cm)
- Border depth: 0.25 in (0.6 cm) on the sides and top; 1.5 in (3.8 cm) at the bottom, including the scallops
- Leaf size: 2.5 in × 1.25 in (6.4 cm × 3.2 cm)
Materials
Yarn: Use a smooth worsted-weight cotton or cotton blend at about 208 yd (190 m) per 100 g. Cotton keeps the mesh crisp and holds its shape when hanging. Avoid fuzzy yarns, because they blur the mesh squares.
- Sage green: 2,400 g, about 4,560 m (4,987 yd), for both panels and all 152 leaves
These quantities include a margin of about 10%.
Tools:
– 5.0 mm (H-8) crochet hook
– Tapestry needle
– Locking stitch markers (at least 20)
– Rust-proof pins and a large blocking surface
– Measuring tape
– Spray bottle
Abbreviations (US Terms)
- ch: chain
- sc: single crochet
- hdc: half double crochet
- dc: double crochet
- sl st: slip stitch
- sk: skip
- sp: space
- st(s): stitch(es)
Special blocks (filet):
– Mesh block: Ch 1, sk 1 st, dc in next st. Uses 2 sts.
– Solid block: Dc in each of next 2 sts, working into a ch-1 sp counts as working into a st. Uses 2 sts.
Every row starts with ch 3, which counts as the first dc. Each row is therefore 1 dc plus 60 blocks, for 121 sts in total (each ch-1 counts as a st).
Gauge and Checkpoints
Gauge in mesh pattern: 16 sts and 8 rows = 4 in (10.2 cm).
Gauge in sc (border and tabs): 16 sts and 18 rows = 4 in (10.2 cm).
Test piece first: Ch 35. Row 1: dc in 4th ch from hook and in each ch across (33 sts). For Rows 2–10, ch 3 and turn, then work: mesh 7, solid 1, mesh 8. Make two leaves (see below) and sew them on either side of the solid column. The swatch should measure 8.25 in × 5 in (21.0 cm × 12.7 cm). This also lets you check how the leaves sit on the stem before you commit.
Checkpoints on the panel body:
– After Row 8: 4 in (10.2 cm) tall, 30.25 in (76.8 cm) wide
– After Row 40: 20 in (50.8 cm)
– After Row 80: 40 in (101.6 cm)
– After Row 120: 60 in (152.4 cm)
– After Row 160: 80 in (203.2 cm)
If your piece is too big, go down a hook size. If it is too small, go up a hook size. Measure the width first, because you can’t adjust the stitch count without changing the vine layout. If only the row height is off, add or remove rows in pairs, but keep the leaf spacing even.
Panel Body (Make 2)
Foundation: Ch 123.
Row 1 (right side, bottom edge): Dc in 4th ch from hook (skipped chs count as first dc) and in each ch across. (121 sts)
Rows 2–159: Ch 3 (counts as dc), turn. Work this block sequence across:
- Solid 1, mesh 6, solid 1 (left edge strip, blocks 1–8)
- Mesh 7, solid 1, mesh 7 (first vine field, blocks 9–23; block 16 is the stem)
- Solid 1, mesh 5, solid 2, mesh 5, solid 1 (center strip, blocks 24–37)
- Mesh 7, solid 1, mesh 7 (second vine field, blocks 38–52; block 45 is the stem)
- Solid 1, mesh 6, solid 1 (right edge strip, blocks 53–60)
(121 sts per row: 71 dc + 50 ch-1 sps; 50 mesh blocks + 10 solid blocks)
The sequence is symmetrical, so every row reads the same in both directions. Solid blocks always stack over solid blocks and mesh over mesh. Together they form straight vertical stripes.
Row 160: Ch 3, turn. Dc in each dc and each ch-1 sp across. (121 sts)
Do not fasten off. Continue straight into the border.
Checkpoint: 30.25 in × 80 in (76.8 cm × 203.2 cm).
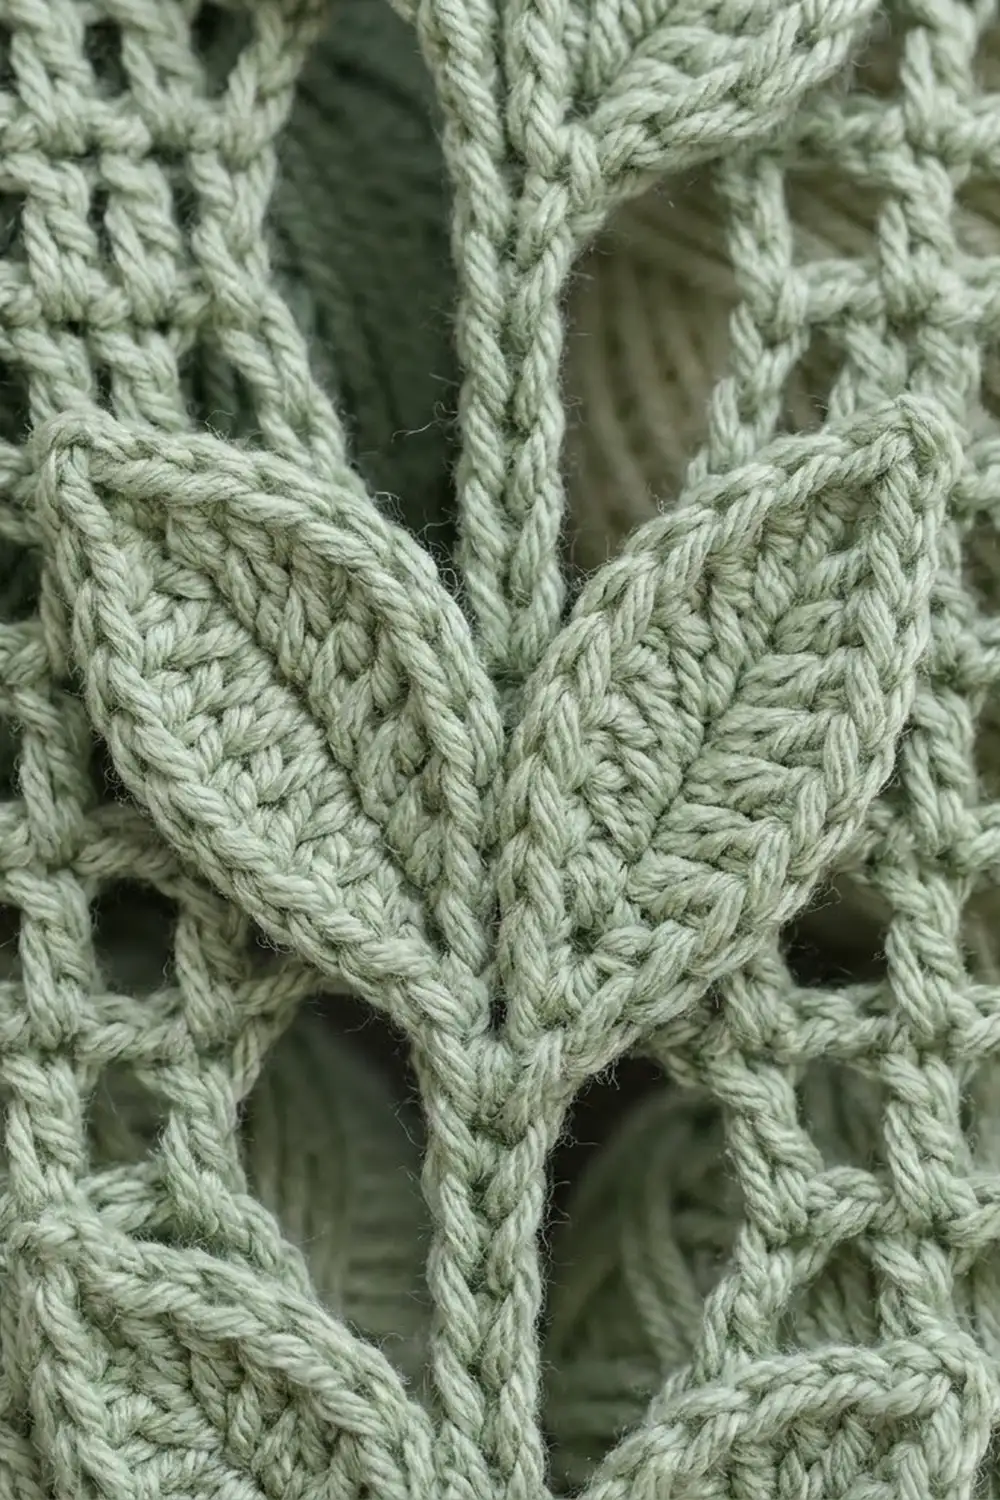
Leaves (Make 152: 76 per Panel)
Each panel has two vines with 38 leaves each (19 on the left of the stem and 19 on the right).
Foundation: Ch 9.
Rnd 1: Working in back bumps, sc in 2nd ch from hook, hdc in next ch, dc in next 3 chs, hdc in next ch, sc in next ch. Work (sc, ch 2, sc) in last ch for the tip. Rotate and work along the other side of the foundation: sc in next ch, hdc in next ch, dc in next 3 chs, hdc in next ch, sc in last ch. Sl st to first sc. (16 sts + 1 ch-2 tip sp)
Rnd 2 (trim): Ch 1, sc in each st around, with 3 sc in the tip ch-2 sp. Sl st to first sc. (16 sc worked 1-per-st + 3 sc in tip = 19 sc)
Fasten off and leave a 12-in (30.5 cm) tail. Using the starting tail, sl st on the surface along the center of the foundation chain from base to tip. This makes the vein line. Weave in only the starting tail.
Leaf checkpoint: 2.5 in × 1.25 in (6.4 cm × 3.2 cm).
Make All Pieces
Quantities (sage green throughout):
– Panel bodies: 2
– Leaves: 152 (76 per panel)
– Tabs: 8, worked directly onto the panels (4 per panel)
Layout (one panel, by block columns, viewed from the right side):
| Edge 8 | Vine 15      | Center 14       | Vine 15      | Edge 8 |
| S M6 S | M7 [STEM] M7 | S M5 SS M5 S    | M7 [STEM] M7 | S M6 S |
         leaves L/R          (no leaves)     leaves L/R
Hanging arrangement:
[ Panel A ] [ Panel B ]
The panels are not joined. Each one gets its own border, tabs, and leaves.
Border
Border gauge: 16 sc = 4 in (10.2 cm). Along the sides, 2 sc per dc row-end gives 4 sc per inch, which matches the border gauge. The edge will lie flat without ruffling or pulling.
Rnd 1 (right side): Ch 1, then work in sc around the whole panel:
- Top edge (Row 160): 3 sc in first st, sc in next 119 sts, 3 sc in last st. (121 sts worked 1-per-st + 4 extra corner sc = 125 sc)
- Long side: 2 sc in each row-end down the side, 160 rows × 2. (320 sc between corner groups)
- Bottom edge (Row 1, into unused foundation loops): 3 sc in first st, sc in next 119, 3 sc in last st. (125 sc)
- Second long side: 2 sc in each row-end. (320 sc)
Sl st to first sc. Round total: 125 + 320 + 125 + 320 = 890 sc.
Each corner group of 3 sc is counted once, inside the top or bottom count. The side counts run only between corner groups, so no corner stitch is counted twice.
Checkpoint: 30.75 in × 80.5 in (78.1 cm × 204.5 cm). Fasten off.
Scallop Row (bottom edge only): With the right side facing, join yarn in the last sc of the bottom-right corner group. That is the 3rd sc of the 125 bottom sts. This leaves exactly 121 sts to the first sc of the opposite corner group.
Sc in the same st, sk 5 sts, work [dc, ch 1] 6 times in next st, then dc once more in the same st, sk 5 sts, sc in next st. Repeat from * 9 more times. (10 scallops; 11 sc)
Why the math works: each repeat uses 12 sts (5 skipped + 1 shell + 5 skipped + 1 sc). Ten repeats use 120 sts, and the first sc adds 1, for 121. Each scallop is 3 in (7.6 cm) wide and 1.25 in (3.2 cm) deep.
Fasten off.
Checkpoint: 30.75 in × 81.75 in (78.1 cm × 207.6 cm).
Tabs (4 per Panel)
Use the 125 top-edge sc from Border Rnd 1. Number them 1–125 from right to left with the right side facing. Tabs sit over sts 1–11, 39–49, 77–87, and 115–125. That leaves gaps of 27 sts between them: 11 + 27 + 11 + 27 + 11 + 27 + 11 = 125.
Row 1: Join yarn in the first st of the tab, ch 1, sc in the same st and in the next 10 sts. (11 sc)
Rows 2–27: Ch 1, turn, sc in each st across. (11 sc)
Each tab is 2.75 in (7.0 cm) wide and 6 in (15.2 cm) long. Each gap is 6.75 in (17.1 cm).
Fold the tab to the wrong side. Whipstitch Row 27 to the back of Row 160, directly behind Tab Row 1. This forms a 3 in (7.6 cm) loop that fits rods up to 1.5 in (3.8 cm) in diameter.
Attaching the Leaves
The stem columns are block 16 and block 45. Rows are numbered from the hem (Row 1) upward.
- Left leaves: Rows 6, 14, 22, and so on, every 8 rows up to Row 150 (19 leaves).
- Right leaves: Rows 10, 18, 26, and so on, every 8 rows up to Row 154 (19 leaves).
- Leaves alternate sides every 4 rows, which is 2 in (5.1 cm) of height.
- Lay each leaf with its base on the stem column at the marked row. Angle it up and out at about 45°, so the tip points toward the outer mesh.
- Pin all 38 leaves on one vine before sewing anything. Then step back and check the spacing.
- Using the long tail, sew around the leaf edge through the back loops of Rnd 2 into the mesh posts below. Leave the outer 0.5 in (1.3 cm) of the tip free so the leaf lifts slightly.
- Weave the tail through the stem column on the wrong side.
Final Blocking
- Weave in all remaining ends through solid columns, where they will not show through the mesh.
- Soak each panel in cool water and press out the water gently. Do not wring.
- Roll the panel in towels to remove excess moisture.
- Lay it flat face up and pin to 30.75 in × 81.75 in (78.1 cm × 207.6 cm).
- Pin along the solid edge and center stripes first. Then square up the mesh between them.
- Pin each scallop into a smooth curve.
- Lift each leaf slightly and shape its tip with your fingers.
- Let the panel dry completely. Then hang it for 24 hours so the mesh settles under its own weight.
Final Quality-Control Checklist
- Every body row has 121 sts: 71 dc and 50 ch-1 sps.
- Solid stripes run straight for the full 160 rows.
- Border Rnd 1 totals 890 sc: 125 / 320 / 125 / 320.
- Each panel has 10 scallops and 4 tabs, spaced 27 sts apart.
- Each panel has 76 leaves, alternating every 4 rows, all angled upward.
- Both panels match in size within 0.5 in (1.3 cm).
- No loose ends show through the mesh.
Troubleshooting
Mesh squares are rectangles: Your dc is taller or shorter than gauge. Change the hook size, or adjust your yarn-over tension so the squares come out even.
Solid stripes drift sideways: Check where the row starts. Ch 3 always counts as a dc, and the last dc goes into the top of the turning ch.
Side border ruffles: Your row height runs short. Use 2 sc in only every other row-end for a stretch, or go down a hook size for the border.
Leaves curl: Re-block them flat, and sew them a little closer to the tip.
Panel lengthens when hung: This is normal with cotton. Block, hang for a day, and then measure. If needed, remove rows before Row 160 in pairs.
Care
Hand wash cool, or machine wash on a gentle cycle inside a laundry bag. Lay flat to dry, and re-block to the finished measurements.
Final Notes
The measurement chain is:
- Gauge: 16 sts × 8 rows = 4 in (10.2 cm).
- Panel body: 121 sts × 160 rows = 30.25 in × 80 in (76.8 cm × 203.2 cm).
- Border Rnd 1: 890 sc, bringing the panel to 30.75 in × 80.5 in (78.1 cm × 204.5 cm).
- Scallops: 10 scallops add 1.25 in (3.2 cm), for 81.75 in (207.6 cm).
- Tabs: 3 in (7.6 cm) loops bring the hanging length to 84.75 in (215.3 cm).
If each step matches its checkpoint, the two panels will match each other and hang straight.
Happy crocheting!