

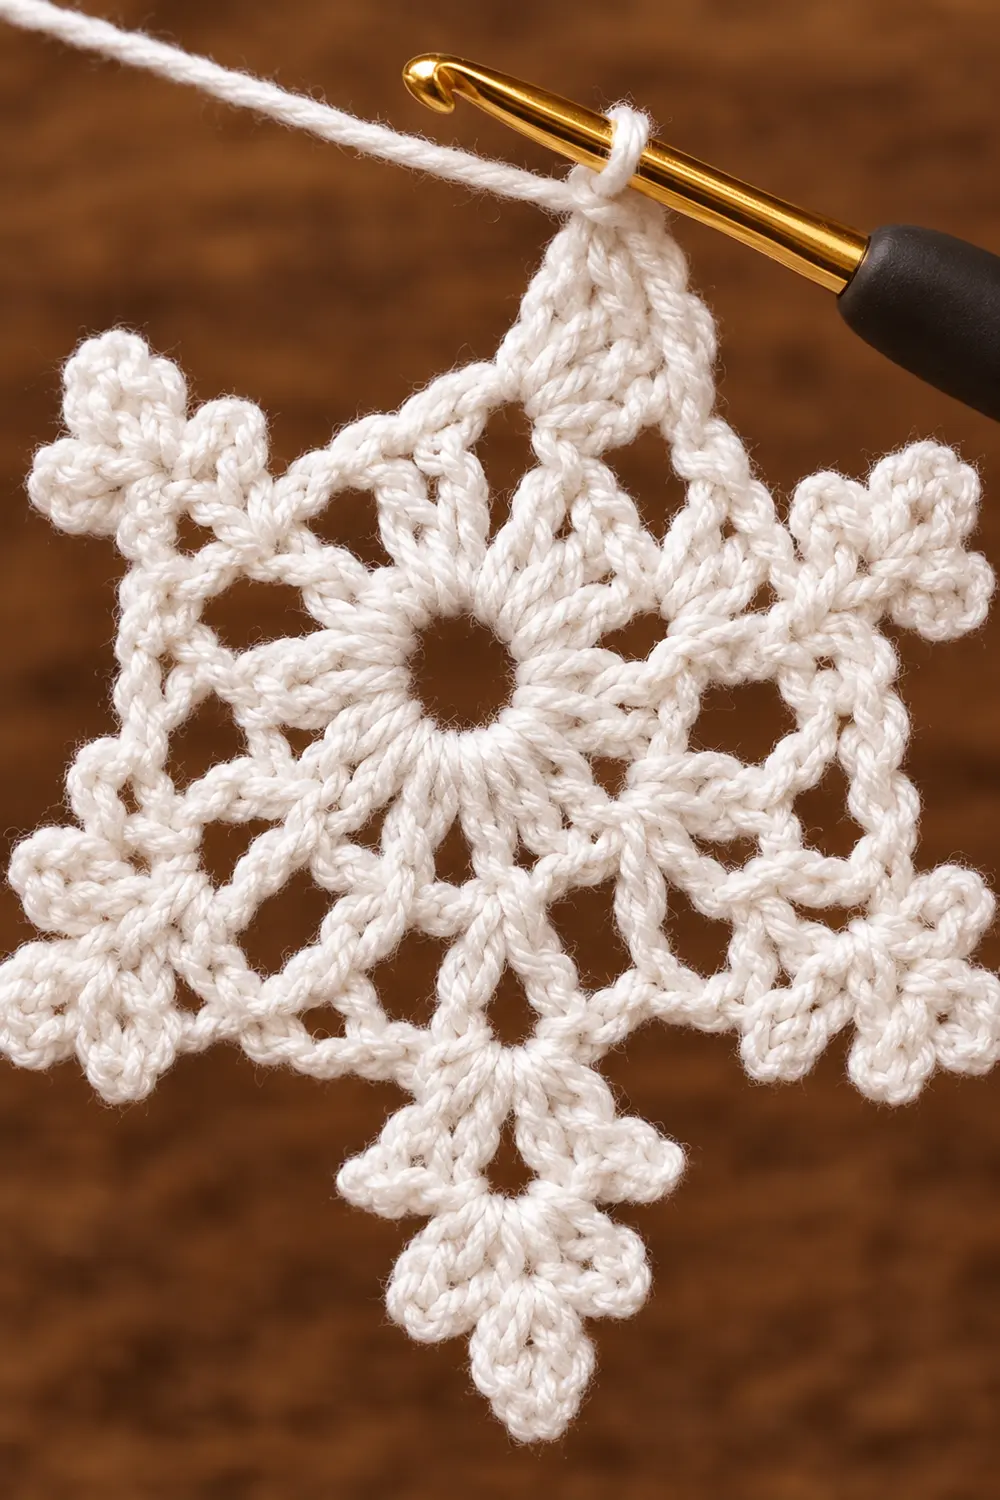
This little snowflake is all white, all lace, and quick to finish. It has six points that form a star, with clusters and chain spaces leaving open holes across the motif. Up close it reads as a neat geometric pattern. From a distance it looks like a real frost crystal.
The Frosted Star is worked in a single strand of white yarn. It has a classic, airy look that fits a tree, a gift tag, a window, or a card. The open center ring and the looped tips keep it light, and blocking makes the geometry crisp.
This pattern uses US crochet terms. The finished snowflake measures 3 in (7.6 cm) from tip to opposite tip after blocking, which sits within the 2.5–3 in (6.4–7.6 cm) range of the piece in the photo.
It is one motif, worked in the round in four rounds. Round 1 builds a solid ring of double crochets around an open center. Round 2 gathers those stitches into six clusters with chain spaces between them. Round 3 adds six double-crochet fans that form a hexagon. Round 4 is the edging round, and it adds the looped points.
Finished Size and Construction
- Finished size: 3 in (7.6 cm) tip to opposite tip, blocked
- Skill level: Easy / advanced beginner
- Terminology: US crochet terms
- Yarn weight: Sport weight (#2 fine) cotton
- Hook: 2.75 mm (US C-2)
- Number of pieces: 1
- Layout: Single motif worked in the round, six-fold symmetry
- Piece size: 3 in (7.6 cm) point to point
- Size before border (after Round 3): 2 in (5.1 cm) point to point
- Border depth (Round 4): 0.5 in (1.3 cm) beyond Round 3 at each point
Materials
Yarn advice: Choose a smooth, mercerized cotton in sport weight (#2). Cotton holds the lace open, takes starch well, and keeps a crisp edge. Avoid fuzzy or very stretchy yarns, because they blur the holes and the points. A bright white gives the cleanest frosted look.
Color:
– White: 4 g (about 12 m / 13 yd)
Tools:
– 2.75 mm (US C-2) crochet hook
– Tapestry needle
– Scissors
– Blocking mat or folded towel
– Rustproof pins (at least 6)
– Fabric stiffener or spray starch (optional)
– Ruler or tape measure
Note: The yarn quantity includes a margin of about 50% for the gauge swatch, tails, and frogging. The snowflake itself uses about 8 m (8.7 yd).
Abbreviations (US Terms)
- ch – chain
- sl st – slip stitch
- sc – single crochet
- dc – double crochet
- dc2tog – double crochet 2 together
- dc3tog – double crochet 3 together
- sp(s) – space(s)
- st(s) – stitch(es)
- rnd – round
- * * – repeat instructions between asterisks as directed
Special stitch – 3-dc cluster (dc3tog): Yarn over, insert the hook in the next stitch, yarn over and pull up a loop, yarn over and pull through 2 loops (2 loops remain). Repeat in each of the next 2 stitches (4 loops remain). Yarn over and pull through all 4 loops. One cluster is made over 3 stitches.
Beginning cluster: Ch 2, then dc2tog over the next 2 stitches. The ch-2 counts as the first leg, so this matches a dc3tog worked over 3 stitches.
Gauge and Checkpoints
Gauge matters on a small motif. A slightly tight hand can shrink the snowflake by 0.25 in (0.6 cm) or more, and the points will not open. Treat your first snowflake as your swatch.
Main gauge: Round 1 measures 1 in (2.5 cm) across.
Measurement checkpoints (measured flat, before blocking):
– After Round 1: 1 in (2.5 cm) across
– After Round 2: 1.5 in (3.8 cm) across, cluster to opposite cluster
– After Round 3: 2 in (5.1 cm) point to opposite point
– After Round 4: about 2.75 in (7.0 cm) unblocked. Blocking opens it to 3 in (7.6 cm).
If your piece is too small: Go up one hook size to 3.0 mm and work again from Round 1. Also check that you are not pulling the chain spaces tight.
If your piece is too big: Go down to 2.5 mm (US B-1/C-2). Also check that your double crochets are not overly tall.
Stop and measure after Round 1. A difference of 0.125 in (0.3 cm) there grows to about 0.375 in (1.0 cm) by the final round, so fix it early.
Pattern
Center Ring
Ch 6, sl st to the first ch to form a ring. Leave a 6 in (15.2 cm) tail.
Round 1 (Solid Ring)
Ch 3 (counts as dc), work 17 dc into the ring. Join with a sl st to the top of the beginning ch-3.
Count: 18 dc.
Work over the starting tail as you go so it is hidden inside the stitches. Spread the stitches evenly around the ring. The center hole should stay open, about 0.25 in (0.6 cm) across.
Checkpoint: 1 in (2.5 cm) across.
Round 2 (Clusters and Chain Spaces)
Beginning cluster over the first 3 sts: ch 2, dc2tog over the next 2 dc. Ch 4.
*dc3tog over the next 3 dc, ch 4*. Repeat from * to * 5 more times. Join with a sl st to the top of the beginning cluster.
Count: 6 clusters and 6 ch-4 sps (30 sts total: 6 clusters + 24 ch).
Each cluster uses 3 stitches from Round 1: 6 × 3 = 18. That uses all 18 dc exactly once. The ch-4 spaces form the first ring of open holes.
Checkpoint: 1.5 in (3.8 cm) across.
Round 3 (Hexagon Fans)
Sl st into the next ch-4 sp.
Ch 3 (counts as dc). In the same sp, work (2 dc, ch 3, 3 dc). Ch 1.
*In the next ch-4 sp, work (3 dc, ch 3, 3 dc), ch 1*. Repeat from * to * 4 more times. Join with a sl st to the top of the beginning ch-3.
Count: 36 dc, 6 ch-3 point sps, and 6 ch-1 sps (60 sts total: 36 dc + 18 ch + 6 ch).
This is a growth round. Each of the 6 ch-4 spaces from Round 2 gets one fan of 6 dc around a ch-3, so 6 × 6 = 36 dc.
Each ch-3 becomes a point of the hexagon. Each ch-1 sits directly above a Round 2 cluster. Each side of the hexagon, from one point space to the next, holds 3 dc, ch 1, 3 dc.
Checkpoint: 2 in (5.1 cm) point to opposite point. This is your “size before border.”
Border: Snowflake Points (Round 4)
Round 4 is the edging round. It turns the hexagon into a six-pointed star. Each point gets three loops: a short loop on each side and a long loop at the tip.
Border Gauge
The border is a chain-loop round, so its gauge is set by your chains. 8 ch = 1 in (2.5 cm). At this gauge, a ch-6 tip loop is 0.75 in (1.9 cm) long. Folded into a loop, it stands about 0.5 in (1.3 cm) beyond Round 3. That is the border depth.
To check, chain 8 loosely with your working hook and measure. If the chain is shorter than 1 in (2.5 cm), loosen your chains or go up half a hook size for this round only.
Round 4
Sl st in each of the next 2 dc, then sl st into the ch-3 point sp.
Ch 1. In the same point sp, work (sc, ch 4, sc, ch 6, sc, ch 4, sc). Ch 3. Skip the next 3 dc, sc in the ch-1 sp, ch 3. Skip the next 3 dc.
*In the next ch-3 point sp, work (sc, ch 4, sc, ch 6, sc, ch 4, sc). Ch 3. Skip 3 dc, sc in the ch-1 sp, ch 3. Skip 3 dc*. Repeat from * to * 4 more times.
Join with a sl st to the first sc. Fasten off, leaving a 6 in (15.2 cm) tail.
Exact Counts per Side
Each of the 6 repeats covers one point and one hexagon side. Each repeat holds:
– Point: 4 sc, 2 ch-4 side loops, 1 ch-6 tip loop
– Side: 1 sc in the ch-1 sp, with 1 ch-3 span on each side of it
Per repeat: 5 sc and 20 ch (4 + 6 + 4 + 3 + 3).
Round total: 30 sc and 120 ch (150 sts): 6 tip loops, 12 side loops, and 12 ch-3 spans.
Why the Math Works
Every round is built in 6 equal repeats, so the snowflake stays symmetric:
– Round 1: 18 dc = 6 × 3
– Round 2: 6 clusters, each using exactly 3 dc
– Round 3: one fan in each of the 6 ch-4 sps
– Round 4: one point in each of the 6 ch-3 sps and one sc in each of the 6 ch-1 sps
Each ch-3 span in Round 4 skips exactly 3 dc. That is half of one 6-dc fan. The span reaches from the point to the center of the side, and the next span reaches from the center to the next point, so no stitch is skipped twice or left out.
The size also checks out. Round 3 measures 2 in (5.1 cm). Each tip loop adds 0.5 in (1.3 cm) on opposite sides, and 2 + 0.5 + 0.5 = 3 in (7.6 cm).
Final Blocking
- Weave in ends. Run each tail through the back of several stitches, change direction once, and trim close. Do this before blocking so the ends set in place.
- Wet the snowflake. Soak it in cool water for a few minutes, then press gently in a towel. Do not wring it.
- Mark a guide. On your blocking mat, draw or imagine a 3 in (7.6 cm) circle. Mark six points around it, evenly spaced at 60° apart.
- Pin the tips. Pin each ch-6 tip loop to one mark. Work in opposite pairs so the center stays centered.
- Open the details. Use pin tips to open the center ring, the ch-4 holes from Round 2, and the side loops. Add pins to the side loops if they curl.
- Stiffen (optional). Spray with starch or brush on fabric stiffener while the piece is pinned. Blot away excess so the holes stay clear.
- Dry fully. Leave it pinned for at least 12 hours, or until it is completely dry and stiff.
- Measure. Unpin and check that it measures 3 in (7.6 cm) tip to opposite tip.
Final Quality-Control Checklist
- [ ] Round 1 has 18 dc and an open center hole
- [ ] Round 2 has 6 clusters and 6 ch-4 sps
- [ ] Round 3 has 36 dc, 6 ch-3 point sps, and 6 ch-1 sps
- [ ] Round 4 has 6 points, each with 2 ch-4 side loops and 1 ch-6 tip loop
- [ ] Round 4 has 30 sc in total
- [ ] All six points are the same length
- [ ] The snowflake lies flat with no cupping or ruffling
- [ ] It measures 3 in (7.6 cm) tip to tip after blocking
- [ ] All ends are woven in securely and trimmed
Troubleshooting
The center hole closed up. Your starting ring was pulled too tight, or the dc were crowded. Work the ring loosely and spread the dc around it.
The motif cups like a bowl. Your chain spaces are too tight. Loosen your chains, or go up half a hook size for Rounds 2–4.
The motif ruffles. Your chains are too loose, or you worked extra dc in Round 3. Recount the fans: there should be exactly 6 dc per fan.
Points are uneven lengths. One ch-6 tip loop has the wrong number of chains. Count each tip loop as you work. Blocking can only fix small differences.
I ran out of space at the end of Round 4. You probably skipped more or fewer than 3 dc in one span. Check that each ch-3 span crosses exactly 3 dc.
The clusters look loose. Pull each leg of the dc3tog to the same height before closing it. That keeps the clusters neat and even.
Stiffener filled the holes. Use less product. Poke the holes open with a pin while the stiffener is still wet.
Care
Hand wash in cool water and dry flat. Re-block and re-stiffen as needed to restore the crisp shape.

Final Notes
The Frosted Star depends on a short, reliable measurement chain. Round 1 sets the gauge at 1 in (2.5 cm). Round 2 grows to 1.5 in (3.8 cm). Round 3 reaches 2 in (5.1 cm) at the hexagon points. Round 4 adds 0.5 in (1.3 cm) at each tip, and blocking finishes the snowflake at 3 in (7.6 cm).
Check each stage before moving on, and keep every round to its six repeats. Then each snowflake should match the last one.
Optional: If you want a larger snowflake, try the same pattern in DK cotton with a 3.5 mm hook. Expect a larger finished size, and measure your own result.
Happy crocheting!