

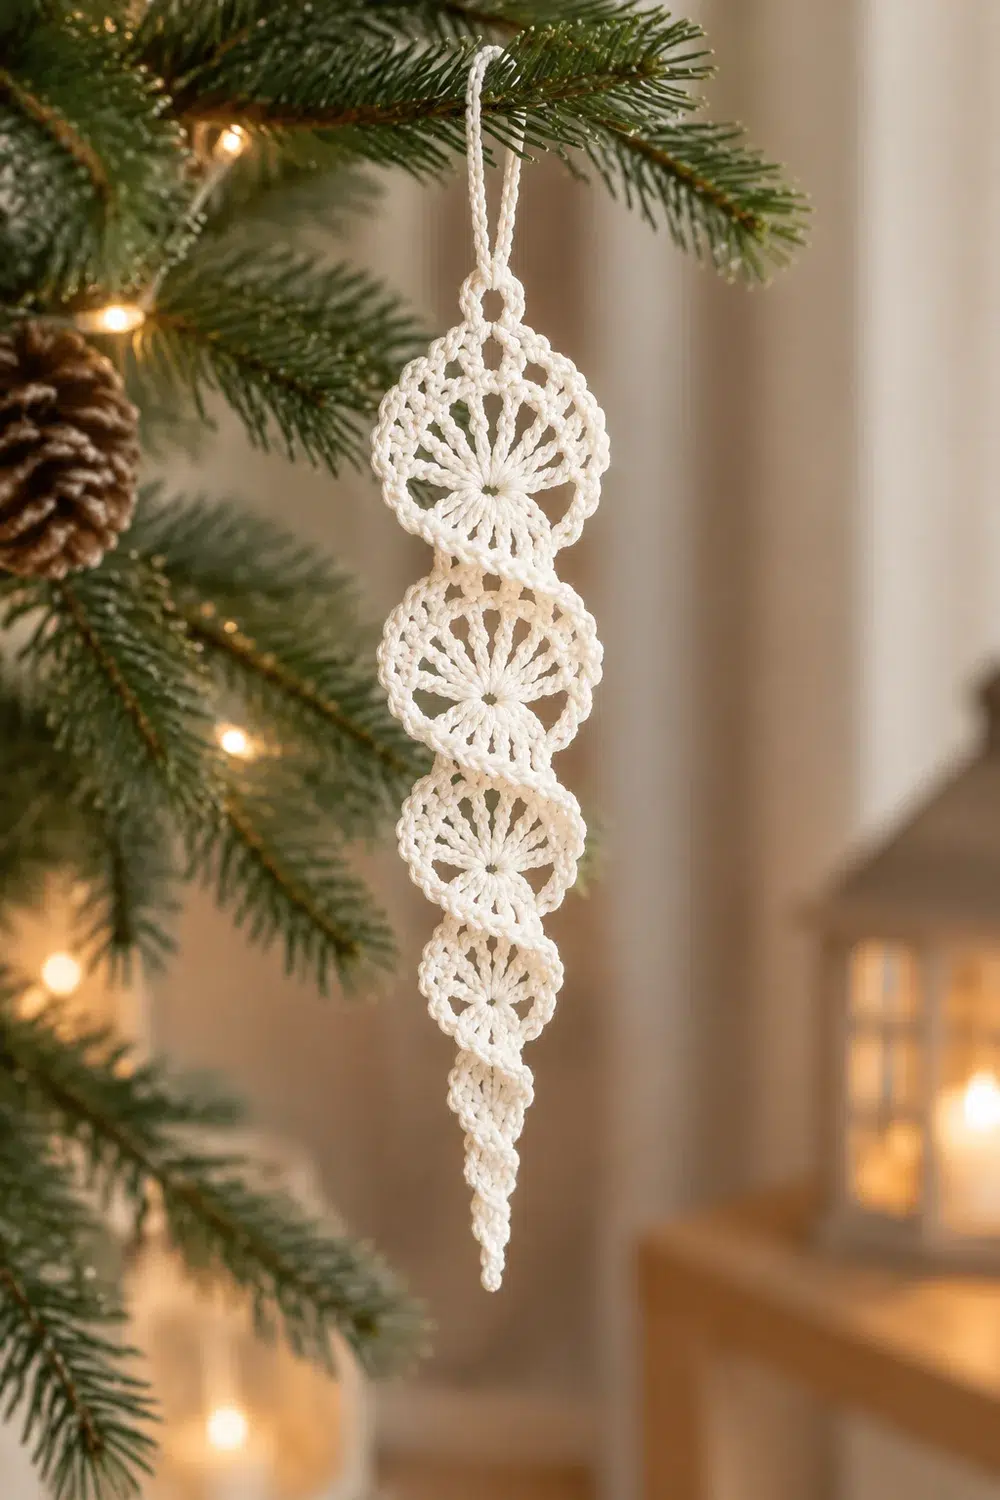
This little ornament is an elongated teardrop made of four lacy fans stacked one above the other. Each fan is a semicircle of radiating spokes edged with small chain arcs. The top three fans are equal in size. The bottom fan is noticeably smaller and tapers to a fine point, which gives the piece its icicle silhouette.
The ornament is worked in white or cream crochet thread. The openwork construction catches the light on a tree branch, in a window, or tied to a gift. A chain loop at the top center lets it hang straight.
This pattern uses US crochet terms. The finished ornament measures 4 in (10.2 cm) from the point to the top of the last fan, or 5 in (12.7 cm) including the hanging loop. At its widest it measures 1.8 in (4.6 cm).
The ornament is one continuous piece. You start at the point and work each fan from a small chain ring, travelling upward. Only one side of each fan’s edge is worked on the way up. At the top you make the hanging loop. You then work back down the other side, completing every fan’s edge as a continuous scalloped border, and finish at the point. There is nothing to sew together.
Finished Size and Construction
- Finished size: 4 in (10.2 cm) long without loop, 5 in (12.7 cm) with loop; 1.8 in (4.6 cm) wide at the widest fan
- Skill level: Easy-intermediate (small thread, but simple stitches)
- Terminology: US crochet terms
- Yarn weight: Size 3 crochet thread (Lace, category 0)
- Hook: 2.25 mm (US B-1)
- Number of pieces: 1, worked continuously
- Layout: 4 fans stacked vertically: Fan 1 (small) at the bottom, Fans 2–4 (large) above it, hanging loop at the top center
- Piece size: Fan 1 is 1.4 in (3.6 cm) wide; Fans 2–4 are 1.8 in (4.6 cm) wide
- Size before border: 1.6 in (4.1 cm) at the widest point, 4 in (10.2 cm) long
- Border depth: 0.2 in (0.5 cm) of scalloped arcs on the return side
Materials
Choose a mercerized 100% cotton thread in size 3. Mercerized cotton holds crisp stitch definition and takes starch well, which keeps the spokes and arcs sharp. Avoid fuzzy or very soft threads, because the lace will blur.
- White (or cream) size 3 crochet thread: 10 g, about 16 m
- 2.25 mm (US B-1) crochet hook
- Tapestry needle (small eye)
- Sharp scissors
- Blocking mat or foam board and rust-proof pins
- Optional: spray starch or a fabric stiffener
The ornament itself uses about 7 g (about 11 m). The quantity listed includes a margin for your gauge swatch and tails.
Abbreviations (US Terms)
- ch – chain
- sl st – slip stitch
- sc – single crochet
- dc – double crochet
- tr – treble crochet (yarn over twice)
- sk – skip
- sp – space
- st(s) – stitch(es)
- [ ] – repeat the instructions inside the brackets the stated number of times
Special technique – Ring link: Make the stated number of chains, then sl st in the stated chain from the hook. This forms a small chain ring that sits on a short 2-chain stem. The stem is the 2 chains nearest the stitch you started from.
Special technique – Travel slip stitches: Slip stitches worked along the side (post) of an end stitch. They move the hook to a new position almost invisibly.
Gauge and Checkpoints
Exact gauge is not critical for an ornament, but it controls the final length and how open the lace looks. Test one fan first.
Gauge:
– 10 ch = 1.25 in (3.2 cm)
– 1 dc = 0.25 in (0.6 cm) tall
– 1 tr = 0.35 in (0.9 cm) tall
Test swatch: Work the point and Fan 1 (Rows 1, 2 and 3A). Then work Fan 1’s Row 3B right away and fasten off. The finished test fan should measure 1.4 in (3.6 cm) wide.
Checkpoints during the project:
– After Fan 1, Row 2: 1.0 in (2.5 cm) wide
– After Fan 1, Row 3A: tip of point to center sc = 0.7 in (1.8 cm)
– After each large fan, Row 2: 1.4 in (3.6 cm) wide
– Each large fan: center sc to center sc = 1.1 in (2.8 cm)
– After Fan 2: 1.8 in (4.6 cm) total length
– After Fan 3: 2.9 in (7.4 cm) total length
– After Fan 4: 4 in (10.2 cm) total length
If your fan is too big (more than 1.5 in / 3.8 cm), change to a 2.0 mm hook or tighten your chains.
If your fan is too small (less than 1.25 in / 3.2 cm), change to a 2.5 mm hook.
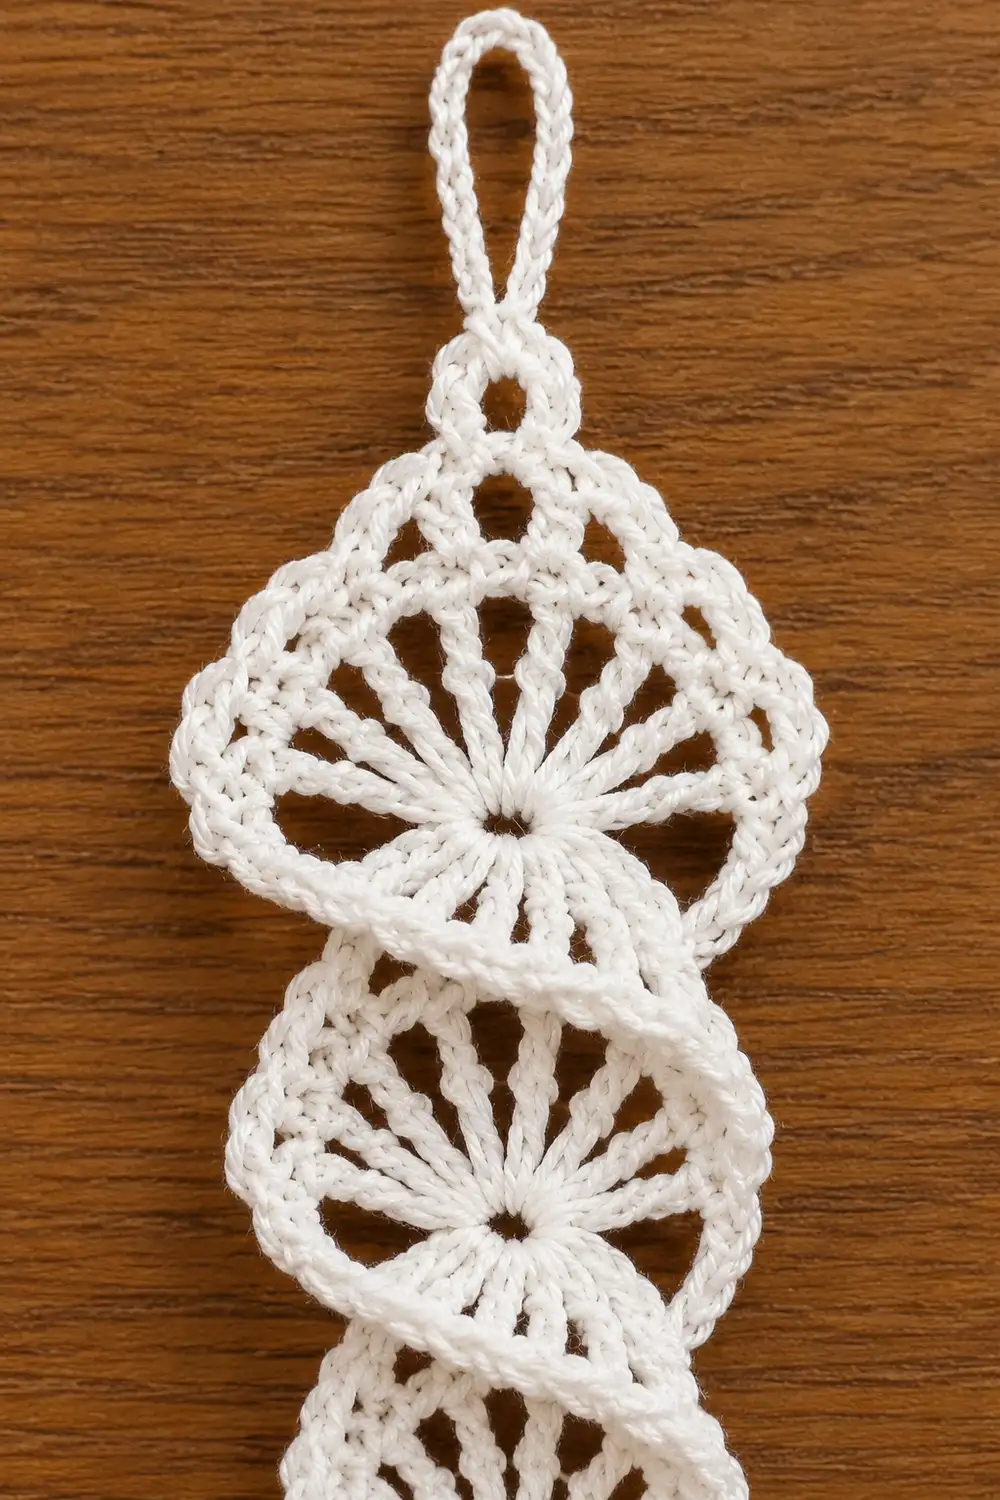
The Point and Fan 1 (Small Fan)
Start: Ch 6, sl st in 4th ch from hook to form a 4-ch ring. The 2 unused chains hang below the ring and form the point. Leave a 4 in (10.2 cm) tail.
Row 1: Ch 3 (counts as dc), 6 dc in ring. Turn. (7 dc)
Work the dc around the upper half of the ring so they fan out away from the point.
Row 2: Ch 4 (counts as dc + ch 1), dc in next dc, [ch 1, dc in next dc] 4 times, ch 1, dc in top of turning ch. Turn. (7 dc, 6 ch-1 sps)
The spokes now radiate from the ring. Check width: 1.0 in (2.5 cm).
Row 3A (first-side edge): Ch 1, sc in first dc, [ch 3, sk ch-1 sp, sc in next dc] 3 times. (4 sc, 3 ch-3 arcs)
Your last sc is in the 4th dc, which is the center spoke. Call this stitch the center sc. Do not turn and do not fasten off. The other half of this edge is completed on the way back down.
Fans 2, 3 and 4 (Large Fans)
Work this section 3 times. Each large fan begins from the center sc of the fan below it.
Ring link: Ch 7, sl st in 5th ch from hook. (5-ch ring on a 2-ch stem)
Row 1: Ch 3 (counts as dc), 8 dc in ring. Turn. (9 dc)
Keep the dc on the upper half of the ring, opening away from the stem.
Row 2: Ch 6 (counts as tr + ch 2), tr in next dc, [ch 2, tr in next dc] 6 times, ch 2, tr in top of turning ch. Turn. (9 tr, 8 ch-2 sps)
The taller treble spokes and longer spaces are what make Fans 2–4 larger than Fan 1. Check width: 1.4 in (3.6 cm).
Row 3A (first-side edge): Ch 1, sc in first tr, [ch 4, sk ch-2 sp, sc in next tr] 4 times. (5 sc, 4 ch-4 arcs)
The last sc sits in the 5th tr. This is the new center sc. Do not turn.
Repeat the Ring link and Rows 1–3A for Fan 3, then for Fan 4. Measure after each fan against the checkpoints above.
Hanging Loop
You are at Fan 4’s center sc, at the top center of the ornament.
Loop: Ch 16 (the chain measures about 2 in / 5.1 cm), sl st in the same center sc.
The loop stands 1 in (2.5 cm) above the top fan, which brings the total length to 5 in (12.7 cm). Do not fasten off.
Border: The Scalloped Return Edge
The border is the second half of each fan’s edge. You work it while travelling back down to the point.
Border gauge: Each ch-4 arc (large fans) and each ch-3 arc (Fan 1) spans about 0.25 in (0.6 cm) and stands about 0.2 in (0.5 cm) proud of the spokes.
Fan 4, Row 3B: [Ch 4, sc in next tr] 4 times. (4 sc, 4 arcs) You end in the end tr at Fan 4’s base.
Travel down to Fan 3: Work these slip stitches in order:
– 2 sl st along the side of the end tr
– 1 sl st along the side of the end dc of Row 1
– sl st in ring
– sl st in each of the 2 stem ch
– sl st in Fan 3’s center sc
(7 sl st)
Fan 3, Row 3B: Work as Fan 4, Row 3B. Then travel down to Fan 2 the same way.
Fan 2, Row 3B: Work as Fan 4, Row 3B. Then travel down to Fan 1’s center sc the same way.
Fan 1, Row 3B: [Ch 3, sc in next dc] 3 times. (3 sc, 3 arcs) You end in the end dc.
Finish at the point: Work these slip stitches in order:
– 1 sl st along the side of the end dc of Row 2
– 1 sl st along the side of the end dc of Row 1
– sl st in ring
– sl st in each of the 2 point ch
Fasten off, leaving a 4 in (10.2 cm) tail.
Counts per side:
– Side A (worked on the way up): Fan 1 = 3 arcs, Fans 2–4 = 4 arcs each. Total 15 arcs, 19 sc (the 4 center sc are included here).
– Side B (border on the way down): Fans 4, 3 and 2 = 4 arcs each, Fan 1 = 3 arcs. Total 15 arcs, 15 sc.
Why the math works: Every spoke receives exactly one sc. Fan 1 has 7 spokes and the three large fans have 9 spokes each, so 7 + (3 × 9) = 34 spokes. The edge sc total is 19 + 15 = 34, which matches. The center spoke of each fan is shared: it is worked once in Row 3A and only used as a starting point in Row 3B. That leaves 3 arcs on each side of Fan 1 (6 gaps between its 7 spokes) and 4 arcs on each side of each large fan (8 gaps between its 9 spokes). Both sides carry 15 arcs, so the silhouette is symmetrical.
The arcs (ch-3 or ch-4) are slightly longer than the gaps they bridge. That extra length lets each arc curve outward into a scallop instead of pulling the fan flat. It adds 0.2 in (0.5 cm) to each side, taking the widest fan from 1.6 in (4.1 cm) before the border to 1.8 in (4.6 cm) after it.
Final Blocking
- Weave in both tails along the stems and chains, then trim close.
- Dampen the ornament lightly with water, or mist it with spray starch.
- Lay it flat on the blocking mat, right side up.
- Pin the point first. Then pin the top center sc so the body measures 4 in (10.2 cm) long.
- Open each fan into a semicircle, with the spokes radiating evenly.
- Pin each arc tip outward so each scallop is round and the large fans measure 1.8 in (4.6 cm) wide.
- Pin the hanging loop into a neat oval 1 in (2.5 cm) tall.
- For a stiffer ornament, brush on diluted fabric stiffener now.
- Let it dry completely before unpinning (several hours or overnight).
Final Quality-Control Checklist
- [ ] Fan 1 has 7 spokes; Fans 2–4 have 9 spokes each
- [ ] Each side of Fan 1 has 3 arcs; each side of each large fan has 4 arcs
- [ ] Each side has 15 arcs in total
- [ ] Body length is 4 in (10.2 cm); total with loop is 5 in (12.7 cm)
- [ ] Large fans are 1.8 in (4.6 cm) wide; Fan 1 is 1.4 in (3.6 cm) wide
- [ ] The point ends in a fine, tidy tip
- [ ] The hanging loop sits at the top center and the ornament hangs straight
- [ ] All tails are woven in securely
Troubleshooting
Fans cup or ruffle: Your ring is too small for the stitches, or your dc are too tight. Make the ring chains slightly looser, or go up one hook size.
Fans look flat and wedge-shaped instead of semicircular: Spread Row 1 evenly around the upper half of the ring. Do not bunch the stitches on one side.
Arcs pull straight instead of scalloping: Your chains are too tight. Loosen the arc chains, or add 1 ch per arc. If you add a chain, add it to every arc on both sides so the edge stays symmetrical.
Ornament leans to one side: Check that every Row 3A ends in the true center spoke (4th dc or 5th tr). Count your spokes again.
The point looks blunt: Pull the starting tail snug before weaving it in, and pin the tip firmly while blocking.
Travel stitches show: Keep the slip stitches loose and work them through the side of the stitch rather than into its top.
Care
Hand wash in cool water, press out the water in a towel, and re-block flat to dry. Re-starch if the ornament softens over time.
Final Notes
The measurement chain is short and easy to follow:
– 10 ch = 1.25 in (3.2 cm).
– Fan 1 measures 0.7 in (1.8 cm) from the tip and 1.4 in (3.6 cm) wide.
– Each large fan adds 1.1 in (2.8 cm) of length and is 1.8 in (4.6 cm) wide.
– Three large fans bring the body to 4 in (10.2 cm). The 1 in (2.5 cm) loop gives a 5 in (12.7 cm) total.
– The 34 spokes are matched by 34 edge sc, giving 15 arcs on each side.
Optional: worked in size 10 thread with a 1.75 mm hook, the same pattern makes a dainty ornament with a body of about 3 in (7.6 cm).
Happy crocheting!