

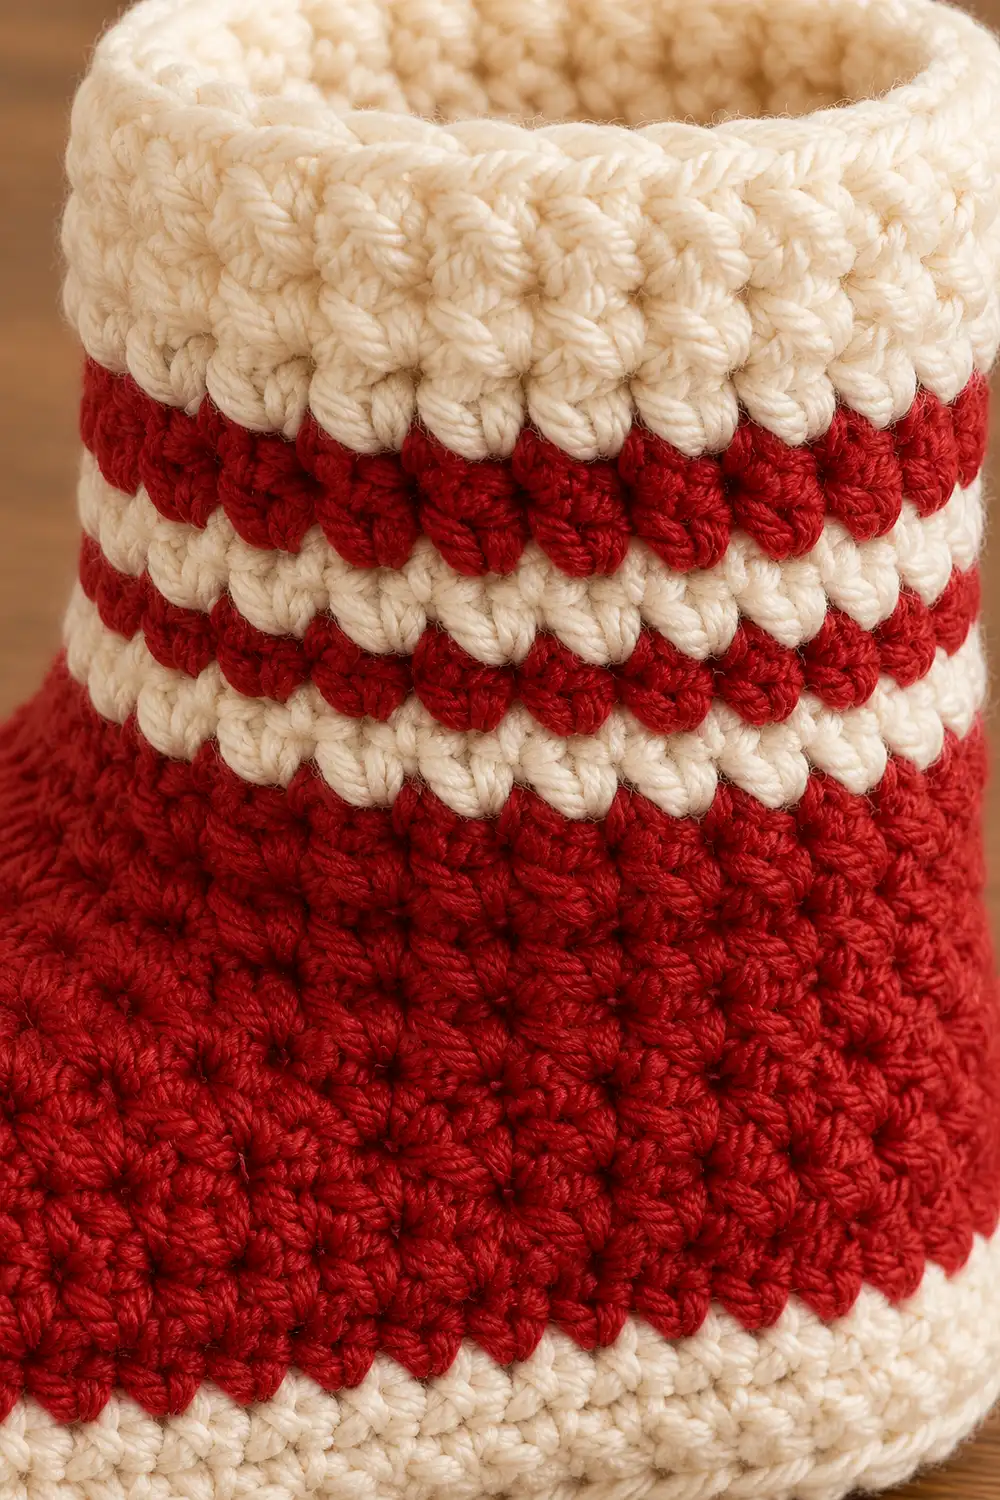
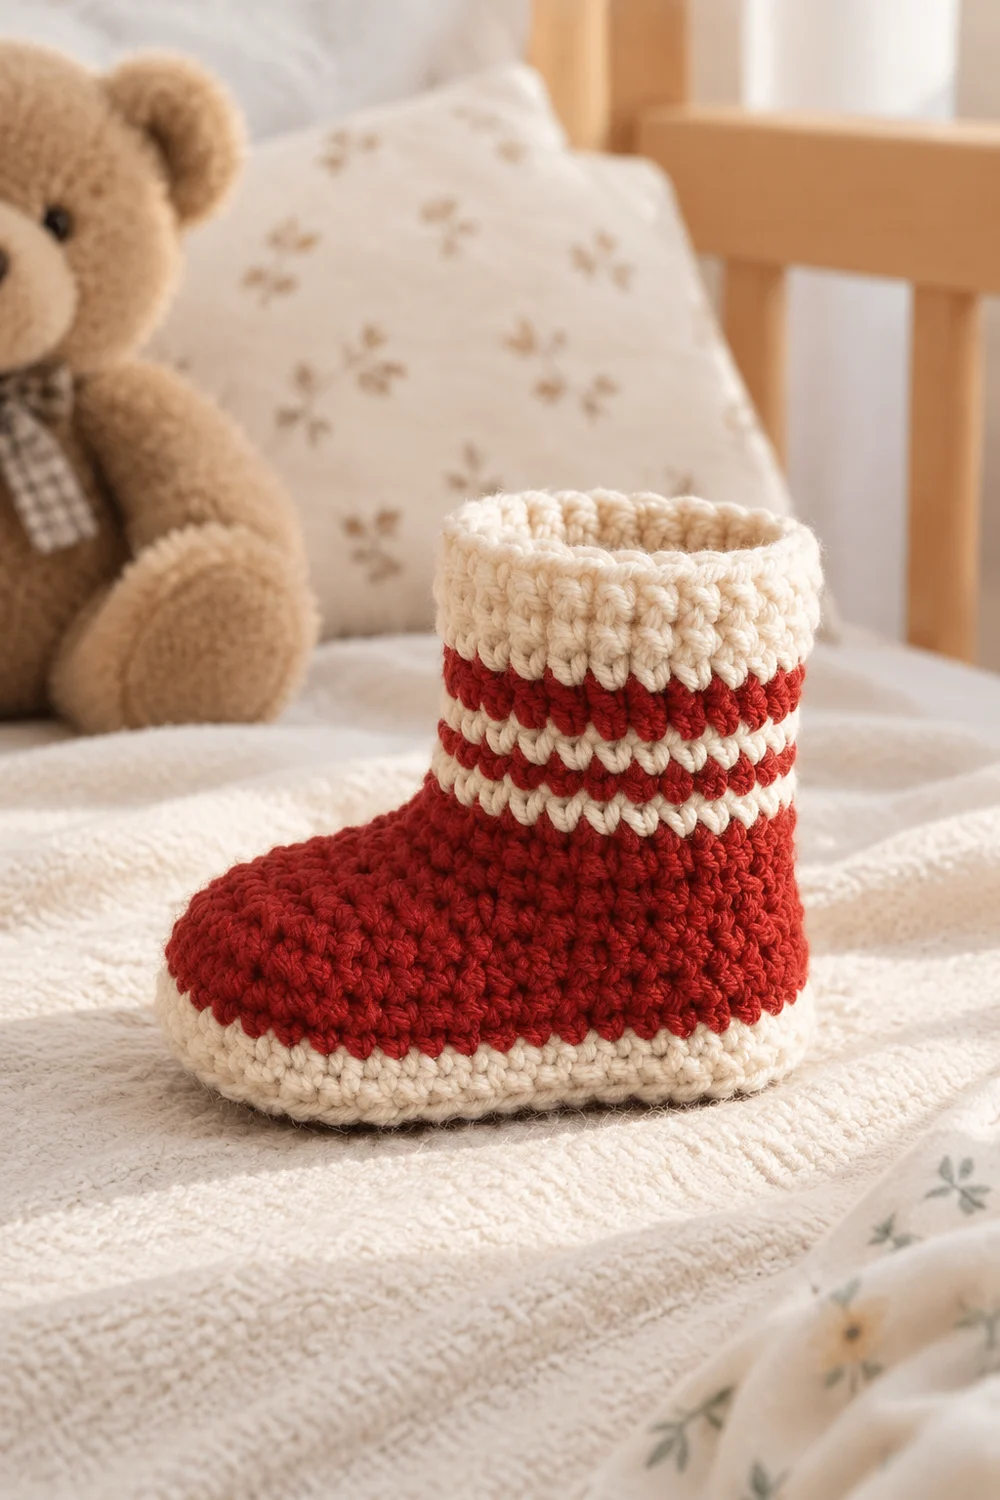
This cuffed baby bootie has a bold, candy-cane look. It uses just two colors, deep red and cream. The bootie stands upright on its own, with a cylindrical leg, a rounded red foot, and a slightly flared base.
The top cuff is cream with two red stripes beneath it. A band of raised puff stitches runs horizontally around the upper cuff. A matching cream band at the base combines a ribbed ridge with a second row of puffs. The red foot is worked in a dense, alternating single-crochet and half-double-crochet texture that holds its shape well.
This pattern uses US crochet terms. The finished bootie is 4 in (10.2 cm) tall. The sole is 4 in (10.2 cm) long and 2.25 in (5.7 cm) wide. That fits roughly 3–6 months.
Construction is one continuous piece worked in joined rounds. You start with an oval cream sole and work the cream base band. Next comes the textured red foot with toe shaping. Then you add the striped leg and finish with the cream puff cuff and rim. There is no sewing.
Finished Size and Construction
- Finished size: 4 in (10.2 cm) tall
- Sole: 4 in (10.2 cm) long × 2.25 in (5.7 cm) wide
- Leg circumference: 6 in (15.2 cm); flat width 3 in (7.6 cm)
- Skill level: Advanced beginner to intermediate
- Terminology: US terms
- Yarn weight: Worsted (#4)
- Hook: 3.75 mm (US F-5)
- Number of pieces: 1
- Layout: One seamless piece in joined rounds, sole to rim
- Piece size: 4 in (10.2 cm) tall × 4 in (10.2 cm) long
- Height before cuff band (end of Rnd 17): 2.75 in (7.0 cm)
- Cuff band (border) depth: 1.25 in (3.2 cm)
Materials
Yarn: Use a smooth worsted-weight yarn that is soft enough for baby skin, such as cotton, a cotton blend, or a baby-safe acrylic. Firm, smooth yarn shows the puff texture best and helps the bootie stand upright. Avoid fuzzy or splitty yarns.
- Deep red: 20 g (approx. 40 m / 44 yd)
- Cream / off-white: 25 g (approx. 50 m / 55 yd)
These quantities include a margin. One bootie uses less than this.
Tools:
- 3.75 mm (US F-5) crochet hook
- 1 stitch marker (plus 2 optional markers for the toe)
- Yarn needle
- Scissors
- Measuring tape
- A rolled washcloth or tissue for blocking
Abbreviations (US Terms)
- ch – chain
- sl st – slip stitch
- sc – single crochet
- hdc – half double crochet
- sc2tog – single crochet 2 together (decrease)
- BLO – back loop only
- st(s) – stitch(es)
- rnd(s) – round(s)
- yo – yarn over
Special stitch – mini-puff: (Yo, insert hook in st, yo, pull up a loop to about sc height) 3 times. You now have 7 loops on the hook. Yo and pull through all 7 loops. The mini-puff counts as 1 st.
Round structure: Every round ends with a sl st to the first st. Every round begins with ch 1, which does not count as a stitch.
Color changes: Complete the joining sl st with the new color.
Gauge and Checkpoints
Gauge: 20 sc and 22 rnds = 4 in (10.2 cm) in sc worked in the round. This is a firm gauge on purpose, so the bootie keeps its structure.
Test first: Work Rnds 1–3 of the sole and measure them before you continue. The sole is your gauge swatch.
Checkpoints:
- After Rnd 3 (sole): 4 in (10.2 cm) long × 2.25 in (5.7 cm) wide.
- After Rnd 6 (base band): The band stands about 0.5 in (1.3 cm) above the sole edge.
- After Rnd 13 (foot complete): The bootie is 2 in (5.1 cm) tall. The opening lies 3 in (7.6 cm) wide when flattened.
- After Rnd 17 (stripes): The bootie is 2.75 in (7.0 cm) tall.
- Finished: The bootie is 4 in (10.2 cm) tall.
If the sole is too big: Go down to a 3.5 mm hook.
If the sole is too small: Go up to a 4.0 mm hook.
Change hooks only after measuring the sole. Do not skip or add rounds, because the toe shaping depends on the exact stitch positions.
Sole (Cream)
With cream, ch 12.
Rnd 1: Hdc in 3rd ch from hook (the skipped 2 ch do not count), hdc in next 8 ch, 5 hdc in last ch. Rotate and work along the other side of the chain: hdc in next 8 ch, 4 hdc in the same ch as the first hdc. Sl st to first hdc. (26 sts)
Each end now holds 5 sts, and each long side holds 8 sts.
Rnd 2: Ch 1. 2 hdc in first st, hdc in next 8, 2 hdc in each of next 5, hdc in next 8, 2 hdc in each of last 4. Sl st to join. (36 sts)
This adds 10 sts, all at the two ends.
Rnd 3: Ch 1. (Hdc in next st, 2 hdc in next st) once, hdc in next 8, (hdc in next st, 2 hdc in next st) 5 times, hdc in next 8, (hdc in next st, 2 hdc in next st) 4 times. Sl st to join. (46 sts)
Checkpoint 1: The sole should measure 4 in × 2.25 in (10.2 cm × 5.7 cm).
Stitch map: Number the Rnd 3 stitches 1–46 from the start of the round.
- Sts 1–3 and 35–46 form the heel end.
- Sts 4–11 and 27–34 are the sides.
- Sts 12–26 form the toe end (15 sts).
Rnds 4–10 are worked 1:1, so these positions carry straight up. If you like, place markers in st 12 and st 26.
Base Band (Cream – Ribbed and Puffed)
Rnd 4: Ch 1. Sc in BLO of each st around. Sl st to join. (46 sc)
The unworked front loops form a crisp horizontal ridge, which is the ribbed base edge.
Rnd 5: Ch 1. (Sc in next st, mini-puff in next st) 23 times. Sl st to join. (46 sts: 23 sc + 23 mini-puffs)
Rnd 6: Ch 1. Sc in each st around, working into the top of each puff. Join with red. (46 sc)
Checkpoint 2: The cream band rises about 0.5 in (1.3 cm) above the sole.
Foot (Red – Dense Texture)
The foot alternates sc and hdc, stacking each sc on an hdc and each hdc on an sc. This creates a dense, pebbled fabric. The count of 46 is even, so the repeat closes cleanly.
Rnd 7: Ch 1. (Sc in next st, hdc in next st) 23 times. Sl st to join. (46 sts)
Rnd 8: Ch 1. (Hdc in next sc, sc in next hdc) 23 times. Sl st to join. (46 sts)
Rnd 9: Repeat Rnd 7. (46 sts)
Rnd 10: Repeat Rnd 8. (46 sts)
Toe Shaping (Red – sc)
Work in plain sc for the shaping. Decreases fall over the toe sts (12–26) to round the instep.
Rnd 11: Ch 1. Sc in first 11 sts, sc2tog 7 times, sc in last 21 sts. Sl st to join. (39 sts)
Check: 11 + 7 + 21 = 39.
Rnd 12: Ch 1. Sc in first 10 sts, sc2tog 5 times, sc in last 19 sts. Sl st to join. (34 sts)
Check: 10 + 5 + 19 = 34.
Rnd 13: Ch 1. Sc in first 9 sts, sc2tog 4 times, sc in last 17 sts. Sl st to join. (30 sts)
Check: 9 + 4 + 17 = 30.
Join with cream at the end of Rnd 13.
Checkpoint 3: The bootie is 2 in (5.1 cm) tall. The opening lies 3 in (7.6 cm) wide when flattened.
Striped Leg
Work each round as ch 1, sc in each st around (30), sl st to join. Change color at each join.
- Rnd 14: Cream. (30 sc)
- Rnd 15: Red. (30 sc)
- Rnd 16: Cream. (30 sc)
- Rnd 17: Red. Join with cream. (30 sc)
Carry the unused color loosely up the inside at the join instead of cutting it. Cut red after Rnd 17, leaving a 6 in (15.2 cm) tail.
Checkpoint 4: The bootie is 2.75 in (7.0 cm) tall.
Border: Upper Cuff Band and Rim (Cream)
Border gauge: The border uses the same gauge as the leg, 20 sc = 4 in (10.2 cm). It is worked over the leg’s own 30 sts with no added stitches.
When the bootie is flattened, each side holds 15 sts.
Rnd 18: Ch 1. Sc in each st. Sl st to join. (30 sc; 15 per side)
Rnd 19: Ch 1. (Sc in next st, mini-puff in next st) 15 times. Sl st to join. (30 sts: 15 sc + 15 puffs; 15 per side)
Rnd 20: Ch 1. Sc in each st. Sl st to join. (30 sc; 15 per side)
Rnd 21: Ch 1. (Mini-puff in next st, sc in next st) 15 times. Sl st to join. (30 sts; 15 per side)
The puffs in this round sit above the sc of Rnd 19, which staggers the texture.
Rnd 22: Ch 1. Sc in each st. Sl st to join. (30 sc; 15 per side)
Rnd 23 (rim): Sl st loosely in each st around. (30 sl sts)
Fasten off. The slip-stitch rim firms the edge and keeps the opening snug.
Why the math works: 30 ÷ 2 = 15 repeats, so both puff rounds close with no partial repeat. At 5 sc per in, 30 sts gives a 6 in (15.2 cm) circumference, or a 3 in (7.6 cm) flat width. The six border rounds add 1.25 in (3.2 cm), bringing the total height from 2.75 in (7.0 cm) to 4 in (10.2 cm).
Optional: Work a second bootie identically for a pair.
Final Blocking
- Weave in all ends on the inside. Weave along same-color stitches so nothing shows through.
- Stuff the bootie firmly with a rolled washcloth or tissue. Fill out the toe and push the leg into a straight cylinder.
- Stand the bootie upright on a flat surface. Press the sole flat with your fingers.
- Hover a steam iron about 1 in (2.5 cm) above the fabric. Never press down, because that flattens the puffs.
- Shape while damp. Round the toe, straighten the stripes, and line up the round joins at the back of the heel.
- Let it dry fully upright before removing the stuffing.
- Measure: 4 in (10.2 cm) tall, 4 in (10.2 cm) sole length.
Final Quality-Control Checklist
- [ ] Sole measures 4 in × 2.25 in (10.2 cm × 5.7 cm)
- [ ] Rnd 4 ridge is visible all the way around the base
- [ ] 23 puffs in Rnd 5; 15 puffs each in Rnds 19 and 21
- [ ] Foot holds 46 sts through Rnd 10
- [ ] Counts after toe shaping: 39, 34, 30
- [ ] Two clean red stripes (Rnds 15 and 17)
- [ ] Flat opening width is 3 in (7.6 cm)
- [ ] Total height is 4 in (10.2 cm)
- [ ] All ends secured on the inside
- [ ] No loose loops or exposed carried strands inside the cuff
Troubleshooting
Sole is curling or cupping. Your hdc tension is too tight. Re-check the sole measurement, and go up 0.25 mm if needed.
Sole is ruffling. Your tension is too loose, or extra stitches were added at the ends. Recount Rnd 3: it should be 46.
Puffs aren’t popping. Pull each loop up to a consistent height. Keep the sc rounds on either side firm.
Foot texture looks like plain stripes. Stitches are stacking sc-on-sc. Rnd 8 must start with an hdc into the sc.
Toe is lopsided. The decreases drifted off the toe stitches. Use markers at sts 12 and 26 on Rnd 10.
Visible jog at the stripe joins. Join with a sl st and ch 1 every round. Keep the joins aligned at the back.
Bootie won’t stand. Your gauge is too loose. Remake with a smaller hook, or block over a firm stuffing.
Care
Hand wash in cool water with mild soap and press out the water gently. Reshape and dry flat or upright, away from direct heat.
Final Notes
Your measurement chain is:
- Sole: 4 in × 2.25 in (10.2 cm × 5.7 cm)
- Base band: 0.5 in (1.3 cm)
- Foot: 2 in (5.1 cm) tall
- Stripes: 2.75 in (7.0 cm)
- Finished with the puff cuff: 4 in (10.2 cm)
The stitch counts run 26, 36, and 46 for the sole, holding at 46 through the foot. Toe shaping takes it to 39, 34, and 30, and the leg and cuff stay at 30.
If every checkpoint matches, your bootie will stand tall in bold red and cream.
Happy crocheting!