

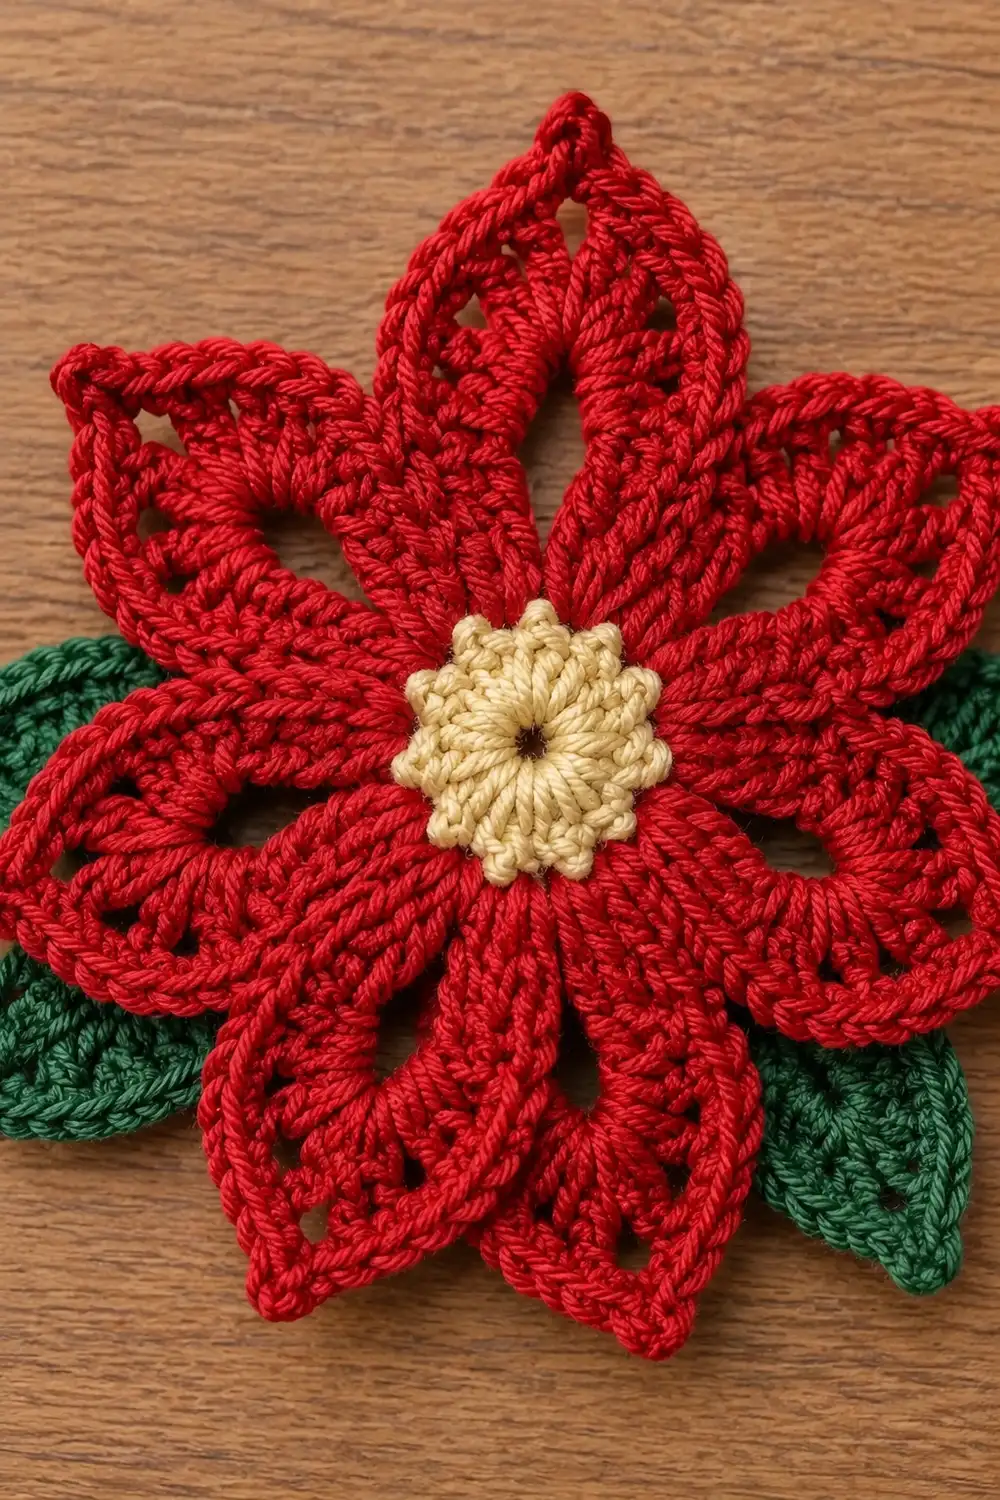
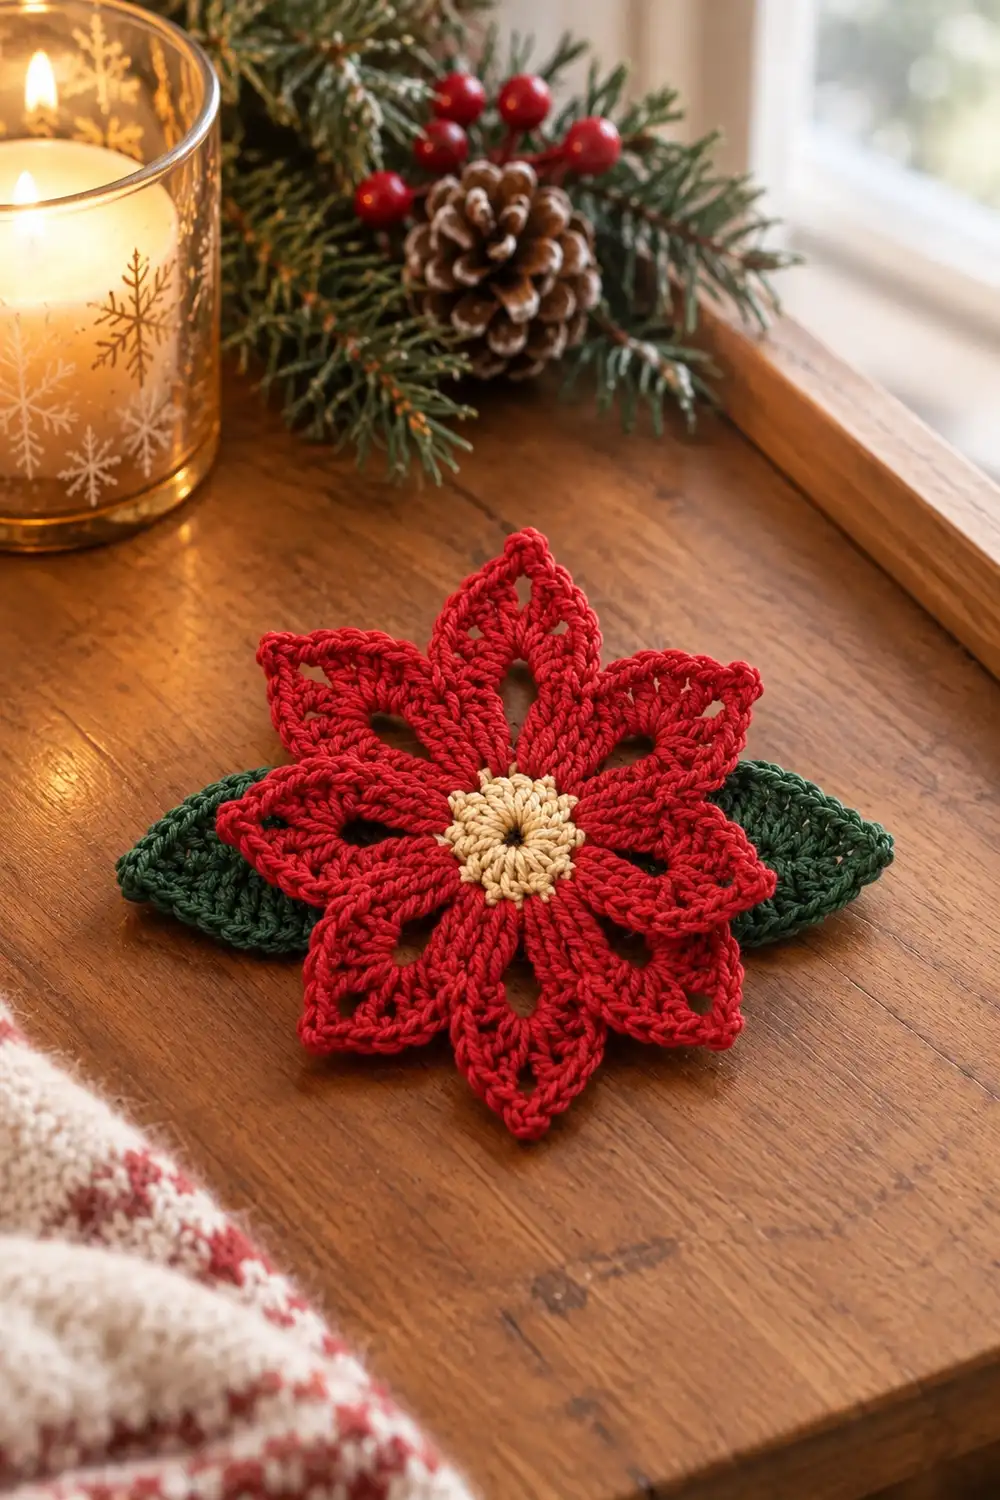
This poinsettia is a small holiday motif with six bright red, pointed petals around a raised cream center. Each petal has an open eyelet window and a scalloped shell edge, so the flower looks light and lacy instead of solid.
Two small green leaves are sewn behind the flower where the petals meet, peeking out on the left and right. The finished piece lies flat, so you can use it as a standalone ornament, a gift-wrap topper, or an appliqué on a stocking or bag.
The pattern uses US crochet terms. The finished flower measures about 4.5 in (11.4 cm) from petal tip to opposite petal tip, which falls within the 4 to 5 in (10.2 to 12.7 cm) range of the original.
You work the flower in one continuous piece. You start with a small cream dome, change to red for a round hub, then make six chain loops that become the petals. A final scalloped edging round gives each petal its shell-trimmed outline. You make the two leaves separately and sew them to the back.
Finished Size and Construction
- Finished size: about 4.5 in (11.4 cm) across, tip to tip
- Skill level: Easy-intermediate
- Terminology: US crochet terms
- Yarn weight: DK (#3), cotton or cotton blend
- Hook: 3.5 mm (E-4)
- Number of pieces: 1 flower (cream center and red petals worked as one piece) plus 2 leaves, assembled into one motif
- Layout: a single flower with one leaf tucked behind it at about 8 o’clock and one at about 4 o’clock
- Leaf size: about 2.5 in (6.4 cm) long × 1 in (2.5 cm) wide
- Size before edging (after Round 6): about 3.75 in (9.5 cm) tip to tip
- Edging depth: about 0.4 in (1.0 cm) added to each petal edge
Materials
Yarn advice: Mercerized or smooth cotton DK gives crisp stitch definition. It also holds the petal points and scallops well after blocking. Acrylic DK works too, but it is softer and may need light stiffening.
- Red (petals and hub): 10 g / 25 m
- Cream (center dome): 2 g / 5 m
- Green (leaves): 4 g / 10 m
These quantities include a margin of about 25% for gauge differences, a test swatch, and yarn tails.
Tools:
- 3.5 mm (E-4) crochet hook
- Tapestry needle
- Scissors
- 1 stitch marker
- Rust-proof pins and a blocking mat or folded towel
- Spray bottle with water
- Optional: fabric stiffener, a pin back, or a hanging loop of thread
Abbreviations (US Terms)
- MR: magic ring
- ch: chain
- sl st: slip stitch
- sc: single crochet
- hdc: half double crochet
- dc: double crochet
- tr: treble crochet
- st(s): stitch(es)
- sp: space
- rep: repeat
- inc: 2 sc in the same st
Special stitches:
- Shell: 5 dc worked into the same stitch.
- Point: (hdc, dc, ch 2, dc, hdc) worked into the same ch-3 space.
Gauge and Checkpoints
Exact gauge matters less here than for a garment. Even so, the flower only lands at 4.5 in (11.4 cm) if your tension is close. As a reference, 20 sc and 22 rows = 4 in (10.2 cm) in DK cotton with a 3.5 mm hook.
Test first: Work Rounds 1 to 4 as a test piece and measure it before going on. Then check at each stage:
- After Round 3 (cream dome): about 0.75 in (1.9 cm) across, slightly cupped
- After Round 4 (red hub): about 1.25 in (3.2 cm) across, lying flat around the raised dome
- After Round 5 (chain loops): about 1.75 in (4.4 cm) across when gently flattened
- After Round 6 (petals): about 3.75 in (9.5 cm) tip to tip
- After Round 7 (edging): about 4.5 in (11.4 cm) tip to tip
If your piece is too big, go down to a 3.25 mm hook, or tighten your tension on the chain loops and tall stitches.
If your piece is too small, go up to a 3.75 mm hook. Do not add stitches. The stitch counts set the shape, so change only the hook size.
Flower Center (Cream Dome)
The center is a small cupped disc. Round 3 adds no stitches, so the edge pulls in and the center rises into a dome.
Round 1: With cream, make a MR. Ch 1, 6 sc in ring. Pull the ring tight. Do not join. Place a marker in the last st and move it up each round. (6 sts)
Round 2: Inc in each st around. (12 sts)
Round 3: Sc in each st around. (12 sts). This even round makes the dome.
Sl st to the next st. Fasten off, leaving a 6 in (15.2 cm) tail.
Before closing up the back, tuck the cream tails up under the dome. They add padding and help the center stay raised. Leave them loose for now; you will weave them in later.
Red Hub and Petal Base
Round 4: Join red with a sl st in any st of Round 3. Ch 1. Sc in next st, inc in next st. Rep from * 6 times. Join with a sl st to the first sc. (18 sts)
This round spreads outward around the dome. The hub should lie flat while the cream center stays raised.
Round 5: Ch 1, sc in the same st as the join. Ch 6, skip 2 sts, sc in next st. Rep from * 4 more times. Ch 6, skip the last 2 sts, then join with a sl st to the first sc. (6 sc and 6 ch-6 loops)
Check: 6 repeats × 3 sts (1 sc plus 2 skipped) = 18 sts. This uses every Round 4 stitch exactly once. Each ch-6 loop becomes one petal.
Petals
Each petal is worked entirely inside one ch-6 loop. The sc stitches from Round 5 are skipped and sit hidden between the petals.
Round 6: Sl st into the first ch-6 loop. Ch 1. In the same loop work:
(sc, hdc, dc, ch 2, tr, ch 3, tr, ch 2, dc, hdc, sc)
Then in each of the remaining 5 ch-6 loops, work the same group. Join with a sl st to the first sc. (6 petals)
Per petal: 8 sts (2 sc, 2 hdc, 2 dc, 2 tr), 2 ch-2 sps, and 1 ch-3 tip sp.
Round total: 48 sts, 12 ch-2 sps, and 6 ch-3 tip sps.
The ch-2 spaces between each dc and tr form the open eyelet window on each side of the petal. The two tr stitches and the ch-3 between them build the tall pointed tip. The last sc of one petal and the first sc of the next sit side by side at the hub.
Checkpoint: The flower should now measure about 3.75 in (9.5 cm) tip to tip and lie flat. If the petals cup forward, your chain loops are too tight. If they ripple, the loops are too loose.
Do not fasten off. Continue straight into the edging.
Leaves (Make 2)
The leaves are worked around both sides of a foundation chain. They taper from a pointed tip to a rounded base, with a smooth plain edge.
With green, ch 13.
Side 1: Sc in 2nd ch from hook, hdc in next ch, dc in next 7 ch, hdc in next ch, sc in next ch. (11 sts)
Base: 3 sc in the last ch. (3 sts)
Side 2: Rotate the work and continue along the opposite side of the foundation chain. Sc in next ch, hdc in next ch, dc in next 7 ch, hdc in next ch, sc in the last ch. This is the same ch that holds the first sc of Side 1. (11 sts)
Tip: Ch 2, sl st in the first sc of Side 1.
Leaf total: 11 + 3 + 11 = 25 sts, plus a ch-2 tip.
Fasten off, leaving an 8 in (20.3 cm) tail for sewing. Each leaf should measure about 2.5 in (6.4 cm) long × 1 in (2.5 cm) wide.
Border (Scalloped Petal Edging)
On this flower, the “border” is the shell edging around each petal. It is what creates the scalloped silhouette. You work it in red, directly into Round 6, without turning the work.
Border gauge: Each shell spreads to about 0.75 in (1.9 cm) wide along the petal edge. One complete petal side measures about 1.25 in (3.2 cm) once the edging is done.
Round 7: Do not ch. Sl st in the first sc of Round 6; this counts as the first sl st. Then work the following for each petal:
- Sc in hdc.
- Shell in dc.
- Ch 1, skip the ch-2 sp, sc in tr.
- Point in the ch-3 tip sp.
- Sc in tr, ch 1, skip the ch-2 sp.
- Shell in dc.
- Sc in hdc.
- Sl st in sc.
Continue with the next petal by working “sc in hdc” into its first hdc. Rep for all 6 petals. The final sl st joins to the first sl st. Fasten off and weave in the ends.
Counts for each petal side:
- Right side of the petal: sl st, sc, 5 dc (shell), sc, plus hdc and dc from the Point = 10 sts and 1 ch-1
- Left side of the petal: dc and hdc from the Point, sc, 5 dc (shell), sc, sl st = 10 sts and 1 ch-1
- Per petal: 20 sts, 2 ch-1 sps, and 1 ch-2 point
- Round total: 6 × 20 = 120 sts, plus 12 ch-1 sps and 6 ch-2 points
Why the math works:
- Each petal side in Round 6 has 4 sts and a ch-2 space, running from the sc to the tr. The edging places 10 sts over that same side. That roughly doubles the stitch count along the outer edge, which is what you need because the outer edge of a petal is about twice as long as its base.
- Each shell fans 5 sts out from a single dc. That extra width has nowhere to go but outward, so it forms a rounded scallop.
- The ch-1 bridges skip over the eyelet spaces, so the windows stay open.
- The Point repeats the hdc-dc height of the shells but adds a ch-2 at the very top. This keeps the petal tip sharp.
- Both sides of each petal have identical counts, so every petal is symmetrical. Six identical 20-st petals make the round total of 120.
Final Blocking
- Weave in all ends except the two green sewing tails.
- Lightly spray the flower and both leaves with water until they are damp but not soaking.
- Pin the flower face up on the mat. Pin the dome first, then pin each petal tip outward until the flower measures 4.5 in (11.4 cm) tip to tip. The petals should be evenly spaced, about 60 degrees apart.
- Pin the middle of each shell to open the scallops. Push a pin through each eyelet to open the windows.
- Pin each leaf flat to 2.5 in (6.4 cm) long, with the tip pinned to a sharp point.
- Gently push the cream dome up from underneath so it stays raised.
- If you want a stiffer ornament, apply fabric stiffener now. Let everything dry completely.
- Attach the leaves: Place the leaves behind the flower at about 8 o’clock and 4 o’clock, with their rounded bases under the red hub. Each leaf should extend about 0.75 in (1.9 cm) beyond the petal tips. Use the green tails to whipstitch each leaf base to the back of Rounds 4 and 5. Keep the stitches small so they do not show on the front. Weave in the ends.
Final Quality-Control Checklist
- [ ] The cream dome is raised and about 0.75 in (1.9 cm) across.
- [ ] The red hub lies flat with no ripples.
- [ ] There are exactly 6 petals, each with 20 edging sts and a sharp ch-2 point.
- [ ] Both eyelet windows are open on every petal.
- [ ] The shells form rounded scallops along both sides of each petal.
- [ ] The flower measures 4.5 in (11.4 cm) tip to tip.
- [ ] Both leaves are 2.5 in (6.4 cm) long and sewn securely behind the hub.
- [ ] No sewing stitches show on the front.
- [ ] All ends are woven in and trimmed.
Troubleshooting
The dome is flat. You probably added an increase in Round 3. Round 3 must stay at 12 sts. You can also tuck more yarn tail under the dome for extra padding.
The hub cups like a bowl. Your Round 4 tension is too tight. Redo it with a looser hand, or use a hook 0.25 mm larger for that round only.
The petals ruffle. The ch-6 loops are too long or too loose. Chain more snugly, or make ch-5 loops if you have a loose chain.
The petals cup forward. The loops are too tight. Loosen your chains or go up a hook size for Round 5.
The eyelets have closed up. You worked into the ch-2 spaces instead of skipping them. Check that you have ch 1 and a skip at those spots.
The tips are blunt. Make sure you worked the ch 2 inside each Point. Pin the tips sharply during blocking.
The leaves twist. Twisting is normal before blocking. Pin the leaves flat and let them dry fully.
Care
Hand wash in cool water with mild soap, press out the water in a towel, and dry flat, reshaping the petals as it dries. If you used fabric stiffener, spot clean only.
Final Notes
The measurement chain is simple: a 0.75 in (1.9 cm) dome, then a 1.25 in (3.2 cm) hub, 1.75 in (4.4 cm) after the chain loops, 3.75 in (9.5 cm) after the petals, and 4.5 in (11.4 cm) after the scalloped edging. Check your size at each stage and the finished poinsettia will come out right. Optional: if you make several, they also look lovely scattered across a wreath or stitched onto a gift bag.
Happy crocheting!