

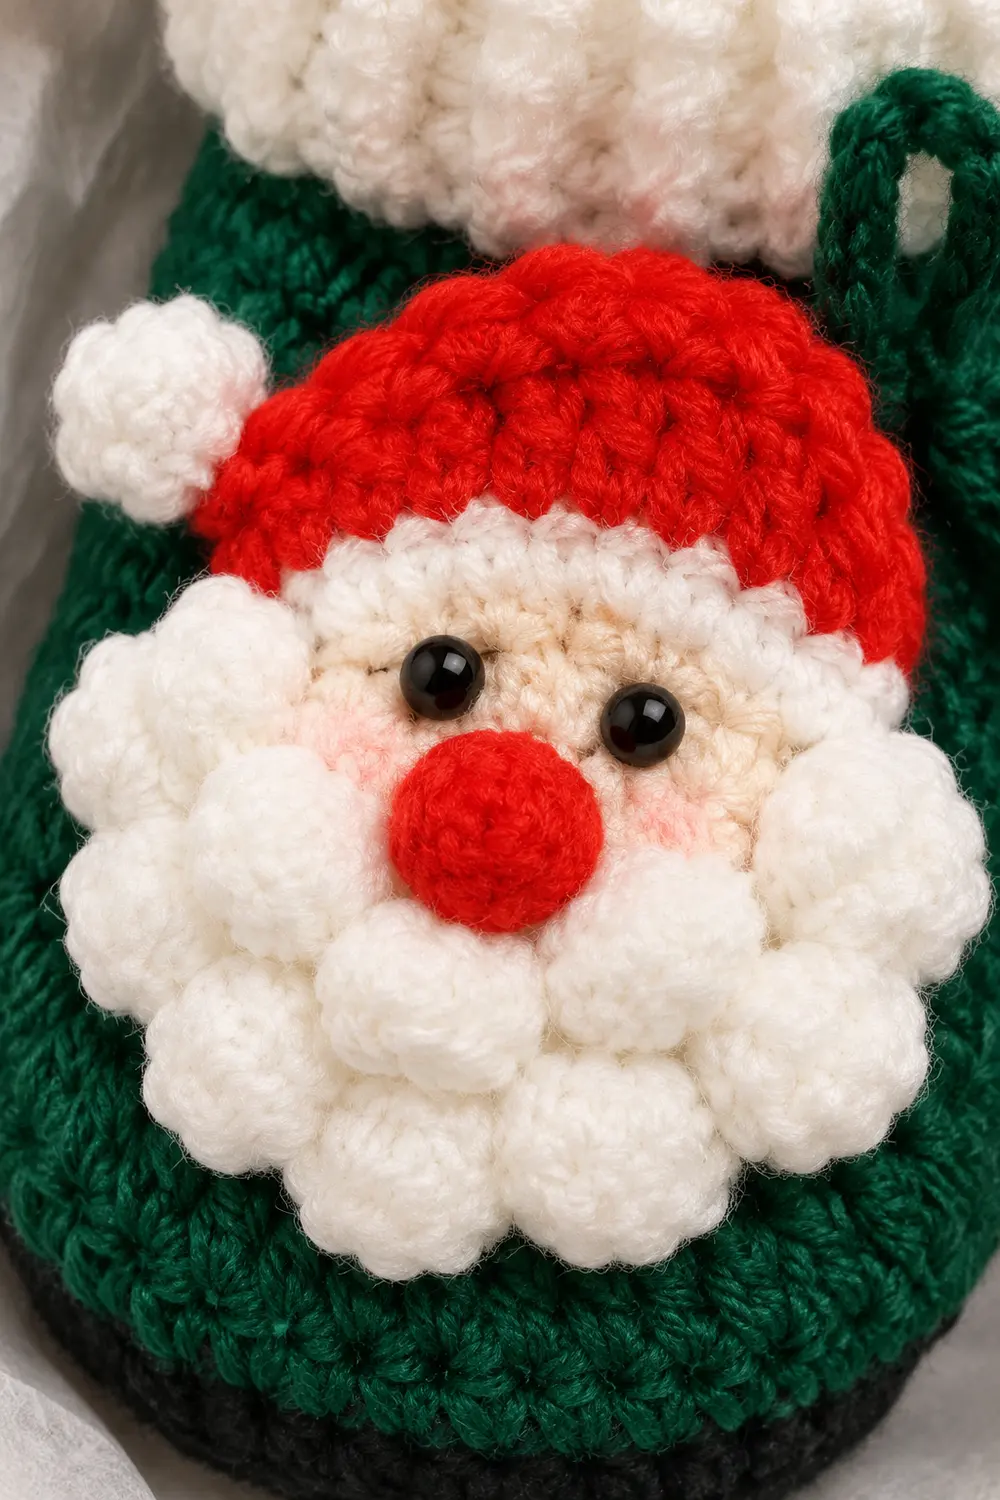
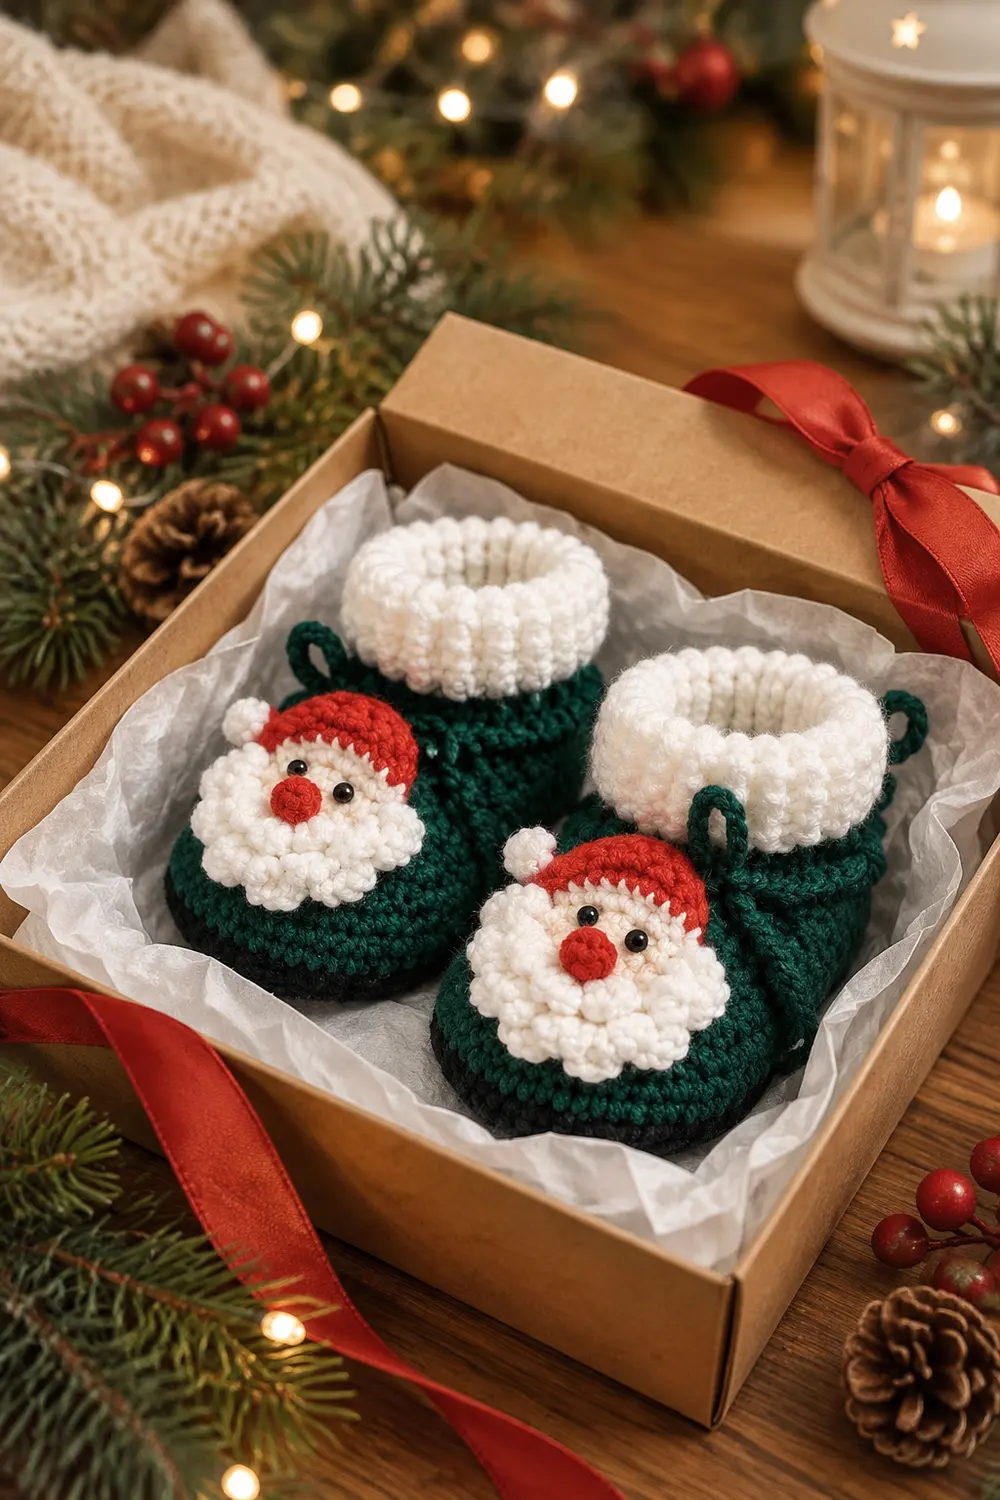
This set has four separate baby booties, made to be given together in a gift box. Two booties carry a Santa face with a red hat, a fluffy white popcorn-stitch beard, a small white pom-pom nose, and black bead eyes. The other two are plain forest green boots. All four have the same rounded, sock-like shape and a chunky white ribbed cuff folded down slightly at the top.
The palette is forest green, white, and red, with black bead eyes on the Santas. The style is classic and cozy, with smooth single crochet bodies, textured post-stitch cuffs, and puffy popcorn beards.
This pattern uses US crochet terms. Each finished bootie is 3.5 in (8.9 cm) tall with the cuff folded and 3.75 in (9.5 cm) long at the sole.
Each bootie is worked in one continuous piece. You start with an oval sole, build straight sides, shape the instep with decreases, and then switch to white for the ribbed cuff. A short border finishes the cuff edge. The Santa appliqué is made separately and sewn onto the instep of two booties. The four booties are never joined to each other.
Finished Size and Construction
- Finished size: 3.5 in (8.9 cm) tall with the cuff folded; sole 3.75 in (9.5 cm) long x 1.75 in (4.4 cm) wide
- Skill level: Intermediate (post stitches, popcorns)
- Terminology: US
- Yarn weight: DK (#3)
- Hooks: 3.5 mm (E-4) for the body and border; 4.0 mm (G-6) for the cuff
- Number of pieces: 4 booties (2 Santa, 2 plain), plus 2 Santa appliqués
- Layout: 2 Santa booties and 2 plain booties, arranged flat in a gift box
- Piece size: green body 2.25 in (5.7 cm) tall; ankle opening 5.6 in (14.2 cm) around
- Size before border: 4 in (10.2 cm) tall unfolded (cuff 1.75 in / 4.4 cm)
- Border depth: 0.25 in (0.6 cm), for 4.25 in (10.8 cm) unfolded and 3.5 in (8.9 cm) folded
Materials
Choose a smooth DK cotton or cotton blend for the clearest stitch definition. Soft baby acrylic also works. Avoid fuzzy yarns, because they blur the ribbing and the popcorns.
- Forest green: 50 g / 120 m
- White: 35 g / 84 m (cuffs, beards, noses)
- Red: 10 g / 24 m (hats)
These quantities include a margin of roughly 20% for swatching and tails.
Tools:
– 3.5 mm (E-4) and 4.0 mm (G-6) hooks
– 4 black beads, 4 mm (2 per Santa)
– Black sewing thread and a fine needle
– Tapestry needle
– Stitch marker
– Scissors
– Fork or cardboard strip, for the pom-poms
– Spray bottle and pins
Abbreviations (US Terms)
- ch – chain
- sl st – slip stitch
- sc – single crochet
- dc – double crochet
- BLO – back loop only
- sc2tog – single crochet 2 together (1 decrease)
- sc3tog – single crochet 3 together (2 decreases)
- FPdc – front post double crochet
- BPdc – back post double crochet
- st(s) – stitch(es)
- rnd – round
Special stitch: Popcorn (pc). Work 4 dc in the same stitch. Remove the hook and insert it from front to back into the first dc of the group. Pick up the dropped loop and pull it through. Ch 1 to close; this ch-1 does not count. One popcorn counts as 1 stitch. Worked with the right side facing you, the popcorn pops forward.
Gauge and Checkpoints
Body gauge: 20 sc x 22 rnds = 4 in (10.2 cm) with the 3.5 mm hook.
Make one complete bootie before starting the others, and measure it at each stage:
- After Rnd 4 (sole): 3.75 in (9.5 cm) x 1.75 in (4.4 cm)
- After Rnd 8 (sides): sides stand 0.75 in (1.9 cm) tall
- After Rnd 16 (ankle): opening measures 5.6 in (14.2 cm) around, or 2.8 in (7.1 cm) laid flat; green body is 2.25 in (5.7 cm) tall
- After Cuff Rnd 5: cuff is 1.75 in (4.4 cm) tall
- After the border, folded: 3.5 in (8.9 cm) total height
If your bootie is too big, go down half a hook size. If it is too small, go up half a size. Change both hooks by the same amount.
Bootie Body (Make 4)
Use forest green and the 3.5 mm hook. Join each round with a sl st to the first st and ch 1. The ch-1 does not count as a stitch.
Sole
Rnd 1: Ch 13. Sc in the 2nd ch from the hook, sc in the next 10 ch, and work 3 sc in the last ch. Turn to work along the other side of the chain. Sc in the next 10 ch, then work 2 sc in the first ch (the one that already holds 1 sc). (26 sts)
Rnd 2: 2 sc in the first st, sc in the next 10, 2 sc in each of the next 3, sc in the next 10, 2 sc in each of the last 2. (32 sts)
Rnd 3: (Sc, 2 sc in next) once, sc in the next 10, (sc, 2 sc in next) 3 times, sc in the next 10, (sc, 2 sc in next) twice. (38 sts)
Rnd 4: (Sc in the next 2, 2 sc in next) once, sc in the next 10, (sc in the next 2, 2 sc in next) 3 times, sc in the next 10, (sc in the next 2, 2 sc in next) twice. (44 sts)
Check the sole size now.
Sides
Rnd 5: Sc in the BLO of each st around. (44 sts) This round creates a crisp sole edge.
Rnds 6–8: Sc in each st around. (44 sts)
Instep (toe shaping)
Rnd 9: Sc in the next 14, sc2tog 6 times, sc in the next 18. (38 sts)
Rnd 10: Sc in the next 14, sc2tog 3 times, sc in the next 18. (35 sts)
Rnd 11: Sc in the next 14, sc3tog, sc in the next 18. (33 sts)
Rnd 12: Sc in the next 13, sc3tog, sc in the next 17. (31 sts)
Rnd 13: Sc in the next 12, sc3tog, sc in the next 16. (29 sts)
Rnd 14: Sc in the next 12, sc2tog, sc in the next 15. (28 sts)
Ankle
Rnds 15–16: Sc in each st around. (28 sts)
Fasten off the green and weave in the end. Check the ankle size: 5.6 in (14.2 cm) around.
Ribbed Cuff (All 4 Booties)
Switch to the 4.0 mm hook. Join white with a sl st at the round join. In each round, the ch 2 does not count as a stitch.
Cuff Rnd 1: Ch 2, dc in each st around. Join. (28 dc) This is a conversion round: 1 dc goes into each existing sc, and nothing is added.
Cuff Rnds 2–5: Ch 2, (FPdc around the next st, BPdc around the next st) 14 times. Join. (28 sts, 14 rib pairs)
Do not fasten off. The cuff should measure 1.75 in (4.4 cm) tall.
Santa Appliqué (Make 2)
Face and Beard
Use white and the 3.5 mm hook. Work in joined rounds.
Rnd 1: Magic ring, 6 sc. (6 sts)
Rnd 2: 2 sc in each st. (12 sts)
Rnd 3: (Sc, 2 sc in next) 6 times. (18 sts) The circle should measure 1.25 in (3.2 cm) across.
Rnd 4: Sc in the next 9 (top half). Then work the lower half: (pc in next, sc in next) 4 times, pc in the last st. (18 sts: 9 sc on top; 5 pc + 4 sc on the bottom)
Rnd 5: Sl st loosely in the next 9 (the hat will cover these). Then work the lower half: (2 sc in the pc, pc in the next sc) 4 times, 2 sc in the last pc. (23 sts: 9 sl st + 4 pc + 10 sc)
The popcorns in Rnd 5 sit between the ones in Rnd 4, like bricks, which makes a fuller beard. Fasten off and leave a 12 in (30.5 cm) tail.
Hat
Use red and the 3.5 mm hook. Work in rows.
Row 1: Ch 8, sc in the 2nd ch from the hook and across. (7 sts)
Row 2: Ch 1, turn. Sc2tog, sc in the next 3, sc2tog. (5 sts)
Row 3: Ch 1, turn. Sc2tog, sc, sc2tog. (3 sts)
Row 4: Ch 1, turn. Sc3tog. (1 st)
The hat should measure 1.4 in (3.6 cm) across the base and 0.75 in (1.9 cm) tall. Fasten off and leave a tail.
Nose
Wrap white yarn 20 times around a fork. Tie the bundle tightly through the middle, cut the loops, and trim to a 0.5 in (1.3 cm) pom-pom. Keep the tie tails for sewing.
Eyes
Sew 2 black beads between Rnds 2 and 3, 3 sts apart, using doubled black thread. Pass through each bead at least 3 times.
Safety note: for booties that a baby will actually wear, test every bead firmly. If you prefer, embroider black French knots in the same spots instead.
The finished appliqué is about 1.75 in (4.4 cm) wide x 2 in (5.1 cm) tall.
Make All Pieces
- Forest green: 4 bootie bodies
- White: 4 cuffs, 2 face/beard pieces, 2 noses
- Red: 2 hats
- Black beads: 4
Gift box layout:
ROW 1: SANTA   SANTA
ROW 2: PLAIN   PLAIN
The booties are symmetrical, so either one of a pair can go on either foot.
Joining: Attaching the Santa Appliqué
Only the two Santa booties need assembly. The four booties are never joined to one another.
- Hat to face. Lay the hat over the top half of the face so that its base covers the 9 sl sts from Rnd 5. Whipstitch the 7 base stitches of the hat across the face, matching 1 hat stitch to each stitch underneath where they overlap.
- Nose. Sew the pom-pom to the center of the face, just above the first popcorn tier. Pull the tie tails through to the back and knot them.
- Placement. Center the appliqué on the instep, lined up with the column of decreases from Rnds 11–13. The hat tip points toward the ankle, and the bottom of the beard points toward the toe. Its top should sit about 0.5 in (1.3 cm) below the cuff.
- Stitch-to-stitch. Both the appliqué and the bootie are worked at about 5 sts per in. Make 1 whipstitch through each outer stitch of the appliqué and catch the nearest bootie stitch. This gives about 23 stitches around the face and beard, plus the two hat sides.
- Tension. Sew snugly but not tightly. If you pull too hard, the instep will pucker and the popcorns will flatten. Work with one hand inside the bootie so you sew through only one layer.
Size checkpoint: the bootie should still lie flat, and the ankle should still measure 5.6 in (14.2 cm) around.
Border
Border gauge: the border is worked with the 3.5 mm hook at body gauge, 5 sc per in. This is slightly tighter than the cuff ribbing, which uses the 4.0 mm hook. For counting, the round is split into a front half and a back half of 14 sts each.
Switch to the 3.5 mm hook and keep working with the white yarn still attached from the cuff.
Border Rnd 1: Ch 1, sc in each st around. Join. (28 sc: 14 front, 14 back) This is a conversion round: 1 sc goes into each existing post stitch, and nothing is added.
Border Rnd 2: Sl st loosely in each sc around. (28 sl sts: 14 front, 14 back)
Fasten off and weave in the end.
Why the math works:
– 28 sts divides evenly into 14 FPdc/BPdc pairs, so the ribbing never breaks pattern.
– Working 1 sc per stitch keeps the count at 28.
– At 5 sc per in, 28 sts measures 5.6 in (14.2 cm), which matches the ankle exactly.
– Because the edge matches the ankle, it does not flare when folded.
Post-stitch ribbing looks the same from both sides, so the folded side reads as clean ribbing.
Final Blocking
- Lightly mist each bootie with water.
- Stuff the foot firmly with tissue paper to round out the toe and the sides.
- Fold the top 0.75 in (1.9 cm) of each cuff down and pin the fold evenly.
- Shape the sole flat and the toe round with your fingers.
- Fluff the popcorns from behind with a fingertip. Do not press them.
- Let the booties dry completely, at least 12 hours.
- Remove the pins and measure: 3.5 in (8.9 cm) tall and 3.75 in (9.5 cm) long.
Final Quality-Control Checklist
- All four booties match each other within 0.25 in (0.6 cm).
- Every ankle measures 5.6 in (14.2 cm) around.
- Each cuff has 14 even rib pairs and a 0.75 in (1.9 cm) fold.
- The sole edge ridge from Rnd 5 is visible all the way around.
- Santa appliqués are centered, sewn flat, and identical.
- Beads pass a firm pull test, or have been replaced with embroidery.
- All ends are woven in securely.
Troubleshooting
The sole cups or ruffles. Your tension is changing between rounds. Re-check Rnds 2–4 against the stated stitch counts.
The toe is pointed. Your decreases are drifting off center. Place a marker on the center decrease in each round.
The ankle is too tight. Work Rnds 15–16 more loosely, or go up half a hook size for the whole bootie.
The cuff flares. Make sure Border Rnd 1 is worked with the 3.5 mm hook, not the 4.0 mm.
The popcorns sink to the back. Work them with the right side facing you, and close each one firmly.
The appliqué puckers. Unpick the stitching and resew with looser whipstitches.
Care
Hand wash in cool water with a mild soap, press the water out gently, and dry flat with the booties stuffed with tissue. Do not tumble dry.
Final Notes
The measurement chain:
– Sole after Rnd 4: 3.75 in (9.5 cm)
– Green body: 2.25 in (5.7 cm) tall, 28-st ankle measuring 5.6 in (14.2 cm)
– Cuff: 1.75 in (4.4 cm), then 0.25 in (0.6 cm) of border
– Unfolded: 4.25 in (10.8 cm)
– Folded: 3.5 in (8.9 cm)
Check your first bootie at every checkpoint, then repeat it three more times. Add the Santa faces to two of the booties, and the gift box set is ready.
Happy crocheting!