

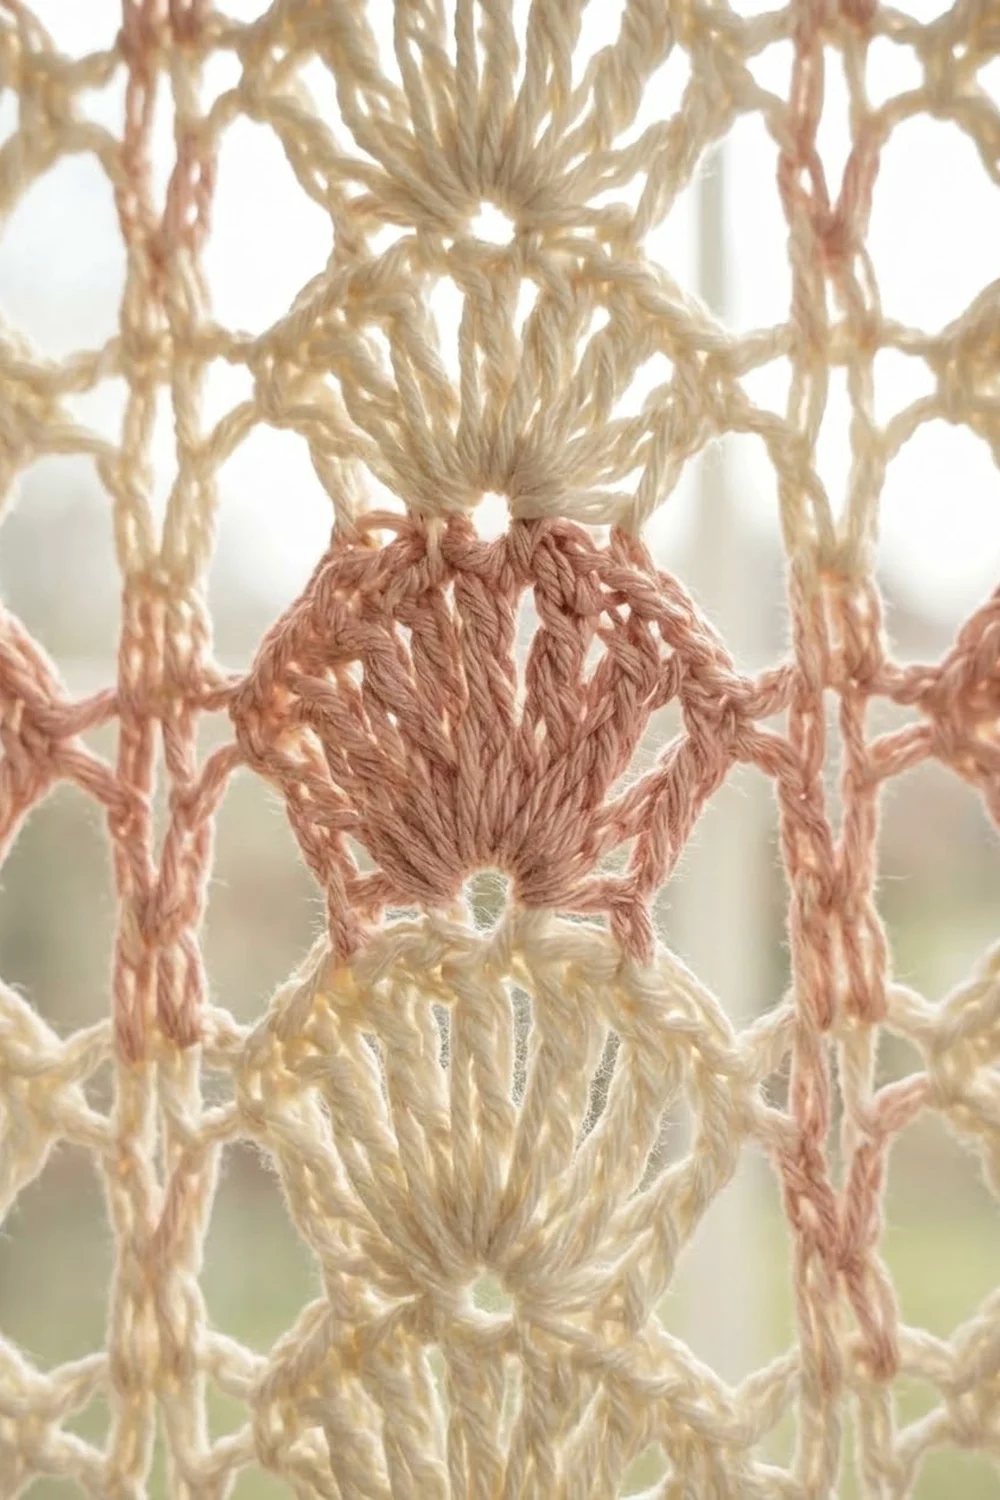
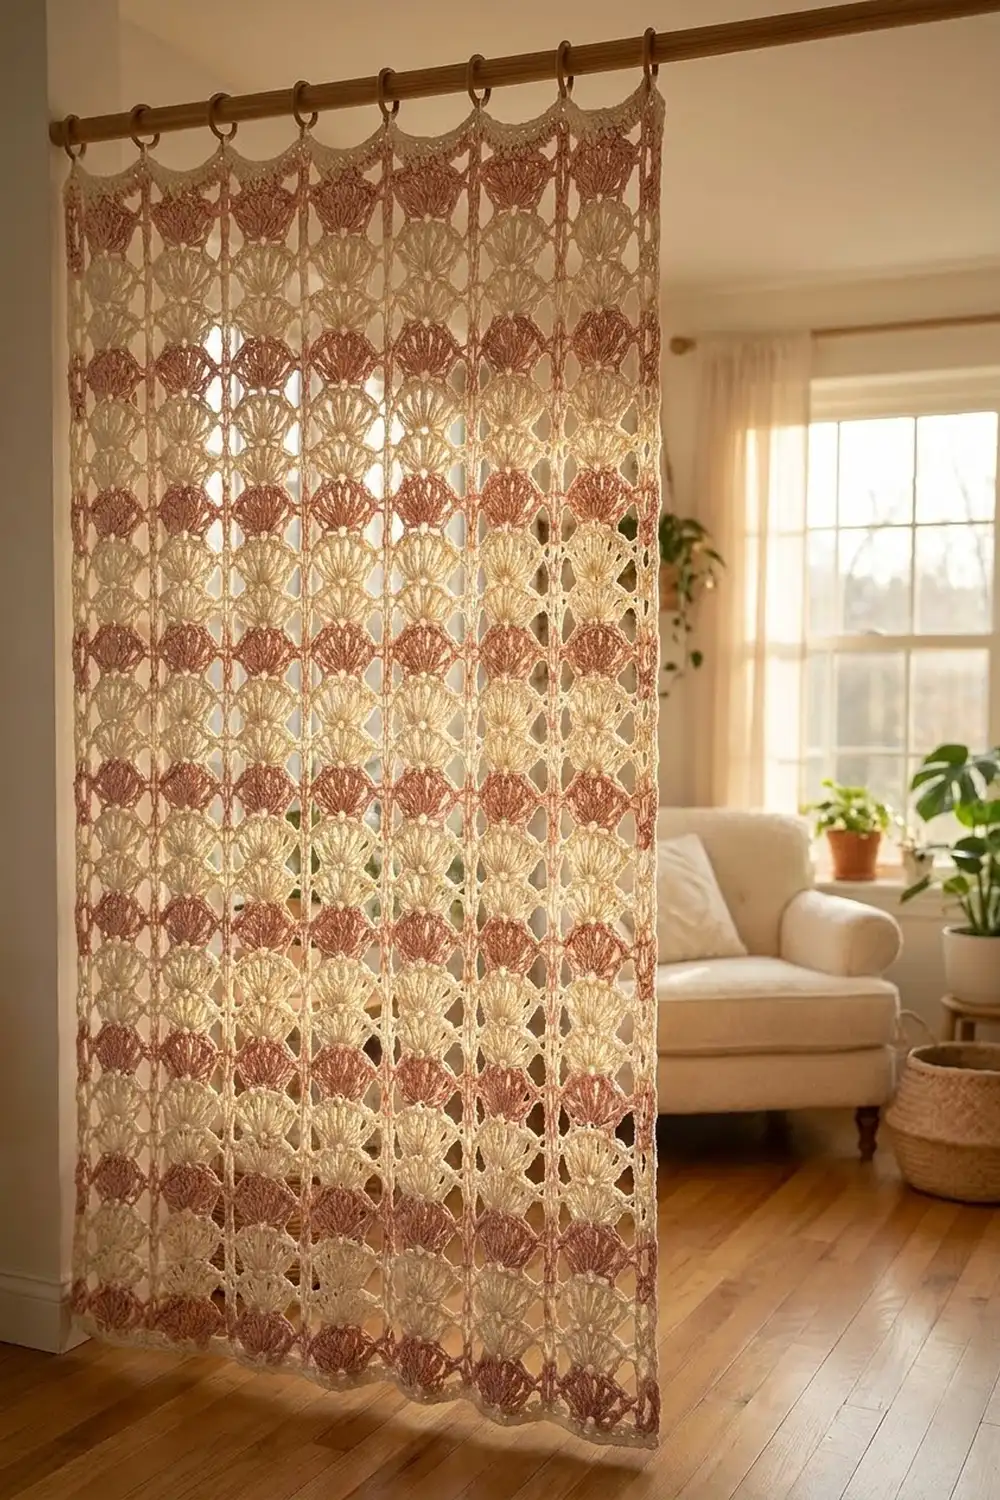
The Rosewater Lattice is a single rectangular curtain panel made of open shell lace. Columns of fan-shaped shells are separated by slim vertical posts and airy chain arcs, so light passes through every block. It hangs from a wooden rod by soft crocheted loops along the top edge.
Two colors, dusty rose and cream, alternate in a checkerboard. Each color block holds one shell: seven treble stitches radiating from a single base stitch. A cream band with evenly spaced hanging loops finishes the top edge. The sides and bottom have a simple single crochet edge.
This pattern uses US crochet terms. The finished panel measures 37.5 in (95.3 cm) wide by 51.6 in (131.1 cm) tall without the loops. It measures 54.3 in (137.9 cm) to the loop tips.
The panel is worked flat in one piece from the bottom up. Each “tier” is two rows: a lattice row of chain arcs, then a shell row. The colors are worked intarsia-style, with one rose and one cream bobbin per column. Two rounds of sc go around all four edges. A top band with loops is worked last.
Finished Size and Construction
- Finished size: 37.5 in x 51.6 in (95.3 cm x 131.1 cm), plus 2.7 in (6.9 cm) loops
- Skill level: Intermediate (lace plus intarsia color changes)
- Terminology: US
- Yarn weight: Aran / heavy worsted (#4), cotton or cotton blend
- Hook: 6 mm (US J-10)
- Number of pieces: 1
- Layout: 12 shell columns x 20 tiers, checkerboard (240 blocks)
- Block size: 3 in wide x 2.4 in tall (7.6 cm x 6.1 cm)
- Size before border: 36.3 in x 48.6 in (92.2 cm x 123.4 cm)
- Border depth: 0.6 in (1.5 cm) on sides and bottom; 2.4 in (6.1 cm) at the top (0.6 in / 1.5 cm of rounds plus a 1.8 in / 4.6 cm band)
Materials
Yarn: Choose a smooth aran-weight cotton or cotton blend, about 170 m per 100 g. Cotton holds the shell shape and blocks crisply. Avoid fuzzy yarns, which blur the openwork.
- Dusty rose: 165 g / 280 m (120 blocks)
- Cream: 235 g / 400 m (120 blocks, foundation and top rows, border, band, and loops)
These quantities include a margin of about 15%.
Tools:
– 6 mm (US J-10) hook, plus 5.5 mm and 6.5 mm for gauge adjustment
– 24 yarn bobbins (12 rose, 12 cream)
– Tapestry needle
– Stitch markers
– Rust-proof pins and a large blocking surface
– Measuring tape
Abbreviations (US Terms)
- ch – chain
- sl st – slip stitch
- sc – single crochet
- dc – double crochet
- tr – treble crochet
- sp – space
- st(s) – stitch(es)
- rep – repeat
- RS / WS – right side / wrong side
Special stitches:
- Shell: 7 tr worked into the same st.
- Post: the single dc (lattice rows) or single tr (shell rows) that separates two columns. Posts stack directly above each other to form the vertical lines.
- Color change: work the last st of a block until 2 loops remain on the hook. Drop the old color, yarn over with the new color, and pull through.
Gauge and Checkpoints
Gauge: 10 sts = 3 in (7.6 cm). One tier (lattice row + shell row) = 2.4 in (6.1 cm). The sc border uses the same gauge: 10 sc = 3 in (7.6 cm).
Test swatch first. Ch 22. Work Row 1 (21 sc). Then work 3 tiers following the main pattern with 2 repeats instead of 12. The swatch should measure 6.3 in (16.0 cm) wide. The 3 tiers should measure 7.2 in (18.3 cm) tall, not counting the foundation row. Measure after a light wet block.
Checkpoints:
– Row 1 (121 sc): 36.3 in (92.2 cm) wide
– After 5 tiers: 12 in (30.5 cm) of tiers
– After 10 tiers: 24 in (61.0 cm)
– After 15 tiers: 36 in (91.4 cm)
– After 20 tiers: 48 in (121.9 cm); with the top row added, 48.6 in (123.4 cm)
– After Border Round 2: 37.5 in x 49.8 in (95.3 cm x 126.5 cm)
– After the top band: 37.5 in x 51.6 in (95.3 cm x 131.1 cm)
If your swatch is too big, go down to 5.5 mm. If it is too small, go up to 6.5 mm. A difference of 0.5 in (1.3 cm) across the 2 swatch repeats becomes about 3 in (7.6 cm) across the full panel, so fix it now.
Color Plan and Bobbin Setup
Number the columns 1 to 12, starting from the edge where Row 2 begins. Tier t consists of Rows 2t and 2t+1.
- Odd tiers (1, 3, 5…19): Column 1 is rose. Columns alternate rose, cream, rose… so Column 12 is cream.
- Even tiers (2, 4, 6…20): Column 1 is cream. Columns alternate cream, rose… so Column 12 is rose.
Each column uses 10 rose and 10 cream blocks. Wind about 10 m onto each bobbin. Join new yarn at a post when a bobbin runs low.
Intarsia logic: Each column’s yarn works its own block, plus the post at the far end of that block in the direction of travel. At that post, change to the next column’s yarn.
After every tier, both of a column’s bobbins hang at the column’s starting edge. When a column switches color, drop the old bobbin there. That resting strand then travels up the post. Trap it against the WS each time you work that post: lay the strand over the working yarn as you insert the hook. On RS rows the resting strand stays behind the work. On WS rows it stays in front, facing you.
Row 2 is a RS row. All even rows are RS rows.
Main Pattern
Foundation: With cream, ch 122.
Row 1 (WS): Sc in 2nd ch from hook and in each ch across. (121 sc) Fasten off cream and turn.
Row 2 (RS, lattice row, Tier 1): Join rose in the first sc. Ch 3 (counts as dc). Then ch 3, skip 4 sc, sc in next sc, ch 3, skip 4 sc, dc in next sc. Rep from * 11 more times, changing color on the last dc of each column. (13 posts, 12 sc bases, 24 ch-3 sps = 97 sts)
Check: 1 + (12 x 10) = 121 sts of Row 1 used.
Row 3 (WS, shell row): Turn. Ch 4 (counts as tr). Then ch 1, skip ch-3 sp, shell in next sc, ch 1, skip ch-3 sp, tr in next post. Rep from * 11 more times, keeping each column’s color. (13 posts + 84 shell tr + 24 ch-1 = 121 sts)
Each shell radiates from its own sc base, so every base matches its shell color.
Row 4 (RS, lattice row, Tier 2): Switch to the even-tier colors. Turn. Ch 3 (counts as dc). Then ch 3, skip ch-1 sp and 3 tr, sc in the 4th (center) tr of the shell, ch 3, skip 3 tr and ch-1 sp, dc in next post. Rep from * 11 more times. (97 sts)
Row 5 (WS, shell row): Work as Row 3. (121 sts)
Rows 6–41: Repeat Rows 4–5, alternating the color plan every tier, until you have 20 tiers. Row 41 is a shell row. (121 sts)
Fasten off all bobbins. Weave in tails along the posts.
Row 42 (RS, top leveling row): Turn. Join cream. Ch 1, then sc in each st across, including each ch-1 sp and the top of the turning ch. (121 sc)
That is 10 sc per repeat plus 1, the same count as Row 1. Fasten off.
Checkpoint: The body measures 36.3 in x 48.6 in (92.2 cm x 123.4 cm).
Border
Border gauge: 10 sc = 3 in (7.6 cm), the same as the body. Along the side edges, work 3 sc into each lattice-row end and 5 sc into each shell-row end. That gives 8 sc per tier, or 8 sc over 2.4 in (6.1 cm), which is the same 10 sc per 3 in.
The row ends of Rows 1 and 42 are covered by the corner groups. They get no extra sc.
Round 1 (RS, cream): Join with RS facing in the first st of Row 42.
– Top: 3 sc in first st, sc in next 119 sts, 3 sc in last st.
– Side: work 160 sc down the tier row ends (8 per tier x 20 tiers).
– Bottom: working in the foundation ch loops, 3 sc in first loop, sc in next 119 loops, 3 sc in last loop.
– Side: work 160 sc up the second side. Join with sl st to the first sc.
Total: 119 + 119 + 160 + 160 worked 1 per st or row-end placement, plus 4 corners x 3 sc = 570 sc.
Counting each corner’s center sc as shared, the top and bottom each have 123 sc and each side has 164 sc. Check: 2(123) + 2(164) − 4 = 570.
Round 2: Ch 1. Sc in each st around, working 3 sc in each corner center sc. Join.
Total: 570 sc worked 1 into each existing st, plus 2 extra at each of 4 corners = 578 sc. The top and bottom now have 125 sc each and the sides have 166 sc each, corners included. Fasten off.
Why the math works: The top has 125 sc x 0.3 in = 37.5 in (95.3 cm). The sides have 166 sc x 0.3 in = 49.8 in (126.5 cm), which equals 48.6 in (123.4 cm) of body plus 2 rounds of 0.6 in (1.5 cm) each. Every edge is at the same gauge, so nothing ruffles or pulls.
Top Band (worked in rows over the 125 top sts, from corner center to corner center):
Rows 1–4: With RS facing, join cream in the right corner center sc. Ch 1, sc in each st across. Turn. (125 sc per row)
Row 5 (RS, loop row): Ch 1, sc in first 2 sts. In next st work (sc, ch 18, sc). Then sc in next 14 sts, (sc, ch 18, sc) in next st. Rep from * 7 more times. Sc in last 2 sts. Turn.
Result: 9 loops at sts 3, 18, 33… 123, spaced 15 sts = 4.5 in (11.4 cm) apart. The count is 125 sc worked 1 per st, plus 9 extra sc, for 134 sc and 9 ch-18 loops.
Row 6 (WS): Ch 1. Sc in each sc, and work 24 sc into each ch-18 loop. (134 + 216 = 350 sc) Fasten off.
The covered loops hang 2.7 in (6.9 cm) above the band. The band adds 1.8 in (4.6 cm), for a total height of 51.6 in (131.1 cm).
Optional: For a wider window, add columns in multiples of 2 to keep the checkerboard. Each pair adds 20 sts and 6 in (15.2 cm), so adjust every count accordingly.
Final Blocking
- Weave in all ends along the posts or inside the border before blocking.
- Soak the panel in cool water for 15 minutes. Press out the water; do not wring.
- Roll the panel in towels to remove excess moisture.
- Lay it flat and pin the corners to 37.5 in x 51.6 in (95.3 cm x 131.1 cm).
- Pin along each post so the columns run straight. Open each shell into an even fan.
- Pin each ch-3 arc open to show the negative space.
- Straighten the hanging loops and pin them flat.
- Let the panel dry completely, usually 24–48 hours, before unpinning.
Final Quality-Control Checklist
- Rows 1 and 42 each have 121 sc.
- Every lattice row has 97 sts. Every shell row has 121 sts.
- There are 12 columns x 20 tiers, with a true checkerboard and no two same-color blocks touching side by side.
- The posts run vertically with no drift.
- Border Round 1 has 570 sc. Round 2 has 578 sc.
- There are 9 loops, evenly spaced 4.5 in (11.4 cm) apart, each covered with 24 sc.
- The blocked size is 37.5 in x 51.6 in (95.3 cm x 131.1 cm).
- No resting strands show on the RS.
Troubleshooting
Panel narrows as it grows: Your ch-3 arcs are too tight. Count the chains, and keep each arc relaxed, matching the swatch.
Shells cup or ruffle: Your tr are too short or too loose for the base. Adjust your hook size or yarn-over tension.
Posts lean or zigzag: You may be working into the wrong st. Always work the post into the post below, not into an edge tr of a shell.
Gaps at color changes: Change color on the last yarn over of the post. Snug the new color before chaining.
Rose shows through cream: The resting strand isn’t trapped. Catch it at every post on the WS.
Side border ruffles or pulls: Recount: 8 sc per tier, 160 sc per side in Round 1.
Loops stretch when hung: Work the 24 covering sc firmly. You can add a second sc row over the loops if needed.
Panel lengthens after hanging: Cotton relaxes. Re-block, and hang the panel only once it is fully dry.
Care
Hand wash in cool water with mild detergent, supporting the weight of the wet panel. Dry flat and reshape. Never tumble dry or hang it wet.
Final Notes
The measurement chain is simple. Ten sts = 3 in (7.6 cm), so 121 sts = 36.3 in (92.2 cm). Twenty tiers of 2.4 in (6.1 cm) = 48 in (121.9 cm), and the two sc rows bring the body to 48.6 in (123.4 cm).
Two border rounds add 0.6 in (1.5 cm) on every side, for 37.5 in x 49.8 in (95.3 cm x 126.5 cm). The band adds 1.8 in (4.6 cm), for 51.6 in (131.1 cm). Check gauge first and count at every checkpoint, and the panel will hang straight and open.
Happy crocheting!