

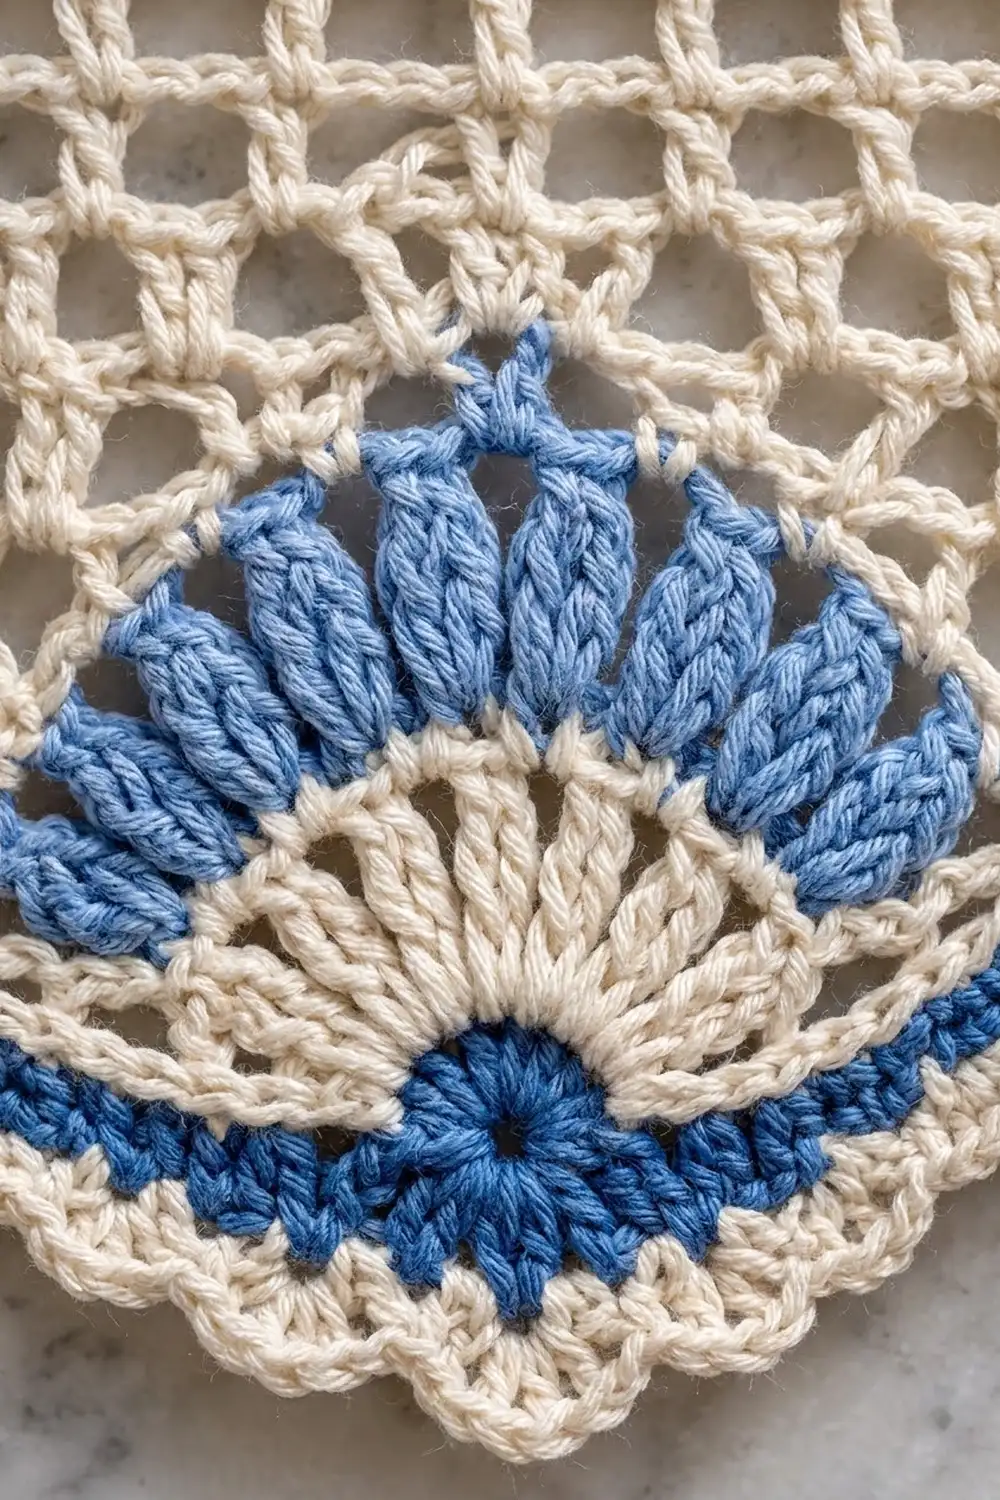
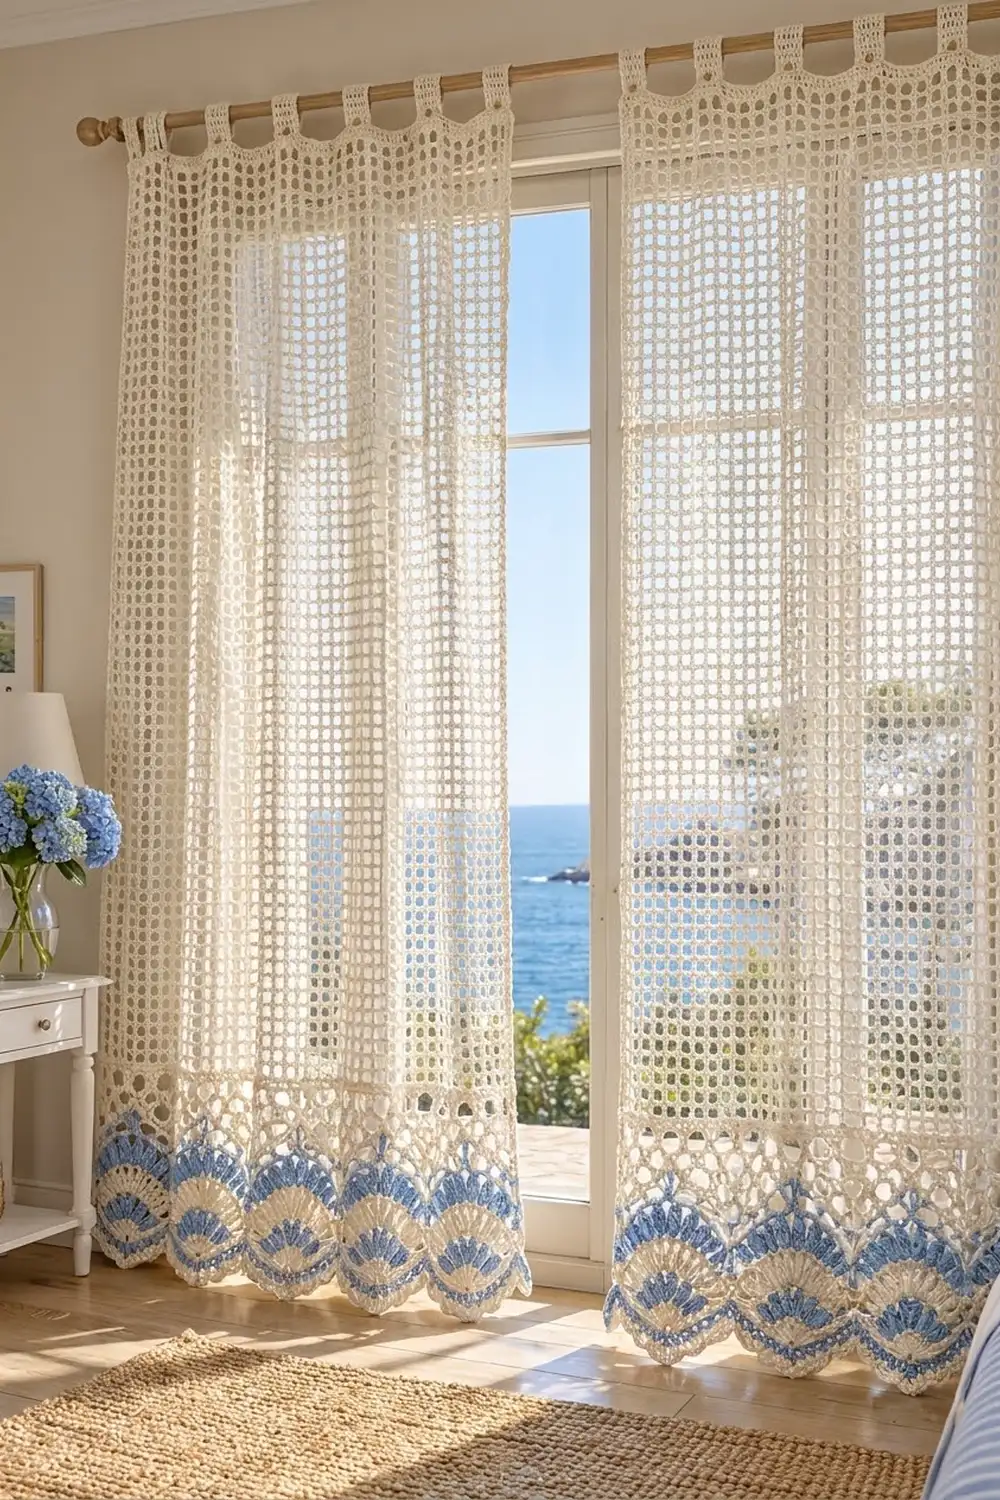
This curtain panel has an open filet mesh body and a deep fan border along the hem. The cream mesh lets daylight through. The border adds a row of blue petal fans, cream spokes and a soft scalloped edge.
The panel uses two colors. Warm cream is used for the mesh, spokes, lattice and edging. Soft cornflower blue is used for the fan petals and the scallop band. The style is relaxed coastal cottage, and it suits a bright bedroom or a window with a view.
The pattern uses US crochet terms. One finished panel measures 28 in (71.1 cm) wide and 72 in (182.9 cm) long from the top edge to the scallop points. The cream tabs for the rod sit above that.
The panel is one single piece, worked from the top down. You start with a solid foundation row, then work 136 rows of filet mesh. A seven-row fan border goes straight onto the last mesh row, and the tabs go on the top edge last. For a pair like the one shown hanging, make two identical panels.
Finished Size and Construction
- Finished size: 28 in (71.1 cm) wide x 72 in (182.9 cm) long, plus tabs
- Skill level: Intermediate
- Terminology: US
- Yarn weight: DK / light (3) cotton
- Hook: 3.5 mm (E-4)
- Number of pieces: 1 panel (make 2 for a pair)
- Layout: single rectangular panel, 7 fan scallops along the hem
- Piece size: 28 in x 72 in (71.1 cm x 182.9 cm)
- Size before border: 28 in x 68.5 in (71.1 cm x 174.0 cm)
- Border depth: 3.25 in (8.3 cm) at the scallop points, about 2.25 in (5.7 cm) at the valleys
- Tabs: 7 tabs, each about 2.2 in (5.6 cm) wide, forming 2.5 in (6.4 cm) loops
Materials
Choose a smooth mercerized or combed cotton in DK weight. Cotton keeps the mesh squares square, drapes well, and holds up to sunlight and washing. Avoid fuzzy or very stretchy yarns. They blur the open squares and let the panel sag.
Quantities for one panel:
- Cream: 450 g, about 990 m
- Blue: 75 g, about 165 m
For a pair, double both amounts. These quantities include a margin of about 10 to 15 percent for gauge differences and swatching.
Tools:
- 3.5 mm (E-4) crochet hook
- Tapestry needle
- Stitch markers (at least 13)
- Measuring tape
- Rust-proof pins and a large blocking surface (or a clean sheet on carpet)
- Spray bottle
- Scissors
Abbreviations (US Terms)
- ch – chain
- sl st – slip stitch
- sc – single crochet
- sc2tog – single crochet 2 together
- dc – double crochet
- dtr – double treble crochet (yo 3 times)
- sp – space
- st(s) – stitch(es)
- yo – yarn over
- RS / WS – right side / wrong side
Special stitches
- Puff: (yo, insert hook in st, pull up a loop) 3 times, then yo and pull through all 7 loops on the hook. Don’t work a closing chain unless the pattern says so.
- dtr9tog (fan cluster): *yo 3 times, insert hook in next puff, pull up a loop, (yo, pull through 2 loops) 3 times; rep from * 8 more times. You have now worked into 9 puffs in a row and have 10 loops on the hook. Yo and pull through all 10 loops, then ch 1 to close. This closing ch-1 is the “eye” at the fan center.
- Picot: ch 3, sl st in 3rd ch from hook.
Gauge and Checkpoints
Mesh gauge: 8 mesh squares and 8 mesh rows = 4 in (10.2 cm). Each square is 0.5 in (1.3 cm) wide and tall.
Sc gauge: 24 sc = 4 in (10.2 cm).
Test one piece first. Make a test swatch with one border repeat. It checks both the mesh and the border:
- Ch 27. Dc in 4th ch from hook and in each ch across: 25 sts (turning ch counts as 1 dc).
- Work 8 mesh rows as in Rows 2–3 below: 8 squares.
- Work Border Rows 1–7 with a single repeat.
Checkpoints on the swatch:
- After the mesh rows: 4 in (10.2 cm) wide and 4.5 in (11.4 cm) tall, including the foundation row.
- Border Row 1: 25 sc. Row 5: 27 sc. Row 6: 29 sc. Row 7: 29 sc and 14 picots.
- Finished scallop: 4 in (10.2 cm) wide and 3.25 in (8.3 cm) deep at the point.
If the swatch is too big, go down 0.25 mm. If it is too small, go up 0.25 mm. If the width is right but the rows are too tall, pull up the first loop of each dc a little shorter.
Pattern: Mesh Body
Work the panel from the top down in turned rows, using cream.
Row 1 (foundation, RS): Ch 171. Dc in 4th ch from hook and in each ch across. Turn. (169 sts: 168 dc + turning ch.)
The width is now 28 in (71.1 cm). Check this before you continue.
Row 2 (first mesh row): Ch 5 (counts as dc + ch 2), skip next 2 dc, dc in next dc, ch 2, skip next 2 dc, dc in next dc; rep from * across, working the last dc in the top of the turning ch. Turn. (57 dc, 56 ch-2 sps = 169 sts, 56 squares.)*
Row 3: Ch 5 (counts as dc + ch 2), dc in next dc, ch 2, dc in next dc; rep from * across, working the last dc in the 3rd ch of the turning ch-5. Turn. (57 dc, 56 ch-2 sps.)*
Rows 4–137: Repeat Row 3. (136 mesh rows total, 56 squares each.)
Checkpoints:
- After Row 20: 10 in (25.4 cm) long.
- After Row 137: 68.5 in (174.0 cm) long and still 28 in (71.1 cm) wide.
To change the length, add or remove mesh rows. Each row is 0.5 in (1.3 cm). Keep 136 mesh rows for the stated finished size.
Don’t fasten off. Go straight into the border.
Pattern: Fan Border
The border is 7 repeats of 24 sts, plus 1 st. This matches the mesh exactly: 56 squares x 3 sts + 1 = 169 = (7 x 24) + 1.
Border Row 1 (cream): Ch 1, sc in first dc, 2 sc in next ch-2 sp, sc in next dc; rep from * across. Turn. (169 sc.)*
Place a marker in sc 1, sc 25, sc 49 and every 24th sc after that, ending at sc 169. (8 markers.) These are the boundary sts between fans.
Border Row 2 (cream, fan base): Ch 1, sc in first sc, ch 3, skip 3 sc, dc in next sc, (ch 1, skip 1 sc, dc in next sc) 8 times, ch 3, skip 3 sc, sc in next (marked) sc; rep from * across. Fasten off cream. Turn. (8 sc, 63 dc, 56 ch-1 sps, 14 ch-3 sps.)*
Each repeat uses exactly 24 sts: 3 skipped + 9 dc + 8 skipped + 3 skipped + 1 sc. The center dc sits on the 13th st of each repeat.
Border Row 3 (blue, petals): Join blue in first sc. Ch 1, sc in same sc, ch 3, puff in next dc, (ch 1, puff in next dc) 8 times, ch 3, sc in next sc; rep from * across. Fasten off blue. Turn. (8 sc, 63 puffs, 56 ch-1 sps, 14 ch-3 sps.)*
Each fan has 9 blue petals.
Border Row 4 (cream, spokes and lattice): Join cream in first sc. Ch 1, sc in same sc, ch 10, dtr9tog across the next 9 puffs, ch 10, sc in next sc; rep from * across. Fasten off cream. Turn. (8 sc, 7 fan clusters, 14 ch-10 arms.)*
The 9 dtr legs fan out down from the petals and meet at one point. These are the cream spokes. The ch-10 arms run from each fan point up to the boundary sc and back down to the next fan. They form the cream V-shaped lattice between the fans.
Border Row 5 (blue, scallop band): Join blue in first sc. Ch 1, sc in same sc, 10 sc in next ch-10 arm, 5 sc in the ch-1 eye of the cluster, 10 sc in next ch-10 arm, skip next sc; rep from * 5 more times, then rep from * to ** once, sc in last sc. Fasten off blue. Turn. (177 sc: 1 + 7 x 25 + 1.)*
The 5 sc around each eye form the blue center ring. Skipping the 6 inner boundary sc pulls each valley up into a point. Mark the 13th sc of each 25-sc scallop as its center.
Border Row 6 (cream, outline): Join cream in first sc. Ch 1, sc in first sc, sc in next sc, sc in next 11 sc, 3 sc in center sc, sc in next 11 sc, sc2tog over the last sc of this scallop and the first sc of the next; rep from * 5 more times, then rep from * to ** once, sc in last 2 sc. Turn. (185 sc: 2 + 7 x 25 + 6 sc2tog + 2.)*
Border Row 7 (cream, picot edge): Ch 1, sc in first sc, sc in next 2 sc, picot; rep from * across. Fasten off. (185 sc, 92 picots.)*
Checkpoint: the panel now measures 71.75 in (182.2 cm) to the scallop points. Each of the 7 scallops is 4 in (10.2 cm) wide.
Why the border math works
- Mesh: 56 squares x 3 sts + 1 = 169 sts.
- Border repeat: 24 sts = 8 squares = 4 in (10.2 cm).
- 7 repeats x 24 + 1 = 169, so Border Row 1 needs no increases or decreases.
- 7 scallops x 4 in = 28 in (71.1 cm), the same as the panel width.
- Row 5: 25 sc per scallop + 2 edge sc = 177.
- Row 6 adds 2 sc per scallop (+14) and loses 1 st at each of the 6 valleys (-6): 177 + 14 – 6 = 185.
- Row 7 uses 1 sc per sc: 1 + (92 x 2) = 185.
Pattern: Top Edge and Tabs
Top Edge Row (cream): With RS facing, join cream at the top right corner. Ch 1, sc in each free loop of the foundation chain across, working 1 sc at the base of the turning ch. Turn. (169 sc.) This row adds 0.25 in (0.6 cm), so the panel is now 72 in (182.9 cm) long.
Place markers to divide the 169 sc into 13 sections of 13 sc. Tabs go on sections 1, 3, 5, 7, 9, 11 and 13. (7 tabs and 6 gaps: 7 x 13 + 6 x 13 = 169.)
Each tab: Join cream in the first sc of a tab section. Ch 1, sc in same st and next 12 sc. Turn. (13 sc.) Work 23 more rows of 13 sc. (24 rows, about 6 in / 15.2 cm.) Fasten off, leaving a long tail. Fold the tab to the WS and sew the last row to the top of Row 1. This makes a loop about 2.5 in (6.4 cm) tall.
Final Blocking
- Weave in all ends along the mesh dc posts or inside the border sc. Never weave across open squares.
- Soak the panel in cool water with a little mild soap for 15 minutes.
- Gently press out the water and roll the panel in towels. Don’t wring it.
- Lay it flat on the blocking surface, RS up.
- Pin the top edge straight at 28 in (71.1 cm).
- Pin both side edges straight to 72 in (182.9 cm), keeping the mesh columns vertical.
- Pin each scallop point and each valley point. Space the valley points 4 in (10.2 cm) apart.
- Pin the 9 petals of each fan into an even arc.
- Let the panel dry completely, about 24 hours, before unpinning.
Final Quality-Control Checklist
- Width is 28 in (71.1 cm) at the top, in the middle and just above the border.
- Length is 72 in (182.9 cm) to the scallop points on both sides.
- Every mesh row has 56 open squares and straight dc columns.
- Each fan has 9 blue petals and 9 cream spokes meeting at one point.
- Each blue center ring has 5 sc.
- All 7 scallops are the same size, and all 6 valleys sit at the same height.
- The picot edge is even, with no tight or skipped sections.
- All 7 tabs are evenly spaced, the same length and sewn on straight.
- No ends show on the RS or through the mesh.
Troubleshooting
The panel gets narrower as you go. You are probably missing the last dc in the turning chain. Count 57 dc every 10 rows.
The mesh squares are tall rectangles. Your dc are too tall. Pull the first loop up shorter, or try a hook 0.25 mm smaller.
The fans curl or cup. The ch-10 arms are too tight. Chain more loosely, or work ch 11 and still put 10 sc in each arm in Row 5.
The scallop points look flat. Check that you skip the inner boundary sc in Row 5 and work the sc2tog at each valley in Row 6.
The border flares wider than the panel. Your sc rows are looser than your mesh. Go down a hook size for Border Rows 1, 5, 6 and 7.
The tabs twist. Sew the tab end flat to the back of Row 1, matching all 13 sts.
Care
Hand wash, or machine wash on a cool gentle cycle in a mesh laundry bag. Reshape while damp and lay flat or hang straight to dry. Don’t use a dryer.
Final Notes
The whole panel follows one chain of measurements. The mesh gauge of 8 squares to 4 in (10.2 cm) gives 56 squares across 28 in (71.1 cm). Those 169 sts divide exactly into 7 border repeats of 24 sts plus 1, so each scallop is 4 in (10.2 cm) wide.
The foundation row and 136 mesh rows give 68.5 in (174.0 cm). The border adds 3.25 in (8.3 cm) and the top edge row adds 0.25 in (0.6 cm), for a finished length of 72 in (182.9 cm). Check your counts at each stage and block the panel flat, and it will hang straight and light.
Happy crocheting!