

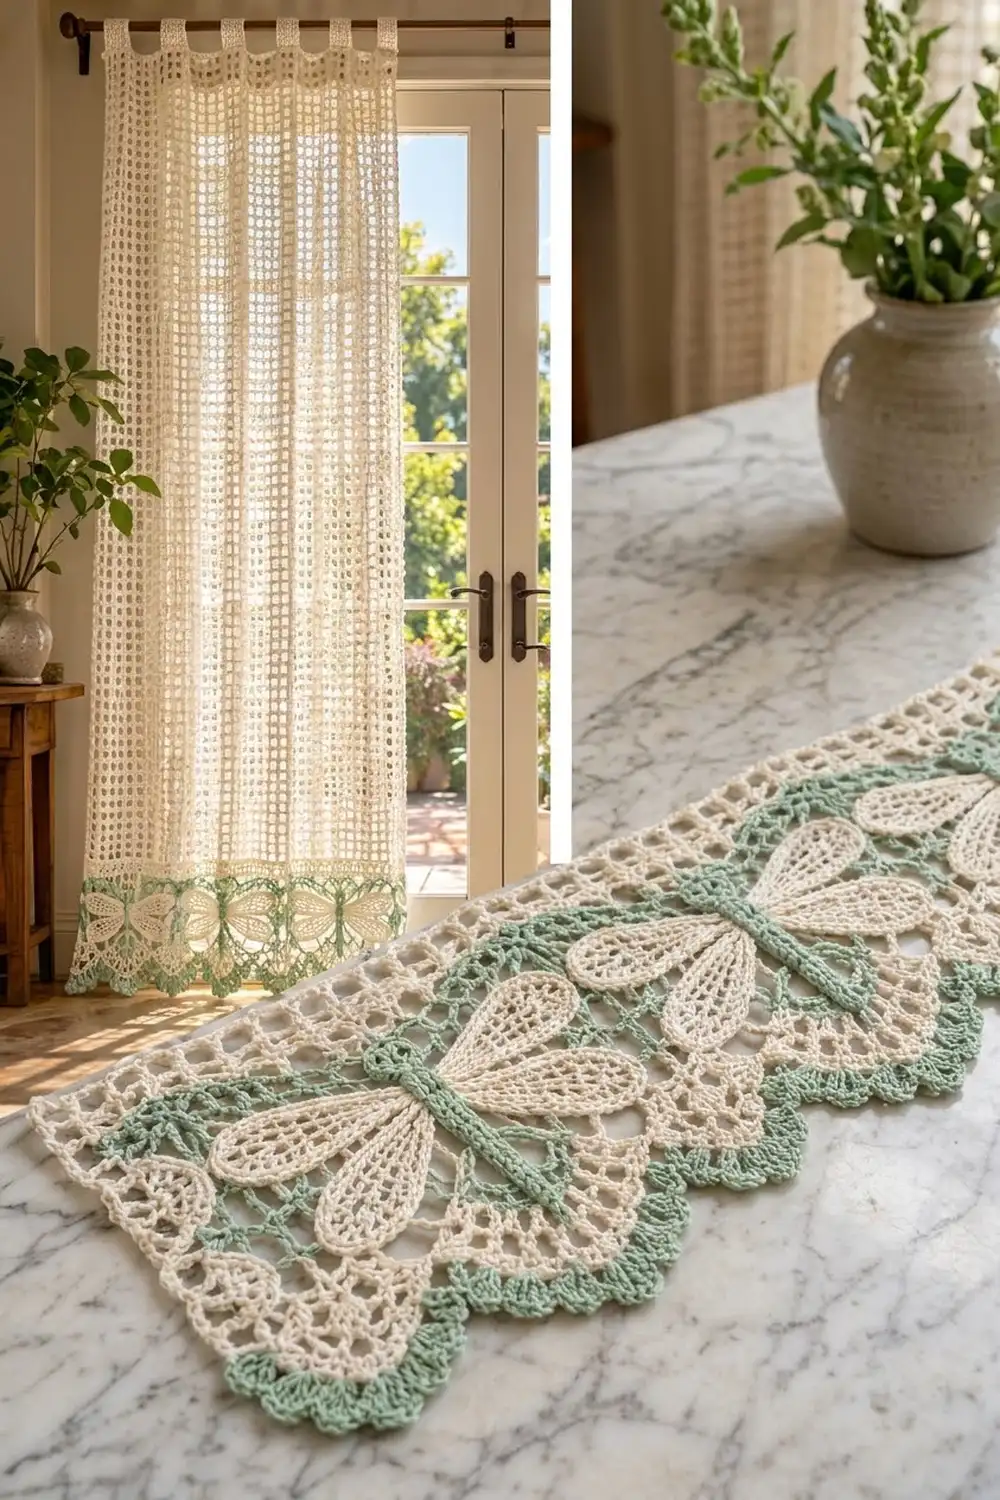
This curtain panel pairs a light, airy cream filet mesh with a deep scalloped edging in sage green. A row of lacy dragonflies sits along the hem, one on each scallop, so the bottom of the curtain has a soft garden look when the light comes through.
The palette is just two colors: warm cream for the mesh, fans, and wings, and soft sage for the lace band, picot edge, and dragonfly bodies. The style is vintage filet with a modern, clean finish. All instructions use US crochet terms.
One finished panel measures 40.4 in (102.6 cm) wide by 79 in (200.7 cm) long. It also has 2 in (5.1 cm) tab loops at the top, for a total hanging length of 81 in (205.7 cm). The photo shows a pair, so make two panels.
Construction is simple. You crochet the mesh body from the bottom up. Next, you turn it over and work the scalloped edging into the foundation chain. Then you make the dragonfly appliqués, sew them on, and finish with a sage picot edge, a cream side-and-top border, and tabs.
Finished Size and Construction
- Finished size (one panel): 40.4 x 79 in (102.6 x 200.7 cm), plus 2 in (5.1 cm) tabs
- Skill level: Intermediate
- Terminology: US
- Yarn weight: Super fine #1 (fingering) mercerized cotton
- Hook: 2.5 mm, or the size that gives you gauge
- Number of pieces (per panel): 1 main panel + 5 bodies + 10 upper wings + 10 lower wings = 26
- Layout: 5 scallops across the hem, one dragonfly centered on each
- Scallop repeat: 8 in (20.3 cm) wide
- Size before border: 40 x 78.6 in (101.6 x 199.6 cm)
- Border depth: 0.2 in (0.5 cm) on the sides, top, and picot hem
Materials
Use a smooth, mercerized cotton at about 170 m per 50 g. It gives crisp mesh, sharp picots, and holds up to sunlight and washing.
- Cream: 450 g / 1,530 m per panel (900 g / 3,060 m for the pair)
- Sage green: 60 g / 204 m per panel (120 g / 408 m for the pair)
These quantities include a margin of about 10%.
Tools: 2.5 mm hook, tapestry needle, stitch markers, rustproof pins, a blocking surface at least 42 x 82 in (106.7 x 208.3 cm) (a clean floor with towels works), a spray bottle, and a tape measure.
Abbreviations (US Terms)
- ch = chain
- sl st = slip stitch
- sc = single crochet
- hdc = half double crochet
- dc = double crochet
- sk = skip
- sp = space
- st(s) = stitch(es)
- RS = right side
Special stitch – picot: Ch 3, then sl st into the last sc made.
Mesh square: One dc followed by ch 2, skipping 2 sts. Each square is 3 sts wide.
Gauge and Checkpoints
Gauge: 10 mesh squares and 10 rows = 4 in (10.2 cm) square after blocking. That works out to 7.5 sts per inch, with each dc row 0.4 in (1.0 cm) tall.
Test one piece first. Ch 63.
- Row 1: Dc in the 4th ch from the hook and in each ch across. That gives 61 sts (the skipped ch counts as a dc).
- Rows 2–10: Work 9 mesh rows as written in Rows 5+ of the body below. That gives 20 squares per row.
Block the swatch. It should measure 8 in (20.3 cm) wide and 4 in (10.2 cm) tall. This swatch is exactly one scallop repeat wide, so use it to practice the edging and one dragonfly too.
- Too big: Go down 0.25 mm in hook size.
- Too small: Go up 0.25 mm in hook size.
Each 0.1 in (0.3 cm) error per 4 in becomes 1 in (2.5 cm) across the panel. Fix it now.
Checkpoints (blocked):
- After Row 4: 40 in (101.6 cm) wide, 1.6 in (4.1 cm) tall
- After Row 54: 21.6 in (54.9 cm) tall
- After Row 184: 73.6 in (186.9 cm) tall
- After Row 188: 75.2 in (191.0 cm) tall
- After the edging: 78.6 in (199.6 cm) long
Mesh Body (Cream)
Ch 303.
Row 1 (RS): Dc in the 4th ch from the hook and in each ch across. Turn. (301 sts)
Rows 2–4: Ch 3 (counts as dc throughout), dc in each st across. Turn. (301 sts)
Row 5: Ch 5 (counts as dc + ch 2), sk 2, dc in the next st. Ch 2, sk 2, dc in the next st. Repeat from * across. Turn. (100 squares; 101 dc + 200 ch = 301 sts)
Rows 6–184: Ch 5, sk the ch-2 sp, dc in the next dc. Ch 2, dc in the next dc. Repeat from * across, working the last dc in the 3rd ch of the turning ch. Turn. (100 squares per row)
Row 185 (conversion row): Ch 3, 2 dc in the ch-2 sp, dc in the next dc. Repeat from * across. Turn. (101 dc into dc + 200 dc into spaces = 301 sts)
Rows 186–188: Ch 3, dc in each st across. Fasten off. (301 sts)
Scalloped Edging
Turn the body upside down and work into the free loops of the foundation chain. Each foundation dc sits in one loop, so there are 301 loops.
E-Row 1 (sage): With the RS facing, join sage in the first loop. Ch 1, sc in each loop across. Turn. (301 sc)
E-Row 2: Ch 4 (counts as dc + ch 1), sk 1, dc in the next st. Ch 1, sk 1, dc in the next st. Repeat from * across. Turn. (151 dc + 150 ch = 301 sts)
E-Row 3: Ch 1, sc in each dc and each ch-1 sp across. Fasten off. (301 sc)
The edging band is now 0.8 in (2.0 cm) deep.
Scallops (make 5)
Divide E-Row 3 into 5 sections of 60 sts, plus 1 extra st. Each scallop is worked over 61 sts, so neighboring scallops share their boundary stitch:
- Scallop 1: sts 1–61
- Scallop 2: sts 61–121
- Scallop 3: sts 121–181
- Scallop 4: sts 181–241
- Scallop 5: sts 241–301
Place markers on the shared sts.
S1 (sage): Join sage in the first st of the section. Ch 1, sc in the same st. Ch 3, sk 2, sc in the next st. Repeat from * 20 times. Turn. (21 sc, 20 ch-3 loops)
S2: Sl st into the first loop. Ch 1, sc in the same loop. Ch 3, sc in the next loop. Repeat from * across. Turn. (19 loops)
S3: Repeat S2. Fasten off sage. (18 loops)
S4 (cream): Join cream in the first loop and repeat S2. (17 loops)
S5: Repeat S2. (16 loops)
S6 (double decrease): Sl st to the 2nd loop. Ch 1, sc in that loop. Ch 3, sc in the next loop. Repeat from * to the 2nd-to-last loop. Turn. (14 sc, 13 loops)
S7: Repeat S6. (11 sc, 10 loops)
S8 (fan): Sl st into the first loop. Ch 3, then 3 dc in the same loop. Work 4 dc in each of the remaining 9 loops. Fasten off. (40 dc)
The quick decreases in S6 and S7 round the bottom of each scallop. Each scallop is 8 in (20.3 cm) wide and 2.6 in (6.6 cm) deep. The full edging is 3.4 in (8.6 cm) deep.
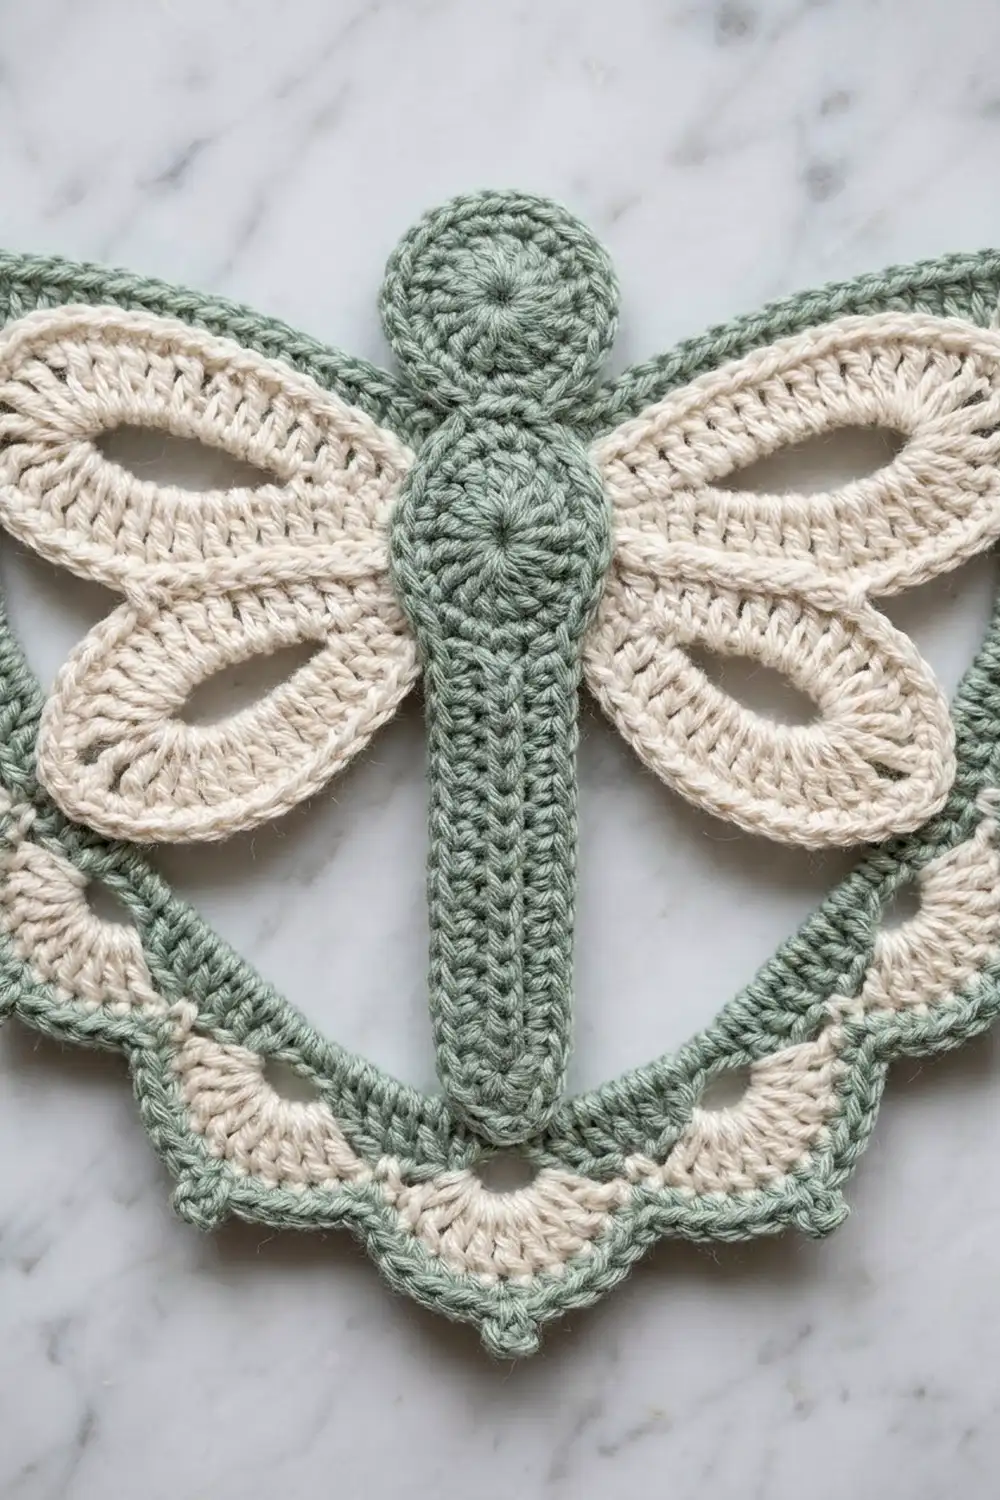
Dragonfly Appliqués
Body (sage, make 5)
Head: Make a magic ring. Ch 2, then work 9 hdc in the ring. Pull the ring closed and sl st to the first hdc. (9 hdc)
Body: Ch 27.
- Side 1: Sc in the 2nd ch from the hook, then hdc in the next ch, sc in the next ch 12 times, then hdc in the last ch. Sl st into the head. (26 sts)
- Side 2: Working in the free loops of the chain, hdc in the first loop, then sc in the next loop, hdc in the next loop 12 times, then sc in the last loop. Sl st into the tip. (26 sts)
Fasten off and leave a 12 in (30.5 cm) tail.
Because the hdc and sc alternate, the body has raised segments. It measures 4 in (10.2 cm) long: 3.5 in (8.9 cm) of body plus a 0.5 in (1.3 cm) head.
Upper Wing (cream, make 10)
Ch 25.
Rnd 1:
- First side: Sc in the 2nd ch from the hook, hdc in the next ch, dc in the next ch, then ch 1, sk 1, dc in the next ch 10 times. (23 sts)
- Tip: In the last ch, work (3 dc, ch 2, 3 dc).
- Second side: Working in the free loops, ch 1, sk 1, dc in the next loop 10 times, hdc in the next loop, sc in the next loop. (22 sts)
- Sl st to the first sc.
Rnd 1 total: 51 sts plus the tip ch-2 sp.
Rnd 2: Ch 1, sc in each st around, skipping the ch-1 sps. In the tip sp, work (2 sc, ch 2, 2 sc). Sl st to the first sc and fasten off. (55 sc)
The open ch-1 spaces down the center form the wing vein. The upper wing is 3.4 in (8.6 cm) long.
Lower Wing (cream, make 10)
Ch 19.
Rnd 1:
- First side: Sc in the 2nd ch from the hook, hdc in the next ch, dc in the next ch, then ch 1, sk 1, dc in the next ch 7 times. (17 sts)
- Tip: In the last ch, work (3 dc, ch 2, 3 dc).
- Second side: Working in the free loops, ch 1, sk 1, dc in the next loop 7 times, hdc in the next loop, sc in the next loop. (16 sts)
- Sl st to the first sc. (39 sts)
Rnd 2: Work as for the upper wing. (43 sc)
The lower wing is 2.6 in (6.6 cm) long.
Make All Pieces
Per panel:
- Cream: 1 main panel (body + fans), 10 upper wings, 10 lower wings
- Sage: 5 bodies (the edging rows are already part of the main panel)
For the pair: Double everything, for 52 pieces in total.
Hem layout (left to right):
SCALLOP:   1    2    3    4    5
APPLIQUÉ:  DF   DF   DF   DF   DF
Each dragonfly (DF), as stacked:
UPPER WING L | HEAD  | UPPER WING R
LOWER WING L | BODY  | LOWER WING R
Joining (Appliqué)
Method: Whipstitch the pieces on through the back loops of Rnd 2, using a matching color.
Placement:
- Find the center stitch of each scallop section (st 31, 91, 151, 211, 271 of E-Row 3) and mark it.
- Wings first. Pin the upper wings so their bases meet at the marker, at E-Row 2. Angle them slightly upward. Pin the lower wings just below, angled downward.
- Body on top. Place the head at E-Row 1, and run the tail down the center line to about S5. The body covers all four wing bases.
Stitch logic: Take one stitch through each outline sc and one strand of the edging beneath it. Don’t pull through to the front of the mesh.
Tension: Keep the stitches snug but not tight. If the wings pucker, the edging will cup.
Size checkpoint: The edging should still lie flat and measure 40 in (101.6 cm) across.
Border
Border gauge: 7.5 sc per inch, the same as the body. A dc row is 0.4 in (1.0 cm) tall, so each dc row end takes 3 sc (0.4 x 7.5 = 3).
Part A: Sage Picot Hem
Join sage at the outer right edge in the last st of E-Row 3. Work down the side of Scallop 5:
- Down the side: Work 2 sc in each of the 8 row ends of S1–S8, with a picot after every 4th sc. (16 sc, 4 picots)
- Across the bottom: Sc in each of the next 4 dc, picot. Repeat from * 10 times. (40 sc, 10 picots)
- Up the other side: Work as for the first side. (16 sc, 4 picots)
- At each V between scallops: Sl st into the shared stitch of E-Row 3, then continue down the next scallop.
End with a sl st in the first st of E-Row 3 and fasten off.
Counts:
- Per scallop: 72 sc and 18 picots
- Total: 360 sc, 90 picots, and 4 anchor sl sts
Why it works: The 16 side sc and 40 bottom sc both divide evenly by 4, so the picots land evenly. Anchoring each V keeps the scallop points sharp.
Part B: Cream Side and Top Border
With the RS facing, join cream at the lower right edge, at the end of E-Row 3. Work 1 row:
- Right side: Work 6 sc evenly across the ends of E-Rows 1–3, then 3 sc in each of the 188 body row ends. (570 sc)
- Corner: 3 sc in the corner st.
- Top: Sc in each of the next 299 sts.
- Corner: 3 sc in the corner st.
- Left side: Work 3 sc in each of the 188 row ends, then 6 sc across the edging ends. (570 sc)
Fasten off.
Counts per side, including corner stitches:
- Right side: 572
- Top: 303
- Left side: 572
- Total: 1,445 sc (572 + 303 + 572 − 2 shared corners)
Why it works:
- 570 sc ÷ 7.5 = 76 in, which matches the 75.2 in (191.0 cm) body plus the 0.8 in (2.0 cm) edging band.
- 303 sc ÷ 7.5 = 40.4 in (102.6 cm), which is the finished width.
Tabs (make 8)
Along the 303 top stitches, mark sections in this order: 7 sts, then 9 sts for a tab, then 31 sts for a gap. Repeat the tab and gap, and end with a final tab and 7 sts.
Check the total: 7 + (8 × 9) + (7 × 31) + 7 = 303.
For each tab:
- Row 1: Join cream and sc in the 9 marked sts. Turn.
- Rows 2–20: Ch 1, sc in each st across. Turn. (9 sc)
The strip is 4 in (10.2 cm) long. Fold it to the wrong side and sew the last row to Row 188. Each tab is 1.2 in (3.0 cm) wide, the gaps are 4.1 in (10.4 cm), and the finished loops are 2 in (5.1 cm) deep.
Final Blocking
- Weave in all ends, splitting them through the solid stitches.
- Soak the panel in cool water with a little wool wash for 20 minutes.
- Press the water out in towels. Don’t wring.
- Lay the panel flat and pin it to 40.4 x 79 in (102.6 x 200.7 cm).
- Pin both sides every 4 in (10.2 cm) and check that the mesh squares are square.
- Pin each scallop’s lowest point and the anchor at each V. Then pin open every picot.
- Shape the wings flat, with the veins straight.
- Let it dry completely before you unpin.
Final Quality-Control Checklist
- Every mesh row has 100 squares.
- The width is 40.4 in (102.6 cm) at the top, middle, and hem.
- There are 5 scallops, each with 40 fan dc.
- The 5 dragonflies are centered, and every wing base is hidden.
- There are 90 picots, all open.
- The 8 tabs are evenly spaced and the same depth.
- No ends are visible from the RS.
Troubleshooting
- The mesh is leaning: Work the last dc into the 3rd ch of the turning ch, not into the space.
- The panel is wider at the hem: Your foundation chain was loose. Work E-Row 1 with a 0.25 mm smaller hook.
- The scallops are flat or pointed: Recount S6 and S7. Each should lose 3 loops.
- The edging ruffles: You worked more than 2 sc per row end in the picot hem.
- The wings curl: Block them before sewing, and sew with a looser tension.
- The sides wave: Rework the border at exactly 3 sc per dc row end.
Care
Hand wash cool, roll in a towel, and dry flat, re-pinning the scallops. Over time, direct sun may soften the sage, so rotate the panels every season.
Final Notes
Here is the full measurement chain:
- Gauge: 7.5 sts and 2.5 rows per inch.
- Body: 301 sts give 40 in (101.6 cm) of width, and 188 rows give 75.2 in (191.0 cm) of length.
- Edging: 5 scallops of 60 sts plus 1 shared st fit the 301 sts exactly. They add 3.4 in (8.6 cm) of depth.
- Border: 570 sc per side and 303 across the top give a finished panel of 40.4 x 79 in (102.6 x 200.7 cm).
- Tabs: These bring the hanging length to 81 in (205.7 cm).
Make two panels for the pair, then hang them where the light catches the dragonflies.
Happy crocheting!