

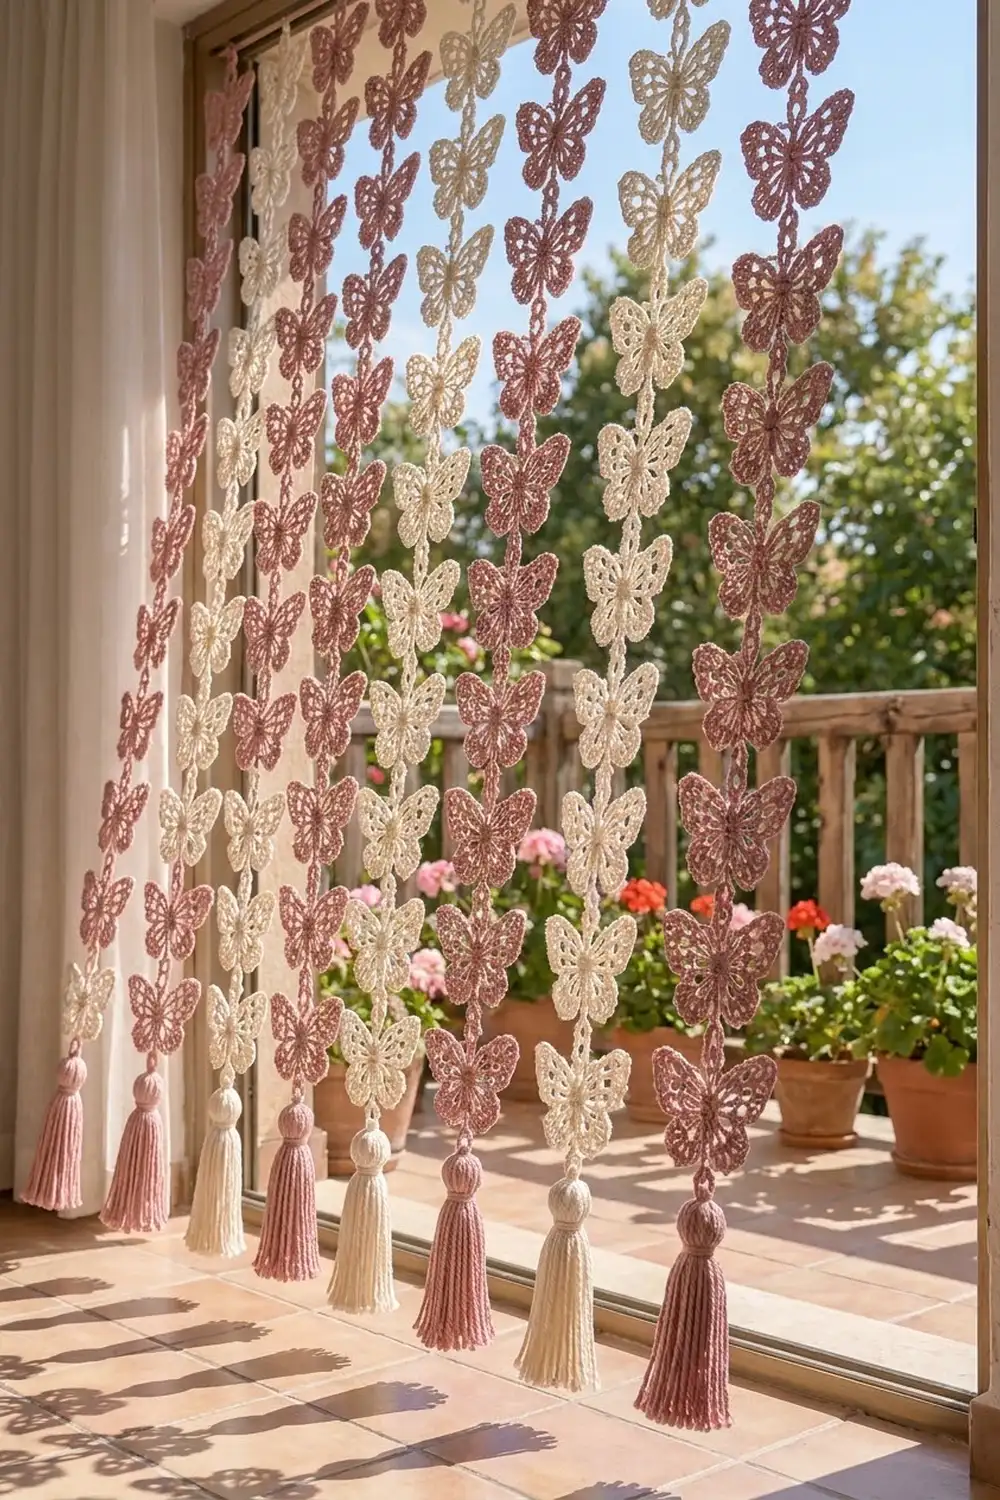
This butterfly curtain turns a plain doorway into a soft, airy screen. Twelve strands of lacy butterflies hang from a rod and move in the breeze, and each strand ends in a full tassel.
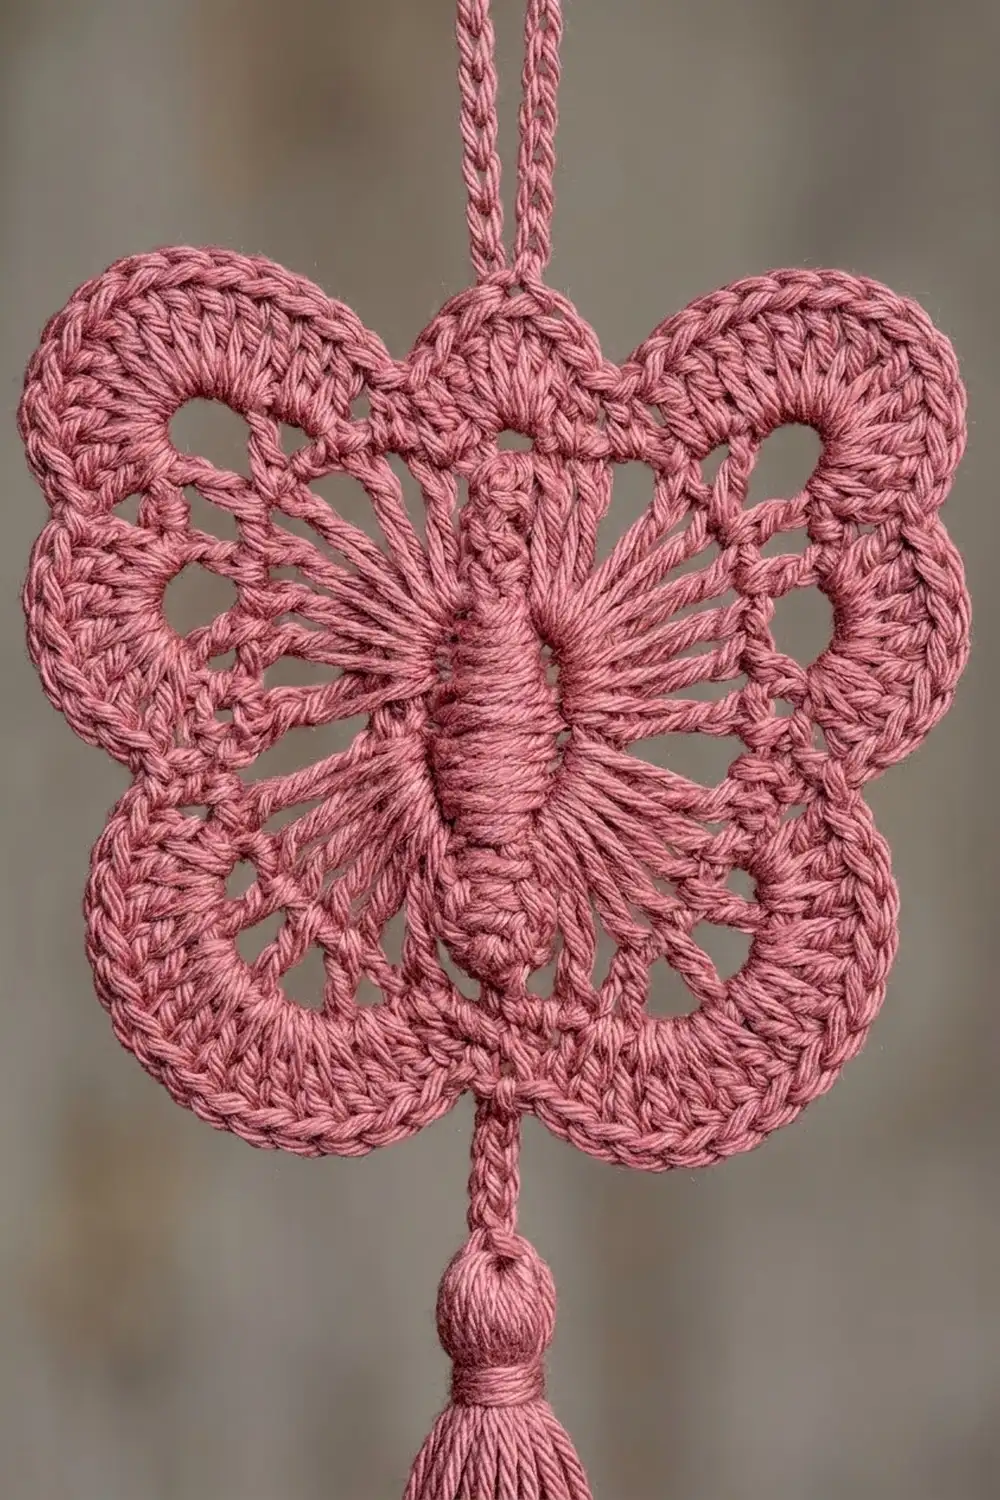
The colors are dusty rose and warm cream, alternating strand by strand across the rod. Each butterfly has a dense round body, long spokes that open into lacy wing “windows,” and a smooth scalloped outline. Like a real butterfly, the upper wings are larger than the lower wings.
The pattern uses US crochet terms. The finished curtain measures 42 in (106.7 cm) wide and 63 in (160.0 cm) long, from the top of the hanging loops to the tips of the tassels.
Construction is simple. You crochet each butterfly in four rounds from the center out. As you finish it, you join it to the butterfly above with a chain link. The top butterfly of each strand gets a hanging loop and the bottom butterfly gets a tassel. There is no sewing.
Finished Size and Construction
- Finished size: 42 in (106.7 cm) wide × 63 in (160.0 cm) long
- Skill level: Intermediate (simple stitches, lots of repetition)
- Terminology: US crochet terms
- Yarn weight: Sport / #2 fine mercerized cotton
- Hook: 2.5 mm (between US B-1 and C-2)
- Number of pieces: 168 butterflies (84 rose, 84 cream) and 12 tassels
- Layout: 12 vertical strands × 14 butterflies per strand
- Piece size: each butterfly 3.5 in (8.9 cm) wide × 3 in (7.6 cm) tall, not counting the loops
- Size before border: butterfly section of each strand 55 in (139.7 cm) long; 12 strands side by side 42 in (106.7 cm) wide
- Border depth: 2 in (5.1 cm) hanging loop at the top; 1 in (2.5 cm) connector plus 5 in (12.7 cm) tassel at the bottom
Materials
Use a smooth, mercerized cotton in sport weight. Cotton keeps the scalloped edge crisp, hangs straight, and doesn’t stretch over time the way acrylic can. Avoid fuzzy or brushed yarns, because they blur the open wing windows.
These amounts assume yarn of about 155 m per 50 g.
- Dusty rose: 300 g (930 m), 6 balls
- Cream: 300 g (930 m), 6 balls
Each butterfly uses about 2.6 g (8 m). Each tassel uses about 4.5 g (14 m). The amounts above include a margin of about 20% for gauge differences and swatching.
Tools:
- 2.5 mm crochet hook
- Tapestry needle
- Scissors
- Stiff card cut to 5 in (12.7 cm) tall, for the tassels
- 12 wooden beads, 0.8 in (2.0 cm) across, for the rounded tassel heads
- Rustproof pins and a blocking mat
- Spray bottle
- Curtain rod or tension rod at least 42 in (106.7 cm) long
- Stitch marker
Abbreviations (US Terms)
- ch – chain
- sl st – slip stitch
- sc – single crochet
- hdc – half double crochet
- dc – double crochet
- tr – treble crochet (yo twice, insert, pull up a loop, [yo, pull through 2] 3 times)
- MR – magic ring
- sp – space
- st(s) – stitch(es)
- yo – yarn over
Special stitch – Scallop: a shaped fill worked into one chain arch. Large scallop in a ch-7 arch: (sc, hdc, 5 dc, hdc, sc) = 9 sts. Small scallop in a ch-5 arch: (sc, hdc, 3 dc, hdc, sc) = 7 sts.
Gauge and Checkpoints
Make one full butterfly before you start anything else. Don’t join it. Block it lightly and measure.
Chain gauge: 11 ch = 2 in (5.1 cm).
Measurement checkpoints:
- After Round 1: center body 0.9 in (2.3 cm) across
- After Round 2: spoke frame about 2.25 in (5.7 cm) across
- After Round 4: 3.5 in (8.9 cm) wide at the upper wing tips × 3 in (7.6 cm) tall from head to tail
If your butterfly is too big: go down to a 2.25 mm hook, or check that your tr spokes aren’t loose.
If your butterfly is too small: go up to a 2.75 mm hook. Tight chain arches are the most common cause, so try chaining a little looser.
Small differences add up. If each butterfly is off by 0.25 in (0.6 cm), a strand of 14 butterflies changes length by 3.5 in (8.9 cm).
Butterfly Motif
Every butterfly uses these four rounds. Round 1 is the body. Round 2 makes the spokes. Round 3 sets the wing shape with chain arches. Round 4 fills the arches to make the solid scalloped outline.
Stitch map for Round 1: Number the 16 dc of Round 1 as sts 1–16, with st 1 at the top (the head). Going around:
- st 1 = head
- sts 2–5 = upper wing A
- sts 6–8 = lower wing A
- st 9 = tail
- sts 10–12 = lower wing B
- sts 13–16 = upper wing B
That is 1 + 4 + 3 + 1 + 3 + 4 = 16 sts.
Round 1 (body): MR, ch 3 (counts as dc), 15 dc in ring, pull the ring tightly closed, sl st to top of ch-3. (16 dc)
Place a marker in the ch-3. This is st 1, the head.
Round 2 (spokes): Ch 1, sc in st 1.
- Upper wing A: [ch 4, tr in next st] 4 times (sts 2–5).
- Lower wing A: [ch 3, dc in next st] 3 times (sts 6–8).
- Tail: ch 3, sc in st 9.
- Lower wing B: [ch 3, dc in next st] 3 times (sts 10–12).
- Upper wing B: ch 3, tr in next st (st 13), then [ch 4, tr in next st] 3 times (sts 14–16).
- Ch 4, sl st to first sc.
(16 sts: 2 sc, 8 tr, 6 dc; 16 ch-sps: 8 ch-4 sps and 8 ch-3 sps)
The tr sts form the long spokes in the upper wings. The dc sts form the shorter spokes in the lower wings.
Round 3 (arches): In this round, you sc in each Round 2 stitch and chain between them. The chain lengths set the wing shape.
Ch 1, sc in head sc.
- Ch 3, sc in next tr (head notch).
- [Ch 7, sc in next tr] 3 times (upper wing A arches).
- Ch 2, sc in next dc (wing notch).
- [Ch 5, sc in next dc] 2 times (lower wing A arches).
- Ch 3, sc in tail sc (tail notch).
- Ch 3, sc in next dc (tail notch).
- [Ch 5, sc in next dc] 2 times (lower wing B arches).
- Ch 2, sc in next tr (wing notch).
- [Ch 7, sc in next tr] 3 times (upper wing B arches).
- Ch 3, sl st to first sc (head notch).
(16 sc; 16 arches: 6 ch-7, 4 ch-5, 2 ch-2, 4 ch-3)
The short ch-2 arches pull in between the upper and lower wings to form the waist on each side. The ch-3 arches dip in at the head and tail.
Round 4 (scalloped outline): Ch 1, sc in head sc.
- 3 sc in ch-3 sp.
- Large scallop in each of next 3 ch-7 arches (27 sts).
- 2 sc in ch-2 sp.
- Small scallop in each of next 2 ch-5 arches (14 sts).
- 3 sc in ch-3 sp.
- Tail loop: (sc, ch 6, sc) in tail sc.
- 3 sc in ch-3 sp.
- Small scallop in each of next 2 ch-5 arches (14 sts).
- 2 sc in ch-2 sp.
- Large scallop in each of next 3 ch-7 arches (27 sts).
- 3 sc in last ch-3 sp, sl st to first sc.
(101 sts plus 1 ch-6 tail loop)
Check: each side has 3 + 27 + 2 + 14 + 3 = 49 sts. Then 49 + 49 + 1 head sc + 2 tail sc = 101.
Don’t fasten off. You work the top link or hanging loop from here (see Joining).
The open windows are the gaps between the Round 2 spokes and the Round 3 arches. The dense outline is Round 4.
Make All Pieces
- Dusty rose: 84 butterflies (6 strands × 14) and 6 tassels
- Cream: 84 butterflies (6 strands × 14) and 6 tassels
Because you join as you go, you build each strand from the top down instead of making loose motifs first.
Layout grid (strands left to right, butterflies top to bottom):
ROW 1:  ROSE CREAM ROSE CREAM ROSE CREAM ROSE CREAM ROSE CREAM ROSE CREAM
ROW 2:  ROSE CREAM ROSE CREAM ROSE CREAM ROSE CREAM ROSE CREAM ROSE CREAM
...
ROW 14: ROSE CREAM ROSE CREAM ROSE CREAM ROSE CREAM ROSE CREAM ROSE CREAM
Every row is the same. Each strand is a single color.
Joining
Method: chain-link join-as-you-go, vertical only. Strands are never joined to each other side to side.
Butterfly 1 (top of strand): Work Rounds 1–4. After the final sl st, ch 22, sl st in the head sc. Fasten off. This is the hanging loop.
Butterflies 2–14: Work Rounds 1–4. After the final sl st:
- Ch 3.
- Insert the hook from front to back through the ch-6 tail loop of the butterfly above. Yo and pull through the loop and the st on the hook.
- Ch 3.
- Sl st in the head sc of the current butterfly. Fasten off.
Stitch-to-stitch logic: The head sc of each new butterfly links to exactly one tail loop above it. The link is centered on both motifs, so the strand hangs straight with all the bodies in a vertical line.
Tension advice: Make the link chains the same size as your gauge chains. Tight links pull the head into a point. Loose links make the strand sag unevenly.
Size checkpoint: The gap from the tail of one butterfly to the head of the next should be 1 in (2.5 cm). Every 4 butterflies, hang the strand and measure: 4 butterflies + 3 connectors = 12 + 3 = 15 in (38.1 cm). A full strand of 14 butterflies is 14 × 3 + 13 × 1 = 55 in (139.7 cm).
Border: Top Hanging Loops and Bottom Tassels
A curtain has no framed border. Here, the “border” is the hanging edge at the top and the tasseled edge at the bottom.
Border gauge: 11 ch = 2 in (5.1 cm). The strands hang 3.5 in (8.9 cm) apart, center to center.
Top edge (1 hanging loop per strand, 12 total): Each ch-22 loop folds in half and hangs 11 ch, which is 2 in (5.1 cm). Slide the loops onto the rod in the order shown in the layout grid.
Bottom edge (1 tassel per strand, 12 total):
- Wrap matching yarn 50 times around the 5 in (12.7 cm) card.
- Slide a 10 in (25.4 cm) tie under the wraps at the top edge and knot it tightly. Cut the wraps at the bottom edge.
- Thread both tie ends through a wooden bead. Spread the strands evenly over the bead so it is fully covered.
- Wrap a separate 12 in (30.5 cm) strand tightly 6 times just below the bead to form the rounded head. Knot it and bury the ends inside the tassel.
- Tie the top tie through the tail loop of butterfly 14, leaving a 1 in (2.5 cm) connector. Knot 3 times and bury the ends.
- Trim the tassel evenly to 5 in (12.7 cm) from the top of the head to the tips.
Why the math works:
- Width: 12 strands × 3.5 in = 42 in (106.7 cm). The strand spacing equals one butterfly width, so the wing tips just meet, with no overlap and no gaps. From the center of strand 1 to the center of strand 12 is 11 × 3.5 in = 38.5 in (97.8 cm). Add half a butterfly, 1.75 in (4.4 cm), on each side and you get 42 in again.
- Length: 2 in hanging loop + 55 in butterflies + 1 in connector + 5 in tassel = 63 in (160.0 cm).
- No stitches are added between strands, because the strands hang free.
Final Blocking
Block each strand after it is finished and its tassel is attached.
- Lay the strand flat on a long blocking surface, or on a clean floor covered with a towel.
- Spray each butterfly until it is damp but not soaked.
- Pin the upper wing tips to 3.5 in (8.9 cm) wide and the head-to-tail height to 3 in (7.6 cm).
- Pin into the Round 3 notches to sharpen the waist between the upper and lower wings.
- Straighten each connector so it measures 1 in (2.5 cm).
- Steam the tassel lightly and comb the strands straight with your fingers.
- Let it dry completely, about 6 hours, before you unpin it.
- Hang the strand on the rod for 24 hours. The weight of the tassel settles every link.
Final Quality-Control Checklist
- [ ] 168 butterflies total: 84 rose, 84 cream
- [ ] Every butterfly has 101 sts plus a ch-6 tail loop in Round 4
- [ ] Every butterfly measures 3.5 in (8.9 cm) × 3 in (7.6 cm)
- [ ] Every connector is 1 in (2.5 cm)
- [ ] Each strand is 55 in (139.7 cm) from top head to bottom tail
- [ ] 12 hanging loops, each 2 in (5.1 cm)
- [ ] 12 tassels, each 5 in (12.7 cm), with fully covered bead heads
- [ ] Strands alternate rose and cream, starting with rose on the left
- [ ] All ends woven in and hidden on both sides
Troubleshooting
Wings curl or cup. The Round 3 arches are too short. Chain more loosely, or go up a hook size for that round only.
Wings ruffle. The Round 4 scallops are too full. Check that you have 9 sts in each large scallop and 7 in each small one.
No visible waist between the wings. The ch-2 notch arches are too loose. Keep them snug.
Strand twists when hung. The top link is off-center. Make sure you sl st into the head sc and not the stitch next to it.
Strands are different lengths. A connector or a butterfly is off gauge. Measure in sections of 4 butterflies and redo the one that is off.
Tassel bead shows through. Add 10 more wraps on the card.
Care
Hand wash in cool water with mild soap. Roll the curtain in a towel, dry it flat, then hang it to finish drying.
Final Notes
All the sizes in this curtain come from one butterfly. One butterfly is 3.5 in (8.9 cm) × 3 in (7.6 cm). With 1 in (2.5 cm) connectors between them, fourteen butterflies make a 55 in (139.7 cm) strand. The 2 in (5.1 cm) hanging loop, 1 in (2.5 cm) connector, and 5 in (12.7 cm) tassel bring each strand to 63 in (160.0 cm). Twelve strands hung 3.5 in (8.9 cm) apart make the curtain 42 in (106.7 cm) wide.
If the first butterfly is right, the rest of the curtain will be too. For a taller doorway, add more butterflies: each extra butterfly plus its connector adds 4 in (10.2 cm).
Happy crocheting!