

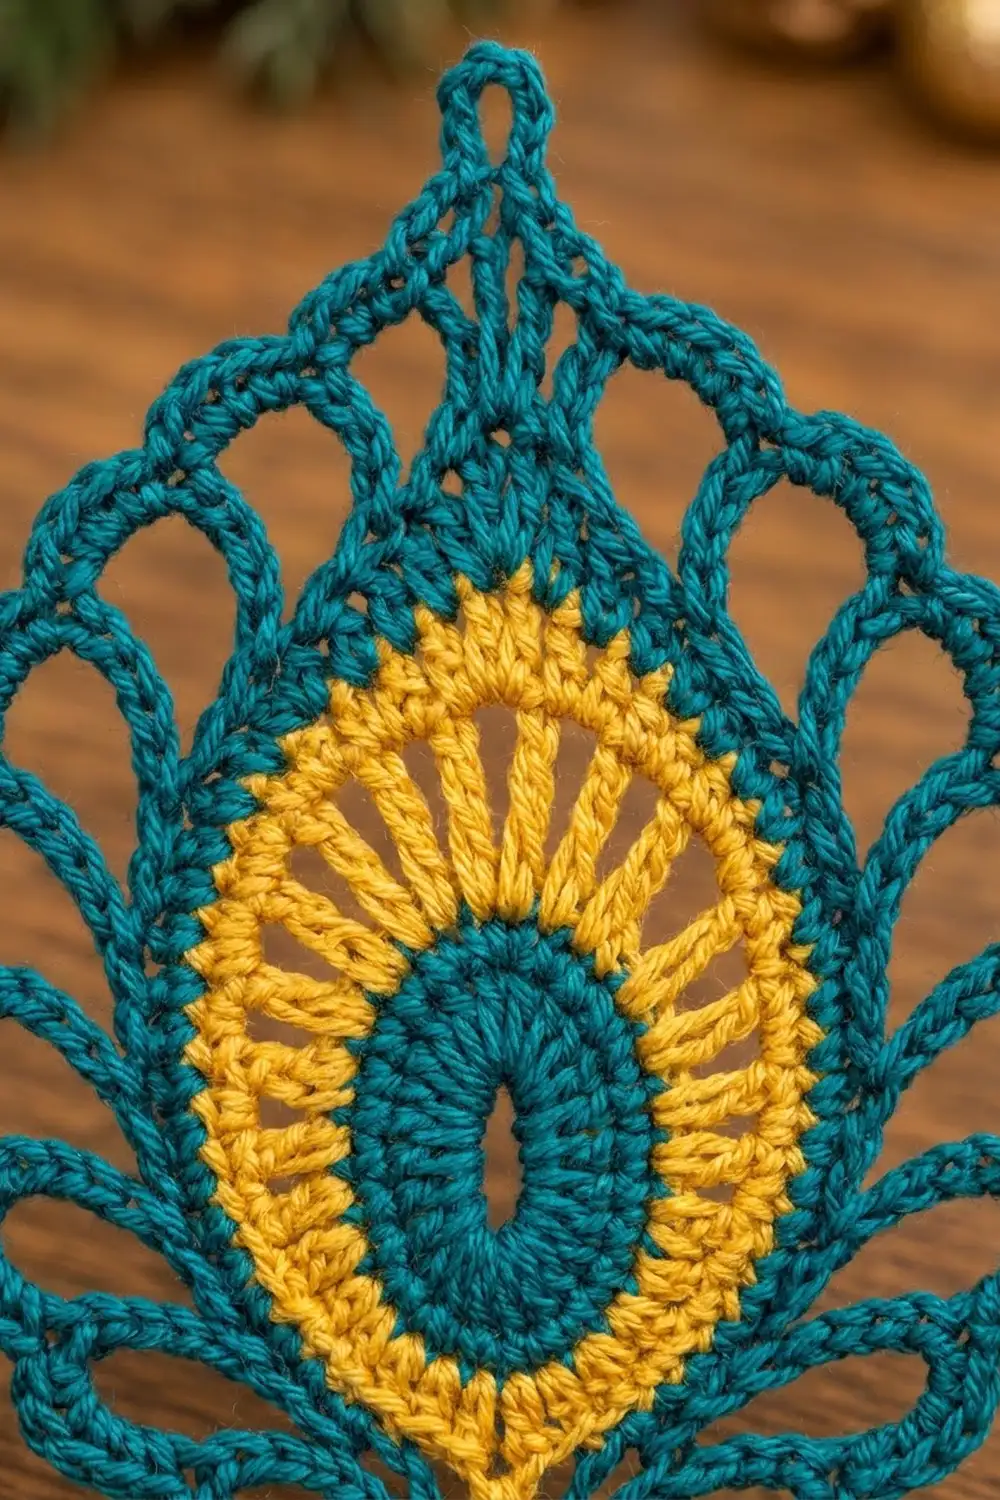
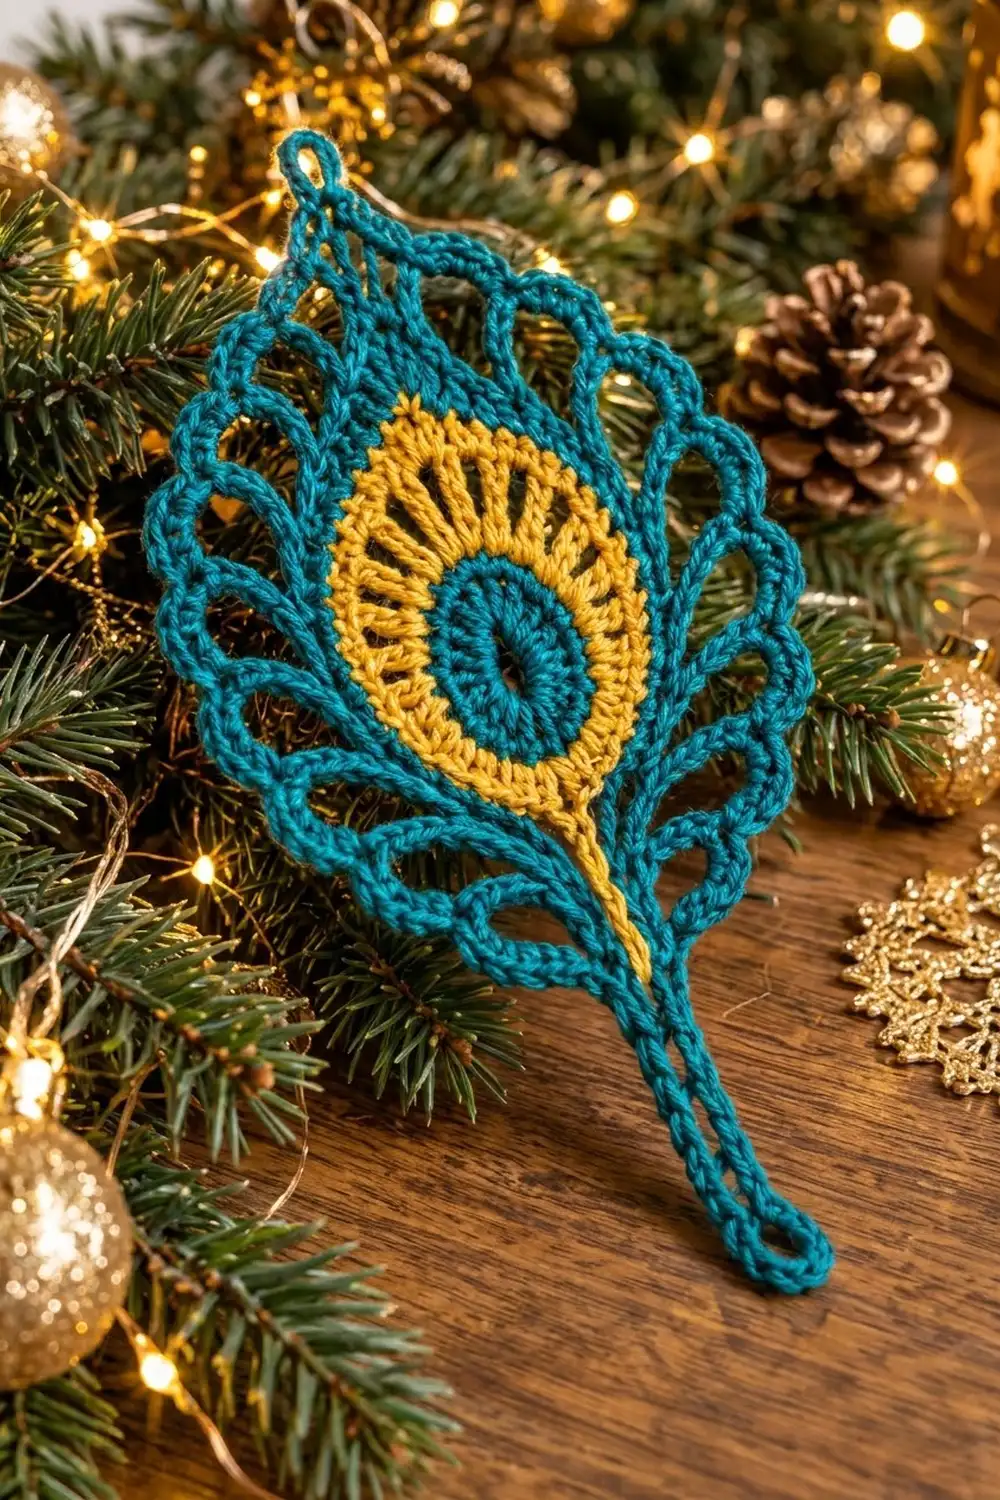
The Golden Eye Peacock Feather is a single lace appliqué shaped like a stylized peacock plume. A deep teal “eye” sits inside a sunny yellow ring of radiating stitches, framed by open teal arches that rise to a pointed tip. A slim teal stem finishes in a small hanging loop.
Only two colors are used: deep teal and golden yellow. The look is crisp and graphic, a little Art Nouveau. You can use it as an ornament, a gift-tag topper, an appliqué, or a bookmark-style hanger. It looks especially good against evergreen branches and gold holiday décor.
This pattern uses US crochet terms. The finished feather measures 3.5 in (8.9 cm) wide and 6.5 in (16.5 cm) long, from the top tip to the end of the stem loop. The body alone, from the top tip to the point of the yellow tail, is 4.5 in (11.4 cm).
Construction is simple and all in one piece. You work an oval teal eye into a chain ring, add two yellow rounds with a pointed tail, then one teal round. Next, three teal rows are worked back and forth around the oval to form the barbs, arches, and scalloped edge. The stem is chained last and anchored to the yellow tail.
Finished Size and Construction
- Finished size: 3.5 in (8.9 cm) wide × 6.5 in (16.5 cm) long
- Skill level: Intermediate
- Terminology: US crochet terms
- Yarn weight: Sport weight (#2) mercerized cotton
- Hook: 3.0 mm (US C/2–D/3)
- Number of pieces: 1 (single motif, no joining)
- Layout: One vertical feather, tip up, stem down
- Piece size: body 3.5 in (8.9 cm) × 4.5 in (11.4 cm), plus a 2 in (5.1 cm) stem
- Size before border: 3.25 in (8.3 cm) wide × 4.25 in (10.8 cm) tall, tip to tail point
- Border depth: 0.125 in (0.3 cm) on each side; the tip point adds another 0.125 in (0.3 cm) at the top
Materials
Choose a smooth, mercerized cotton in sport weight. Mercerized cotton shows each stitch clearly and holds the arches open after blocking. Avoid fuzzy, brushed, or very stretchy yarns; the lace will lose its outline and the eye will blur.
If you only have fingering-weight cotton, the feather will come out about 10% smaller. If you use DK cotton with a 3.5 mm hook, expect it to be about 15% larger.
- Teal: 10 g (about 33 m)
- Golden yellow: 5 g (about 17 m)
These amounts include a generous margin for your gauge test and for weaving in ends. One feather actually uses about 7 g of teal and 3 g of yellow.
Tools:
– 3.0 mm crochet hook
– Tapestry needle
– Scissors
– Stitch markers (2–3)
– Ruler or tape measure
– Blocking mat and rust-proof pins
– Spray bottle with water
– Optional: liquid fabric stiffener for ornaments
Abbreviations (US Terms)
- ch – chain
- sl st – slip stitch
- sc – single crochet
- hdc – half double crochet
- dc – double crochet
- tr – treble crochet
- st(s) – stitch(es)
- sp(s) – space(s)
- sk – skip
- beg – beginning
- rep – repeat
Special technique – Working into a ring with mixed heights: In Round 1, every stitch goes into the center of the chain ring, not into the chains themselves. Changing the stitch height as you go around the ring is what makes the oval.
Gauge and Checkpoints
Gauge: 22 sc and 24 rows = 4 in (10.2 cm) in sport cotton with a 3.0 mm hook.
Because this is a small motif, the best gauge test is the motif itself. Work through Round 3, measure, and adjust before going further. A flat swatch tells you less here than the actual oval does.
Checkpoints:
– After Round 1: oval about 1 in (2.5 cm) wide × 1.25 in (3.2 cm) tall
– After Round 3 (not counting the tail): 2 in (5.1 cm) wide × 2.5 in (6.4 cm) tall
– After Round 4: 2.25 in (5.7 cm) wide × 2.75 in (7.0 cm) tall
– After Row 6: 3.25 in (8.3 cm) wide × 4.25 in (10.8 cm), tip to tail point
– After Row 7: 3.5 in (8.9 cm) wide × 4.5 in (11.4 cm), tip to tail point
If your piece is more than 0.25 in (0.6 cm) too large at Round 3, go down 0.25 mm in hook size and start again. If it is more than 0.25 in (0.6 cm) too small, go up 0.25 mm. Blocking can fix differences under 0.25 in (0.6 cm).
Pattern
Work Rounds 1–4 with the right side facing. Rows 5–7 are worked back and forth around the oval, leaving the bottom open for the tail and stem. Leave a 4 in (10.2 cm) yarn end at every color change so it is easy to weave in.
Round 1 – Teal Eye
The mix of stitch heights stretches the ring into a tall oval. Tall treble stitches sit at the top and bottom, and short single crochet sit at the sides.
With teal, ch 12, sl st in first ch to form a ring.
Round 1: Ch 4 (counts as first tr), in ring work: tr, 2 dc, 2 hdc, 2 sc, 2 hdc, 2 dc, 4 tr, 2 dc, 2 hdc, 2 sc, 2 hdc, 2 dc, 2 tr. Sl st in top of beg ch-4. Fasten off. (28 sts)
The 4 tr in the middle form the top of the oval. The 2 tr at the start and the 2 tr at the end meet at the bottom center, where the tail will grow. Push the stitches together around the ring so the center opening stays a narrow oval slit.
Round 2 – Yellow Rays
Round 2: Join yellow in top of beg ch-4. Ch 4 (counts as dc + ch 1), dc in next st, ch 1; rep from * 26 more times. Sl st in 3rd ch of beg ch-4. (28 dc, 28 ch-1 sps)*
The 28th ch-1 sp sits exactly at the bottom center of the oval. Place a marker in it. Keep each ch-1 snug so the dc stand out as separate sun rays instead of loose gaps.
Round 3 – Yellow Edge and Tail
Round 3: Sl st in first ch-1 sp, ch 1, 2 sc in same sp, 2 sc in each of next 26 ch-1 sps (54 sc so far). In the marked ch-1 sp work: sc, then make the tail: ch 8, sc in 2nd ch from hook, sc in next ch, hdc in next 2 ch, dc in next 2 ch, tr in last ch; sc in same marked sp. Sl st in first sc. Fasten off.
Count: 56 sc around the oval + 7 sts on the tail.
The tail tapers from a treble at its base to a single crochet at its point. This gives the slim yellow spike that runs down toward the stem.
Round 4 – Teal Frame
This round goes around the oval only. The tail stays free and sits between the first and last stitch, so the round is not joined.
Round 4: Join teal in the sc just after the tail (the last sc of Round 3). Ch 1, sc in same st, sc in each of the next 55 sc, ending in the sc just before the tail. Do not join. (56 sc)
Stitch 1 and stitch 56 sit on either side of the tail base. Do not fasten off; the rest of the feather is worked in teal from here.
Row 5 – Inner Arches
Row 5: Ch 1, turn. Sc in first sc, ch 6, sk 4 sts, sc in next st; rep from * 10 more times. (12 sc, 11 ch-6 loops)*
Math check: 1 + (11 × 5) = 56. The last sc lands in stitch 1, next to the tail. Loop 6 is the top-center loop, spanning the 4 skipped stitches at the very top of the oval.
These loops become the teal “barbs” that fan out from the eye.
Row 6 – Outer Arches and Tip
Row 6: Ch 1, turn. Sc in first sc, ch 3, sc in first ch-6 loop, [ch 7, sc in next loop] 4 times, ch 7, (sc, ch 3, sc) in next loop (loop 6, top center), [ch 7, sc in next loop] 5 times, ch 3, sc in last sc.
Count: 14 sc, 10 ch-7 arches (5 on each side), 1 ch-3 tip, 2 ch-3 end spaces.
The ch-3 in loop 6 sets up the pointed tip of the feather. Check your width here against the 3.25 in (8.3 cm) checkpoint.
Border
Border Gauge
Each ch-7 arch is covered with 9 sc: 7 sc for the 7 chains plus 2 extra for the curve. The extra stitches let the arch round out and lie flat instead of pulling into a straight line. Nine sc measure about 1.5 in (3.8 cm) along the outer curve of each arch.
Row 7 – Scalloped Edge
Row 7: Ch 1, turn. Sc in first sc, 4 sc in ch-3 sp, [9 sc in next ch-7 arch] 5 times, (2 sc, ch 3, 2 sc) in tip ch-3 sp, [9 sc in next ch-7 arch] 5 times, 4 sc in last ch-3 sp, sc in last sc. Do not work into the sc between arches.
Count per side:
– Right side: 1 + 4 + 45 + 2 = 52 sc
– Left side: 2 + 45 + 4 + 1 = 52 sc
– Total: 104 sc + 1 ch-3 tip
Why the Math Works
Round 4 has 56 sts. Row 5 uses exactly 1 + (11 × 5) = 56 sts, so the loops start and end at the tail. Eleven is an odd number, so loop 6 sits at top center with 5 loops on each side. Row 6 places one sc in each loop, making 10 arches, 5 on each side of the tip. Row 7 fills every arch with the same 9 sc, so both sides total 52 sc and the feather stays symmetrical.
Stem and Hanging Loop
Do not fasten off. You are now at the tail base on one side.
Stem: Ch 7 (this runs along one side of the yellow tail), sl st in the sc at the tail point, ch 15, sl st in 6th ch from hook to form the hanging loop, sc in each of next 9 ch back toward the tail, sl st in the tail point, ch 7 (this runs along the other side of the tail), sl st in first sc of Row 7. Fasten off.
The two ch-7 lines frame the yellow tail. The sc stem makes a firm 2 in (5.1 cm) handle with an open loop at the end.
Weave in all ends along the back of stitches in the same color. Hide yellow ends inside the yellow ring, and teal ends inside the stem or the scalloped edge.
Final Blocking
- Lightly mist the feather until it is damp but not dripping.
- Lay it face down on the blocking mat.
- Pin the top tip and the stem loop first, 6.5 in (16.5 cm) apart.
- Pin the widest point of the arches to 3.5 in (8.9 cm) across.
- Pin each of the 10 arches at its highest point so the curves are round and even.
- Open each inner ch-6 loop with your fingers so the barbs fan out.
- Straighten the tail so it points straight down the center of the stem.
- Let it dry completely, at least 4 hours.
- For a stiff ornament, brush on fabric stiffener after drying, re-pin, and let it dry again.
Final Quality-Control Checklist
- Round 1 has 28 sts and the teal eye is a tall oval.
- Round 2 has 28 dc and 28 ch-1 sps.
- Round 3 has 56 sc plus a 7-st tail at bottom center.
- Round 4 has 56 sc and is not joined across the tail.
- Row 5 has 11 loops, with loop 6 at top center.
- Row 6 has 10 arches, 5 on each side of the tip.
- Row 7 has 52 sc per side, 104 sc total.
- The stem loop is open and lies flat.
- Finished size is 3.5 in (8.9 cm) × 6.5 in (16.5 cm).
- All ends are hidden on the back.
Troubleshooting
The eye is round, not oval. Check that you used tr at the top and bottom and sc at the sides in Round 1. Blocking can add a little length.
The yellow ring ruffles. Your ch-1 spaces may be too loose. Chain more tightly or go down one hook size.
The arches pull straight. Make sure each arch has 9 sc, not 7, and that your ch-7 is not too tight.
The tip is off-center. Recount Row 5. Loop 6 must sit over the 4 tr at the top of Round 1.
The stem twists. Make sure the ch-15 is not twisted before you work the sl st and sc. Block it flat.
The tail curls. Pin it straight while damp and let it dry fully.
Care
Hand wash in cool water with mild soap, roll it in a towel to press out the water, and dry flat, re-pinning if needed. Wipe stiffened ornaments clean instead of washing them.
Final Notes
This feather is built on a simple measurement chain. Round 1 makes a 1 in (2.5 cm) × 1.25 in (3.2 cm) oval with 28 sts. Rounds 2 and 3 grow it to 2 in (5.1 cm) × 2.5 in (6.4 cm), with 56 sc and a yellow tail. Round 4 brings it to 2.25 in (5.7 cm) × 2.75 in (7.0 cm). Rows 5 and 6 reach 3.25 in (8.3 cm) wide, and the scalloped edge finishes at 3.5 in (8.9 cm) wide and 4.5 in (11.4 cm) tall. The stem adds 2 in (5.1 cm), for a total length of 6.5 in (16.5 cm).
Check your size after Round 3, and every count after that will work out. Once you have made one feather, more go quickly as ornaments or gift toppers.
Happy crocheting!