

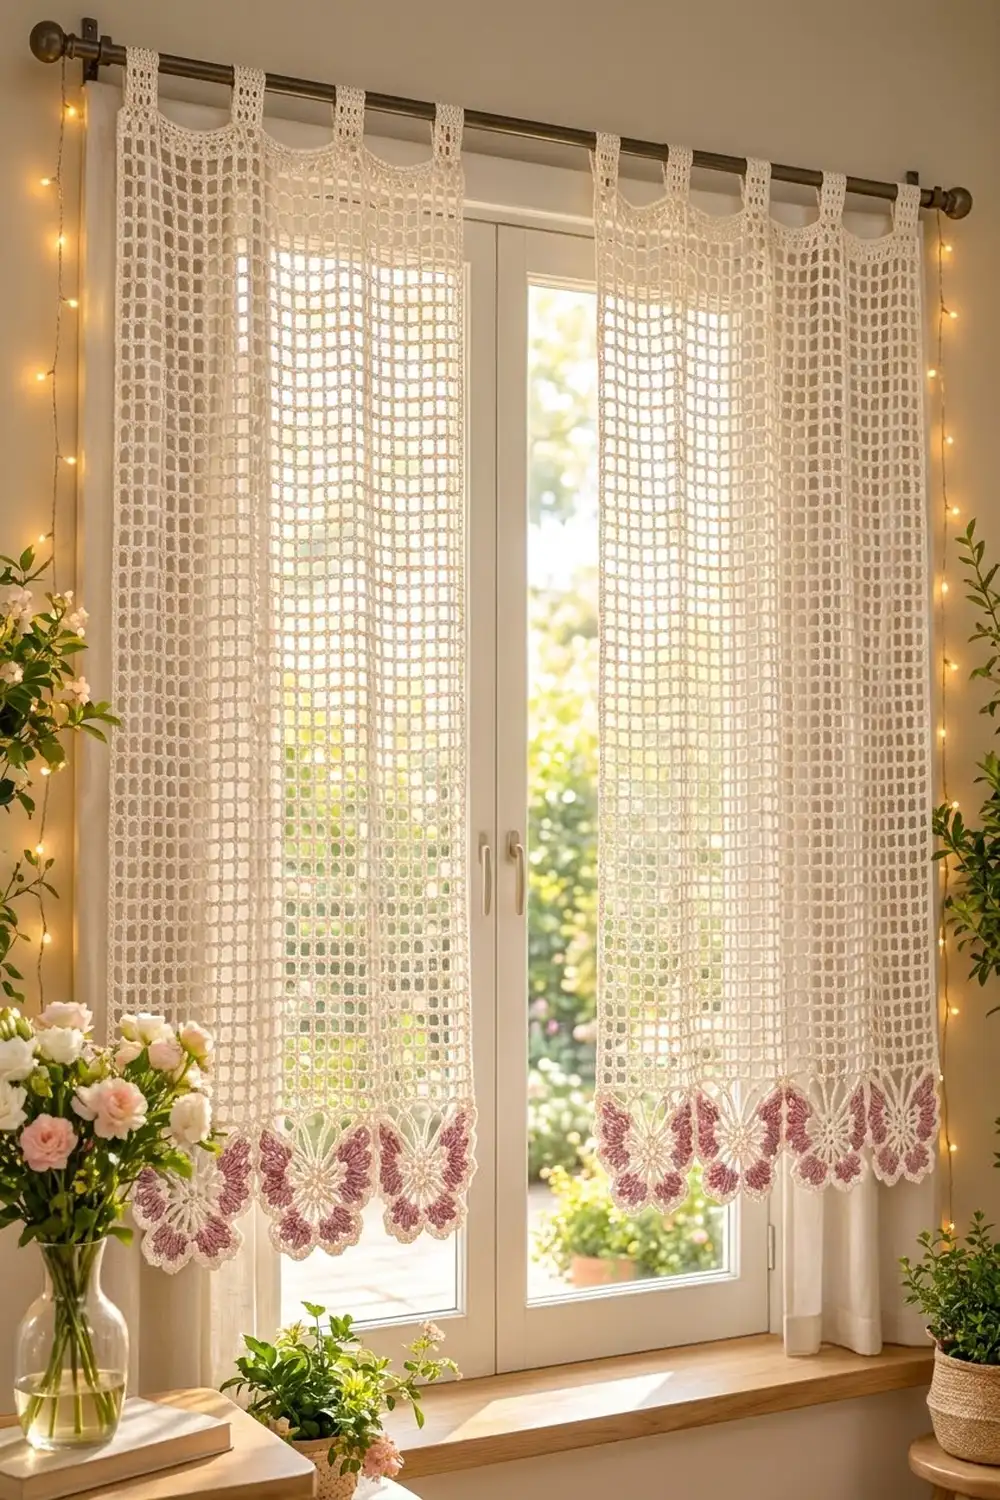
This curtain panel has a soft, cottage feel. It is a cream filet mesh rectangle with a row of three dusty-mauve butterflies along the bottom. Light passes easily through the open grid, and the solid wings give the hem some weight and color.
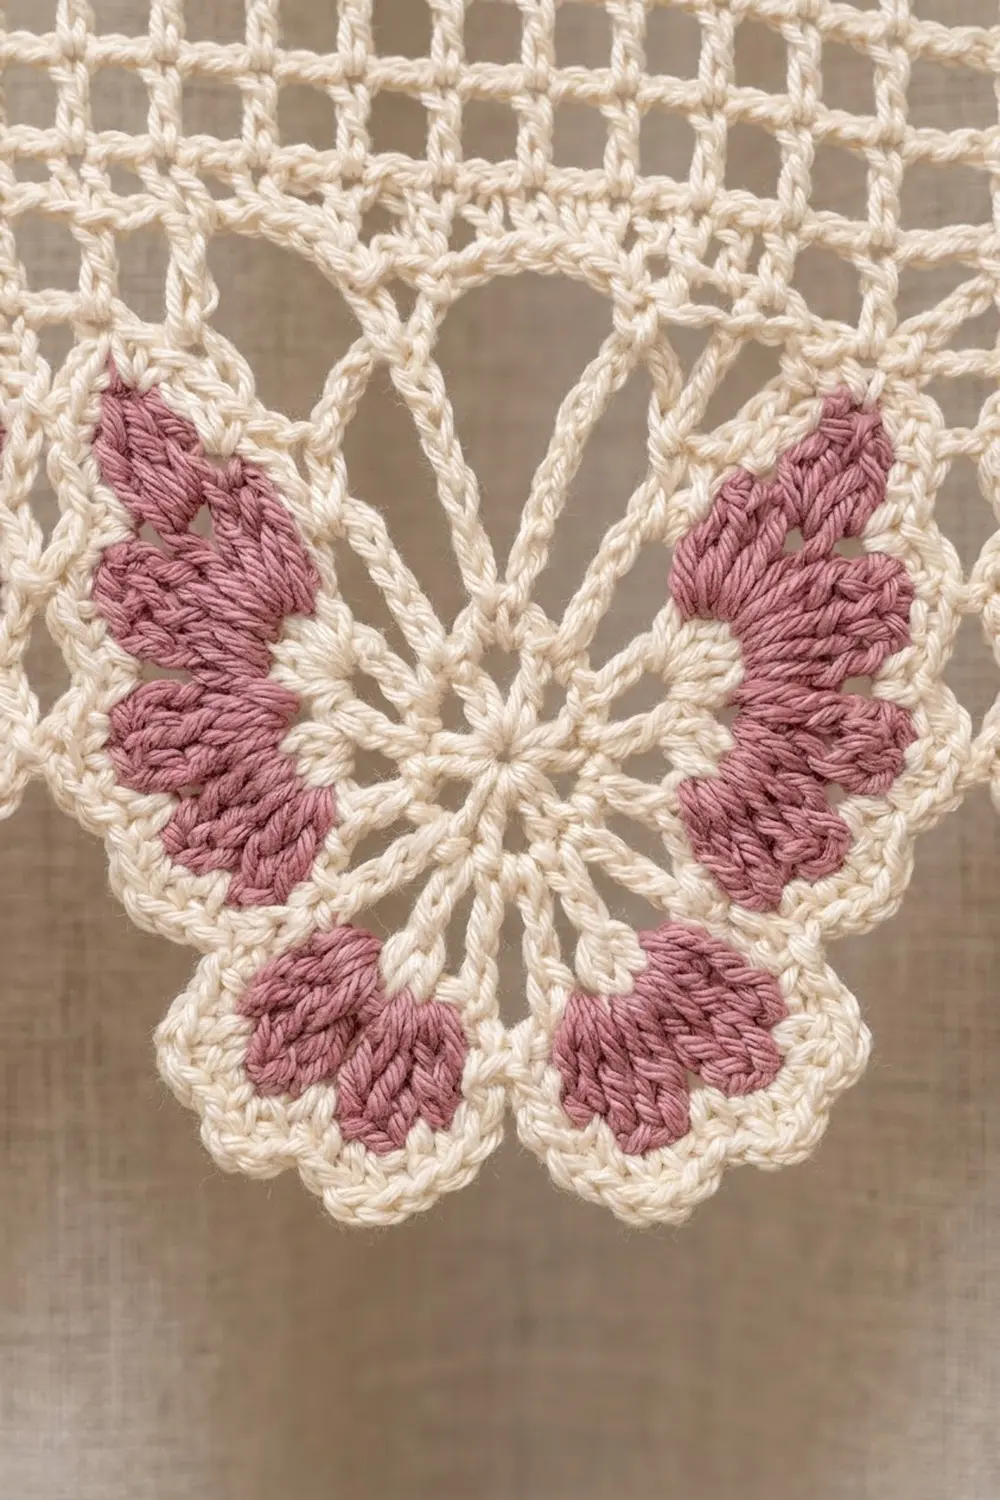
Each butterfly has a cream center ring with double-crochet spokes, two large scalloped upper wings and two small heart-shaped lower wings. A cream outline goes around every wing. The butterflies touch at their wing tips and hang from the mesh on fans of chain loops.
The pattern uses US crochet terms. One finished panel measures 18.5 in (47.0 cm) wide and about 58 in (147.3 cm) long, from the top of the tab loops to the lowest wing tips. The photo shows two identical panels hung as a pair, so make two panels to recreate that look.
Here is the order of work. Crochet the mesh body from the bottom up, add a top header row and four tabs, then edge both sides. Make three butterflies separately, joining them to each other in their last round. Finally, attach the butterfly strip to the bottom of the mesh with a chain-loop row.
Finished Size and Construction
- Finished size (one panel): 18.5 in (47.0 cm) wide × about 58 in (147.3 cm) long
- Skill level: Intermediate
- Terminology: US crochet terms
- Yarn weight: Sport-weight (#2) cotton
- Hook: 3.5 mm (E-4)
- Number of pieces per panel: 1 mesh body + 3 butterfly motifs (4 pieces)
- Layout: Mesh body above; 3 butterflies in one row along the bottom edge
- Butterfly size: 6 in (15.2 cm) wide × 5.5 in (14.0 cm) tall
- Mesh body before border: 18 in (45.7 cm) wide × 48.5 in (123.2 cm) tall
- Border depth: side edging 0.25 in (0.6 cm) on each side; tab loops 3.5 in (8.9 cm) above the top; butterfly edging 6 in (15.2 cm) below the bottom
Materials
Choose a smooth mercerized or combed cotton. It shows mesh lines and stitch definition crisply, and it holds its shape when hung. These estimates assume about 300 m per 100 g.
- Cream (main color): 110 g, about 330 m per panel (220 g, about 660 m for the pair)
- Dusty mauve (wings): 10 g, about 30 m per panel (20 g, about 60 m for the pair)
The quantities above include a margin of roughly 20% for your gauge swatch and small tension differences.
Tools:
– 3.5 mm (E-4) crochet hook
– Tapestry needle
– Stitch markers (at least 10)
– Rust-proof pins and a blocking surface large enough for the full panel
– Measuring tape
– Scissors
– Spray bottle
Abbreviations (US Terms)
- ch – chain
- sl st – slip stitch
- sc – single crochet
- dc – double crochet
- tr – treble crochet
- sk – skip
- sp(s) – space(s)
- st(s) – stitch(es)
- RS – right side
Special stitches:
– Upper wing shell: (dc, 3 tr, dc) all in the same ch-2 sp. That is 5 sts.
– Lower wing shell: 5 dc in the same ch-2 sp.
– Mesh square: ch 2, dc in the next dc.
Gauge and Checkpoints
Mesh gauge: 8 mesh squares × 8 mesh rows = 4 in (10.2 cm). Each square is 0.5 in (1.3 cm) wide and 0.5 in (1.3 cm) tall.
Sc gauge: 6 sc = 1 in (2.5 cm) across a row.
Test piece first: Ch 26. Work Row 1 (25 sc) as given in the mesh body below, then work 8 mesh rows of 8 squares each. Block the swatch, then measure it. Also make one complete butterfly as a test, because it will tell you whether your tr height suits the wings.
Checkpoints:
– Swatch: 4 in (10.2 cm) square after blocking
– Butterfly Round 1: 1.5 in (3.8 cm) across
– Butterfly Round 2: 3 in (7.6 cm) across
– Butterfly Round 3: 5.5 in (14.0 cm) across the upper wings
– Butterfly Round 4: 6 in (15.2 cm) wide, measured from one outer wing tip to the other
– Mesh body after Row 1 and 24 mesh rows: 12 in (30.5 cm) of mesh
– Full mesh body: 18 in (45.7 cm) wide
If your piece is too big, go down to a 3.25 mm hook. If it is too small, go up to a 3.75 mm hook. If the width is right but the rows are too short, pull up a slightly taller loop on each dc rather than changing hooks.
Mesh Body
Use cream throughout.
Foundation: Ch 110.
Row 1 (RS): Sc in the 2nd ch from the hook and in each ch across. Turn. (109 sc)
Row 2: Ch 3 (counts as a dc throughout). Then ch 2, sk 2 sc, dc in the next sc 36 times. Turn. (37 dc, 36 ch-2 sps = 36 squares)
The dc stitches land on sc 1, 4, 7 and so on, up to sc 109. That is 36 × 3 + 1 = 109.
Rows 3–97: Ch 3, ch 2, dc in the next dc 36 times; the last dc goes into the top of the turning ch-3. Turn. (37 dc, 36 squares in every row)
Rows 2–97 give you 96 mesh rows. At 0.5 in (1.3 cm) each, that is 48 in (121.9 cm) of mesh.
Checkpoints: After Row 25 (24 mesh rows), the mesh should measure 12 in (30.5 cm). After Row 49, it should measure 24 in (61.0 cm). Check the width at each point: it should stay at 18 in (45.7 cm).
Row 98 (header row): Ch 1, sc in the first dc. Then 2 sc in the next ch-2 sp, sc in the next dc 36 times. Do not fasten off. (109 sc = 37 sc worked one per dc + 72 sc worked two per ch-2 sp)
The body now measures 18 in (45.7 cm) × 48.5 in (123.2 cm), counting Row 1, the mesh and the header.
Butterfly Motif (Make 3)
Round 1 (cream): Make a magic ring. Ch 3 (counts as a dc), then work 15 dc into the ring. Sl st to the top of the ch-3. (16 dc)
Round 2 (cream): Ch 5 (counts as a dc + ch 2). Then dc in the next dc, ch 2 15 times. Sl st to the 3rd ch of the beginning ch-5. Fasten off. (16 dc, 16 ch-2 sps)
These are the cream spokes that radiate from the center.
Round 3 (mauve): Join mauve in any ch-2 sp; this space becomes the top of the butterfly. Ch 1, sc in the same sp (top gap).
- First upper wing: Work an upper wing shell in each of the next 4 sps. Call these Shells A, B, C and D, where A sits next to the head and D is the outer tip.
- Sc in the next sp (side gap).
- First lower wing: Work a lower wing shell in each of the next 2 sps.
- Sc in the next sp (bottom gap).
- Second lower wing: Work a lower wing shell in each of the next 2 sps.
- Sc in the next sp (side gap).
- Second upper wing: Work an upper wing shell in each of the next 4 sps. These are Shells D, C, B and A, in that order.
- Sl st to the first sc. Fasten off.
(64 sts: 40 in the upper wings + 20 in the lower wings + 4 gap sc)
Space check: 1 + 4 + 1 + 2 + 1 + 2 + 1 + 4 = 16 sps.
The short sc in each gap separates the wings into distinct shapes. The tr in each upper shell makes the upper wings larger than the lower ones. Each pair of 5-dc shells forms a heart-shaped lower wing.
Round 4 (cream): Join cream in the top-gap sc (the head). Ch 1, sc in the same st and in each st around. Sl st to the first sc. (64 sc = 64 worked one per existing st + 0 added)
The center sc of each shell is the 3rd sc of its group of 5. Place markers in the center sc of Shells B, C and D on both upper wings, because these become the joining points. The sc over the head stays lower than the wings, which keeps the V-notch.
On butterflies 2 and 3, work Round 4 with the join-as-you-go method described in the Joining section.
Make All Pieces
Per panel:
– 1 mesh body: cream
– 3 butterflies: Rounds 1, 2 and 4 in cream, Round 3 in mauve
For the pair shown: 2 mesh bodies and 6 butterflies.
Layout grid (one panel, RS facing):
TOP:     TAB – gap – TAB – gap – TAB – gap – TAB
BODY:    CREAM MESH, 36 squares × 96 rows
EDGING:  BUTTERFLY 1 – BUTTERFLY 2 – BUTTERFLY 3
Joining
Step 1: Join the butterflies to each other. Work Round 4 of Butterfly 2 until you reach the center sc of Shell D on the side that faces Butterfly 1. Insert the hook through the center sc of Butterfly 1’s free Shell D and sl st. Then complete the sc in Butterfly 2 as normal. Join Butterfly 3 to Butterfly 2 the same way. The sl st does not count, so every butterfly keeps 64 sc.
Strip checkpoint: Lay the three butterflies flat. The strip should measure 18 in (45.7 cm) from one outer wing tip to the other, which matches the width of the mesh.
Step 2: Row A. Turn the body upside down so that the free loops of the foundation chain face you, RS up. Join cream in the first free loop. Ch 1, then sc in each free loop across. (109 sc = 109 worked one per loop + 0 added)
Step 3: Row B (chain-loop joining row). Place the butterfly strip below Row A, RS up. Ch 1 and sc in the first sc. Then repeat the following sequence 3 times, once per butterfly:
- Ch 13, sl st in the center sc of Shell D (the outer tip), ch 13, sk 5 sc, sc in the next sc.
- Ch 8, sl st in the center sc of Shell C, ch 8, sk 5 sc, sc in the next sc.
- Ch 3, sl st in the center sc of Shell B, ch 3, sk 5 sc, sc in the next sc.
- Ch 3, sl st in the center sc of Shell B on the other wing, ch 3, sk 5 sc, sc in the next sc.
- Ch 8, sl st in Shell C on the other wing, ch 8, sk 5 sc, sc in the next sc.
- Ch 13, sl st in Shell D on the other wing, ch 13, sk 5 sc, sc in the next sc.
Fasten off.
Stitch logic: Each repeat uses 6 × 6 = 36 sc of Row A. The full row uses 1 + (3 × 36) = 109 sc, so it ends exactly on the last sc. Where two butterflies meet, both D legs sl st into the same joined tip. Together they make the cream chain fan that fills the triangle between the butterflies.
Tension advice: Keep your chains loose and even. If the chains are tight, the hem will pucker. If they are loose, the butterflies will sag below the mesh.
Size checkpoint: The butterfly tops should sit about 0.5 in (1.3 cm) below Row A. The full edging depth from the top of Row A to the lowest wing tip is 6 in (15.2 cm).
Border
Border gauge: 6 sc per 1 in (2.5 cm) across rows; 4 sc per 1 in (2.5 cm) along row ends.
Side edging (each side): With RS facing, join cream at the bottom corner of Row 1 on one side. Work 1 sc in the end of Row 1, then 2 sc around the end post of each of the 96 mesh rows, then 1 sc in the end of Row 98. Fasten off. Repeat on the other side. (194 sc per side = 1 + 192 + 1)
Tabs (make 4): Work each tab on the 109 sc of the header row (Row 98), with these placements:
- Tab 1: sc 1–13
- Tab 2: sc 33–45
- Tab 3: sc 65–77
- Tab 4: sc 97–109
The 19 sc between tabs stay free.
Tab Row 1: Join cream in the first sc of the tab. Ch 3, then ch 2, sk 2 sc, dc in the next sc 4 times. Turn. (5 dc, 4 squares)
Tab Rows 2–14: Work as mesh Rows 3–97 but with 4 squares per row. Fasten off, leaving a 12 in (30.5 cm) tail.
Each tab is about 2 in (5.1 cm) wide and 7 in (17.8 cm) long. Fold it to the back of the panel and sew the last row to the back of the header row. This makes a 3.5 in (8.9 cm) loop.
Why the math works:
– 109 = 36 squares × 3 + 1, so every mesh row, the header row and Row A all match.
– The tabs take 4 × 13 = 52 sc and the gaps take 3 × 19 = 57 sc, and 52 + 57 = 109. That leaves Tabs 1 and 4 flush with the side edges.
– Each tab uses 13 sc, which is 4 squares × 3 + 1.
– 96 rows × 2 sc = 192 sc along each side, which matches the 4 sc per inch row-end gauge over 48 in (121.9 cm).
Final Blocking
- Weave in all ends along the dc posts or inside the sc outlines.
- Soak the panel in cool water for 15 minutes. Press the water out gently in a towel; do not wring.
- Lay the panel flat. Pin the side edges straight at 18.5 in (47.0 cm) apart.
- Pin the mesh every 12 in (30.5 cm) so the squares sit square at 0.5 in (1.3 cm).
- Pin each butterfly out to 6 in (15.2 cm) wide. Pin the upper wing scallops and the lower heart lobes outward.
- Straighten the chain fans so their legs are even on each side.
- Pin each tab flat at 2 in (5.1 cm) wide.
- Let the panel dry completely, then unpin it.
Final Quality-Control Checklist
- Every mesh row has 37 dc and 36 squares
- The header row, Row 1 and Row A each have 109 sc
- Each butterfly has 64 sc in Round 4
- The butterflies are joined only at the Shell D tips
- Row B ends exactly on sc 109
- Each side edging has 194 sc
- The tabs sit at sc 1–13, 33–45, 65–77 and 97–109
- The panel measures 18.5 in (47.0 cm) × about 58 in (147.3 cm)
Troubleshooting
- Mesh slants or leans: Make sure each row ends in the top of the turning ch-3.
- Upper wings curl: Your tr may be tight. Loosen them slightly, or block more firmly.
- Lower wings don’t look like hearts: Check that the sc in the bottom gap separates the two lower wing shells.
- Hem puckers: The Row B chains are too tight. Rework them with a 4.0 mm hook.
- Butterflies droop: Shorten the D legs to ch 11 and the C legs to ch 7.
- Panel narrower than the butterfly strip: Recheck your mesh gauge. Block the mesh to 18 in (45.7 cm) wide.
- Tabs too short for your rod: Add mesh rows in pairs. Each extra pair adds 1 in (2.5 cm) of tab length and 0.5 in (1.3 cm) of loop.
Care
Hand wash in cool water with mild detergent, then reshape and dry flat. Never hang the panel while it is wet, because the mesh will stretch lengthwise.
Final Notes
The measurements build on each other:
- Each 0.5 in (1.3 cm) mesh square gives an 18 in (45.7 cm) body, 36 squares wide.
- 96 rows give 48 in (121.9 cm) of mesh, or 48.5 in (123.2 cm) for the body including Row 1 and the header.
- Three 6 in (15.2 cm) butterflies match that 18 in (45.7 cm) width exactly. They add a 6 in (15.2 cm) edging below.
- The tab loops add 3.5 in (8.9 cm) above.
- In total, one panel measures 18.5 in (47.0 cm) wide by about 58 in (147.3 cm) long.
If your swatch is right, every later measurement will fall into place. Make two panels to frame a window as a pair.
Happy crocheting!