

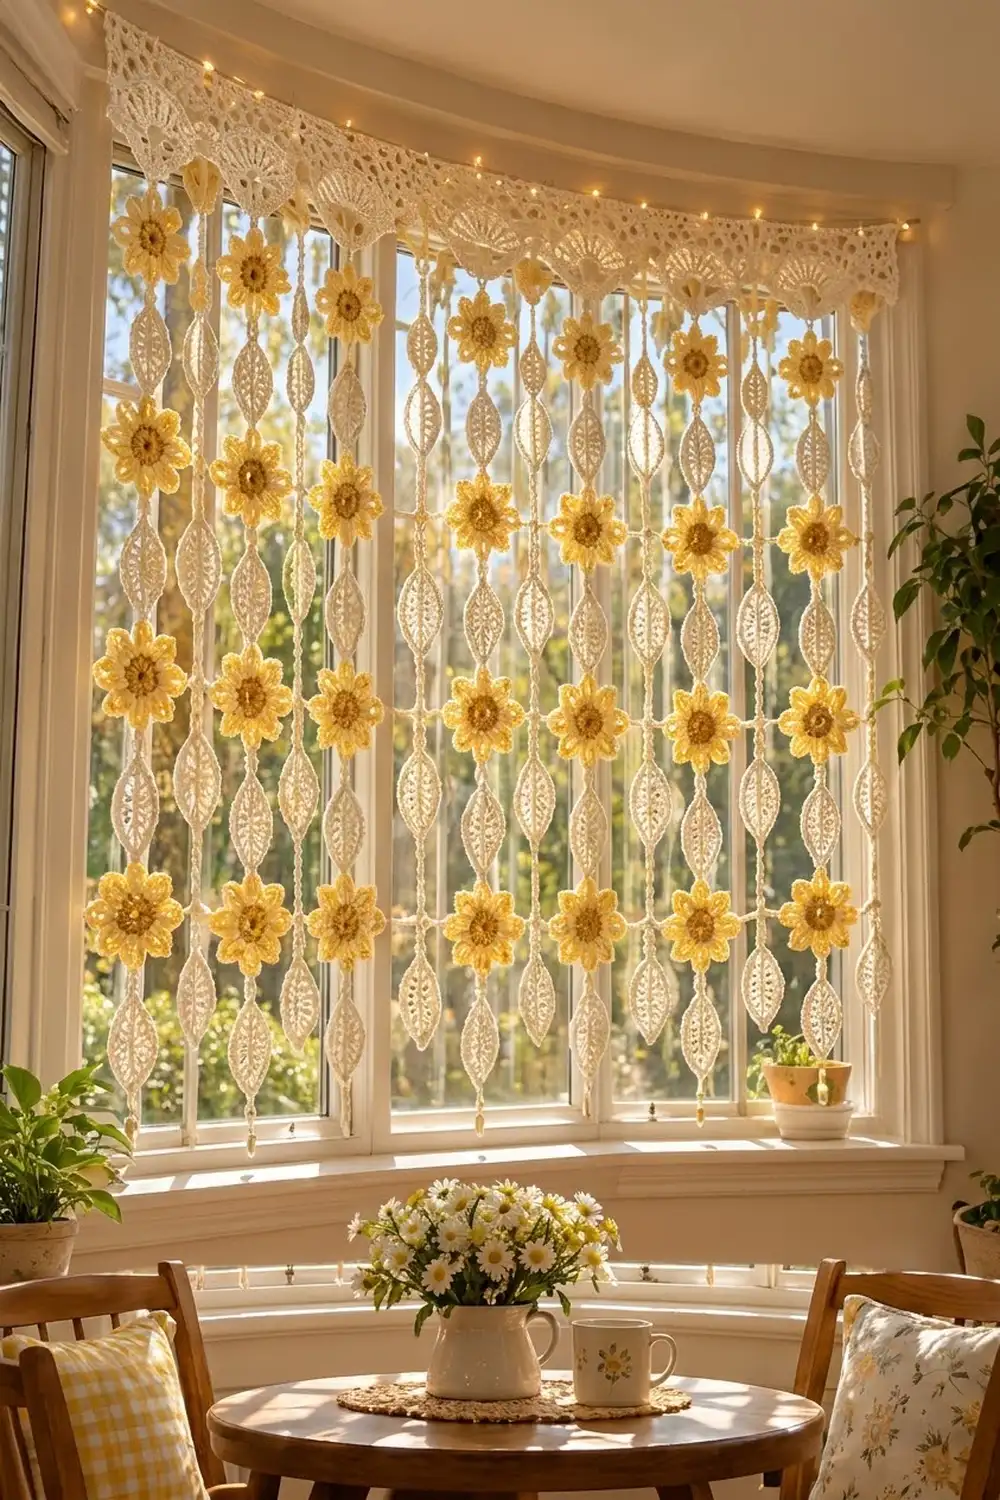
This curtain has a lacy cream header with soft scallops along the bottom. Below it hang chain strands of yellow daisies and cream leaves. When it is hung in a window, sunlight shows through every eyelet and the gaps between the strands.
There are three colors: cream for the header, cords and leaves, buttery yellow for the petals, and golden ochre for the flower centers. It has a light, cottage-style look and suits a kitchen window, a breakfast nook or a doorway. All instructions use US crochet terms.
The finished curtain measures 36 1/4 in (92.1 cm) wide and 40 in (101.6 cm) long at the flower strands, including the rod-loop border.
You will crochet the header in rows. Next you make the flowers as separate motifs. Then you chain each strand down from the header, attaching flowers as you go and working the leaves directly onto the cord. Last, you add a top border with rod loops.
Finished Size and Construction
- Finished size: 36 1/4 in (92.1 cm) wide × 40 in (101.6 cm) long
- Skill level: Intermediate
- Terminology: US
- Yarn weight: DK (weight 3) cotton
- Hook: 4.0 mm (G-6)
- Number of pieces: 1 header, 60 flowers and 25 strands (90 leaves are worked onto the strands)
- Layout: 25 strands that alternate leaf and flower, starting and ending with a leaf strand
- Piece sizes: each flower is 3 in (7.6 cm) across; each leaf is 2 1/2 × 1 1/4 in (6.4 × 3.2 cm); the header is 36 1/4 × 3 1/2 in (92.1 × 8.9 cm)
- Size before border: 36 1/4 × 39 in (92.1 × 99.1 cm)
- Border depth: 1 in (2.5 cm), along the top edge only
Materials
Use a smooth mercerized or combed cotton in DK weight. Cotton holds the petal points crisply and hangs straight, so the strands won’t stretch much. The amounts below assume about 120 m per 50 g.
- Cream: 125 g / 300 m (328 yd)
- Buttercup yellow: 175 g / 420 m (459 yd)
- Golden ochre: 60 g / 144 m (157 yd)
All quantities include a margin of about 25–30% for gauge differences, joins and yarn tails.
Tools:
– 4.0 mm (G-6) crochet hook
– Tapestry needle
– Scissors
– 4–6 stitch markers
– Rust-proof pins and a blocking mat
– Spray bottle
– Measuring tape
– Clothespins (used as light weights while the strands dry)
– Curtain rod or tension rod up to 3/4 in (1.9 cm) in diameter
Abbreviations (US Terms)
- ch – chain
- sl st – slip stitch
- sc – single crochet
- hdc – half double crochet
- dc – double crochet
- tr – treble crochet
- sk – skip
- sp(s) – space(s)
- st(s) – stitch(es)
- rep – repeat
Special stitches
- Standing sc: Start with a slip knot on the hook. Insert the hook in the stitch, yarn over, pull up a loop, yarn over and pull through both loops.
- Picot: (sc, ch 3, sc) worked into one stitch or tip.
- In-line leaf: A leaf worked around a short chain that grows straight out of the strand cord. It is explained step by step in the Leaf section below.
Gauge and Checkpoints
- Single crochet: 16 sc and 18 rows = 4 in (10.2 cm)
- Chain cord: 4 ch = 1 in (2.5 cm)
Test one piece first. Make one complete flower, one leaf and a two-fan header swatch before you start the full curtain. For the swatch, ch 26 and work Rows 1–5 of the header with 2 repeats. It should measure 6 1/4 in (15.9 cm) wide.
Checkpoints:
– Flower after Rnd 2: 1 1/4 in (3.2 cm) across
– Flower after Rnd 3: 1 3/4 in (4.4 cm)
– Finished flower: 3 in (7.6 cm) from petal tip to opposite petal tip
– Leaf: 2 1/2 in (6.4 cm) long
– Header after Row 2: 36 1/4 in (92.1 cm) wide and about 3/4 in (1.9 cm) deep
– Header after Row 3: about 2 1/4 in (5.7 cm) deep at the fan centers
– Header after Row 5: 3 1/2 in (8.9 cm) deep at the scallop points
– Strand segment: a ch 12 segment hangs 3 in (7.6 cm)
If your pieces come out too big, go down 0.25–0.5 mm in hook size. If they come out too small, go up by the same amount. Chain tension matters just as much as stitch tension. If 12 ch measures more or less than 3 in, adjust the way you hold the yarn for the cords only.
Pattern
Header (Cream)
The header is worked in rows. The foundation chain becomes the top edge of the curtain, and the fans grow downward.
Row 1: Ch 146. Sc in the 2nd ch from the hook and in each ch across. Turn. (145 sc)
Row 2: Ch 3 (counts as dc). Sk the first st, then dc in each st across. Turn. (145 dc)
Row 3 (fans): Ch 1. Sc in the first st. Sk 5 sts. In the next st work (tr, ch 1) 6 times, then 1 more tr. Sk 5 sts, sc in the next st. Rep from * to * 11 more times. Turn. (13 sc, 84 tr, 72 ch-1 sps; 12 fans)
Each repeat uses 12 sts. 1 sc + (12 × 12) = 145, so the row ends exactly on the last stitch.
Row 4: Ch 1. Sc in the first sc. Ch 1, dc in the next tr, (ch 2, dc in the next tr) 6 times, ch 1, sc in the next sc. Rep from * to * 11 more times. Turn. (13 sc, 84 dc, 72 ch-2 sps, 24 ch-1 sps)
Row 5 (scallop edge): Ch 1. Sc in the first sc. Sk the ch-1 sp. Work 3 sc in each of the next 3 ch-2 sps, then (sc, ch 3, sc) in the next dc, which is the 4th dc of the fan. Work 3 sc in each of the next 3 ch-2 sps, sk the ch-1 sp, and sc in the next sc. Rep from * to * 11 more times. Fasten off. (253 sc: 13 valley sc + 12 × 20 sc per fan; 12 picots)
The 12 picots sit at the scallop points and will hold the flower strands. The 13 valley sc (including the sc at each end) will hold the leaf strands.
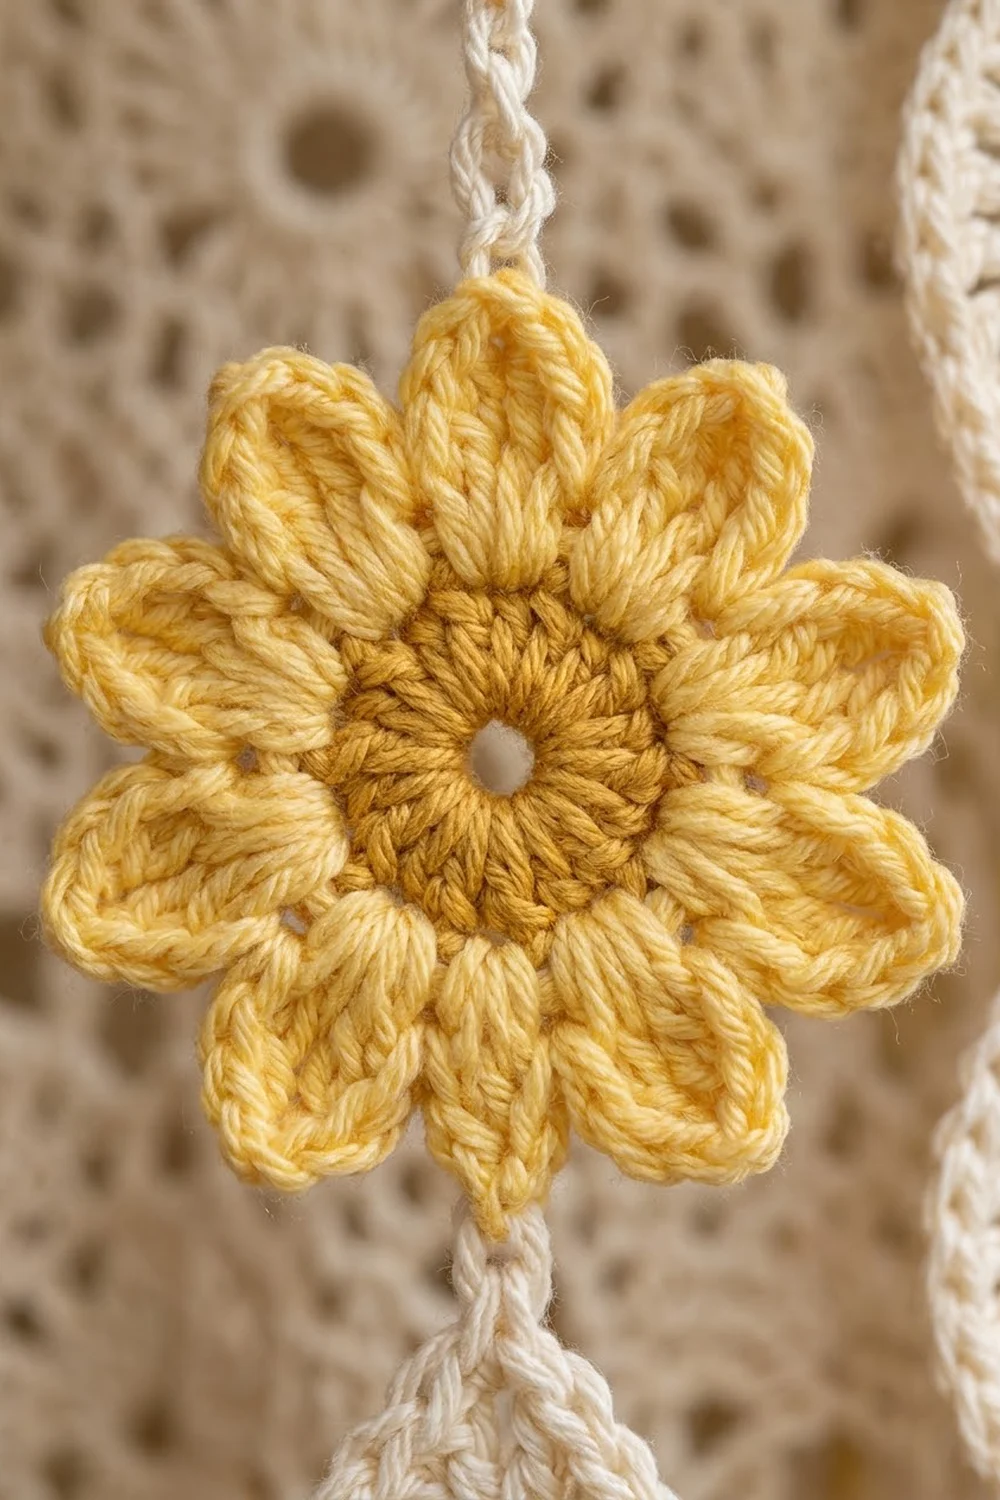
Flower (make 60)
Rnd 1 (golden ochre): Make a magic ring. Ch 1 and work 10 sc in the ring. Pull the ring closed, leaving a tiny hole, and sl st to the first sc. (10 sc)
Rnd 2: Ch 3 (counts as dc), dc in the same st, then work 2 dc in each remaining st. Sl st to the top of the ch-3 and fasten off. (20 dc)
Rnd 3 (yellow): Join yellow with a standing sc in any st, then work 2 sc in the next st. Sc in the next st, 2 sc in the next st. Rep from * to * 8 more times and sl st to the first sc. (30 sc)
Rnd 4 (petals): Sc in the next st. In the next st work (dc, tr, ch 2, tr, dc). Sc in the next st. Rep from * to * 9 more times and sl st to the first sc. Fasten off. (10 petals; 20 sc, 20 dc, 20 tr, 10 ch-2 tips)
Each petal uses 3 sts, and 10 × 3 = 30. The ch-2 at each tip gives the petal its sharp point. Weave in the ends on the back.
Leaf (worked in-line on the cord, cream)
You never make a leaf on its own. Each leaf is worked when the strand instructions tell you to. The spine chain hangs straight down from the cord, and you number its chains from the top: T1 is the first chain you make, closest to the cord, and T11 is the last chain, at the tip.
Spine: Ch 11.
Side A (working up the spine): Sc in the 2nd ch from the hook (T10), hdc in T9, dc in T8. Ch 1, sk T7, tr in T6. Ch 1, sk T5, tr in T4. Dc in T3, hdc in T2, then work 3 sc in T1.
Side B (working down the free loops): Hdc in T2, dc in T3, tr in T4. Ch 1, sk T5, tr in T6. Ch 1, sk T7, dc in T8, hdc in T9, sc in T10.
Tip: Work a picot (sc, ch 3, sc) in T11. (19 sts, 4 ch-1 eyelets, 1 tip picot)
The two sides mirror each other, so the leaf comes out almond-shaped. The 4 ch-1 spaces form the eyelet line down the center. Your hook ends at the tip, ready to keep chaining down the cord.
Make All Pieces
- Golden ochre: 60 flower centers (Rnds 1–2)
- Yellow: 60 petal rounds (Rnds 3–4)
- Cream:
- 1 header
- 12 flower strands, each with 5 flowers and 1 leaf (12 leaves in total)
- 13 leaf strands, each with 6 leaves (78 leaves in total)
In total you will make 60 flowers and 90 leaves.
Strand layout, left to right (L = leaf strand, F = flower strand):
STRANDS 1–9:   L F L F L F L F L
STRANDS 10–18: F L F L F L F L F
STRANDS 19–25: L F L F L F L
That gives 13 leaf strands and 12 flower strands, 25 in total.
Joining (Building the Strands)
Method: You join each strand with a sl st and then chain it continuously down from the header. Flowers are attached with sl sts as the cord passes behind them, and leaves are worked directly onto the cord. Each strand has only two ends to weave in.
Stitch-to-stitch logic:
– The picots sit above header sts 7, 19, 31 and so on, up to st 139.
– The valleys sit above sts 1, 13, 25 and so on, up to st 145.
– Neighboring anchors are 6 sts apart, which is 1 1/2 in (3.8 cm).
– Flowers on neighboring flower strands are 12 sts (3 in) apart, so their petal tips just meet.
– Each leaf on a leaf strand sits in the 3 in gap between two flowers, so leaves and flowers never overlap.
Flower strand (make 12):
1. Join cream with a sl st in a scallop picot.
2. Ch 12. With the flower facing you, insert the hook from front to back through the ch-2 tip of any petal and sl st. Ch 6 behind the flower, then sl st through the back loop of a Rnd 1 sc at the center. Ch 6 and sl st through the ch-2 tip of the opposite petal, which is 5 petals away. Rep from * to * 4 more times.
3. Ch 12 and work 1 in-line leaf. Fasten off.
Each strand hangs 35 1/2 in (90.2 cm) below the scallop points: 6 segments × 3 in + 5 flowers × 3 in + 2 1/2 in for the leaf.
Leaf strand (make 13):
1. Join cream with a sl st in a valley sc.
2. Ch 9 and work 1 in-line leaf.
3. Ch 14 and work 1 in-line leaf. Rep from * to * 4 more times, for 6 leaves in total. Fasten off.
The valleys sit about 2 in (5.1 cm) above the scallop points. The ch 9 lowers leaf 1 so that its top sits about 1/4 in (0.6 cm) below the point line. Each ch 14 segment is 3 1/2 in (8.9 cm). The strand ends 32 3/4 in (83.2 cm) below the points, which leaves a gentle zigzag along the hem. If your valley depth is different, add or remove chains in the first segment only.
Tension advice: Chain at an even, relaxed tension. Tight chains shorten the strands and make them twist.
Size checkpoint: After you have built the first 3 strands, hang the header and measure. A flower strand should reach 35 1/2 in (90.2 cm) below the points, and the header should still be 36 1/4 in (92.1 cm) wide.
Border (Top Edge with Rod Loops)
The border uses the same gauge as the header: 16 sc = 4 in (10.2 cm). It is worked only along the top, in the free loops of the foundation chain. The hem is left open.
Row B1: With the right side facing, join cream in the first free loop. Ch 1 and work 1 sc in each foundation loop across. Turn. (145 sc)
Row B2: Ch 1 and sc in the first 4 sts. Ch 8, sk 5 sts, sc in the next 7 sts. Rep from * to * 10 more times. Ch 8, sk 5, and sc in the last 4 sts. Turn. (85 sc, 12 ch-8 loops)
Row B3: Ch 1. Work 1 sc in each sc and 10 sc in each ch-8 loop. Do not turn. (85 sc worked 1-per-stitch + 120 sc worked into the loops = 205 sc)
Short ends: Work sc evenly down each end, over the row ends of B3, B2, B1, Row 1 and Row 2: 1 sc for each sc row and 2 sc for the dc row. (6 sc on each end) Fasten off.
Why the math works:
– Row B2 covers all 145 sts: 4 + 11 × (5 + 7) + 5 + 4 = 145.
– Each loop centers over a skipped st 7 + 12n, which is the same stitch line as a fan center. This keeps the curtain balanced on the rod.
– Row B3 adds height but no width, because its extra stitches go into the loops.
– Packing 10 sc into each 8-ch loop arches it into an opening that fits a rod up to 3/4 in (1.9 cm). The loops plus Row B1 add the 1 in (2.5 cm) border depth.
Final Blocking
- Weave in all ends, then mist the whole curtain until it is damp but not dripping.
- Lay the header on a mat with the right side up. Pin it to 36 1/4 × 3 1/2 in (92.1 × 8.9 cm).
- Pin each of the 12 scallop points straight down, so they all sit on one level line.
- Pin each flower to 3 in (7.6 cm), with a pin through every petal tip.
- Pin each leaf flat to 2 1/2 in (6.4 cm), with a pin through the tip picot.
- Let it dry about halfway. Then hang it on the rod and clip a clothespin to the bottom of each strand so it dries straight.
- Let it dry completely before you remove the clothespins.
Final Quality-Control Checklist
- The header measures 36 1/4 in (92.1 cm) wide, with 12 even scallops.
- There are 253 sc in Row 5 and 205 sc in Row B3.
- Each of the 25 strands is attached at the correct anchor, following the layout grid.
- Every flower has 10 pointed petals and lies flat.
- Each flower strand reaches 35 1/2 in (90.2 cm) and each leaf strand reaches 32 3/4 in (83.2 cm) below the scallop points.
- No flower edge overlaps a leaf.
- The 12 rod loops are even and open.
- All ends are woven in and invisible from the front.
Troubleshooting
- The header ruffles: Your Row 3 fans are too loose. Work Rows 3–5 with a hook one size smaller.
- The scallops cup upward: Loosen the 3-sc groups in Row 5 or block more firmly.
- The flowers ruffle: Your Rnd 3 is too tight. Check that it measures 1 3/4 in (4.4 cm) before you start the petals.
- The petals are rounded: Make sure each ch-2 tip is a full chain, and pin through the tips when blocking.
- The strands twist: Your chains are uneven. Hang-block with clothespins, or remake the strand at a looser tension.
- The flowers flip forward: Check the sl st at the center back. It must go through a Rnd 1 stitch.
- The strand lengths vary: Count the segment chains again, and recheck your chain gauge of 12 ch = 3 in.
Care
Hand wash in cool water with a mild soap and gently squeeze out the water. Re-hang the curtain while damp, with clothespins on the strands, so it dries straight.
Final Notes
Every measurement builds on the one before it:
- 16 sc = 4 in sets the header width at 145 sts = 36 1/4 in (92.1 cm).
- The 12-st fan repeat gives 12 scallops, with anchors spaced 1 1/2 in (3.8 cm) apart.
- The 3 in (7.6 cm) flowers and 3 in segments repeat every 6 in down each flower strand.
- The 2 1/2 in (6.4 cm) leaves fit into the 3 in gaps between flowers.
- The 1 in (2.5 cm) border with rod loops brings the full length to 40 in (101.6 cm).
To make the curtain longer, add one (ch 12, flower) unit to each flower strand, which adds 6 in (15.2 cm). Then add one (ch 14, leaf) unit to each leaf strand. Because the leaf unit is about 6 in (15.2 cm) long, the leaves will still sit between the flowers.
Happy crocheting!