

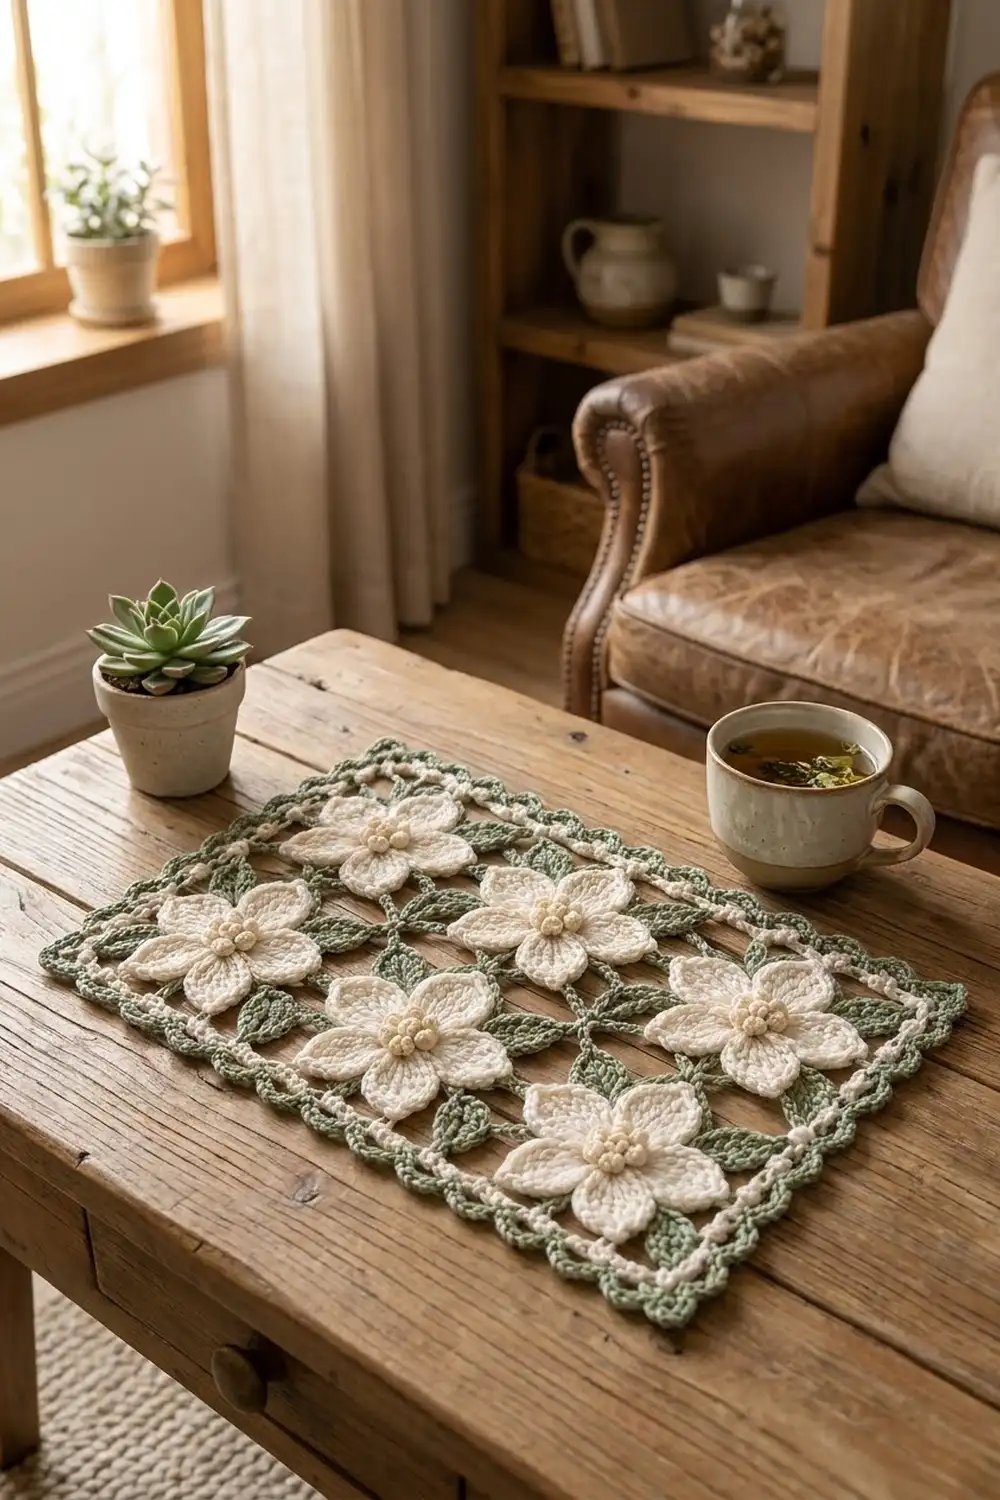
The Sage Jasmine Lattice Mat is a small rectangular lace mat. It has a sage green chain-mesh base with six raised cream flowers on top, set in two rows of three. Little green leaves fill the gaps, and a cream line and a green scalloped edge frame the piece.
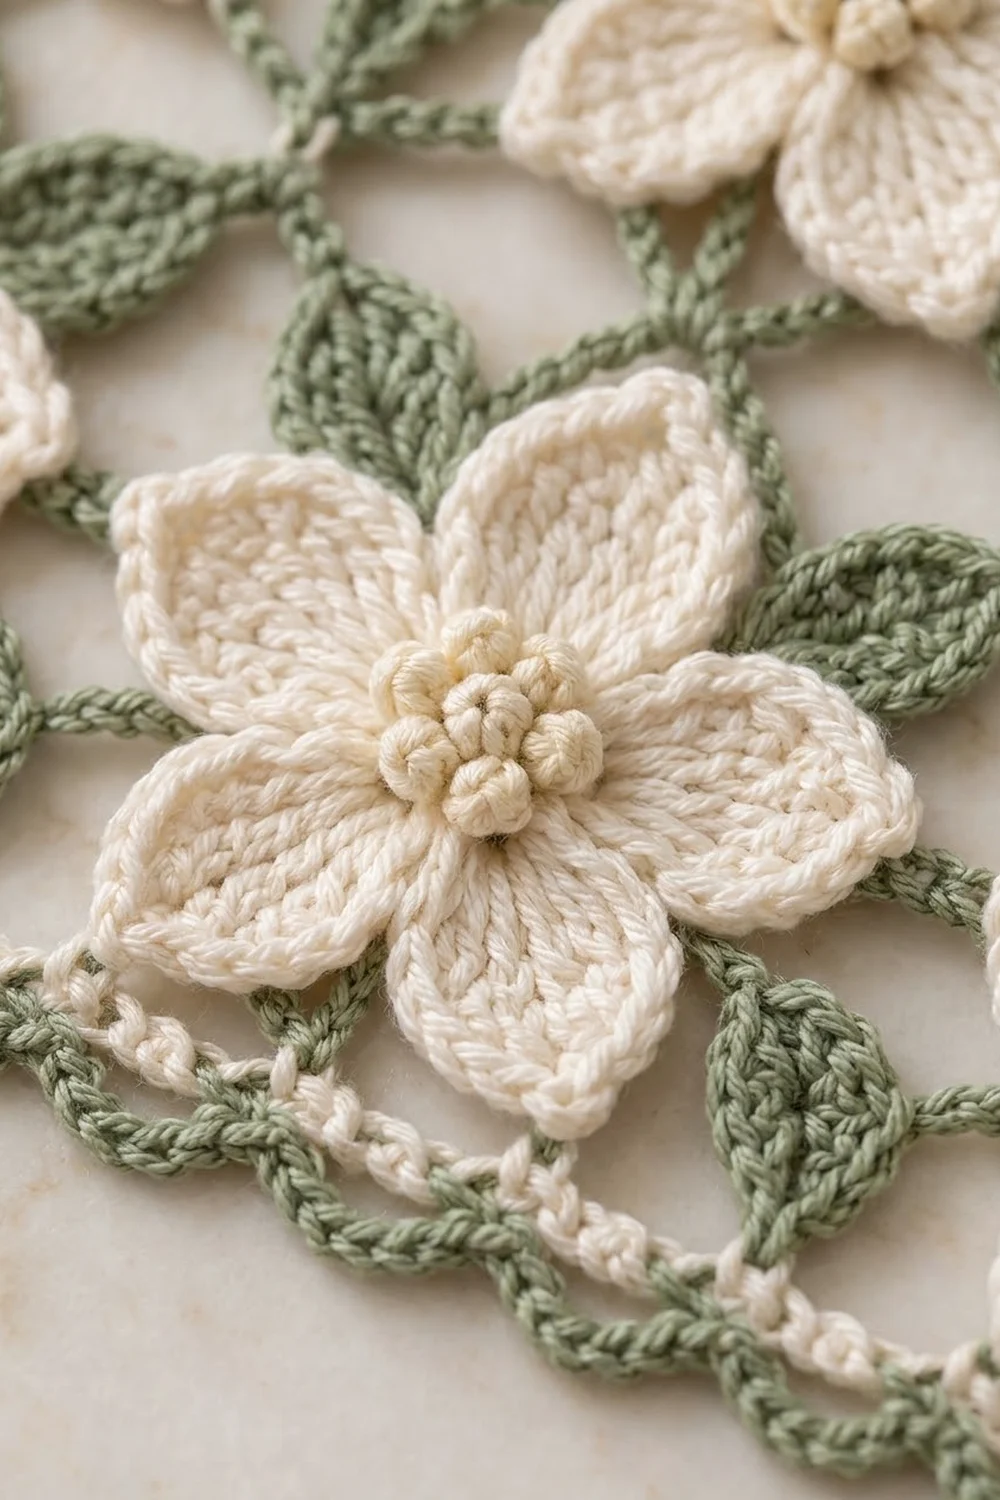
The colors are soft: sage green, warm cream, and pale ivory for the beaded flower centers. Each flower has five pointed, outlined petals. The style is vintage and works well on a dresser, a tea tray, or a side table.
This pattern uses US crochet terms. After blocking, the mat measures 11 x 7.5 in (27.9 x 19.1 cm).
You crochet the green mesh first and add a four-round border. Then you make six flowers, six centers, and sixteen leaves, and sew them onto the mesh. The result is one finished mat, with no blocks to join.
Finished Size and Construction
- Finished size: 11 x 7.5 in (27.9 x 19.1 cm)
- Skill level: Intermediate
- Terminology: US crochet terms
- Yarn weight: DK / light worsted (#3) cotton
- Hook: 3.5 mm (E-4)
- Number of pieces: 1 mat. You work the mesh and border as one piece, then sew on small flowers, centers, and leaves.
- Layout: 6 flowers in 2 rows of 3, with 16 leaves in pairs between them
- Mesh size before border: 9 x 5.5 in (22.9 x 14.0 cm)
- Flower size: 2.25 in (5.7 cm) across
- Leaf size: 1 in (2.5 cm) long
- Border depth: 1 in (2.5 cm) on each side
Materials
Use a smooth mercerized or combed DK cotton. It keeps the petal points and scallops crisp and blocks flat. Fuzzy yarn blurs the open mesh, so avoid it.
- Sage green (Color A): 35 g, about 70 m. Used for the mesh, border Rounds 3–4, and the leaves.
- Cream (Color B): 30 g, about 60 m. Used for the flowers and border Rounds 1–2.
- Pale ivory (Color C): 5 g, about 10 m. Used for the bobble centers.
These amounts assume about 100 m per 50 g. They include a margin of roughly 15% for swatching and sewing tails.
Tools:
- 3.5 mm (E-4) crochet hook
- Tapestry needle
- 4 stitch markers
- Rust-proof pins
- Blocking mat or folded towel
- Spray bottle
- Ruler or tape measure
- Scissors
Abbreviations (US Terms)
- ch – chain
- sl st – slip stitch
- sc – single crochet
- hdc – half double crochet
- dc – double crochet
- tr – treble crochet
- sk – skip
- sp – space
- st(s) – stitch(es)
- RS – right side
Special stitch – 3-dc bobble: Yarn over, insert your hook in the stitch or ring, pull up a loop, yarn over, and pull through 2 loops. Do this 2 more times in the same place, so you have 4 loops on the hook. Yarn over and pull through all 4 loops.
Gauge and Checkpoints
Before you start the mat, make one test flower and a small mesh swatch. For the swatch, ch 18 and work 4 loops across for 8 rows.
- Mesh gauge: 4 ch-5 loops = 4 in (10.2 cm) wide, and 8 rows = 4 in (10.2 cm) tall. That works out to 1 loop per inch and 2 rows per inch.
- Flower: 2.25 in (5.7 cm) across after Round 4.
- Leaf: 1 in (2.5 cm) long.
- Border gauge: 4 sc = 1 in (2.5 cm).
Stage checkpoints:
- Mesh after Row 11: 9 x 5.5 in (22.9 x 14.0 cm), measured with the mesh lightly stretched.
- After border Round 2: 10 x 6.5 in (25.4 x 16.5 cm).
- After border Round 4: 11 x 7.5 in (27.9 x 19.1 cm).
If your swatch is too big, switch to a 3.25 mm hook. If it is too small, switch to 3.75 mm. Mesh opens up when you block it, so measure it lightly stretched, not pulled tight.
Mesh Base (Color A)
This is a classic ch-5 net. Odd rows have 9 full loops. Even rows have 8 full loops plus a half loop at each end, which keeps the side edges straight.
Foundation: With A, ch 38.
Row 1 (RS): Sc in 2nd ch from hook, *ch 5, sk 3 ch, sc in next ch; repeat from * across. Turn. (9 ch-5 loops, 10 sc)
Row 2: Ch 5 (counts as dc + ch 2), sc in first ch-5 loop, *ch 5, sc in next ch-5 loop; repeat from * across, ch 2, dc in last sc. Turn. (8 full loops + 2 half loops)
Row 3: Ch 1, sc in first dc, *ch 5, sc in next ch-5 loop; repeat from * across, working the last sc in the 3rd ch of the turning ch. Turn. (9 ch-5 loops, 10 sc)
Rows 4–11: Repeat Rows 2–3 four more times, so you end on Row 11, which has 9 full loops. Fasten off A.
Checkpoint: 9 x 5.5 in (22.9 x 14.0 cm), with the loops forming even diamonds.
Chain math: 9 loops x 4 ch each = 36. Add 1 ch for the first sc and 1 turning ch, and you get 38.
Flowers (Color B) – Make 6
Round 1: Make a magic ring, ch 1, and work 10 sc in the ring. Sl st to first sc and pull the ring closed. (10 sc)
Round 2: Ch 1, sc in first sc, ch 4, sk 1, *sc in next sc, ch 4, sk 1; repeat from * 3 more times. Sl st to first sc. (5 sc, 5 ch-4 loops)
Round 3 (petals): In each ch-4 loop, work (sc, hdc, 2 dc, 2 tr, ch 2, 2 tr, 2 dc, hdc, sc). Sl st to first sc. (5 petals, each with 12 sts and a ch-2 tip; 60 sts total)
Round 4 (outline): Ch 1. On each petal, sc in next 6 sts, work (sc, ch 2, sc) in the ch-2 tip, then sc in next 6 sts. Sl st to first sc. Fasten off and leave a 12 in (30.5 cm) tail for sewing. (14 sc per petal; 70 sc total + 5 ch-2 tips)
Each petal gets 1 sc in each of its 12 stitches plus 2 sc at the tip, so 12 + 2 = 14. The ch-2 tip in both rounds gives the petals their sharp points, and the outline gives them a raised edge.
Checkpoint: 2.25 in (5.7 cm) across.
Flower Centers (Color C) – Make 6
Round 1: Make a magic ring, ch 1, *sc in ring, 3-dc bobble in ring; repeat from * 5 more times. Sl st to first sc. (6 sc + 6 bobbles = 12 sts)
Pull the ring very tight so the bobbles crowd together and pop forward. Fasten off and leave an 8 in (20.3 cm) tail. Use the tail to make one French knot in the middle. This gives you 7 bead-like bumps.
Sew one center over Round 1 of each flower, stitching through the sc between the bobbles.
Leaves (Color A) – Make 16
Foundation: Ch 7.
Round 1: Sc in 2nd ch from hook, hdc in next ch, dc in next 2 ch, hdc in next ch, then work (sc, ch 2, sc) in the last ch for the tip. Now work along the other side of the chain: hdc in next ch, dc in next 2 ch, hdc in next ch, sc in last ch. Sl st to first sc. Fasten off and leave an 8 in (20.3 cm) tail. (12 sts + 1 ch-2 tip)
Checkpoint: 1 in (2.5 cm) long.
Border
Work the border before you sew anything on, because a flat frame is easier to measure.
Border gauge: 4 sc = 1 in (2.5 cm). In this border, “per side” means the stitches between two corner spaces. The corner spaces are counted on their own.
Round 1 (Color B): With RS facing, join B with a sl st in the first ch-5 loop of Row 11. Ch 1.
- Top: 4 sc in each of the 9 loops (36 sc), then ch 2 for the corner.
- Side: 2 sc in each of the 11 row-ends (22 sc), then ch 2.
- Bottom: working around the foundation chain, 4 sc in each of the 9 groups of skipped ch (36 sc), then ch 2.
- Side: 2 sc in each row-end (22 sc), then ch 2.
Sl st to first sc. (116 sc + 4 corner ch-2 sps)
Round 2 (Color B): Ch 1. Working in back loops only, sc in each sc along the sides, and work (sc, ch 2, sc) in each corner sp. Sl st to first sc. Fasten off B.
- Top and bottom: 1 + 36 + 1 = 38 sc each
- Short sides: 1 + 22 + 1 = 24 sc each
- Total: 124 sc + 4 corner ch-2 sps
Working in back loops leaves a raised cream ridge around the mesh.
Checkpoint: 10 x 6.5 in (25.4 x 16.5 cm).
Round 3 (Color A): Join A with a sl st in any corner ch-2 sp. Ch 1 and sc in the same sp. Along each side, *ch 3, sk 1 sc, sc in next sc; repeat from * across the side. That is 19 times on the top and bottom and 12 times on each short side. Then ch 3 and sc in the next corner sp. On the last corner, ch 3 and sl st to the first sc instead.
- Top and bottom: 19 + 1 = 20 loops each
- Short sides: 12 + 1 = 13 loops each
- Total: 66 ch-3 loops and 66 sc, including the 4 corner sc
Round 4 (Color A): Ch 1 and work (sc, ch 3, sc) in the corner sc. *In each ch-3 loop along the side, work (sc, hdc, dc, hdc, sc). At the next corner sc, work (sc, ch 3, sc). Repeat from * around, skipping the last corner because you already worked it. Sl st to first sc and fasten off.
- Top and bottom: 20 scallops (100 sts) each
- Short sides: 13 scallops (65 sts) each
- Total: 66 scallops (330 sts) + 8 corner sc + 4 ch-3 corner points
Checkpoint: 11 x 7.5 in (27.9 x 19.1 cm).
Why the math works: Each mesh loop is 1 in wide and each row is 0.5 in (1.3 cm) tall. So 4 sc per loop and 2 sc per row-end both match the gauge of 4 sc = 1 in. Round 2 adds exactly 2 corner sc to each side, which gives even counts of 38 and 24. Round 3 uses every other sc, so 38 sc make 19 loops and 24 sc make 12. The corner loop adds 1 more on each side, for 20 and 13. Round 4 puts exactly 1 scallop in each loop, so the edge doesn’t ruffle or pull.
Attaching the Flowers and Leaves
Lay the mat flat with the RS up. Count loops from the left edge and rows from the bottom.
- Bottom flower row: center a flower over loops 2, 5, and 8 on Row 3.
- Top flower row: center a flower over loops 2, 5, and 8 on Row 9.
The flowers end up 3 in (7.6 cm) apart from center to center, with 0.75 in (1.9 cm) of open mesh between neighbors. Pin each flower in place. Using the cream tail, sew from the back. Tack down the base and the tip of each petal with small, slightly loose stitches so the mesh doesn’t pucker.
Sew the leaves on in V-shaped pairs, with the tips pointing away from each other. Place 1 pair at each of these 8 points:
- On Row 1, at the sc between loops 3–4 and between loops 6–7
- On Row 11, at the same 2 positions
- On Row 6, at the same 2 positions
- On Row 6, at the left edge and the right edge, just inside the border
Sew each leaf at its stem end, then tack the tip down with 1 stitch.
Final Blocking
- Weave in all ends through stitches of the same color.
- Spray the mat until it is damp all the way through but not dripping.
- Lay it on the blocking mat with the RS up.
- Pin the 4 corners to 11 x 7.5 in (27.9 x 19.1 cm).
- Pin the middle of each side, then pin every scallop.
- Nudge the mesh loops into even diamonds.
- Shape each petal tip and leaf tip with your fingers.
- Let it dry for at least 12 hours before you unpin it.
Final Quality-Control Checklist
- The mat measures 11 x 7.5 in (27.9 x 19.1 cm).
- The mesh has 9 loops across and 11 rows.
- Border Round 1 has 116 sc, and Round 2 has 124 sc.
- Round 3 has 66 loops: 20 on the top and bottom and 13 on each side.
- Round 4 has 66 scallops and 4 pointed corners.
- Each flower has 5 pointed petals and a 70-sc outline.
- Each center shows 7 ivory bumps.
- All 16 leaves sit in 8 V-shaped pairs.
- The mat lies flat and no ends show on the front.
Troubleshooting
Mesh edges slant. Every even row should start with ch 5 and end with ch 2, dc. If a half loop is missing, the sides will lean.
Border ruffles. You have too many stitches. Work exactly 4 sc per loop and 2 sc per row-end.
Border cups. Your sc are too tight. Use a hook half a size larger for Rounds 1–2.
Petals look round. Make sure you worked the ch-2 tip in both Round 3 and Round 4, and pin the tips when blocking.
Center looks flat. Pull the magic ring tighter and push each bobble to the front before sewing.
Mesh puckers under a flower. Your tacking stitches are too tight. Loosen them, then re-block.
Care
Hand wash in cool water with mild soap, roll the mat in a towel to press out the water, and dry it flat. If the scallops lose their shape, pin them again while the mat is damp.
Final Notes
Here is how the measurements build up. The mesh is 9 loops x 11 rows, or 9 x 5.5 in (22.9 x 14.0 cm). Border Rounds 1–2 bring it to 10 x 6.5 in (25.4 x 16.5 cm). Rounds 3–4 bring it to the finished size of 11 x 7.5 in (27.9 x 19.1 cm).
Each 2.25 in (5.7 cm) flower sits in a 3 in (7.6 cm) cell, and each leaf is 1 in (2.5 cm) long. If you check your gauge on the mesh, the test flower, and the border, every piece will fall into place.
Happy crocheting!