

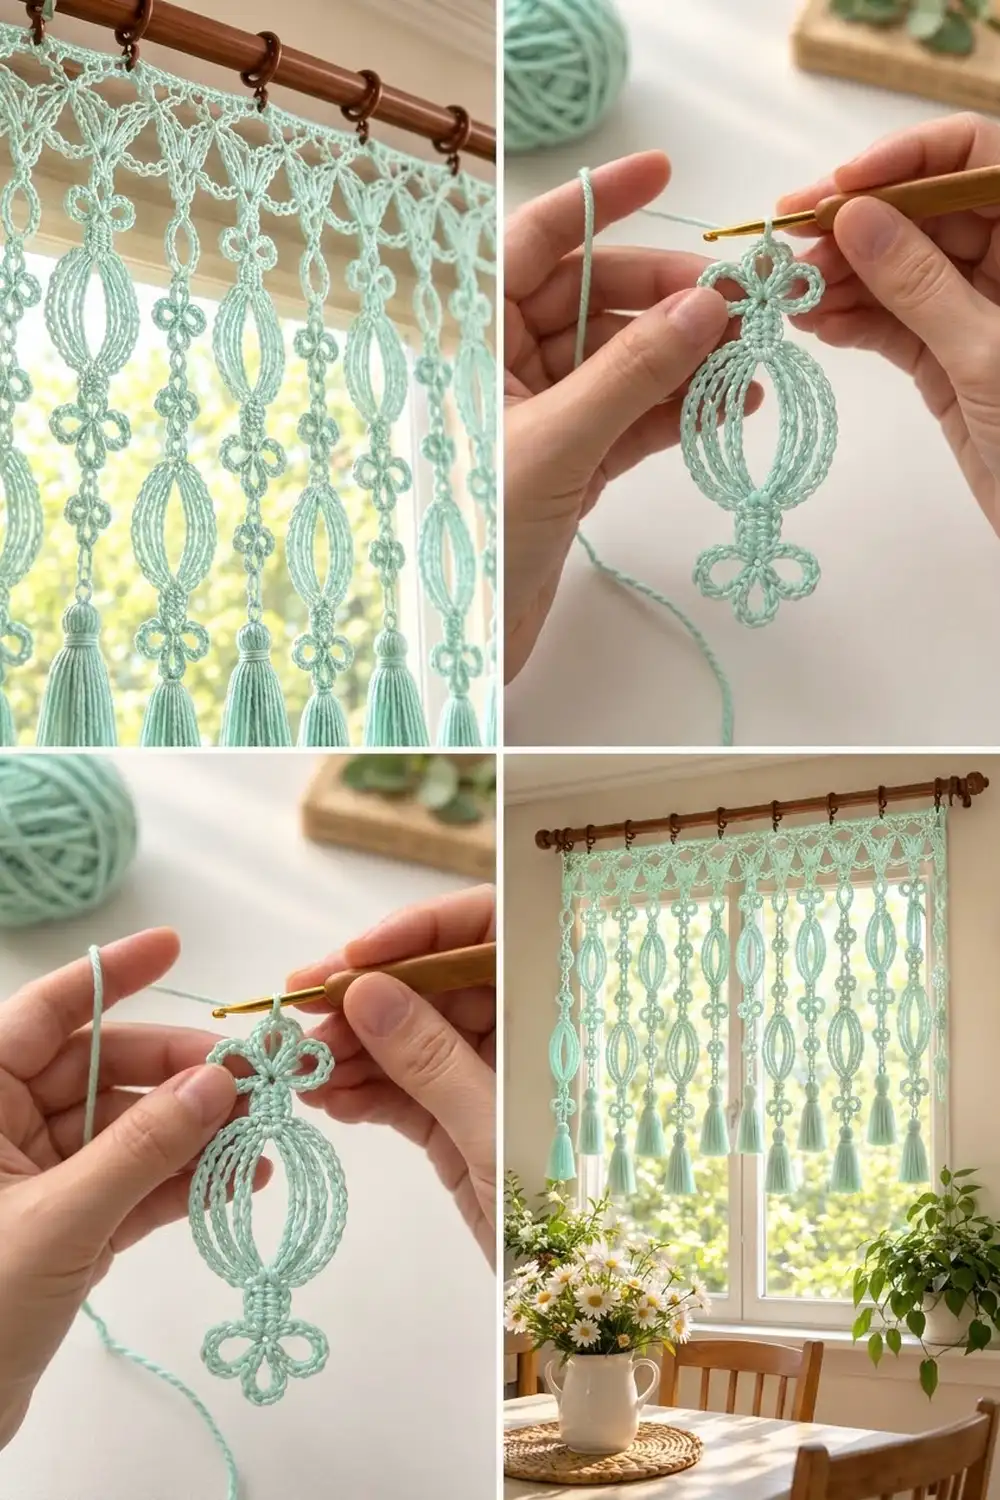
The Mint Lantern Curtain is a light, airy valance made from a lacy header band and eleven hanging strands. Six strands carry two oval “lantern” motifs each. The other five carry a row of small four-petal clovers, and every strand finishes with a soft tassel.
It is worked in one soft mint cotton, so the texture does the work: rope-like single crochet arcs, crisp trefoils and a shell-and-arch header. Sunlight through the open cages gives it a fresh cottage look.
This pattern uses US crochet terms. The finished curtain is 29.6 in (75.2 cm) wide. Lantern strands hang 25.75 in (65.4 cm) from the top edge and clover strands hang 26.5 in (67.3 cm), which gives a gently staggered hem.
The curtain is built in modules. First you make the lantern halves and clovers. Then you build each lantern cage between two halves, crochet the header band, and link everything together with counted chains. The tassels go on last.
Finished Size and Construction
- Finished size: 29.6 in (75.2 cm) wide x up to 26.5 in (67.3 cm) long
- Skill level: Intermediate
- Terminology: US
- Yarn weight: DK (#3) cotton
- Hook: 3.5 mm (E-4)
- Number of pieces: 1 header band, 12 lanterns (24 lantern halves), 36 clovers, 11 tassels
- Layout: 11 strands alternating lantern and clover, starting and ending with lantern
- Strand spacing: 2.8 in (7.1 cm), center to center
- Lantern motif: 6.75 in (17.1 cm) tall x 2.25 in (5.7 cm) wide
- Clover motif: 1.25 in (3.2 cm) across
- Strand length below the header, tassel included: 23.75 in (60.3 cm) for lantern strands, 24.5 in (62.2 cm) for clover strands
- Header depth: 2 in (5.1 cm)
Materials
Choose a smooth, mercerized or combed DK cotton. Cotton holds the arcs open and keeps the trefoils crisp. Acrylic looks softer and droops more.
- Mint green: about 150 g, approximately 360 yd (329.2 m)
This amount includes a margin of roughly 15% for gauge testing, tassel trimming and weaving in ends.
Tools
- 3.5 mm (E-4) crochet hook
- Tapestry needle and scissors
- Stitch markers
- Stiff card, 4 in (10.2 cm) tall, for tassels
- Rust-proof pins and a blocking board
- Spray starch (optional)
- 11 curtain clip rings and a rod
Abbreviations (US Terms)
- ch – chain
- sl st – slip stitch
- sc – single crochet
- dc – double crochet
- fsc – foundation single crochet
- sk – skip
- sp – space
- st(s) – stitch(es)
Special stitch – Shell: (3 dc, ch 3, 3 dc) all in the same space.
Working “over” a chain: Insert the hook under the whole chain (into the chain space), not into individual chains. This covers the chain completely and makes the rope-like arcs.
Gauge and Checkpoints
- Fabric gauge: 20 sc and 22 rows = 4 in (10.2 cm)
- Chain gauge: 5 ch = 1 in (2.5 cm)
Make one complete lantern before anything else. It uses every technique in the main motif and gives you three checkpoints:
- Trefoil: 1.25 in (3.2 cm) across.
- Stem: 4 rows of 4 sc = 0.8 in (2.0 cm) wide x 0.75 in (1.9 cm) tall.
- Finished lantern: 6.75 in (17.1 cm) tall x 2.25 in (5.7 cm) wide.
Then make one clover and check that it measures 1.25 in (3.2 cm) across.
If your motifs come out too big, go down to a 3.25 mm hook. If they are too small, go up to 3.75 mm (F-5). Chain gauge matters most for the header and the links. If 10 ch measures more than 2 in (5.1 cm), tighten your chains rather than working fewer of them.
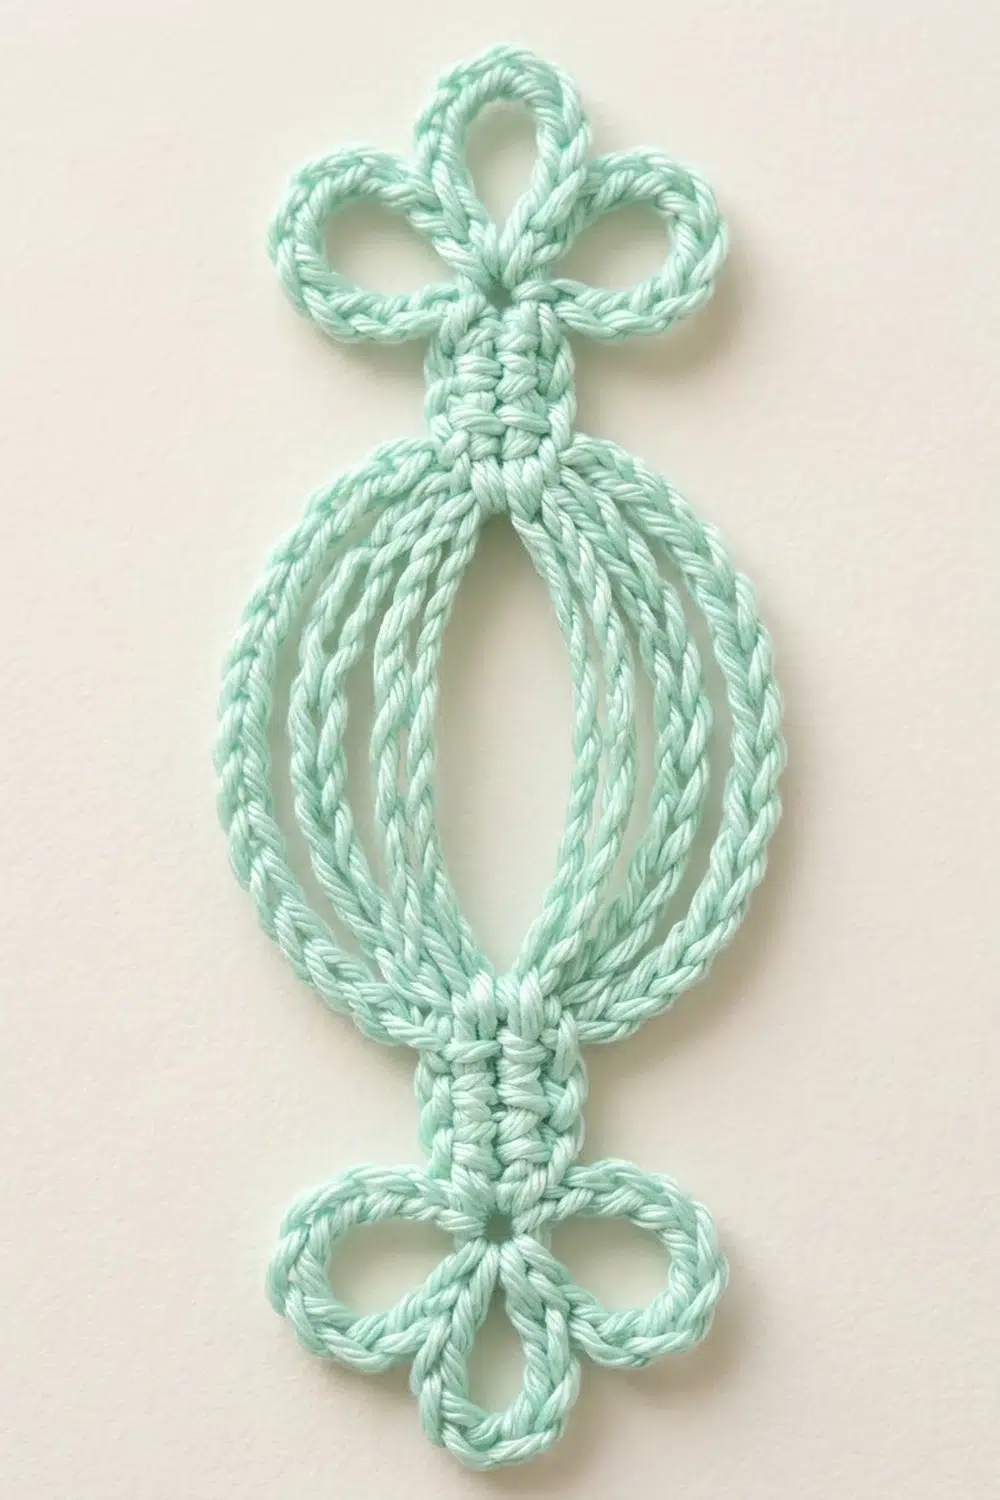
Lantern Half (make 24)
Each lantern is made from two identical halves, each a trefoil with a short stem. Call them Half A (top) and Half B (bottom).
Trefoil
Ch 4, sl st in first ch to form a ring.
Petal loops: [Ch 8, sl st in ring] 3 times. Keep all three loops on the upper half of the ring so the lower half stays open.
Covering: Sl st into first ch-8 loop. 11 sc over loop, sl st in ring. [11 sc over next ch-8 loop, sl st in ring] twice. (33 sc)
The middle loop is the tip petal. Place a marker in its 6th (center) sc. This is the link point.
Stem
Row 1: Ch 1, 4 sc in the open lower half of the ring, turn. (4 sc)
Rows 2–4: Ch 1, sc in each st across, turn. (4 sc)
Don’t turn after Row 4. On Half A, keep the loop live. On Half B, fasten off and weave in the end.
Checkpoint: Each half measures about 2 in (5.1 cm) from petal tip to the end of the stem.
Lantern Cage (make 12)
Lay Half B below Half A with its trefoil pointing down, so the Row 4 edges of the two stems face each other about 2.75 in (7.0 cm) apart. Continue with the live loop of Half A. It sits at one end of Row 4; call that the left edge.
Left arcs
Arc 1 (inner): Ch 14, sl st in end of Row 4 of Half B. Work 14 sc over the ch-14, sl st in end of Row 4 of Half A, sl st in end of Row 3 of Half A.
Arc 2 (middle): Ch 18, sl st in end of Row 3 of Half B. Work 18 sc over the ch-18, sl st in end of Row 3 of Half A, sl st in end of Row 2 of Half A.
Arc 3 (outer): Ch 22, sl st in end of Row 2 of Half B. Work 22 sc over the ch-22, sl st in end of Row 2 of Half A.
Cross over: Sl st in end of Row 3, then in end of Row 4 of Half A. Sl st in each of the 4 sts of Row 4 to reach the right edge.
Right arcs: Repeat Arcs 1–3 on the right edge as a mirror of the left side: Arc 1 from Row 4, Arc 2 from Row 3 and Arc 3 from Row 2, each anchored to the matching row end on Half B. Fasten off.
- Stitch count per cage: (14 + 18 + 22) x 2 = 108 sc.
- Total per lantern: 2 halves x (33 + 16) sc = 98 sc, plus 108 cage sc = 206 sc.
Because the arcs are different lengths, they nest naturally. The inner arc stays close to the center and each longer arc bows further out, which forms the oval cage around an open middle.
Clover (make 36)
Ch 4, sl st in first ch to form a ring.
[Ch 6, sl st in ring] 4 times.
Sl st into first ch-6 loop. [8 sc over loop, sl st in ring] 4 times. (32 sc)
Fasten off. Mark the 4th sc of any petal as the top link point, and the 4th sc of the opposite petal as the bottom link point. The clover measures 1.25 in (3.2 cm) across.
Make All Pieces
Everything is mint, so the counts are per piece type:
- Lantern halves: 24 (for 12 lanterns)
- Clovers: 36 (6 for lantern strands, 30 for clover strands)
- Tassels: 11
- Header band: 1
Layout across the header, left to right (L = lantern strand, C = clover strand):
Shell:  1  3  5  7  9  11 13 15 17 19 21
Strand: L  C  L  C  L  C  L  C  L  C  L
Header Band (Top Border)
The header is worked flat in rows across the full width.
Header gauge: 5 fsc = 1 in (2.5 cm), the same as your sc gauge.
Row 1: Work 148 fsc, turn. (148 sts; 29.6 in / 75.2 cm)
Row 2: Ch 1, sc in first st, [ch 6, sk 6 sts, sc in next st] 21 times, turn. (22 sc, 21 ch-6 sps)
Row 3: Ch 1, sc in first sc, [Shell in next ch-6 sp, sc in next sc] 21 times, turn. (22 sc, 21 shells)
Row 4: Ch 1, sc in first sc, [ch 3, (sc, ch 3, sc) in ch-3 sp of next shell, ch 3, sc in next sc] 21 times. (22 sc, 21 picots, 42 ch-3 sps) Fasten off.
Why the math works: Each Row 2 repeat uses 7 sts (6 skipped + 1 sc), so 21 repeats use 147 sts, and the first sc brings the total to 148.
- Each shell is centered over its arch, so the shells are 7 sts (1.4 in / 3.6 cm) apart.
- Strands hang from every other shell, which puts them 14 sts apart: 14 / 5 = 2.8 in (7.1 cm).
- From Shell 1 to Shell 21 there are 10 gaps x 14 sts = 140 sts, or 28 in (71.1 cm). That leaves about 0.7 in (1.8 cm) of header past each outer strand.
The picots on the even-numbered shells stay free as decoration.
Checkpoint: The header measures 29.6 in (75.2 cm) wide and 2 in (5.1 cm) deep.
Joining the Strands
Every link is a counted chain from one piece to the next. Count the chains instead of measuring them, because a chain stretches easily.
Link method: Join yarn with a sl st in the bottom link point of the upper piece (or in the header picot). Chain the stated number, then sl st in the top link point of the lower piece. Fasten off and weave both ends along the chain.
Lantern strands (Shells 1, 5, 9, 13, 17, 21):
- From the shell’s ch-3 picot, ch 10, sl st in the marked tip sc of Half A of a lantern.
- From the tip sc of Half B, ch 5, sl st in the top point of a clover.
- From the bottom point of the clover, ch 5, sl st in the Half A tip of a second lantern.
- From the Half B tip of the second lantern, ch 5. Fasten off, leaving the last chain as a loop for the tassel.
Length: 2 + 6.75 + 1 + 1.25 + 1 + 6.75 + 1 + 4 (tassel) = 23.75 in (60.3 cm).
Clover strands (Shells 3, 7, 11, 15, 19):
- From the shell’s ch-3 picot, ch 10, sl st in the top point of a clover.
- [From the bottom point of the clover, ch 10, sl st in the top point of the next clover] 5 times. (6 clovers)
- From the bottom point of the last clover, ch 5. Fasten off, leaving a loop for the tassel.
Length: 2 + (6 x 1.25) + (5 x 2) + 1 + 4 (tassel) = 24.5 in (62.2 cm).
Tension: Work the links at the same relaxed tension as your gauge chain. Tight links pull the motifs out of line, and loose links sag and make the strand longer.
Size checkpoint: Hang the header on the rod before adding tassels. The strands should fall straight, 2.8 in (7.1 cm) apart. With tassels on, the lantern strands will end 0.75 in (1.9 cm) higher than the clover strands.
Tassels (make 11)
- Wrap yarn 40 times around the 4 in (10.2 cm) card.
- Slide a 10 in (25.4 cm) tie under the wraps at the top and knot it tightly.
- Cut the wraps along the bottom edge.
- Wrap a separate strand 6 times around the tassel 0.5 in (1.3 cm) below the top to form the neck. Knot it and bury the ends inside.
- Pass the top tie through the final chain loop of a strand, knot it securely, and hide the ends in the tassel head.
- Trim the tassel evenly to 4 in (10.2 cm).
Final Blocking
- Weave in all remaining ends along the chains and sc rows.
- Lay the curtain flat with the header at the top.
- Pin the header to 29.6 in (75.2 cm) x 2 in (5.1 cm), pinning each free picot out to a point.
- Pin each strand straight, at a right angle to the header and 2.8 in (7.1 cm) apart.
- Pin each lantern to 6.75 in (17.1 cm) x 2.25 in (5.7 cm), spacing the arcs evenly so the center stays hollow.
- Pin the trefoil and clover petals open into round shapes.
- Mist with water, or with spray starch for extra crispness.
- Let the curtain dry completely, then unpin it.
- Steam the tassels lightly and comb them straight.
Final Quality-Control Checklist
- Header: 29.6 in (75.2 cm) x 2 in (5.1 cm), with 21 shells
- 11 strands on the odd-numbered shells, in L-C-L order
- Every lantern: 206 sc, with arcs of 14, 18 and 22 sc on each side
- Every clover: 32 sc and four even petals
- Link counts are correct: ch 10 at the header, ch 5 within lantern strands, ch 10 between clovers
- Lantern strands 23.75 in (60.3 cm); clover strands 24.5 in (62.2 cm)
- Tassels trimmed to 4 in (10.2 cm)
- No visible ends
Troubleshooting
Arcs look lumpy or twisted. You may be working into the chains instead of over them. Work under the whole chain and push the sc together evenly.
The lantern cage is lopsided. Check that each arc starts and ends on the same row number on both halves.
The stem is too wide. The 4 sc in the ring are too loose. Work them tightly into the open half of the ring only.
The header ripples. The Row 2 chains are too long. Tighten them, or work ch 5 per arch and keep sk 6.
The header cups. Row 1 is too tight. Work Row 1 only with a hook one size larger.
The strands are different lengths. Recount the links. One missing chain changes the length by 0.2 in (0.5 cm).
Care
Hand wash in cool water with mild soap, roll the curtain in a towel to remove water, and dry it flat with the lanterns pinned back into shape. Starch lightly again if the arcs soften.
Final Notes
The measurements build on each other. A gauge of 20 sc = 4 in (10.2 cm) gives a 2 in (5.1 cm) lantern half and a 6.75 in (17.1 cm) lantern. Five fsc per inch gives a 148-st header that is 29.6 in (75.2 cm) wide, with strands every 2.8 in (7.1 cm). Five chains per inch keeps the links accurate, so the strands finish at 23.75 in (60.3 cm) and 24.5 in (62.2 cm) with their tassels. Check each stage before you move on, and the curtain will hang straight and even.
Happy crocheting!