

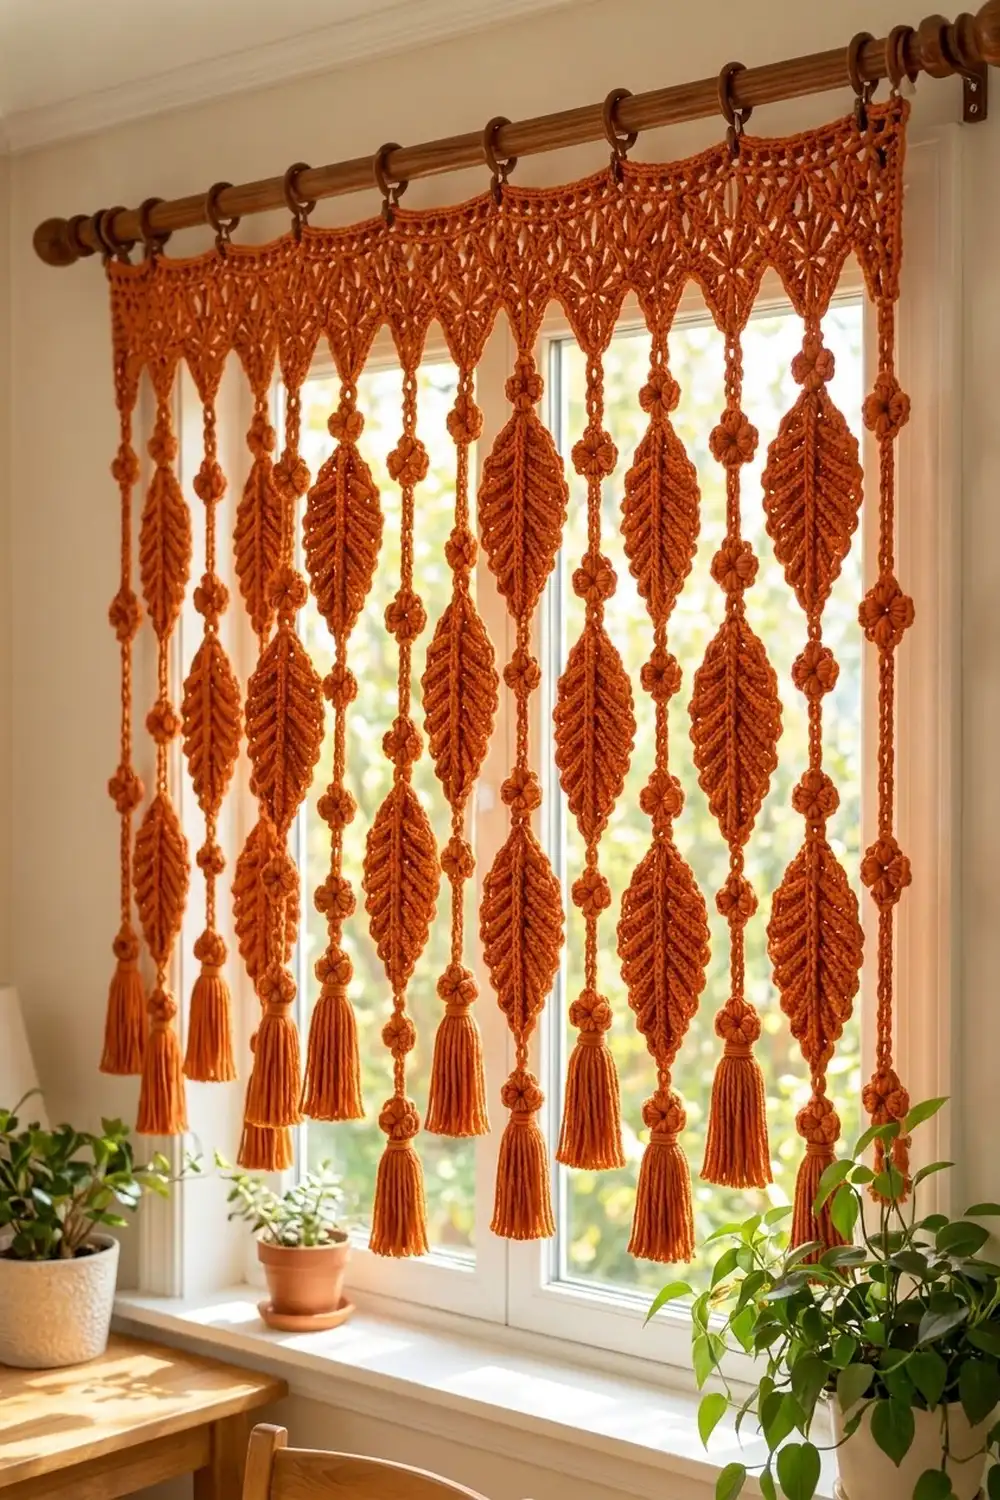
The Ember Leaf Curtain is a warm, rust-colored window curtain built from a lacy pointed header, stacked leaves, small flower-shaped cluster beads and long tassels. In sunlight the leaves look like a cascade of autumn foliage, and the open strands let light pass through.
Everything is worked in one color, a burnt-orange worsted-weight cotton. The leaf texture comes from slanted double crochet columns around a center chain. A slip-stitch spine runs down each leaf, added while the strand is crocheted. The style is boho and seasonal, but it also works year-round.
This pattern uses US crochet terms. The finished curtain is 36 in (91.4 cm) wide and 36.5 in (92.7 cm) long, measured from the top border to the tassel tips.
Construction is simple. You crochet 24 leaves separately, then work the header in rows and finish its lower edge into eight triangular points. Each strand is chained directly from the header. As you go, you add cluster beads and join each leaf by slip stitching down its center. Finally you add a top border with hanging loops and tie on 15 tassels.
Finished Size and Construction
- Finished size: 36 in (91.4 cm) wide x 36.5 in (92.7 cm) long
- Skill level: Intermediate
- Terminology: US crochet terms
- Yarn weight: Worsted (#4), cotton
- Hook: 4.0 mm (G-6)
- Number of pieces: 1 header, 24 leaves, 15 tassels (strands are worked directly onto the header)
- Layout: 8 header points; 15 strands that alternate Leaf Strand (A) and Bead Strand (B)
- Leaf size: 5.5 in (14.0 cm) long x 3 in (7.6 cm) wide
- Header size before border: 36 in (91.4 cm) wide x 4 in (10.2 cm) deep at the points
- Border depth: 0.5 in (1.3 cm), plus hanging loops
Materials
Yarn: Use a smooth, firm worsted cotton or cotton blend. Cotton holds the leaf shape, shows the vein texture clearly and doesn’t stretch much while hanging. Avoid fuzzy acrylic, because the strands will grow longer over time.
- Rust / burnt orange: 450 g, about 855 m (935 yd), based on 100 g = 190 m
Tools:
– 4.0 mm (G-6) crochet hook
– Tapestry needle
– Stiff card 4 in (10.2 cm) tall for tassels
– Scissors and stitch markers
– Rust-proof pins and a blocking mat
– 8 clip-style curtain rings and a curtain rod
These quantities include a margin of about 25%, which covers your gauge swatch, tassel trimming and differences between dye lots. Buy all your yarn from one dye lot.
Abbreviations (US Terms)
- ch – chain
- sl st – slip stitch
- sc – single crochet
- hdc – half double crochet
- dc – double crochet
- dc2tog / dc3tog – double crochet 2 / 3 together
- BLO – back loop only
- sp – space
- st(s) – stitch(es)
- RS – right side
Special stitch – Bead Cluster (BC): Ch 4, sl st in 4th ch from hook to form a small ring. Ch 2, work a 2-dc cluster into the ring (yarn over, insert hook in ring, pull up a loop, yarn over, pull through 2 loops; repeat once more, yarn over, pull through all 3 loops), ch 2, sl st into the ring. Repeat from * to * 3 more times for 4 petals. The working yarn now sits at the ring, ready to keep chaining. One BC measures about 1 in (2.5 cm) across and along the strand.
Surface slip stitch: Hold the working yarn behind the piece. Insert the hook from front to back and pull up a loop, then pull it through the loop on the hook.
Gauge and Checkpoints
Gauge: 16 dc and 8 rows = 4 in (10.2 cm) square. A chain measures about 4 ch per 1 in (2.5 cm).
Make one complete leaf before anything else, and use it as your gauge test:
- After Rnd 1: 4.5 in x 1.25 in (11.4 cm x 3.2 cm)
- After Rnd 2: 5 in x 2.5 in (12.7 cm x 6.4 cm)
- After Rnd 3: 5.5 in x 3 in (14.0 cm x 7.6 cm)
If the leaf is more than 0.25 in (0.6 cm) too large, go down half a hook size. If it’s too small, go up half a size. Check the header after Row 1 as well: it should measure 36 in (91.4 cm) wide, and each 18-stitch section should be 4.5 in (11.4 cm).
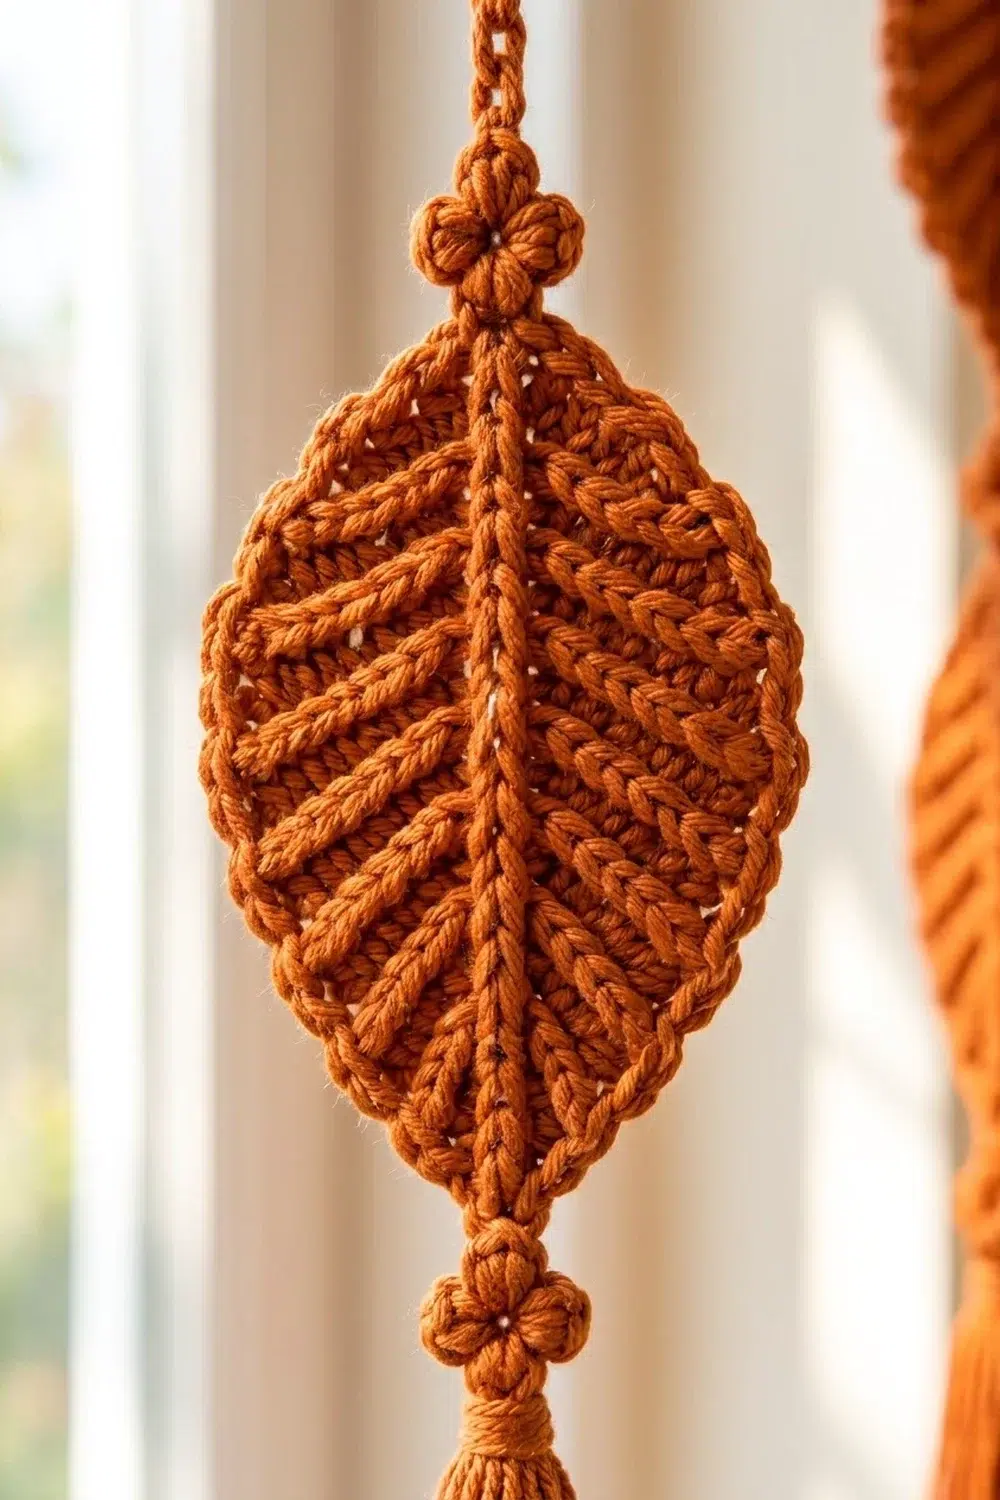
Leaf (Make 24)
The rounds are worked on both sides of a foundation chain and are not turned.
Foundation: Ch 17.
Rnd 1: Sc in 2nd ch from hook, hdc in next ch, dc in next 12 ch, hdc in next ch, 5 sc in last ch (tip). Rotate and work along the opposite side of the foundation: hdc in next ch, dc in next 12 ch, hdc in next ch, 4 sc in last ch (the same ch that holds the first sc). Join with sl st to first sc. (38 sts: 5 stem-end sc, 14 side sts, 5 tip sc, 14 side sts)
Rnd 2 (BLO): Ch 1. Sc in first st. Side: hdc in next st, dc in next 4 sts, 2 dc in each of next 4 sts, dc in next 4 sts, hdc in next st (18 sts). Tip: sc in next st, 2 sc in next st, (sc, ch 2, sc) in next st, 2 sc in next st, sc in next st (8 sc and a ch-2 sp). Second side: work as for the first side (18 sts). Sc in each of last 4 sts. Join. (49 sts and 1 ch-2 sp)
Working in the back loop leaves a front-loop ridge that outlines the inner leaf. The longer dc columns fan out and slant toward the tip, which creates the vein effect.
Rnd 3 (trim round): Ch 1, working through both loops, sc in each st around. Work (sc, ch 2, sc) in the tip ch-2 sp. Join. (49 sc worked 1 per stitch + 2 sc in tip sp = 51 sc, plus a ch-2 tip sp)
Fasten off and weave in the ends. Mark the center sc at the stem end (the 3rd of the 5 stem-end sts); this is where the strand will join.
Header
Foundation: Ch 146.
Row 1 (RS): Dc in 4th ch from hook (the skipped ch count as the first dc) and in each ch across. (144 dc) Checkpoint: 36 in (91.4 cm).
Row 2 (mesh): Ch 3 (counts as dc), turn. Dc in next st, [ch 1, skip next st, dc in next st] 8 times, dc in next st. Repeat from * to * across. The beginning ch-3 takes the place of the first dc of the first repeat. (144 sts: 80 dc and 64 ch-1 sps; 8 sections of 18 sts)
Row 3: Ch 3 (counts as dc), turn. Dc in each dc and each ch-1 sp across. (144 dc)
The header body is now 1.5 in (3.8 cm) deep. Mark every 18th stitch to divide the row into 8 sections.
Points (Make 8)
Each point is worked over one 18-st section.
P1: With RS facing, join yarn in the first st of the section. Ch 2 (does not count), dc3tog over the first 3 sts, [dc in next st, ch 1, skip next st] 6 times, dc3tog over the last 3 sts. (14 sts: 8 dc-type sts and 6 ch-1 sps)
P2: Ch 2, turn. Dc3tog, dc in each of next 8 sts and sps, dc3tog. (10 sts)
P3: Ch 2, turn. Dc3tog, dc in next 4 sts, dc3tog. (6 sts)
P4: Ch 2, turn. Dc3tog twice. (2 sts)
P5: Ch 2, turn. Dc2tog. (1 st: the point tip)
Fasten off. Each point is 4.5 in (11.4 cm) wide at the base and 2.5 in (6.4 cm) deep, so the header measures 4 in (10.2 cm) at the tips. Neighboring points meet at a valley along the edge of Row 3, which leaves 7 interior valleys.
Make All Pieces
All pieces are made in rust:
- 1 header with 8 points
- 24 leaves (3 per Leaf Strand)
- 15 tassels
- 132 Bead Clusters, made as you work the strands (6 per Strand A and 12 per Strand B)
Layout grid (front view):
Header:   [P1]  [P2]  [P3]  [P4]  [P5]  [P6]  [P7]  [P8]
Strands:   A   B  A  B  A  B  A  B  A  B  A  B  A  B  A
Each Strand A hangs from a point tip. Each Strand B hangs from the valley between two points.
Joining: Strands and Leaves
The strands themselves join everything together. The strand yarn joins each leaf at its stem and runs through the leaf as a raised spine.
Strand A (Leaf Strand, make 8): Join yarn with a sl st in a point tip.
- Ch 2, BC, ch 2.
- Sl st into the marked stem-end center sc of a leaf, with the RS of the leaf facing you.
- Work 16 surface sl sts straight down the foundation-chain line to the tip, then sl st in the tip ch-2 sp.
- Ch 2, BC, ch 4, BC, ch 2.
- Repeat Steps 2–4 for Leaf 2.
- Repeat Steps 2–3 for Leaf 3, then ch 2, BC.
- Fasten off, leaving an 8 in (20.3 cm) tail.
Strand A measures 28 in (71.1 cm) from the point tip to the last BC.
Strand B (Bead Strand, make 7): Join yarn with a sl st in an interior valley stitch. Ch 8, BC, then [ch 6, BC] 11 times (12 BCs). Fasten off, leaving an 8 in (20.3 cm) tail. Strand B measures 30.5 in (77.5 cm). Because the valleys sit 2.5 in (6.4 cm) higher than the tips, every strand ends at the same level.
Stitch logic: Each surface sl st matches one foundation chain, which gives 16 sl sts for 16 chains. This keeps the spine the same length as the leaf, so the leaf doesn’t buckle.
Tension: Make the spine sl sts loose enough that the leaf stays flat. Make the strand chains firm and even. Loose chains will stretch under the weight of the leaves.
Size checkpoint: Lay the curtain flat. The last BC on every strand should sit 28 in (71.1 cm) below the point tips, give or take 0.5 in (1.3 cm).
Tassels (Make 15)
Wrap yarn 25 times around the 4 in (10.2 cm) card. Slide a 10 in (25.4 cm) tie under the wraps at the top and knot it tightly. Cut the loops at the bottom. Wrap another strand 6 times around the tassel 0.75 in (1.9 cm) below the top, then knot it and bury the ends. Thread the strand’s tail through the tassel top and tie it securely under the last BC. Trim the tassel to 4 in (10.2 cm). The tassels bring every strand to 32 in (81.3 cm) below the point tips.
Border
Border gauge: 16 sc = 4 in (10.2 cm), the same as the dc gauge, so the top edge stays 36 in (91.4 cm) wide.
Row 1: With RS facing, join yarn in the first free loop of the foundation chain at the top right corner. Ch 1, sc in each foundation ch across. (144 sc)
Row 2: Ch 1, turn. Sc in next 9 sc, ch 8 (hanging loop), sc in next 9 sc. Repeat from * to * 8 times. (144 sc and 8 ch-8 loops) Fasten off.
Why the math works: The header has 144 stitches, which is 8 sections of 18 stitches. Each border section uses exactly 18 sc, with 9 before the loop and 9 after it. This places one loop over the center of each point, directly above each Strand A. No stitches are added at corners, so both rows keep the header width at 36 in (91.4 cm).
Final Blocking
- Weave in all remaining ends, including the tassel ties.
- Lightly mist the header and the leaves with water.
- Pin the header flat at 36 in x 4.5 in (91.4 cm x 11.4 cm), pinning each point tip sharply.
- Pin each leaf to 5.5 in x 3 in (14.0 cm x 7.6 cm), keeping the spine straight and the tip pointed.
- Smooth the BCs so all 4 petals open.
- Steam the tassels lightly and comb the strands straight.
- Let everything dry completely before you hang the curtain.
Final Quality-Control Checklist
- The header is 36 in (91.4 cm) wide with 144 sts in Rows 1, 3 and border Rows 1–2.
- There are 8 points, each 4.5 in (11.4 cm) wide, each ending in a single stitch.
- All 24 leaves are 5.5 in x 3 in (14.0 cm x 7.6 cm) with 51 sc in Rnd 3.
- Each spine has 16 surface sl sts and runs straight from stem to tip.
- Strand A has 6 BCs and Strand B has 12 BCs.
- All tassels are 4 in (10.2 cm) long and line up at 32 in (81.3 cm) below the point tips.
- The 8 hanging loops sit centered above the points.
Troubleshooting
- Leaf cups: Rnd 2 is too tight. Go up half a hook size for that round only.
- Leaf ruffles: Your dc are too loose. Check that each side has 18 stitches, then block it firmly.
- Spine puckers the leaf: Loosen the surface sl sts, or take a slightly deeper bite with each one.
- Strands are uneven: Count the BCs and chains. Re-chain any strand that’s off by more than 0.5 in (1.3 cm).
- Points lean: Work both dc3tog decreases in each point row, not just one.
- Petals collapse: Give each 2-dc cluster a full yarn-over height before you close it.
Care
Hand wash in cool water, then reshape the leaves and dry the curtain flat. Steam it lightly to straighten strands that have hung for a long time.
Final Notes
The measurements build on each other. Each leaf grows from 4.5 in to 5.5 in (11.4 cm to 14.0 cm) long over three rounds. The header is 144 stitches, or 36 in (91.4 cm), split into eight 4.5 in (11.4 cm) points that are 4 in (10.2 cm) deep. The border adds 0.5 in (1.3 cm). The strands hang 28 in (71.1 cm) to the last bead, and the 4 in (10.2 cm) tassels bring the total length to 36.5 in (92.7 cm). If each stage hits its checkpoint, the finished curtain will hang evenly.
Happy crocheting!