

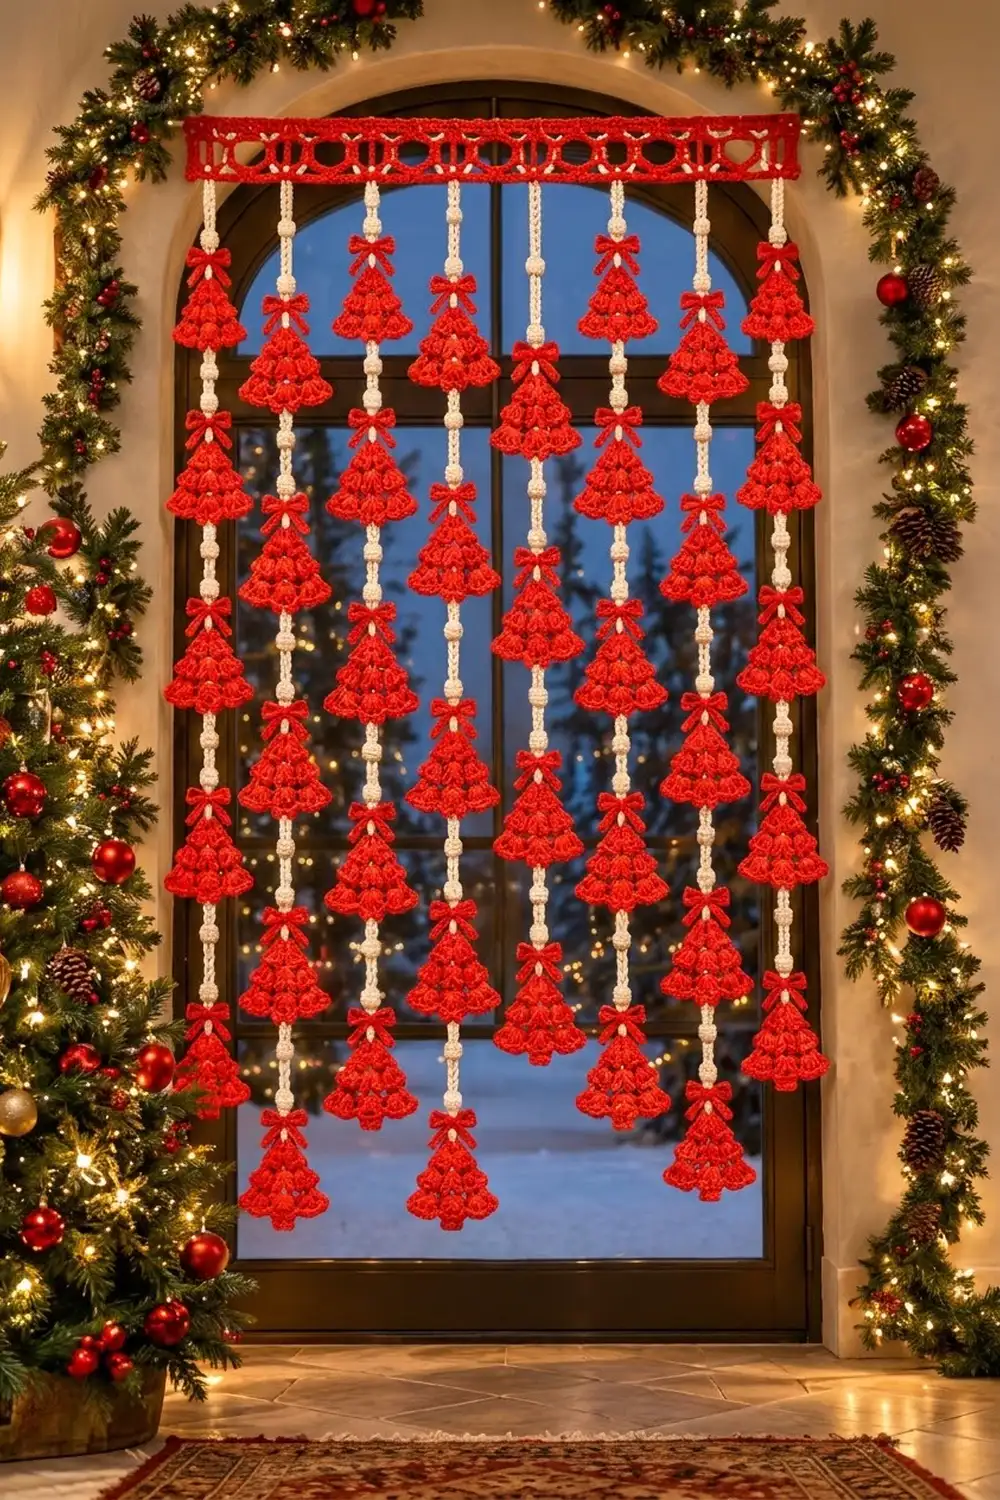
The Ribbon Fir Door Curtain is a festive hanging made of eight beaded cream cords. Bright red puff-stitch Christmas trees climb each cord, and every tree has a small red bow at its tip. A lacy red header band holds everything together across the top of a doorway.
The palette is simple: one saturated red for the trees, bows and header, and one soft cream for the cords. Trees on neighboring cords are staggered, so the curtain looks full but light still shows through between the motifs.
This pattern uses US crochet terms. The finished header measures 35.7 in (90.7 cm) wide and 2.25 in (5.7 cm) tall. The cords hang 72 in (182.9 cm) below the header, so the full drop is 74.25 in (188.6 cm).
You will make 64 trees, 64 bows, 8 bobble cords and 1 header. The trees are worked in rows from the tip down and finished with an outline round and a trunk. The bows are small cinched tubes. The cords are chains worked with two strands held together, with bobbles along them. The header is a 7-row band with a crab-stitch border.
Finished Size and Construction
- Finished size: 35.7 in × 74.25 in (90.7 × 188.6 cm)
- Skill level: Intermediate
- Terminology: US
- Yarn weight: DK (3), cotton
- Hooks: 3.5 mm (E-4) and 4.0 mm (G-6)
- Number of pieces: 137 (1 header, 8 cords, 64 trees, 64 bows)
- Layout: 8 cords with 8 trees each, staggered
- Tree size: 4.25 in (10.8 cm) wide × 4.75 in (12.1 cm) tall, including the trunk
- Header before border: 35.2 in × 1.75 in (89.4 × 4.4 cm)
- Border depth: 0.25 in (0.6 cm) per side
Materials
Use a smooth mercerized cotton or cotton blend in DK weight. Cotton shows off the puff texture clearly and does not stretch much once it is hanging. The amounts below assume about 2.4 m per gram.
- Red: 500 g / 1,200 m (trees, bows, header)
- Cream: 200 g / 480 m (cords, worked with two strands held together)
Both quantities include a margin of about 10% for gauge differences and swatching.
Tools:
– 3.5 mm (E-4) hook
– 4.0 mm (G-6) hook
– Tapestry needle
– Stitch markers
– Rust-proof pins and a blocking board
– Spray bottle
– Measuring tape
– A tension rod for hanging
Abbreviations (US Terms)
- ch: chain
- sl st: slip stitch
- sc: single crochet
- dc: double crochet
- tr: treble crochet
- sk: skip
- sp: space
- st(s): stitch(es)
- tch: turning chain
- RS: right side
Special stitches:
– Puff: (Yarn over, insert hook, pull up a loop) 3 times, yarn over, pull through all 7 loops.
– Fan: (Puff, ch 1, puff, ch 1, puff) all in the same space. Each Fan has 3 puffs and 2 ch-1 spaces, and its center is the middle puff.
– V-st: (Dc, ch 2, dc) in the same stitch.
– Bead: Ch 3, then work a 4-dc bobble in the 3rd ch from the hook. For the bobble, (yarn over, insert hook, pull up a loop, yarn over, pull through 2) 4 times, then yarn over and pull through all 5 loops.
– Crab st (reverse sc): Sc worked from left to right.
Gauge and Checkpoints
Base gauge: 20 sc × 22 rows = 4 in (10.2 cm) with the 3.5 mm hook.
Cord gauge: With two strands of cream held together and the 4.0 mm hook, 3 ch = 1 in (2.5 cm). One repeat of [ch 5, Bead] measures 2 in (5.1 cm).
Make and block one complete tree before anything else. Its widths should match these checkpoints:
- After Row 2: 1.25 in (3.2 cm)
- After Row 4: 2.25 in (5.7 cm)
- After Row 6: 3.25 in (8.3 cm)
- After Row 8: 4 in (10.2 cm)
- After the edging: 4.25 in (10.8 cm) wide and 4 in (10.2 cm) tall from the tip to the bottom edge
If your tree is too big, go down 0.25 mm in hook size. If it is too small, go up 0.25 mm. Puffs that come out loose make the tree too wide, so pull each puff snug before you chain.
For the cord, five [ch 5, Bead] repeats should measure 10 in (25.4 cm). If they don’t, change every ch 5 to ch 4 or ch 6 until they do.
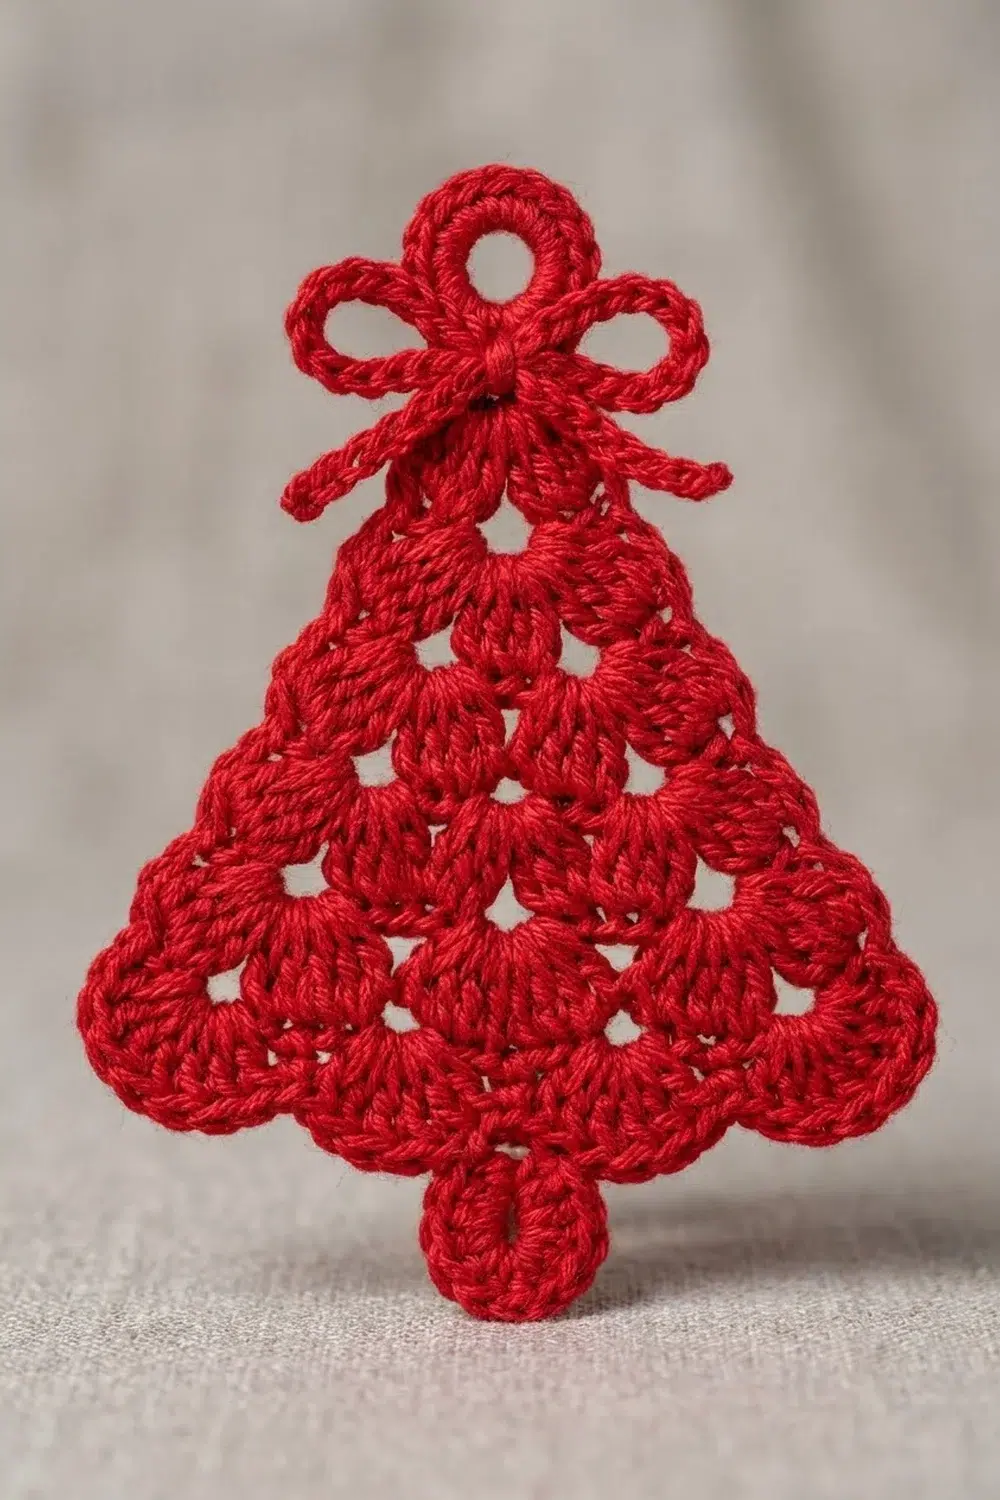
Tree Motif (make 64)
Use red and the 3.5 mm hook.
Row 1: Ch 4, sl st in the first ch to form a ring. Ch 5 (counts as dc + ch 2), dc in the ring. Turn. (1 V-st)
Row 2: Ch 3 (counts as dc), Fan in the ch-2 sp, dc in the 3rd ch of the tch. Turn. (1 Fan, 2 dc)
Row 3: Ch 5 (counts as dc + ch 2), dc in the first dc. Ch 2, sc in the center puff, ch 2, then V-st in the top of the tch. Turn. (2 V-sts, 1 sc, 2 ch-2 sps)
Row 4: Ch 3, Fan in the first V-st sp, dc in the next sc, Fan in the next V-st sp, dc in the 3rd ch of the tch. Turn. (2 Fans, 3 dc)
Row 5: Ch 5, dc in the first dc. Ch 2, sc in the center puff of the next Fan, ch 2, V-st in the next dc; repeat from * once more, working the last V-st in the top of the tch. Turn. (3 V-sts, 2 sc, 4 ch-2 sps)
Row 6: Ch 3. Fan in the next V-st sp, dc in the next sc; repeat from * once more. Fan in the last V-st sp, dc in the tch. Turn. (3 Fans, 4 dc)
Row 7: Work as Row 5, but repeat from * 2 more times so you pass all 3 Fans. Turn. (4 V-sts, 3 sc, 6 ch-2 sps)
Row 8: Work as Row 6, but repeat from * 2 more times. Turn. (4 Fans, 5 dc, 12 puffs in total)
Each fan row adds one Fan. The ch-2 sps in the V-st rows leave the small holes you can see between the tiers.
Edging (Rnd 9): Work across the last row first.
- Bottom: 3 sc in the first dc (corner). Sc in each puff and ch-1 sp across the next Fan (5 sc), then sc in the next dc; repeat from * 2 more times. Work 5 sc across the last Fan, then 3 sc in the top of the tch (corner). (29 sc)
- First side: Work up the row ends. Put 3 sc in each fan-row end and 2 sc in each V-st-row end, ending with 2 sc in the end of Row 1. (17 sc)
- Tip: Work (sc, ch 3, sc) around the ring. The ch-3 becomes the tip loop.
- Second side: Work down the other side the same way. (17 sc)
- Sl st in the first sc to join.
Round total: 65 sc plus 1 ch-3 loop.
Working each puff and ch-1 sp separately makes the bottom edge follow the curves of the Fans, which gives the scalloped edge.
Trunk:
Row T1: With RS facing, join red in the 13th sc of the bottom edge, counting from the first sc of the corner group. Ch 1, sc in the same st and in the next 4 sts. Turn. (5 sc, centered on the 15th sc)
Rows T2–T3: Ch 1, sc in each st across. Turn. (5 sc)
Row T4: Ch 1, sc in the first st, sk 1, 5 dc in the next st, sk 1, sc in the last st. (7 sts)
Fasten off and weave in the ends. The trunk adds 0.75 in (1.9 cm), so the full tree is 4.75 in (12.1 cm) tall.
Bow (make 64)
Use red and the 3.5 mm hook.
Body: Ch 24 and sl st to the first ch to join, without twisting the chain.
Rnds 1–3: Ch 1, sc in each st around, sl st to the first sc to join. (24 sc each round)
Fasten off and leave a 12 in (30.5 cm) tail. Flatten the tube so the join sits at the center back. Wrap the tail tightly around the center 10 times, then secure it. This makes 2 loops, and the bow is 2.4 in (6.1 cm) wide.
Tails: Ch 15. Sc in the 2nd ch from the hook and in each ch across. (14 sc, 2.8 in / 7.1 cm long)
Fold the strip into an upside-down V and sew the fold behind the center of the bow. The tails hang about 1.2 in (3.0 cm) below the bow.
Bobble Cord (make 8)
Hold two strands of cream together and use the 4.0 mm hook.
Top tail: Ch 12. (4 in / 10.2 cm)
Cord: [Ch 5, Bead] 36 times. Fasten off.
Bead number n sits about 2n in (5.1n cm) below the top tail, and the cord ends at Bead 36, 72 in (182.9 cm) down. Each Bead forms a round knot about 0.33 in (0.8 cm) long.
Make All Pieces
Quantities:
– Red: 64 trees, 64 bows, 1 header
– Cream: 8 cords
Block every tree flat to 4.25 in (10.8 cm) wide before you attach it. Pin out each scallop as you go.
Layout grid: T marks the Bead where a tree tip is attached. The dots are Beads with no tree.
Bead   C1  C2  C3  C4  C5  C6  C7  C8
 2     T   .   T   .   T   .   T   .
 4     .   T   .   T   .   T   .   T
 6     T   .   T   .   T   .   T   .
 8     .   T   .   T   .   T   .   T
...    (continue alternating)
30     T   .   T   .   T   .   T   .
32     .   T   .   T   .   T   .   T
- Odd cords (C1, C3, C5, C7): trees at Beads 2, 6, 10, 14, 18, 22, 26 and 30. That is 8 trees, with the tips 8 in (20.3 cm) apart.
- Even cords (C2, C4, C6, C8): trees at Beads 4, 8, 12, 16, 20, 24, 28 and 32. That is 8 trees, offset 4 in (10.2 cm) from the odd cords.
Joining
Sew everything with red yarn and a tapestry needle.
Trees to cords:
The cord runs straight down behind the center line of each tree. The center line is made of these stitches: the Row 3 sc, the middle V-st of Row 5, the 2nd sc of Row 7, the center dc of Row 4 and the 3rd dc of Row 8.
- Lay the tree face down. Sew the ch-3 tip loop to the cord just below the chosen Bead with 2 passes.
- Tack the cord to the center dc of Row 4 with 2 passes.
- Tack the cord to the 3rd dc of Row 8 with 2 passes.
The trunk hangs free in front of the cord.
Bows to trees: Center a bow over the tip so it hides the tip loop. Stitch through the bow’s wrapped center, the tip loop and the cord together, so each bow is anchored in 3 layers.
Tension: Make each tack firm but not tight. If the tree puckers or curls forward, the tack is too short. Remove it and make it again.
Cords to header: Mark these foundation stitches along the bottom edge of the header: 15, 36, 57, 78, 99, 120, 141 and 162. Count from the bottom-right corner stitch as st 1.
The marks are 21 sts apart, which is 4.2 in (10.7 cm). Each outer mark is 14 sts, or 2.8 in (7.1 cm), from the corner. Fold each cord’s 12-ch top tail through the border sc at a mark and sew its end securely to the base of the first ch-5.
Size checkpoint: Hang one finished cord and measure it.
– Tree tips should be 8 in (20.3 cm) apart.
– The last tree on an even cord should end about 68.75 in (174.6 cm) below the header.
– The cord should end at 72 in (182.9 cm).
Header and Border
Use red and the 3.5 mm hook.
Row 1: Ch 177. Sc in the 2nd ch from the hook and in each ch across. Turn. (176 sc)
Rows 2–3: Ch 1, sc in each st across. Turn. (176 sc)
Row 4 (windows): Ch 4 (counts as tr), tr in the next st. [Ch 4, sk 4, tr in the next 2 sts] 29 times. Turn. (60 tr and 29 ch-4 windows; 2 + 29 × 6 = 176 sts covered)
Row 5 (conversion row): Ch 1, sc in the first 2 tr. [4 sc in the next ch-4 sp, sc in the next 2 tr] 29 times. Turn. (60 sc in tr + 116 sc in sps = 176 sc)
Rows 6–7: Ch 1, sc in each st across. Turn. (176 sc)
The header now measures 35.2 in × 1.75 in (89.4 × 4.4 cm).
Border gauge: 5 sc = 1 in (2.5 cm), the same as the base gauge.
In the counts below, each side count leaves out the 3-sc corner groups.
Border Rnd 1: Ch 1.
– Top: 3 sc in the first st, sc in the next 174 sts, 3 sc in the last st.
– Short side: 1 sc in each sc-row end of Rows 6, 5, 3 and 2, and 3 sc in the end of Row 4. (7 sc)
– Bottom: Work into the foundation chain: 3 sc in the first ch, sc in the next 174 chs, 3 sc in the last ch.
– Other short side: 7 sc, worked as before.
– Sl st to the first sc to join.
Round total: 2 × 174 + 2 × 7 + 4 × 3 = 374 sc.
Border Rnd 2: Ch 1, crab st in each st around. (374 sts)
Fasten off. The final header measures 35.7 in × 2.25 in (90.7 × 5.7 cm).
Why the math works:
– On the long sides, 1 sc per stitch keeps the 176-st width flat, and 176 ÷ 5 = 35.2 in.
– Each 3-sc corner group turns 90 degrees without cupping.
– A sc row is about 0.2 in (0.5 cm) tall, so 1 sc fits each sc-row end.
– The tr row is about 0.6 in (1.5 cm) tall, so it needs 3 sc.
– Two border rounds add 0.25 in (0.6 cm) on every side, which accounts for the extra 0.5 in (1.3 cm) in each direction.
Final Blocking
- Before attaching the cords, wet-block the header. Pin it to 35.7 in × 2.25 in (90.7 × 5.7 cm) and keep the windows square.
- Re-pin any tree that curled while you were sewing it. Mist it and let it dry flat at 4.25 in (10.8 cm) wide.
- Shape each bow’s loops with your fingers while they are damp.
- Hang the finished curtain, then mist the cords lightly so they straighten as they dry.
- After 24 hours, check that the cord ends hang level. Trim the length by removing a final Bead if one cord hangs long.
Final Quality-Control Checklist
- [ ] Every tree has 4 fan tiers (1, 2, 3 and 4 Fans) and 12 puffs.
- [ ] Every tree’s edging has 65 sc plus a ch-3 tip loop.
- [ ] Every trunk is centered on the 15th bottom sc.
- [ ] All 64 bows are sewn through the bow, the tip loop and the cord.
- [ ] Each cord has 36 Beads and is 72 in (182.9 cm) long.
- [ ] Each cord carries 8 trees, staggered as shown in the layout grid.
- [ ] The header has 29 windows and a 374-st border.
- [ ] The cords are 4.2 in (10.7 cm) apart on center.
- [ ] All ends are woven in securely.
Troubleshooting
Tree cups or curls: The puffs are too tight or the ch-2 sps are too short. Loosen your puff loops, or use ch 3 in the V-st rows.
Tree ruffles: The Fans are too loose. Go down a hook size.
Bottom scallops are flat: You skipped the ch-1 sps in the edging. Make sure you work 5 sc across each Fan.
Cords twist: Let the cord hang and spin freely before you attach any trees.
Beads look lopsided: Pull the final loop of each bobble firmly, and keep both strands of the cord even.
Header leans or arcs: The row-end counts are off. Check that each short side has 7 sc.
Trees tilt sideways: The cord isn’t on the tree’s center line. Re-tack it at the Row 4 and Row 8 center dc.
Care
Hand wash in cool water, press out the water in a towel, and dry flat before rehanging. Store the curtain rolled around the header, not folded, so the trees stay flat.
Final Notes
Here is the measurement chain in order:
1. The gauge of 20 sc × 22 rows = 4 in (10.2 cm) gives a tree 4.25 in (10.8 cm) wide.
2. Each cord repeat of 2 in (5.1 cm) places a tree tip every 8 in (20.3 cm), on a cord 72 in (182.9 cm) long.
3. The header’s 176 stitches make a band 35.2 in (89.4 cm) wide before the border and 35.7 in (90.7 cm) wide after it.
4. Cords spaced 21 stitches apart sit 4.2 in (10.7 cm) apart on center.
If each step matches, the curtain hangs evenly. Happy crocheting!