

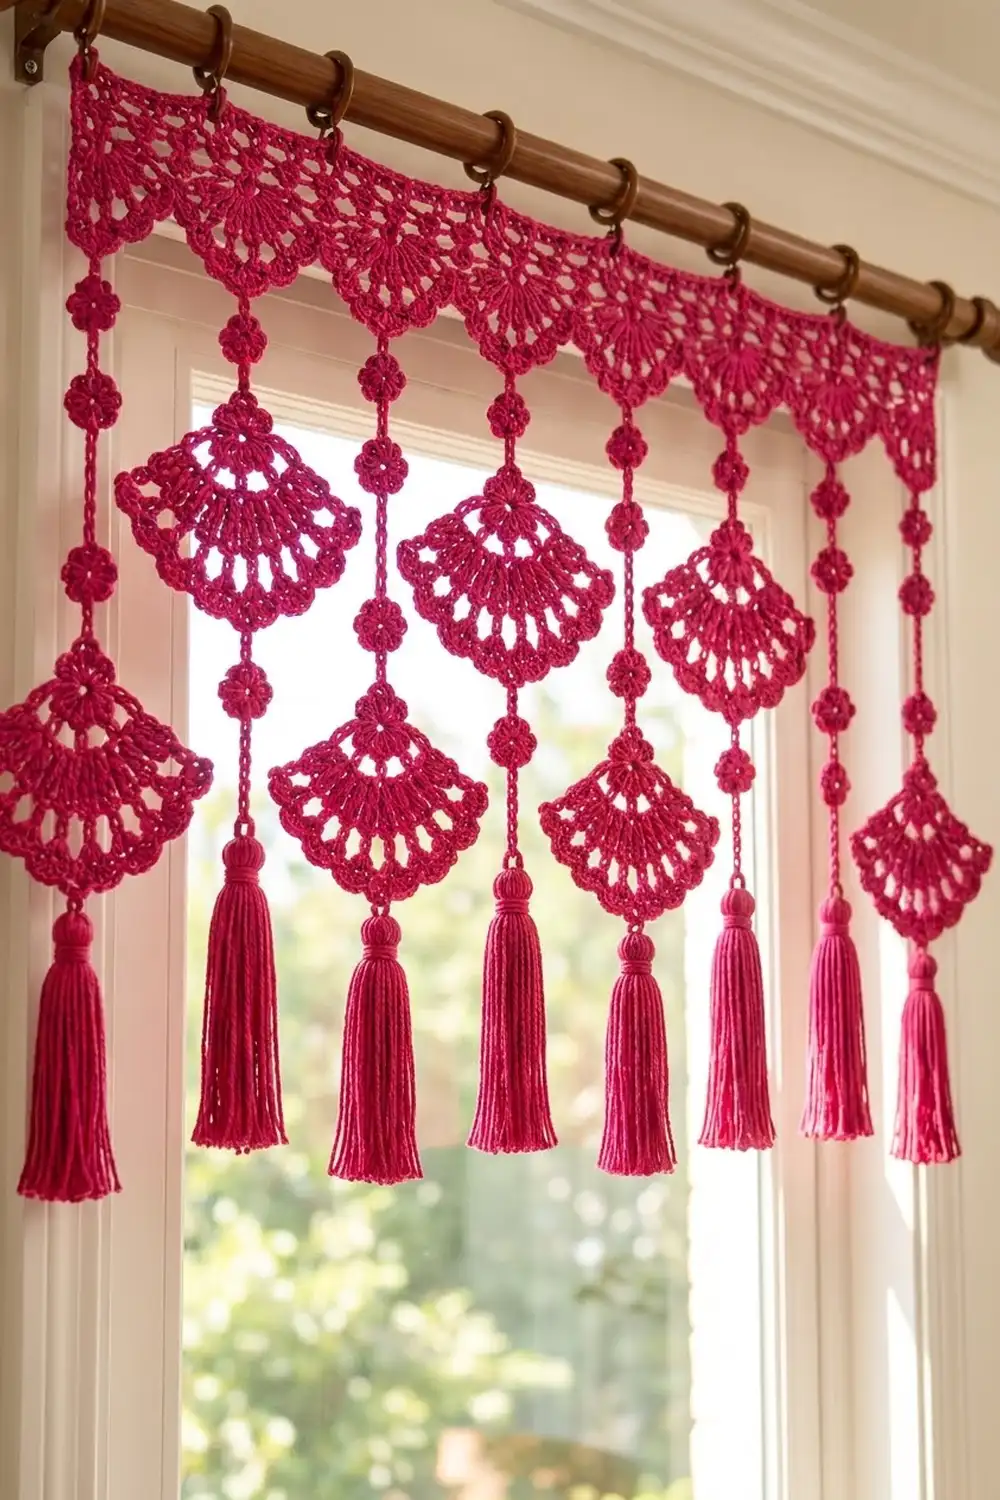
The Raspberry Fan Cascade is a lacy valance curtain made of open fan motifs. A scalloped header band hangs from clip rings. Eight strands drop from it, and each strand carries small flower beads, two fans and a full tassel.
Everything is worked in one saturated raspberry-magenta cotton. Using one color keeps the focus on the texture: dc spokes, chain arches and rounded shell edges. The style is boho and cottage, and it looks good in a kitchen or breakfast nook.
This pattern uses US crochet terms. The finished valance is 33 in (83.8 cm) wide. It hangs 32.5 in (82.6 cm) from the top edge to the bottom of the longest tassel.
You make the pieces in this order:
– a header band, worked in rows
– 16 fan motifs
– 28 flower beads
– 8 tassels
You then chain each strand from the header downward, joining the flowers, fans and tassels as you go. A two-row top border finishes the header for the rings.
Finished Size and Construction
- Finished size: 33 in (83.8 cm) wide × 32.5 in (82.6 cm) long
- Skill level: Intermediate
- Terminology: US
- Yarn weight: DK (#3), cotton or cotton blend
- Hook: 4 mm (G-6)
- Number of pieces: 53 (1 header, 16 fans, 28 flowers, 8 tassels)
- Layout: 8 strands hanging from 8 header scallops, alternating Strand A and Strand B
- Fan size: 4.5 in (11.4 cm) wide × 3.25 in (8.3 cm) tall
- Flower size: 1.25 in (3.2 cm) across
- Header before border: 32 in (81.3 cm) wide × 3 in (7.6 cm) deep at the scallop points
- Border depth: 0.5 in (1.3 cm)
Materials
Yarn: Use a smooth mercerized or combed DK cotton. Cotton holds the fan shapes crisply, keeps the stitch definition sharp and doesn’t stretch much while hanging. Avoid fuzzy or very stretchy acrylics, because the strands will lengthen over time.
- Raspberry (single color): 300 g, about 690 m (755 yd)
- Header and border: 70 g
- Fans: 96 g (about 6 g each)
- Flowers: 28 g
- Strand cords: 10 g
- Tassels: 64 g (about 8 g each)
These quantities include a margin of about 10% for swatching and tassel trimming.
Tools:
– 4 mm (G-6) crochet hook
– Tapestry needle
– 9 curtain clip rings
– Stiff cardboard cut to 4.5 in (11.4 cm) tall, for tassels
– Locking stitch markers
– Sharp scissors
– Blocking mat, rust-proof pins and a spray bottle
Abbreviations (US Terms)
- ch – chain
- sl st – slip stitch
- sc – single crochet
- hdc – half double crochet
- dc – double crochet
- sp – space
- st(s) – stitch(es)
- rep – repeat
Special stitch – Shell: (sc, hdc, 5 dc, hdc, sc) worked into one chain arch. That’s 9 sts. The center of the shell is the 3rd of the 5 dc.
Gauge and Checkpoints
Main gauge: 18 dc and 8 dc rows = 4 in (10.2 cm)
Chain gauge: 10 ch = 2 in (5.1 cm), worked at your normal tension
Make one fan motif before you start the header. That motif is your gauge test.
Checkpoints:
1. Fan after Row 3: 3.5 in (8.9 cm) wide
2. Finished fan: 4.5 in (11.4 cm) wide × 3.25 in (8.3 cm) tall
3. Flower: 1.25 in (3.2 cm) across
4. Header after Row 1: 32 in (81.3 cm) long
If your fan is more than 0.25 in (0.6 cm) too large, go down half a hook size. If it’s too small, go up half a size.
Chain tension matters too. If 10 ch measure more than 2 in (5.1 cm), the strands will grow longer than planned. Tighten your tension rather than removing chains, so the spacing between motifs stays proportional.
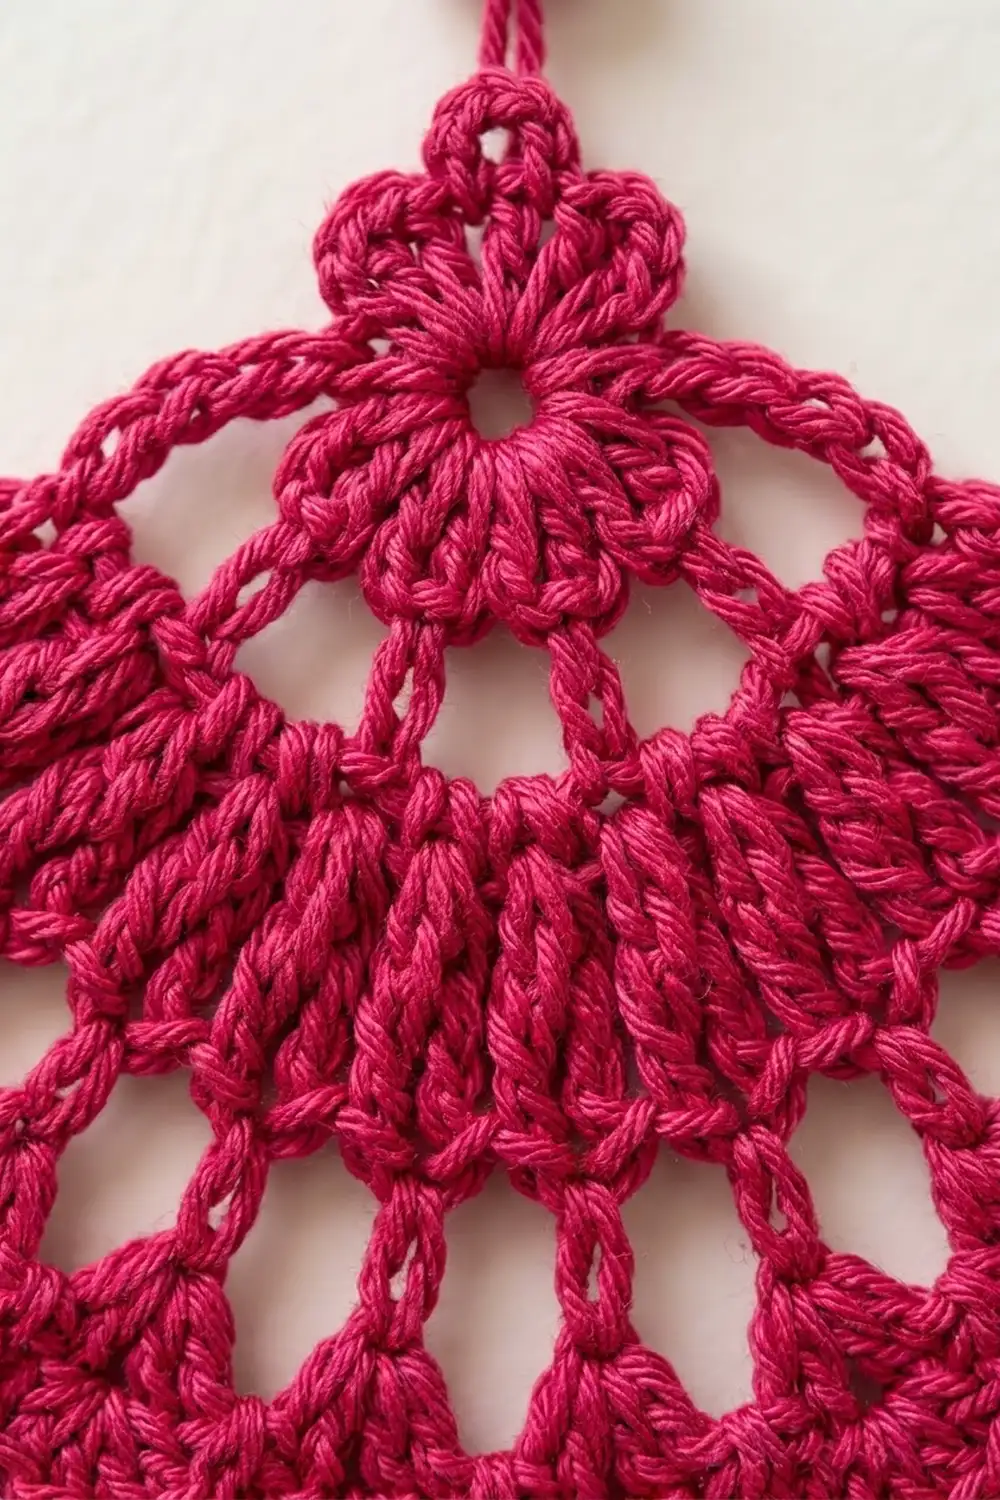
Fan Motif (Make 16)
Each fan is worked flat in rows from a small top ring. The rows fan downward and outward.
Ring: Ch 6, sl st in first ch to form a ring.
Row 1: Ch 3 (counts as dc), 8 dc in the ring. Crowd all the sts onto the lower half of the ring so the upper half stays open as the eyelet. Turn. (9 dc)
Row 2: Ch 3 (counts as dc), dc in the same st, ch 1, 2 dc in next dc; rep from * 7 more times. Turn. (18 dc in 9 pairs, 8 ch-1 sps)
Row 3: Ch 3 (counts as dc), dc in next dc, ch 2, skip ch-1 sp, dc in each of next 2 dc; rep from * 7 more times. Work the last dc in the top of the turning ch. Turn. (18 dc, 8 ch-2 sps)
The dc pairs now form 9 spokes, with widening gaps between them.
Row 4: Ch 1, sc in first dc, ch 5, sc in next ch-2 sp, ch 5; rep from * 7 more times. Sc in the top of the turning ch. Turn. (10 sc, 9 ch-5 arches)
Row 5: Ch 1, work a Shell in each ch-5 arch across, then sl st in the last sc. Fasten off and weave in the ends. (9 shells, 81 sts)
Checkpoint: 4.5 in (11.4 cm) wide × 3.25 in (8.3 cm) tall from the top of the eyelet to the middle of the center shell. Mark the center of the 5th shell (its 3rd dc) with a stitch marker. The strand continues from that point.
Flower Bead (Make 28)
Ring: Ch 4, sl st in first ch to form a ring.
Rnd 1: Ch 1, 12 sc in the ring, sl st in first sc to join. (12 sc)
Rnd 2: Ch 1, (hdc, dc, hdc) in next sc, ch 1, sl st in next sc; rep from * 5 more times. (6 petals)
Fasten off and weave in the ends. Checkpoint: 1.25 in (3.2 cm) across.
With 6 petals, petal 1 and petal 4 sit exactly opposite each other. These become the top and bottom joining points.
Header Band (Make 1)
Row 1: Ch 147, dc in 4th ch from hook and in each ch across. The skipped 3 ch count as the first dc. Turn. (145 dc)
Checkpoint: 32 in (81.3 cm) long.
Row 2 (mesh): Ch 4 (counts as dc + ch 1), skip next dc, dc in next dc, ch 1, skip next dc, dc in next dc; rep from * to the end. Turn. (73 dc, 72 ch-1 sps)
Row 3: Ch 1, sc in each dc and each ch-1 sp across. Turn. (73 + 72 = 145 sc)
Row 4 (scallops): Ch 1, sc in first sc, skip 8 sc, 11 dc in next sc, skip 8 sc, sc in next sc; rep from * 7 more times. Turn. (8 fans of 11 dc, 9 sc = 97 sts)
Each repeat uses 18 sts. That gives 1 + (8 × 18) = 145 sts.
Row 5 (lacy edge): Ch 1, sc in first sc, sc in next dc, (ch 2, sc in next dc) 10 times, sc in next sc; rep from * 7 more times. Do not fasten off. (97 sc, 80 ch-2 sps)
Checkpoint: 32 in (81.3 cm) wide and 3 in (7.6 cm) deep at the scallop points. In each scallop, place a marker in the 6th sc worked over the dc fan. This is the center point, where a strand will hang.
Make All Pieces
All pieces use the single color, Raspberry:
| Piece | Quantity |
|---|---|
| Header | 1 |
| Fans | 16 |
| Flowers | 28 |
| Tassels | 8 |
Tassels: Wrap yarn 40 times around the 4.5 in (11.4 cm) card. Slide a 12 in (30.5 cm) tie strand under the top and knot it tightly, leaving both tails long. Cut the loops at the bottom. Wrap a separate strand 10 times around the bundle, 0.75 in (1.9 cm) below the top, to form the neck. Knot it and bury the ends inside the tassel. Trim the bottom to an even 4.5 in (11.4 cm).
Strand sequences (seg = 10 ch, 2 in/5.1 cm; short = 5 ch, 1 in/2.5 cm):
- Strand A (positions 1, 3, 5, 7): seg, flower, seg, FAN, seg, flower, seg, flower, seg, FAN, short, tassel
- Uses 3 flowers and 2 fans. Length: 25.75 in (65.4 cm).
- Strand B (positions 2, 4, 6, 8): seg, flower, seg, flower, seg, flower, seg, FAN, seg, flower, seg, FAN, short, tassel
- Uses 4 flowers and 2 fans. Length: 29 in (73.7 cm).
Totals: 4 × 3 + 4 × 4 = 28 flowers, and 8 × 2 = 16 fans.
Layout grid (header across the top, columns 4 in/10.2 cm apart):
Position:  1   2   3   4   5   6   7   8
Header:   [S] [S] [S] [S] [S] [S] [S] [S]
Type:      A   B   A   B   A   B   A   B
Fan 1 top: 5.25" A / 11.75" B   (13.3 cm / 29.8 cm)
Fan 2 top: 17" A / 20.25" B     (43.2 cm / 51.4 cm)
Tassel end: 25.75" A / 29" B    (65.4 cm / 73.7 cm)
All heights are measured down from the scallop point. Because of the staggering, fans on neighboring strands never sit side by side, even though they are wider than the 4 in (10.2 cm) column spacing.
Joining
The strands are chained directly off the header, joining each piece with slip stitches as you reach it. Lay the header flat with Row 5 toward you. Work each strand from the top down.
- Start: Join yarn with a sl st in a scallop’s center marker.
- Seg: Ch 10.
- Flower: Sl st in the dc tip of petal 1. Working behind the flower, sl st through the center ring, then sl st in the dc tip of petal 4.
- Fan: Sl st through the eyelet ring from front to back. Ch 14 behind the fan, then sl st in the marked center dc of the 5th shell. This hidden chain spine holds the fan flat and carries the cord to the bottom of the fan.
- Short + tassel: Ch 5. Thread the tassel’s two tie tails through the last ch, knot them securely around it and bury them in the tassel head.
Stitch-to-stitch logic: Each piece is anchored at exactly two points, the top center and the bottom center. That keeps every motif upright and centered on its cord.
Tension: Chain at the same tension as your chain gauge swatch. Pull each joining sl st snug, but not so tight that it puckers the petal or shell.
Checkpoint: Hang the header from a rod after finishing 2 strands. Strand A should hang 25.75 in (65.4 cm) and Strand B 29 in (73.7 cm) below the scallop points, give or take 0.5 in (1.3 cm).
Border
The border is worked along the top and the two short sides of the header only. The scalloped lower edge is already finished.
Border gauge: 4.5 sc per in (2.5 cm) across the top, which matches the dc gauge.
Border Row 1: With the right side facing, rejoin the yarn at the lower right corner (end of Row 5).
– Right side: Work 7 sc up the side edge: 2 sc per dc row-end (Rows 1–2) and 1 sc per sc row-end (Rows 3–5).
– Top: Working into the free loops of the foundation chain, 3 sc in the first ch, 1 sc in each of the next 143 ch, 3 sc in the last ch.
– Left side: 7 sc down the side.
Counts: sides 7 each (not counting the corner groups); top 3 + 143 + 3 = 149. Total 7 + 149 + 7 = 163 sc.
Border Row 2: Ch 1, turn. Sc in each sc, working 3 sc in the center sc of each corner group.
Counts: sides 7 each; top 149 + 2 + 2 = 153. Total 163 + 4 = 167 sc. Fasten off.
Why the math works:
– The top edge has one sc per foundation chain, and those chains sit under 145 dc at 4.5 per in. So the border lies flat without stretching or ruffling.
– The side edge is about 1.75 in (4.4 cm) tall, and 7 sc fits it at about 4 sc per in.
– Each corner gets 2 extra sc per row, which turns the corner without cupping.
The border adds 0.5 in (1.3 cm) to each side and to the top. That gives a width of 32 + 0.5 + 0.5 = 33 in (83.8 cm). The header measures 3.5 in (8.9 cm) deep at the scallop points.
Rings: Clip 9 rings to the top edge. Place the first and last 0.5 in (1.3 cm) in from each end and the rest every 4 in (10.2 cm), so each ring sits above a scallop junction.
Final Blocking
- Lightly mist the header and pin it flat to 33 in (83.8 cm) × 3.5 in (8.9 cm). Pin out every scallop point.
- Lay each strand straight below its scallop on the mat, or across two mats.
- Pin each fan to 4.5 in (11.4 cm) wide. Open every shell and pin the arch gaps into even curves.
- Pin the six petals of each flower into a round shape, 1.25 in (3.2 cm) across.
- Mist everything until it is damp but not soaked, and let it dry completely.
- Steam the tassels lightly and comb them straight with your fingers. Trim any uneven ends.
- Hang the valance and check that every strand drops straight.
Final Quality-Control Checklist
- Header is 33 in (83.8 cm) wide with 8 even scallops
- Header row counts: Row 1 has 145 dc, Row 4 has 97 sts, and Border Row 2 has 167 sc
- All 16 fans have 9 shells and an open eyelet at the top
- All 28 flowers have 6 petals, joined at petals 1 and 4
- Strand A positions (1, 3, 5, 7) are 25.75 in (65.4 cm) long; Strand B positions (2, 4, 6, 8) are 29 in (73.7 cm) long
- All 8 tassels are 4.5 in (11.4 cm) long with matching necks
- No loose ends, and the ch-14 fan spines are hidden
Troubleshooting
- Fan cups instead of lying flat: Your Row 4 arches are too tight. Work them more loosely, or change to ch 6.
- Fan ruffles: Your arches are too loose. Change to ch 4, then work the 9 shells as written.
- Header scallops are shallow: You may have skipped 7 sc instead of 8 in Row 4. Recount; each repeat must use 18 sts.
- Strands twist: Make sure every flower and fan join is worked from the same side, behind the piece.
- Strand too long: Your chains are loose. Rework the segments at a tighter tension.
- Tassels look thin: Wrap 50 times instead of 40.
Care
Hand wash in cool water with mild soap, roll it in a towel and dry it flat, re-pinning the fans while they are damp. Avoid hanging the valance wet, because the weight of the water stretches the strands.
Final Notes
The measurement chain:
1. The fan swatch confirms 18 dc = 4 in (10.2 cm) and 10 ch = 2 in (5.1 cm).
2. Row 1 of the header has 145 dc and measures 32 in (81.3 cm).
3. Eight 18-st repeats make 8 scallops, one every 4 in (10.2 cm).
4. The border brings the header to 33 in (83.8 cm) wide.
5. The staggered strands of 25.75 in (65.4 cm) and 29 in (73.7 cm) give a total drop of 32.5 in (82.6 cm).
If each checkpoint matches, the finished curtain will match too.
Happy crocheting!