

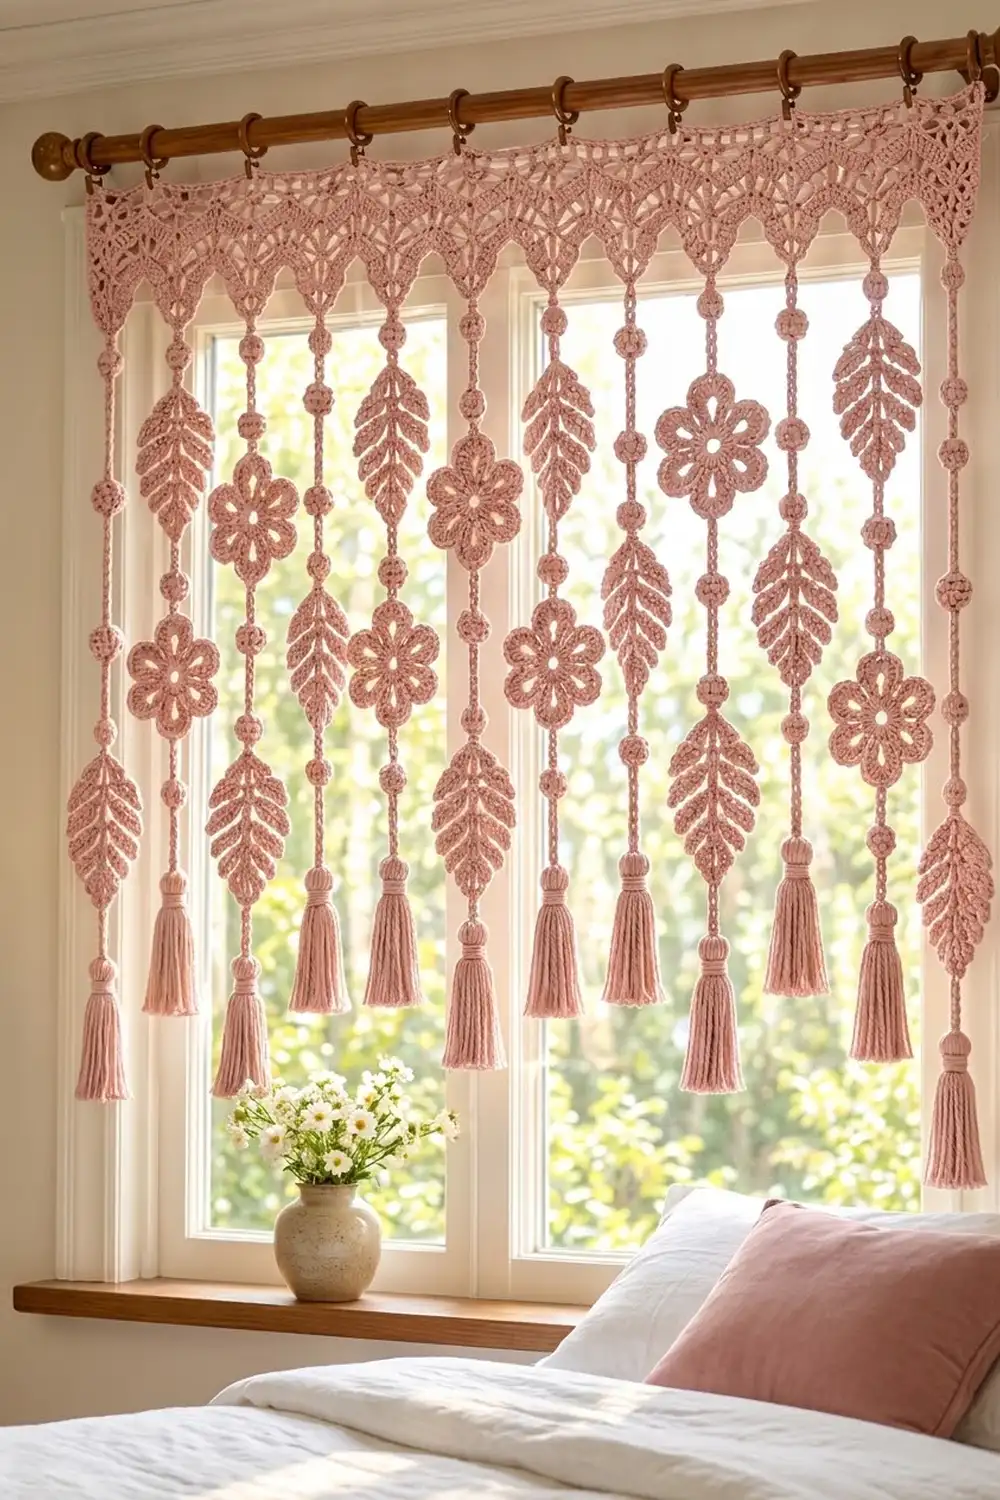
This curtain valance is soft and romantic. A lace header band hangs from a curtain rod, and a row of pointed triangles along its lower edge each lead into a hanging strand. Each strand carries puff beads, ribbed leaves, open six-petal flowers and a capped tassel.
The whole piece uses one dusty rose cotton, which keeps it calm and lets the stitch texture show. Light from the window comes through the mesh rows and the petal holes, so it looks good from both sides.
The pattern uses US crochet terms. The finished header is 35.9 in (91.2 cm) wide and 6 in (15.2 cm) deep, including the points and border. Strand A hangs 30 in (76.2 cm) from the top edge and Strand B hangs 33 in (83.8 cm), which staggers the tassels.
Construction order: first make all the leaves, flowers, tassel caps and tassels. Next, crochet the header body in rows. Then work the 11 triangles one at a time, and chain each strand straight down from its triangle tip, joining the motifs onto the cord as you go. Finish with a two-row border along the top and sides.
Finished Size and Construction
- Finished size: 35.9 in (91.2 cm) wide; longest drop 33 in (83.8 cm)
- Skill level: Intermediate
- Terminology: US
- Yarn weight: DK (weight 3) cotton
- Hook: 4.0 mm (G-6)
- Number of pieces: 1 header, 17 leaves, 10 flowers, 11 tassel caps, 11 tassels
- Layout: 11 strands, alternating A-B-A-B-A-B-A-B-A-B-A
- Piece sizes: leaf 4 in × 2 in (10.2 cm × 5.1 cm); flower 3.5 in (8.9 cm); puff bead 0.5 in (1.3 cm); tassel 5 in (12.7 cm)
- Header size before border: 35.4 in × 2.25 in (89.9 cm × 5.7 cm) for the body, plus points 3.25 in (8.3 cm) deep
- Border depth: 0.5 in (1.3 cm)
Materials
Yarn: Use a smooth, mercerized or combed DK cotton. Cotton holds the leaf points crisply and drapes well without stretching. Avoid fuzzy yarns, because they blur the mesh and the petal holes.
- Dusty Rose: 300 g / 690 m (755 yd), about six 50 g balls
The quantity includes a margin of roughly 25%. The piece itself uses about 240 g: roughly 70 g for the header, 68 g for the leaves, 30 g for the flowers, 30 g for the cords, beads and caps, and 40 g for the tassels.
Tools:
– 4.0 mm (G-6) crochet hook
– Tapestry needle
– 4 locking stitch markers
– A piece of stiff card 5 in (12.7 cm) tall, for the tassels
– Scissors
– Measuring tape
– Rust-proof pins and a blocking mat
– 12 curtain clip rings and a rod, for hanging
Abbreviations (US Terms)
- ch – chain
- sl st – slip stitch
- sc – single crochet
- hdc – half double crochet
- dc – double crochet
- tr – treble crochet
- sc2tog / sc3tog – single crochet 2 (or 3) together
- dc2tog – double crochet 2 together
- rev sc – reverse single crochet (crab stitch)
- BLO – back loop only
- mr – magic ring
- sk – skip
- sp – space
- st(s) – stitch(es)
- RS / WS – right side / wrong side
Special stitch – Puff Bead (PB): Ch 3. Yo, insert hook in 3rd ch from hook, yo, pull up a loop to 0.5 in (1.3 cm). Repeat from * to * 4 more times (11 loops on hook). Yo and pull through all 11 loops, then ch 1 tightly to lock. This makes a round bead 0.5 in (1.3 cm) across, sitting right on the cord.
Gauge and Checkpoints
- Gauge: 20 sc = 4 in (10.2 cm). Each sc row is 0.25 in (0.6 cm) tall and each dc or mesh row is 0.5 in (1.3 cm) tall.
- Chain gauge: 5 ch = 1 in (2.5 cm).
Test one piece first. Make one leaf and one flower before you start anything else.
Checkpoints:
1. Leaf after Round 2: 4 in (10.2 cm) long and 2 in (5.1 cm) wide.
2. Flower after Round 3: 3.5 in (8.9 cm) from one petal tip to the opposite petal tip.
3. Header Row 1: 35.4 in (89.9 cm) across 177 sc.
4. Header body after Row 6: 2.25 in (5.7 cm) tall.
5. One triangle: 3.4 in (8.6 cm) wide at the base and 3.25 in (8.3 cm) tall.
If your pieces are too big, go down 0.5 mm in hook size. If they are too small, go up 0.5 mm. Fix the gauge rather than changing the stitch counts, because the triangle spacing depends on 177 stitches.
Leaf (make 17)
The leaf is worked around both sides of a foundation chain. The tall stitches in the middle fan out to make the slanted ribbing.
Ch 17.
Round 1: Sc in 2nd ch from hook, hdc in next ch, dc in next 3 ch, tr in next 6 ch, dc in next 3 ch, hdc in next ch (15 sts on side 1). Work (sc, ch 2, sc) in the last ch to make the tip. Rotate the piece and work along the opposite side of the chain: hdc in next ch, dc in next 3 ch, tr in next 6 ch, dc in next 3 ch, hdc in next ch, sc in last ch (15 sts on side 2). Sl st to the first sc. (32 sts + 1 ch-2 sp)
Round 2: Ch 1. Working in BLO, sc in each of the next 16 sts. Work (sc, ch 2, sc) in the ch-2 sp. Working in BLO, sc in each of the next 16 sts. Sl st to the first sc. (34 sts + 1 ch-2 sp)
Fasten off and weave in the ends. The joining point at the base and the ch-2 tip are the leaf’s two points. The center vein is added later, when the cord is joined.
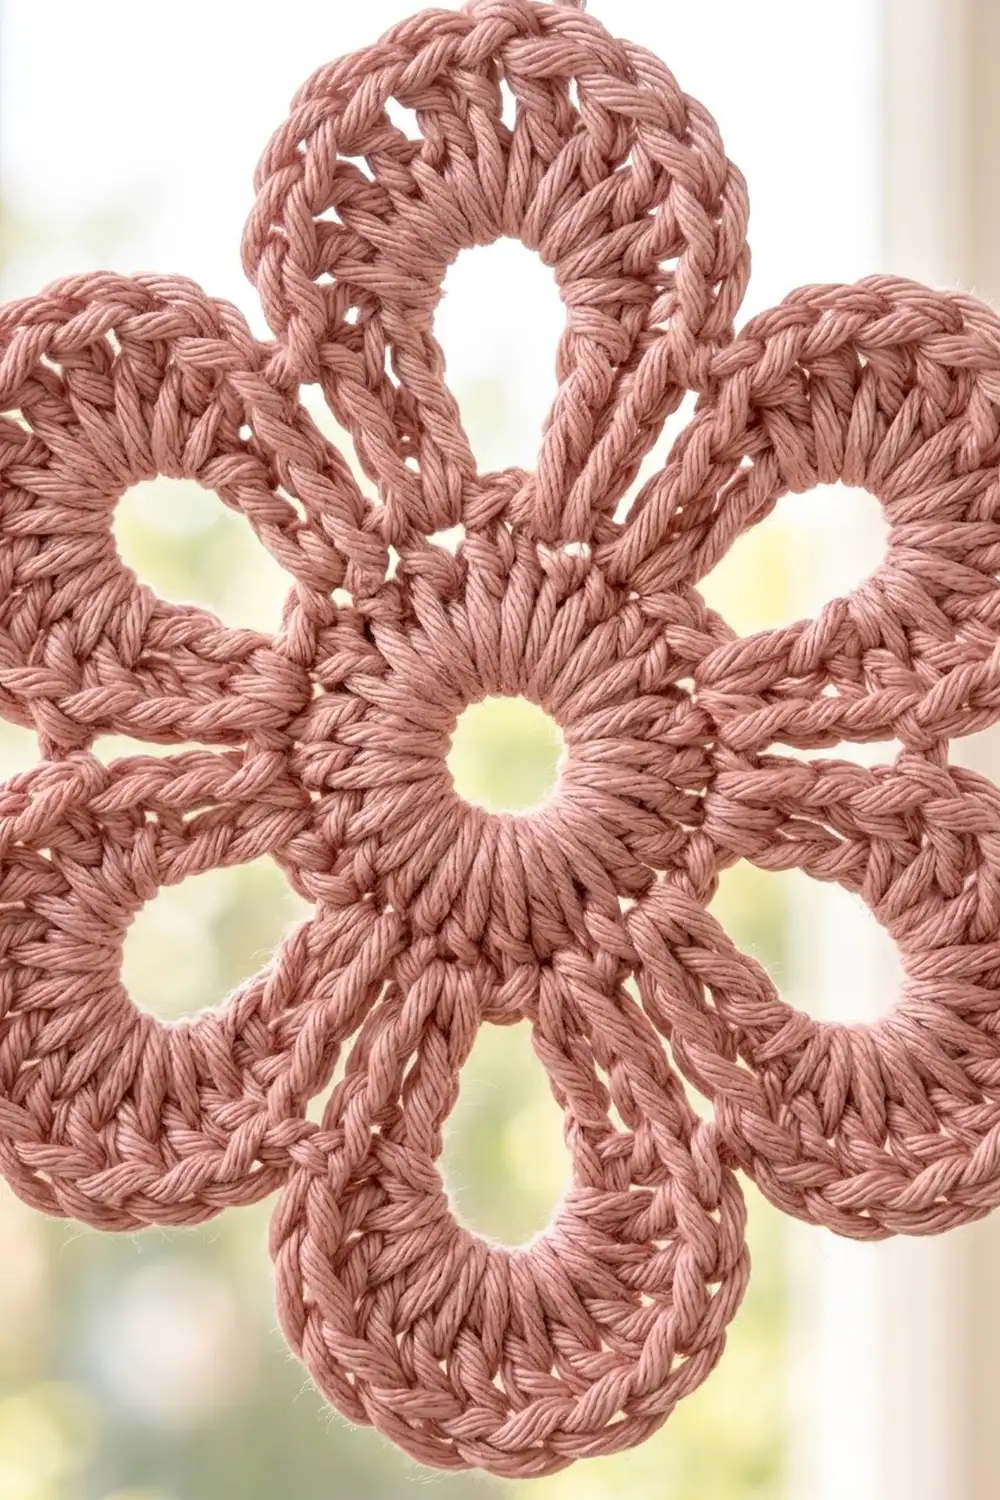
Flower (make 10)
Round 1: Mr, ch 3 (counts as dc), 17 dc in the ring. Pull the ring closed, leaving a small open center. Sl st to the top of ch-3. (18 dc)
Round 2: Ch 1, sc in the same st, ch 7, sk 2. Sc in next st, ch 7, sk 2. Repeat from * to * 4 more times. Sl st to the first sc. (6 sc + 6 ch-7 loops)
Round 3: In each ch-7 loop, work (2 sc, 2 hdc, 7 dc, 2 hdc, 2 sc), then sl st in the next sc. (6 petals of 15 sts each = 90 sts, plus 6 sl sts)
Each petal wraps around its ch-7 loop, which leaves a teardrop-shaped hole inside the petal. Fasten off and weave in the ends. The 8th stitch of each petal, the center dc, is the petal tip.
Tassel Cap (make 11)
Round 1: Mr, 6 sc. (6)
Round 2: 2 sc in each st. (12)
Rounds 3–4: Sc in each st. (12)
Fasten off and weave in the ends. Leave the magic ring slightly open so a yarn tail can pass through it. The cap is 1 in (2.5 cm) tall.
Tassel (make 11)
Wrap the yarn 30 times around the 5 in (12.7 cm) card. Slide a 12 in (30.5 cm) strand under the loops at the top edge, tie it once, and leave the ends loose. Cut through the loops at the bottom edge.
Wrap an 18 in (45.7 cm) strand 8 times around the bundle, 0.75 in (1.9 cm) below the top. Knot it and bury the ends inside the tassel. Trim the bottom evenly to 5 in (12.7 cm).
Header Body
Ch 178.
Row 1: Sc in 2nd ch from hook and in each ch across. Turn. (177 sc)
Row 2: Ch 3 (counts as dc), dc in each st across. Turn. (177 dc)
Row 3 (mesh): Ch 4 (counts as dc + ch 1), sk 1, dc in next st. Ch 1, sk 1, dc in next st. Repeat from * to * across. Turn. (89 dc + 88 ch-1 sps = 177)
Row 4: Ch 1, sc in each dc and each ch-1 sp across. Turn. (177 sc)
Row 5: Repeat Row 3. (177)
Row 6: Repeat Row 4. Fasten off. (177 sc)
Checkpoint: 35.4 in × 2.25 in (89.9 cm × 5.7 cm).
Triangle Points (make 11, one at a time)
Each triangle is worked over 17 sts. Triangle 1 uses sts 1–17, Triangle 2 uses sts 17–33, and so on, so neighboring triangles share one stitch. Place markers in sts 17, 33, 49 and 65 to start, and keep moving them forward as you go.
With RS facing, join the yarn in the first st of the triangle.
Row 1: Ch 1, sc in the same st and in the next 16 sts. Turn. (17)
Row 2: Ch 2 (does not count as a st), dc2tog, ch 1, sk 1, dc in next st. Repeat from * to * 5 more times, then ch 1, sk 1, dc2tog. Turn. (15)
Row 3: Ch 1, sc2tog, sc in each of the next 11 sts and sps, sc2tog. Turn. (13)
Row 4: Ch 2, dc2tog, ch 1, sk 1, dc in next st. Repeat from * to * 3 more times, then ch 1, sk 1, dc2tog. Turn. (11)
Row 5: Ch 1, sc2tog, sc in next 7, sc2tog. Turn. (9)
Row 6: Ch 2, dc2tog, (ch 1, sk 1, dc in next st) 2 times, ch 1, sk 1, dc2tog. Turn. (7)
Row 7: Ch 1, sc2tog, sc in next 3, sc2tog. Turn. (5)
Row 8: Ch 2, dc2tog, ch 1, sk 1, dc2tog. Turn. (3)
Row 9: Ch 1, sc3tog. (1, the tip)
Do not fasten off. Go straight on to the strand for this triangle (see Joining). The next triangle starts in the shared st where this one began its last stitch.
Make All Pieces
Everything is one color, Dusty Rose.
| Piece | Quantity |
|---|---|
| Header body + 11 triangles | 1 |
| Leaves | 17 (12 for Strand A, 5 for Strand B) |
| Flowers | 10 (all for Strand B) |
| Tassel caps | 11 |
| Tassels | 11 |
| Puff beads | 44, worked into the cords (4 per strand) |
Strand layout (left to right, triangle tips 3.2 in / 8.1 cm apart):
Tip:     1  2  3  4  5  6  7  8  9  10 11
Strand:  A  B  A  B  A  B  A  B  A  B  A

Strand A (top to bottom)      Strand B (top to bottom)
ch 5                          ch 5
PB                            PB
ch 5                          ch 5
LEAF                          FLOWER
ch 5                          ch 5
PB                            PB
ch 10                         ch 5
PB                            LEAF
ch 5                          ch 5
LEAF                          PB
ch 5                          ch 5
PB                            FLOWER
ch 5                          ch 5
CAP + TASSEL                  PB
                              ch 5
                              CAP + TASSEL
Joining
Each motif is joined into the cord as you chain down from the triangle tip, so no sewing is needed.
Joining a leaf: Work the chain segment above the leaf, then sl st into the leaf’s base point (its Round 2 joining st). Slip stitch on the surface down the center of the leaf, following the foundation chain line, with 16 sl sts. This makes the raised center vein. Sl st into the ch-2 tip, then carry on chaining the next segment.
Joining a flower: Sl st into the tip of one petal (the 8th st). Ch 17 across the back of the flower, then sl st into the tip of the opposite petal, which is the 3rd petal along from the first. Carry on chaining. The ch-17 strap equals the 3.5 in (8.9 cm) diameter, so the flower sits flat without puckering.
Finishing a strand: After the last ch 5, fasten off and leave a 12 in (30.5 cm) tail. Thread the tail down through the magic ring of a cap. Tie it firmly around the top of a tassel, using the tassel’s top-tie strand too, and bury the ends inside the tassel. Slide the cap down over the tassel head.
Tension: Keep the cord chains the same tightness as your gauge chain, 5 ch = 1 in (2.5 cm). Loose chains stretch under the weight of the tassel and the strands end up uneven.
Size checkpoint: With the header laid flat and the strands hanging straight, measure each cord from the triangle tip to the top of the cap. Strand A should be 18 in (45.7 cm) and Strand B should be 21 in (53.3 cm). With the cap and tassel added, the strands are 24 in (61.0 cm) and 27 in (68.6 cm).
Border
Border gauge: Same as the main gauge. Each border row adds 0.25 in (0.6 cm).
Count the side row-ends this way. Rows 1, 4 and 6 get 1 sc each. Rows 2, 3 and 5 get 2 sc each. That gives 9 sc per side.
Border Row 1: With RS facing, join the yarn at the lower right corner of the header body, at the end of Row 6.
– Right side: Ch 1, work 9 sc up the row-ends.
– Top: Working into the opposite loops of the foundation chain, work 3 sc in the first ch, sc in each of the next 175 ch, and 3 sc in the last ch. That is 177 sts worked one per chain, plus 4 extra corner sts, for 181 sts.
– Left side: Work 9 sc down the row-ends.
– Total: 9 + 181 + 9 = 199 sts.
Border Row 2: Do not turn. Ch 1 and work rev sc in each st back along the edge: 9 on the left side, 181 across the top and 9 on the right side. (199 sts) Fasten off.
Why the math works: The header has 177 sts, which is 11 × 16 + 1. Because the triangles share their edge stitches, each one covers 17 sts and the tips fall exactly 16 sts, or 3.2 in (8.1 cm), apart. The border is worked one stitch per foundation chain, so the top keeps its 35.4 in (89.9 cm) length. The two border rows add 0.25 in (0.6 cm) to each side, for a finished width of 35.9 in (91.2 cm). They also add 0.5 in (1.3 cm) to the top, which brings the header to 6 in (15.2 cm) deep.
Final Blocking
- Weave in any loose ends, but don’t trim them close yet.
- Wet the whole valance in cool water and gently press out the extra water in a towel.
- Pin the header flat to 35.9 in × 2.75 in (91.2 cm × 7.0 cm) for the body plus border.
- Pin each triangle to a sharp point 3.25 in (8.3 cm) below the body.
- Lay the strands out straight. Pin every leaf to 4 in × 2 in (10.2 cm × 5.1 cm) with pointed ends, and pin every flower to 3.5 in (8.9 cm), opening up each petal hole.
- Comb the tassels straight and let them dry hanging off the edge of the mat.
- When everything is fully dry, trim the ends and re-trim the tassels to 5 in (12.7 cm).
Final Quality-Control Checklist
- The header has 177 sts and the border has 199 sts.
- All 11 triangles end in a single tip, 3.2 in (8.1 cm) apart.
- The strands alternate A-B-A, starting and ending with A.
- Every leaf has a raised center vein made by the surface sl sts.
- The flower straps are hidden at the back, so the front looks clean.
- Every strand has 4 puff beads, and they are all the same size.
- Strand A drops 30 in (76.2 cm) and Strand B drops 33 in (83.8 cm).
- All the caps sit snugly over the tassel heads.
Troubleshooting
- The triangles curl: Your dc2tog edges are too tight. Block them firmly, or go up 0.5 mm for the triangle rows only.
- The leaf twists: You worked Round 2 through both loops. Redo it in BLO only.
- The flower puckers: The back strap is too short. Make sure you chain 17 and keep the chains loose.
- The puff beads come out flat: Pull every loop up to the full 0.5 in (1.3 cm) before closing the puff.
- The strands are different lengths: Count the chains again, and check that 5 ch = 1 in (2.5 cm).
- The header ripples: You have too many sts. Recount Row 1 for exactly 177.
Care
Hand wash in cool water, press out the water in a towel, and re-pin it flat to dry. To refresh it, steam it lightly while it hangs.
Final Notes
Here is the measurement chain from start to finish. The gauge is 20 sc = 4 in (10.2 cm). The header body is 177 sts, or 35.4 in (89.9 cm), and its 11 triangles have tips 3.2 in (8.1 cm) apart. The border brings the header to 35.9 in (91.2 cm) wide and 6 in (15.2 cm) deep. The leaves are 4 in (10.2 cm), the flowers are 3.5 in (8.9 cm) and the beads are 0.5 in (1.3 cm). The finished strands drop 30 in (76.2 cm) and 33 in (83.8 cm) from the top edge. If you check each step against these numbers, the curtain will hang straight and even.
Happy crocheting!