

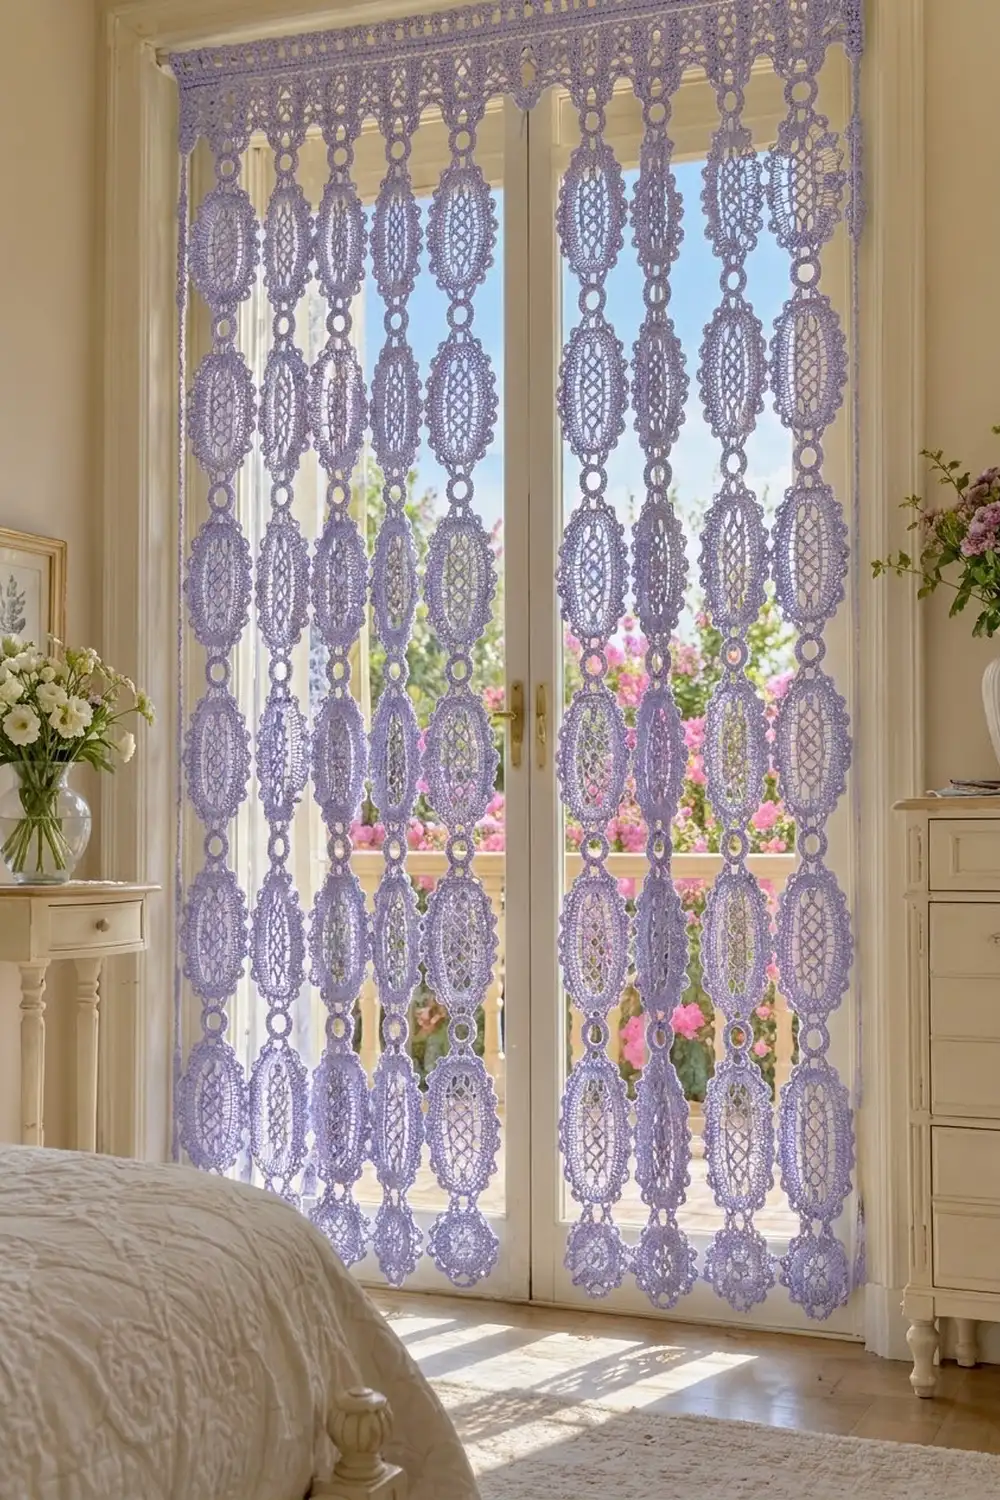
This lace door curtain is made from soft lavender oval motifs that hang in long vertical strands. Each oval has an open diamond lattice in the center. Solid double crochet rounds frame the lattice, and a scalloped edge finishes it. Small crocheted rings link the ovals into strands, and every strand hangs from one straight header band.
The curtain uses one color, a light lavender cotton. With a single shade, the lace carries the design: light comes through the lattice centers, and the solid frames give each oval a clean outline. It suits French doors, a bedroom window, or a wardrobe opening.
The pattern uses US crochet terms. The finished curtain measures 64 in (162.6 cm) wide and 72 in (182.9 cm) long, including the header. Each oval motif measures 6 x 10 in (15.2 x 25.4 cm).
The construction is modular. You crochet the header band first. Then you build each strand from the top down: a ring joined to the header, a motif joined to that ring, another ring, and so on. Every join is made as you go, so there’s no sewing at the end.
Finished Size and Construction
- Finished size: 64 x 72 in (162.6 x 182.9 cm)
- Skill level: Intermediate
- Terminology: US crochet terms
- Yarn weight: DK (light, category 3) cotton
- Hook: 3.5 mm (E-4)
- Number of pieces: 60 oval motifs, 70 rings, 1 header band
- Layout: 10 strands. Each strand has 7 rings and 6 motifs, alternating, starting and ending with a ring
- Piece size: motif 6 x 10 in (15.2 x 25.4 cm); ring 1.5 in (3.8 cm) across
- Motif size before scallop edge: 5 x 9 in (12.7 x 22.9 cm)
- Header (border) depth: 1.5 in (3.8 cm)
- Scallop edge depth: 0.5 in (1.3 cm)
Materials
Choose a smooth mercerized or combed cotton in DK weight. Cotton holds the lattice shape, blocks crisply, and stretches very little when it hangs. Avoid fuzzy or very elastic yarns, because the long strands would get longer over time.
- Lavender: 650 g / 1,495 m (thirteen 50 g balls of about 115 m each)
These quantities include a margin of about 20% over the calculated use of about 1,220 m. That leaves room for a gauge swatch and protects you against running short of one dye lot. Buy all balls from the same dye lot.
Tools:
- 3.5 mm (E-4) crochet hook
- Stitch markers (at least 4)
- Tapestry needle
- Measuring tape
- Blocking mats and rust-proof pins
- Spray bottle
- Curtain rod or tension rod, at least 64 in (162.6 cm) long
Abbreviations (US Terms)
- ch – chain
- sl st – slip stitch
- sc – single crochet
- dc – double crochet
- sk – skip
- st(s) – stitch(es)
- sp – space
- rnd – round
Shell: (3 dc, ch 2, 3 dc) all in the same stitch.
Joining shell: (3 dc, ch 1, sl st into the indicated ring stitch, ch 1, 3 dc) all in the same stitch. A join takes the place of the ch-2 at the tip of the shell.
Gauge and Checkpoints
Gauge: 20 dc and 8 rows = 4 in (10.2 cm) in dc rows.
Make one complete motif before anything else and treat it as your test piece. Measure it at each stage:
- After Rnd 3 (lattice): 2.5 x 6.5 in (6.4 x 16.5 cm), lightly stretched
- After Rnd 5 (dc frame): 4.5 x 8.5 in (11.4 x 21.6 cm)
- After Rnd 6 (sc round): 5 x 9 in (12.7 x 22.9 cm)
- After Rnd 7 (scallops), blocked: 6 x 10 in (15.2 x 25.4 cm)
- Ring: 1.5 in (3.8 cm) across
If your motif is too big: change to a 3.25 mm hook. If it’s too small: change to a 3.75 mm hook. Don’t change the stitch counts, because the header math depends on them. Small errors add up: 0.25 in (0.6 cm) extra per motif makes each strand 1.5 in (3.8 cm) longer. Fix gauge now.

Oval Motif (make 60)
The motif starts from a center chain along its long axis. The lattice rounds grow outward, then the solid frame and the scallops finish it. The two narrow ends become the top and bottom of the motif.
Rnd 1 (lattice foundation): Ch 22. Sc in 2nd ch from hook. Ch 5, sk 3 ch, sc in next ch 5 times; the last sc lands in the last ch. Ch 5, sc in same last ch. Rotate to work along the other side of the foundation chain. Ch 5, sk 3 ch, sc in next ch 5 times; the last sc lands in the base of the first sc. Ch 2, dc in first sc to join. The ch-2 and dc form the last loop and leave your hook at its center.
Count: 14 loops (5 per long side, 2 per end).
Rnd 2: Ch 1, (sc, ch 5, sc) in the joining loop. Ch 5, sc in next loop along each side. In each of the other end loops, work (ch 5, sc, ch 5, sc), so every end loop becomes 2 loops. You increase in all 4 end loops; the joining loop counts as one of them. Finish with ch 2, dc in first sc.
Count: 18 loops (5 per long side, 4 per end).
Rnd 3: Ch 1, sc in joining loop. Ch 5, sc in next loop around, except in the first and last loop of each end group: there, work (sc, ch 5, sc). This adds 1 loop at each of the 4 points where an end meets a side. The new loops count as side loops. Finish with ch 2, dc in first sc.
Count: 22 loops (7 per long side, 4 per end).
You should now see a diamond lattice, with each sc sitting like a small knot where two loops cross.
Rnd 4 (conversion round): Ch 3 (counts as dc), 4 dc in joining loop. Work 4 dc in each side loop and 5 dc in each end loop. Sl st to top of ch-3.
Count: 96 sts = (22 loops x 4 dc) + (8 end loops x 1 extra dc). Sides have 28 sts each; ends have 20 sts each.
Rnd 5 (growth round): Ch 3 (counts as dc). Dc in each st along the sides. Across each end, work 2 dc in every other st (10 increases per end). Sl st to top of ch-3.
Count: 116 sts. Sides have 28 sts each; ends have 30 sts each.
Rnd 6 (growth round): Ch 1. Sc in each st along the sides. Across each end, work 2 sc in every 5th st (6 increases per end). Sl st to first sc.
Count: 128 sts. Sides have 28 sts each; ends have 36 sts each.
Place a marker in the 18th st of the top end and another in the 18th st of the bottom end. These mark the center points. The two markers are exactly 64 sts apart, half of 128, so the ends match. Fasten off.
Rnd 7 (scallop edge): Join yarn with a sc in the 4th st before the top marker. Sk 3 sts, shell in next st, sk 3 sts, sc in next st 16 times; on the last repeat, sl st to the first sc instead of working the final sc. Fasten off and weave in ends.
Count: 16 shells and 16 sc. 16 repeats x 8 sts = 128 sts.
The first shell lands in the top marker. Because 64 divides evenly by 8, the 9th shell lands exactly in the bottom marker. The ch-2 sp of each shell makes the small eyelet at the tip of every scallop.
Joining note: Every motif hangs below a ring, so work the shell in the top marker as a joining shell on every motif. The shell in the bottom marker is a regular shell, and the next ring joins into its ch-2 sp.
Ring (make 70)
Rnd 1: Ch 10, sl st to first ch to form a ring. Ch 1, work 9 sc in ring, join to the piece above (see below), work 9 more sc in ring, sl st to first sc.
Count: 18 sc.
To join to the piece above: Drop the loop from your hook. Insert the hook from front to back through the stitch or space you’re joining to, pick up the dropped loop, and pull it through. Continue with the next sc.
The bottom of each ring is the point between sc 18 and sc 1, directly opposite the join. The motif below joins there.
Make All Pieces
| Piece | Per strand | Total |
|---|---|---|
| Oval motif | 6 | 60 |
| Ring | 7 | 70 |
| Header band | – | 1 |
All pieces are worked in Lavender. Each motif takes about 19 m, each ring about 0.6 m, and the header about 36 m.
Layout grid (front view; each column is one strand):
[==================== HEADER: 320 sts ====================]
 o    o    o    o    o    o    o    o    o    o     ring 1
 M    M    M    M    M    M    M    M    M    M     motif 1
 o    o    o    o    o    o    o    o    o    o     ring 2
 M    M    M    M    M    M    M    M    M    M     motif 2
 ...  (continue alternating to motif 6)
 o    o    o    o    o    o    o    o    o    o     ring 7
Joining
Every join is made as you go. Work one strand at a time, from the top down.
- Top ring: Make a ring, joining it after sc 9 to that strand’s header stitch (see Border below).
- Motif: Work Rnds 1–6. In Rnd 7, work the shell in the top marker as a joining shell, with the sl st going into the bottom of the ring above (between sc 18 and sc 1).
- Next ring: Make a ring, joining it after sc 9 into the ch-2 sp of the bottom-marker shell on the motif above.
- Repeat steps 2–3 until the strand has 6 motifs, then add the 7th ring at the bottom.
Stitch-to-stitch logic: Each motif connects at exactly one point at the top and one point at the bottom, always on the center shells. This keeps every motif hanging straight along its long axis.
Tension: Keep the ch 1 on each side of every join sl st relaxed. If you pull them tight, the scallop tip puckers and the motif tilts.
Size checkpoint: Each finished strand should measure 70.5 in (179.1 cm) when hanging. That’s 6 motifs x 10 in (25.4 cm) = 60 in (152.4 cm), plus 7 rings x 1.5 in (3.8 cm) = 10.5 in (26.7 cm).
Border: Header Band
The header is the only border on this curtain. It runs across the top and carries all 10 strands.
Border gauge: The same as the motifs: 5 sts per inch (2.5 cm). Each strand gets its own 32-st section, which is 6.4 in (16.3 cm) wide. A 6 in (15.2 cm) motif in that section leaves a 0.4 in (1.0 cm) gap between neighboring motifs, so the ovals nearly touch.
Row 1: Ch 321. Sc in 2nd ch from hook and in each ch across. Turn.
Count: 320 sc.
Row 2: Ch 3 (counts as dc), dc in each st across. Turn.
Count: 320 dc.
Row 3 (rod eyelets): Ch 4 (counts as dc and ch 1), sk next st. Dc in next st, ch 1, sk next st 158 times. Dc in last 2 sts. Turn.
Count: 320 sts = 161 dc + 159 ch-1 sps.
Row 4: Ch 1. Sc in each dc and in each ch-1 sp across. Fasten off.
Count: 320 sc.
Strand placement: Divide Row 4 into 10 sections of 32 sts. Mark the 16th st of each section: sts 16, 48, 80, 112, 144, 176, 208, 240, 272, and 304. Each top ring joins into one marked st. Thread the rod in and out through the Row 3 eyelets.
Why the math works: 10 strands x 32 sts per strand = 320 sts. No stitches are added between sections, so all sections are the same and every strand hangs from its section’s center point. At 5 sts per inch, 320 sts = 64 in (162.6 cm). The header rows add 0.25 + 0.5 + 0.5 + 0.25 = 1.5 in (3.8 cm) of depth. A 70.5 in (179.1 cm) strand plus the 1.5 in (3.8 cm) header = 72 in (182.9 cm).
Final Blocking
- Block each motif before joining it if you can. A loose motif pinned flat is much easier to shape than a finished strand.
- Pin the motif to 6 x 10 in (15.2 x 25.4 cm), with a pin in every scallop eyelet.
- Open the lattice with your fingers so the diamonds are even. Pin the center knots if needed.
- Spray until damp but not soaked, and let dry completely.
- Pin the header to 64 x 1.5 in (162.6 x 3.8 cm), spray, and let dry.
- After assembly, hang the curtain and lightly mist any motif that twists. The weight of the strands finishes the blocking.
Final Quality-Control Checklist
- 60 motifs, each with 16 scallops, blocked to 6 x 10 in (15.2 x 25.4 cm)
- Every lattice has 22 loops in Rnd 3, with even diamonds
- 70 rings, each with 18 sc
- Header Row 4 has 320 sts, with 10 join points marked 32 sts apart
- Each strand hangs 70.5 in (179.1 cm), and the full curtain is 72 in (182.9 cm)
- All joins sit on the center scallops
- All ends woven in at least 1 in (2.5 cm) and trimmed
Troubleshooting
Lattice looks crowded or bunched: Your chain loops are too tight. Loosen your chains, or work ch 6 instead of ch 5 in Rnds 1–3 only.
Motif ends ruffle: Your stitches are too loose for the increases. Work Rnds 5–6 with a hook one size smaller.
Motif ends cup: The increases are bunched together. Spread them evenly across the end stitches.
Bottom shell isn’t on the marker: Recount Rnd 6. It must have 128 sts, with the markers 64 sts apart.
Strands twist: A join was made in a side scallop. Undo it and rejoin on the marker shell.
Strands are different lengths: One motif is off gauge. Re-block it to size or remake it.
Care
Hand wash in cool water with mild soap. Roll the curtain in a towel to remove water, then dry it flat or rehang it while slightly damp. Don’t wring it or tumble dry it.
Final Notes
Each measurement builds on the one before. A gauge of 5 sts per inch (2.5 cm) gives a 5 x 9 in (12.7 x 22.9 cm) motif after Rnd 6 and a 6 x 10 in (15.2 x 25.4 cm) motif after the scallops. Six motifs and seven 1.5 in (3.8 cm) rings make a 70.5 in (179.1 cm) strand. Ten strands on a 320-st, 1.5 in (3.8 cm) header make a curtain 64 in (162.6 cm) wide and 72 in (182.9 cm) long. If the first motif measures correctly, the other 59 will too.
Happy crocheting!