

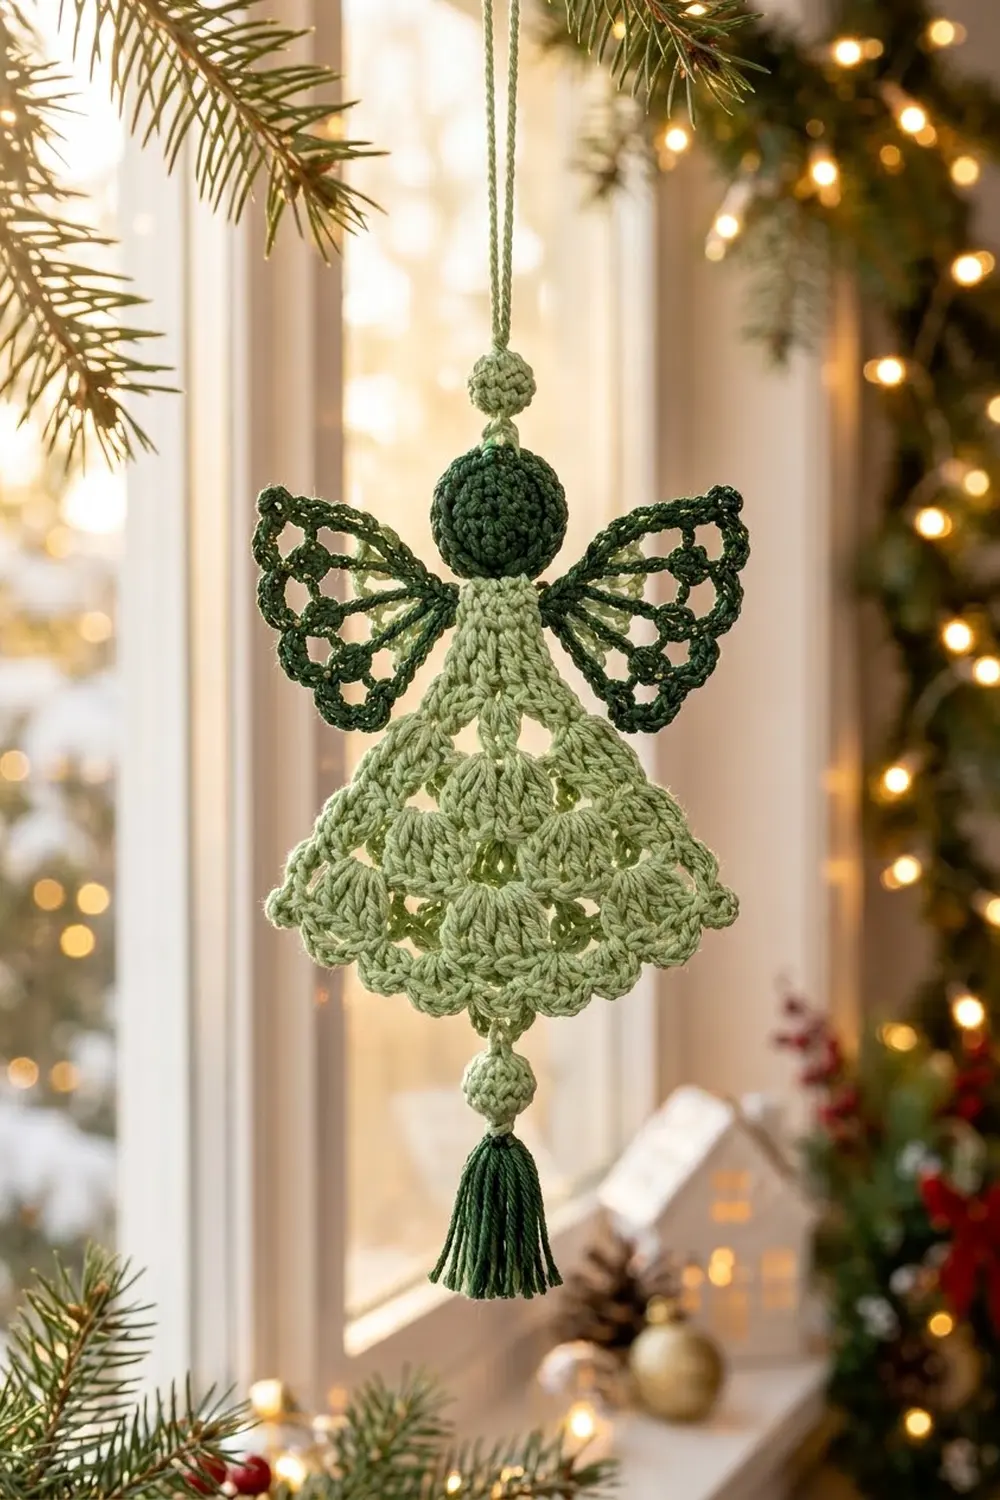
The Evergreen Grace Angel is a small lacy ornament in two shades of green. The body is a soft light sage triangle with two tiers of shell fans and a scalloped picot hem. The round head and the butterfly-style wings are a deep forest green, which frames the pale lace.
The style is vintage-inspired but simple. Solid rows near the neck keep the shape firm, the shell rows add openness, and the dark wings with open arches give the angel a crisp outline. You can hang it on a tree, a window or a gift package.
This pattern uses US crochet terms. The finished angel measures about 4 in (10.2 cm) wide at the hem, 5 in (12.7 cm) across the wings and 6 in (15.2 cm) tall from the top bead to the bottom drop. The hanging loop adds about 1 in (2.5 cm) more.
You make the body flat in rows from the neck down and then add a two-row edging. The head, the two wings and two small beads are made separately and sewn on. Everything is single crochet, double crochet and chains, with one picot.
Finished Size and Construction
- Finished size: 4 in (10.2 cm) hem width × 6 in (15.2 cm) tall; wingspan 5 in (12.7 cm)
- Skill level: Easy-intermediate
- Terminology: US terms
- Yarn weight: DK (#3), cotton or cotton blend
- Hook: 3.5 mm (E-4)
- Number of pieces: 1 ornament made from 6 components (body, head, 2 wings, top bead, bottom bead)
- Layout: Single angel; no joining of motifs
- Body size before border: 3.75 in (9.5 cm) wide × 3.25 in (8.3 cm) tall
- Body size after border: 4 in (10.2 cm) wide × 3.75 in (9.5 cm) tall
- Border depth: 0.5 in (1.3 cm) at the hem; 0.125 in (0.3 cm) along each side
Materials
Choose a smooth, mercerized DK cotton. It shows the shell texture clearly and holds its shape after blocking. Avoid fuzzy yarns, which hide the open arches in the wings.
- Color A (light sage green): 12 g / about 29 m for the body, beads and hanging loop
- Color B (dark forest green): 10 g / about 24 m for the head and wings
- Optional: about 2 m of fine gold metallic thread, held together with Color B for the wing outline round
Tools:
– 3.5 mm (E-4) crochet hook
– Tapestry needle
– Small pinch of polyester fiberfill
– Scissors
– Rust-proof pins and a blocking mat or folded towel
– Spray bottle with water
These yarn amounts include a margin of about 20% for your gauge swatch and tails.
Abbreviations (US Terms)
- ch – chain
- sl st – slip stitch
- sc – single crochet
- dc – double crochet
- sc2tog – single crochet 2 together (decrease)
- inc – 2 sc in the same stitch
- MR – magic ring
- sk – skip
- st(s) – stitch(es)
- tch – turning chain
- RS / WS – right side / wrong side
Special stitches:
– Shell: 5 dc in the same stitch.
– Half shell: 3 dc in the same stitch at a row edge. The ch-3 counts as 1 of the 3 if it is worked at the start of the row.
– Picot: ch 3, then sl st in the 3rd ch from the hook.
Gauge and Checkpoints
Gauge: 18 dc × 9 rows = 4 in (10.2 cm) in plain double crochet. One dc is about 0.22 in (0.6 cm) wide, and one dc row is about 0.44 in (1.1 cm) tall.
Make the body first. It is the largest component and the one most affected by gauge. Check it at these points:
- After Row 1: the fan is about 1 in (2.5 cm) wide.
- After Row 3: about 2 in (5.1 cm) wide × 1.3 in (3.3 cm) tall.
- After Row 6: about 3.75 in (9.5 cm) wide × 2.75 in (7.0 cm) tall.
- After Row 7: about 3.75 in (9.5 cm) wide × 3.25 in (8.3 cm) tall.
- After the border: about 4 in (10.2 cm) wide × 3.75 in (9.5 cm) tall.
A difference of up to 0.25 in (0.6 cm) is fine, because blocking evens it out.
If your body is too big, go down to a 3.25 mm hook. If it is too small, go up to a 3.75 mm hook. Use the same hook for every component so the head and wings stay in proportion to the body.
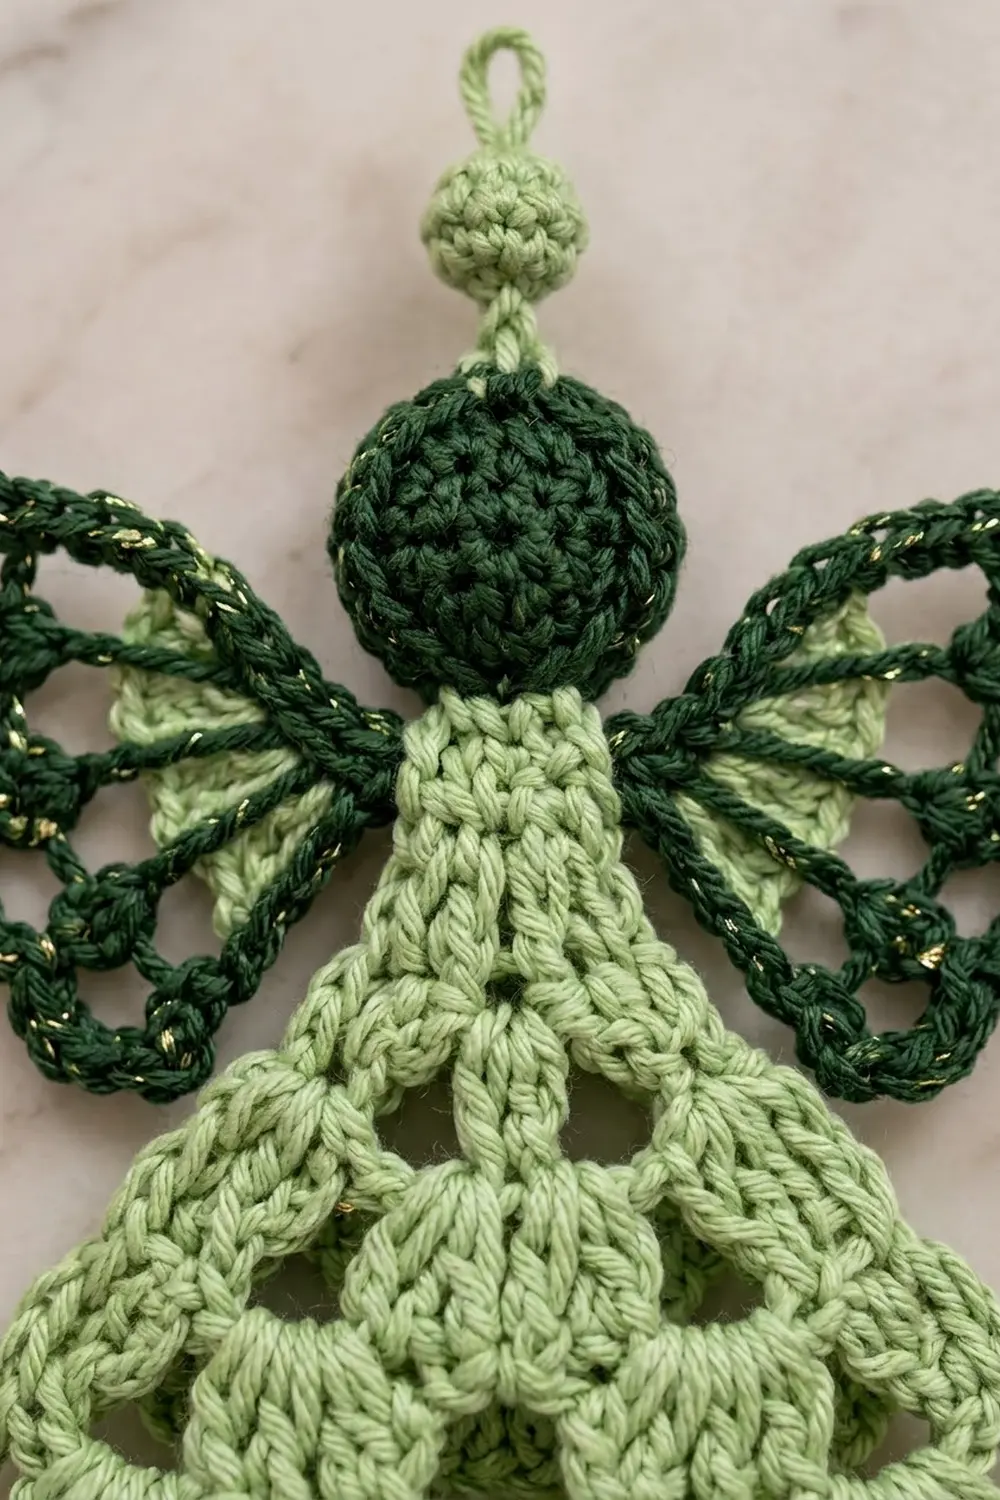
Body (Color A)
The body is worked flat in rows from the neck down. The ch-3 at the start of each row counts as 1 dc. On rows that end in the tch, work the last stitch into the top of the previous row’s ch-3.
Row 1 (RS): Ch 4. Work 4 dc in the 4th ch from the hook (the skipped chs count as the first dc). Turn. (5 dc)
Row 2 (WS): Ch 3, dc in the same st, dc in each of the next 3 sts, 2 dc in the top of the tch. Turn. (7 dc)
Row 3: Ch 3, dc in the same st, dc in each of the next 5 sts, 2 dc in the top of the tch. Turn. (9 dc)
Checkpoint: about 2 in (5.1 cm) wide.
Row 4 (first fan tier): Ch 3, 2 dc in the same st (half shell made). [Sk 1 st, sc in the next st, sk 1 st, shell in the next st] once. Sk 1 st, sc in the next st, sk 1 st, 3 dc in the top of the tch (half shell). Turn.
(3 + 6 + 1 + 3 = 13 sts: 2 half shells, 1 shell, 2 sc)
Row 5: Ch 3, dc in the same st, dc in each of the next 11 sts, 2 dc in the top of the tch. Turn.
(2 + 11 + 2 = 15 dc)
Row 6: Ch 3, dc in the same st, dc in each of the next 13 sts, 2 dc in the top of the tch. Turn.
(2 + 13 + 2 = 17 dc)
Checkpoint: about 3.75 in (9.5 cm) wide × 2.75 in (7.0 cm) tall.
Row 7 (second fan tier): Ch 3, 2 dc in the same st. [Sk 1 st, sc in the next st, sk 1 st, shell in the next st] 3 times. Sk 1 st, sc in the next st, sk 1 st, 3 dc in the top of the tch. Do not turn and do not fasten off.
(3 + 18 + 1 + 3 = 25 sts: 2 half shells, 3 shells, 4 sc)
The fan rows only work when the row before them has a multiple of 4 plus 1 stitches. Row 3 has 9 and Row 6 has 17, so both fan rows fit exactly. Each sc sits on an odd-numbered stitch and each shell sits on the next odd-numbered stitch, which keeps the fans centered under the neck.
Border (Color A)
Border gauge: 2 sc per dc row-end matches the height of a dc row, so the sides lie flat. Along the hem, work 1 sc per stitch.
Border Row 1: Continue from the end of Row 7 and rotate to work down the side.
– Side A: Work 14 sc evenly along the row-ends, 2 sc per row-end for 7 rows, ending at the neck point.
– Turn the point: Ch 1. Work up the second side.
– Side B: Work 14 sc evenly along the row-ends, 2 sc per row-end for 7 rows.
– Hem: Rotate. Work 3 sc in the first stitch of Row 7, sc in each of the next 23 sts, and 3 sc in the last stitch. Sl st to the first sc of Side A.
Counts: Side A has 14 sc and Side B has 14 sc. The hem has (25 sts worked 1 each) + (4 extra corner sts) = 29 sc. The total is 57 sc, not counting the ch-1 at the neck point.
The extra corner stitches stop the two bottom corners from cupping. They also make the hem count 29, which is 4 × 7 + 1, the count needed for 7 even scallops.
Border Row 2: Turn. Ch 1.
– First side: sc in each of the 14 sts (14 sc). Skip the ch-1 at the neck, then sc in each of the 14 sts down the second side (14 sc).
– Hem: sc in the first st. [Sk 1 st, (2 dc, picot, 2 dc) in the next st, sk 1 st, sc in the next st] 7 times. This uses exactly 1 + 28 = 29 hem sts.
– Sl st to the first sc. Fasten off and leave a 6 in (15.2 cm) tail.
Hem count: 1 sc + 7 scallops × (4 dc + 1 sc) = 36 sts plus 7 picots. The center scallop (the 4th) sits directly below the neck. That is where the bottom drop will hang.
Head (Color B)
Work in continuous rounds with a stitch marker.
- Rnd 1: 6 sc in MR. (6)
- Rnd 2: inc in each st. (12)
- Rnd 3: [sc, inc] 6 times. (18)
- Rnds 4–5: sc in each st. (18 each round)
- Rnd 6: [sc, sc2tog] 6 times. (12)
Stuff the head lightly. Press it gently between your fingers to give it a slightly flattened, coin-like shape.
- Rnd 7: sc2tog 6 times. (6)
Fasten off, leaving an 8 in (20.3 cm) tail. Weave the tail through the front loops of the last round, pull it tight and use the rest for sewing.
Checkpoint: the head is about 1 in (2.5 cm) across.
Wings (Make 2, Color B)
Hold the gold metallic thread together with Color B for Rnd 3 only, if you are using it.
Rnd 1: In a MR, work sc, ch 10, sc, ch 7. Sl st to the first sc and pull the ring closed. (2 sc, 1 ch-10 loop for the upper lobe, 1 ch-7 loop for the lower lobe)
Rnd 2: Sl st into the ch-10 loop, ch 1.
– In the ch-10 loop, work sc, [ch 4, sc] 4 times.
– In the ch-7 loop, work sc, [ch 4, sc] 3 times.
– Sl st to the first sc.
(10 sc, 7 ch-4 arches: 4 on the upper lobe, 3 on the lower lobe)
Rnd 3 (outline): Sl st into the first ch-4 arch, ch 1. Work 5 sc in each of the 7 arches. Sl st to the first sc.
(35 sc: 20 on the upper lobe, 15 on the lower lobe)
Fasten off and leave an 8 in (20.3 cm) tail.
The tight sc outline around the open ch-4 arches gives the wings their butterfly look: dense dark edges with open cells inside. The upper lobe is about 1.5 in (3.8 cm) long and the lower lobe about 1 in (2.5 cm), so each wing is about 2 in (5.1 cm) long.
Beads and Hanging Loop (Color A)
Bead (make 2):
– Rnd 1: 6 sc in MR. (6)
– Rnd 2: sc in each st. (6)
– Add a few wisps of fiberfill.
– Rnd 3: sc2tog 3 times. (3)
Fasten off, close the opening and leave a 6 in (15.2 cm) tail. Each bead is about 0.5 in (1.3 cm) across.
Hanging loop: Join Color A to the top of one bead. Ch 16 and sl st back into the same spot. Fasten off. The loop stands about 1 in (2.5 cm) tall.
Bottom drop: Join Color A to the top of the second bead and ch 3. Sew the last ch to the base of the center hem scallop.
Assembly
- Center the head over the neck point of the body, overlapping it by about 0.25 in (0.6 cm). Sew it on through the back of the head.
- Turn the angel over. Place each wing with its center ring just behind a shoulder, at the height of Row 2. Point the upper lobes up and out and the lower lobes down and out. Sew each ring firmly in place.
- Sew the top bead to the top of the head.
- Check that the bottom drop hangs straight below the center scallop.
- Weave in all ends on the WS.
Final Blocking
- Mist the angel until it is evenly damp but not dripping.
- Lay it RS up on the mat.
- Pin the two bottom corners so the hem is 4 in (10.2 cm) wide.
- Pin the neck point so the body is 3.75 in (9.5 cm) tall.
- Pin out the 7 picots so the scallops form an even curve.
- Open each wing arch with a pin tip. Pin the wing tips so the wingspan is 5 in (12.7 cm).
- Let it dry completely, then remove the pins.
- For a stiffer ornament, brush on a light fabric stiffener before step 7.
Final Quality-Control Checklist
- The body is 4 in (10.2 cm) wide and 3.75 in (9.5 cm) tall.
- Row 4 has 1 centered shell and Row 7 has 3 centered shells.
- The hem has 7 scallops with 7 picots, and the 4th scallop sits below the neck.
- The head is round, about 1 in (2.5 cm) across, and centered.
- Both wings have 4 upper and 3 lower arches and are attached symmetrically.
- The beads are firm, the loop is secure and the drop is centered.
- All ends are woven in invisibly.
Troubleshooting
- The body fans out into a semicircle: Your dc rows are too short. Check your gauge or go up a hook size.
- The fans are off center: Recount Row 3 or Row 6. They must have exactly 9 and 17 sts.
- The hem ruffles: You added extra sts. Border Row 1 should have exactly 29 sts along the hem.
- The sides pull in: Work exactly 2 sc per row-end, no fewer.
- The wings curl: Loosen the Rnd 3 outline or block the wings flat.
- The head is lumpy: Use less fiberfill and pull it into small wisps before stuffing.
Care
Hand wash in cool water with mild soap, press out the water in a towel, and dry flat, reshaping as needed. Do not machine wash a stiffened ornament.
Final Notes
The measurement chain is straightforward. A gauge of 18 dc = 4 in (10.2 cm) gives a body 3.75 in (9.5 cm) wide and 3.25 in (8.3 cm) tall after Row 7. The border adds 0.5 in (1.3 cm) at the hem and 0.125 in (0.3 cm) on each side, for 4 in × 3.75 in (10.2 cm × 9.5 cm). The 1 in (2.5 cm) head, 0.5 in (1.3 cm) beads and 2 in (5.1 cm) wings bring the angel to 6 in (15.2 cm) tall and 5 in (12.7 cm) across.
If you check the stitch counts at Rows 3, 6 and 7 and on the 29-stitch hem, the angel will come out balanced. Happy crocheting!