

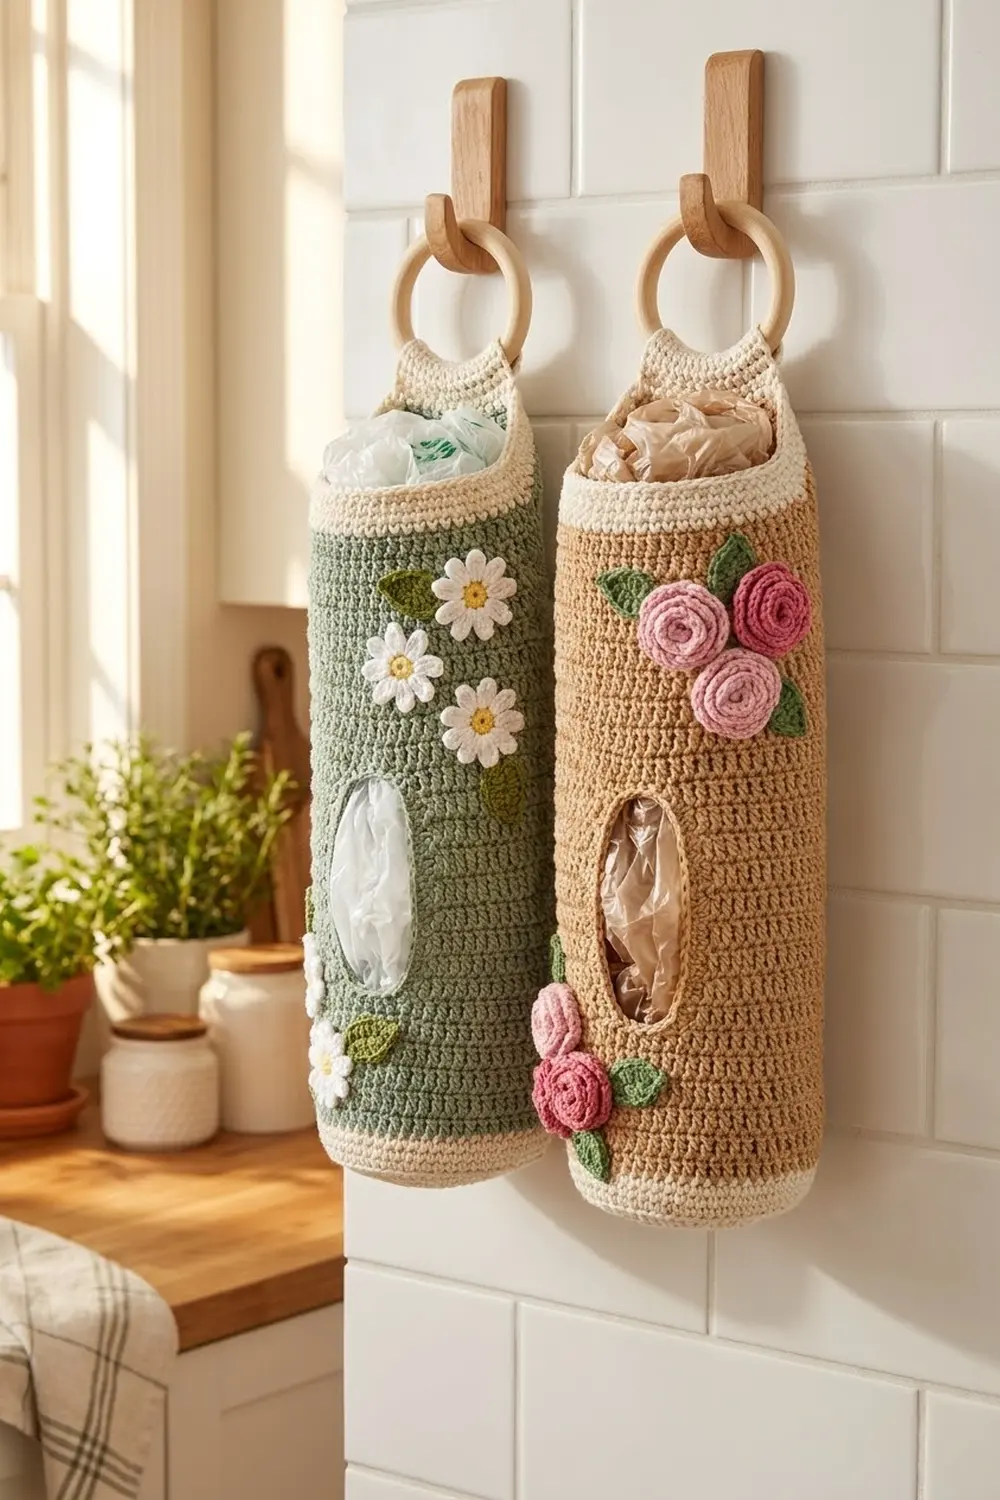
The Garden Window Bag Holder is a tall, airy tube that tidies plastic grocery bags while adding a bit of garden color to your kitchen wall. You push bags in through the open top and pull them out one at a time from the oval opening near the bottom.
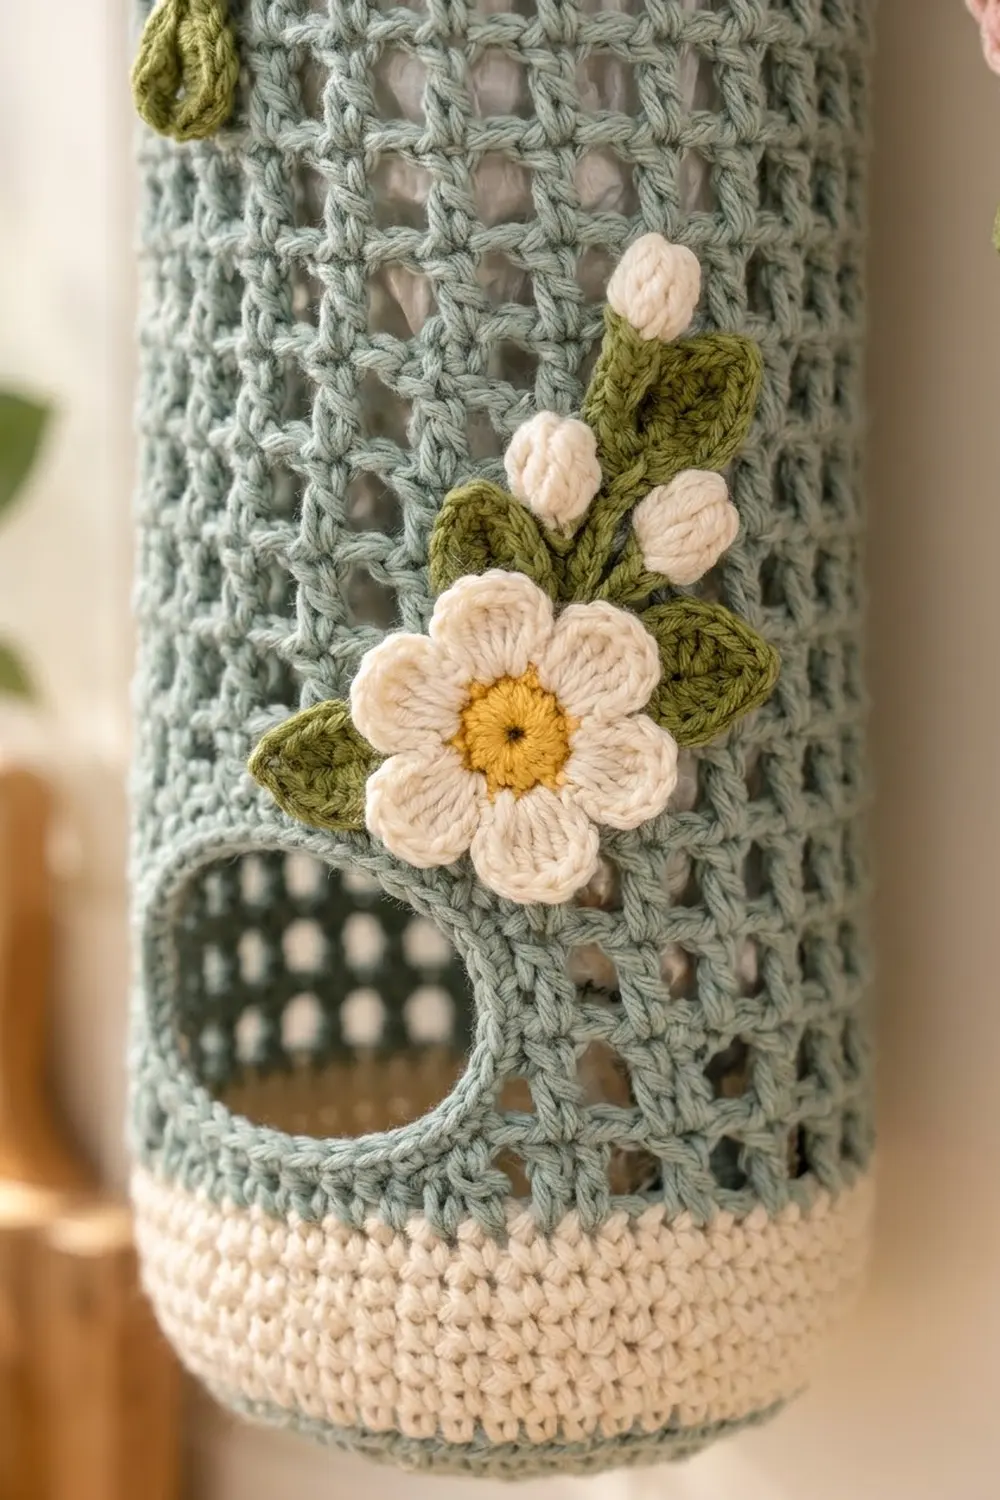
The sample is sage green with cream bands, cream daisies with sunny yellow centers, little cream buds and leafy green accents. A tan version with pink rolled roses uses exactly the same body; only the appliqués change. The style is soft cottage-kitchen: a square open mesh between solid bands, finished with a natural wooden ring.
This pattern uses US crochet terms. The finished holder is about 16 in (40.6 cm) tall and 4.5 in (11.4 cm) in diameter. The full hanging length, including the tab and ring, is about 21.5 in (54.6 cm).
You work the holder in one piece from the bottom up. First you make a rounded base and a solid bottom band, then the mesh body with a built-in dispensing hole, then a solid top band. A tapered tab wraps around the ring. Last, you sew on the flowers and leaves.
Finished Size and Construction
- Finished size: 16 in (40.6 cm) tall body; 14 in (35.6 cm) around; 7 in (17.8 cm) wide when flattened
- Hanging length: about 21.5 in (54.6 cm) with tab and ring
- Skill level: Easy / Advanced Beginner
- Terminology: US
- Yarn weight: Worsted (#4) cotton
- Hook: 5.0 mm (H-8)
- Number of pieces: 1 tubular body plus sewn-on appliqués
- Layout: Single hanging cylinder, opening on the front, tab on the back
- Piece size: 56 stitches around throughout
- Size before top band: about 14 in (35.6 cm) tall from the base
- Top band depth: about 1.5 in (3.8 cm), plus a tab about 3 in (7.6 cm) tall
Materials
Choose a smooth worsted-weight cotton or cotton blend. Cotton holds its shape when stuffed with bags and stands up to washing. Avoid stretchy acrylic: it lets the mesh sag over time.
Daisy version:
– Sage green (Main Color, MC): 70 g / about 120 m
– Cream (CC): 55 g / about 94 m
– Yellow: 5 g / about 9 m
– Leaf green: 8 g / about 14 m
Rose version: Tan (MC) 70 g / about 120 m; cream 55 g / about 94 m; dusty pink 6 g / about 10 m; light pink 3 g / about 5 m; leaf green 8 g / about 14 m.
Tools:
– 5.0 mm (H-8) crochet hook
– Wooden ring, 2.75 in (7.0 cm) outside diameter
– Tapestry needle
– 4 stitch markers
– Scissors and tape measure
All quantities include a margin of roughly 15% for gauge swatching and sewing tails.
Abbreviations (US Terms)
- ch – chain
- sl st – slip stitch
- sc – single crochet
- hdc – half double crochet
- dc – double crochet
- sc2tog – single crochet 2 together
- inc – 2 sc in the same stitch
- MR – magic ring
- sp – space
- st(s) – stitch(es)
- rep – repeat
Special stitch: Bud cluster. Yarn over and insert the hook in the stitch. Pull up a loop, then yarn over and pull through 2 loops. Do this 4 times in the same stitch, then yarn over and pull through all 5 loops on the hook.
Gauge and Checkpoints
- Solid sc: 16 sts and 18 rounds = 4 in (10.2 cm)
- Mesh: 8 mesh squares (16 sts) and 7 rounds = 4 in (10.2 cm)
Work the base first as your gauge test. It is a small piece, and it sets the 56-stitch count for the whole holder.
Checkpoints:
1. After Base Round 7: about 14 in (35.6 cm) around the outer edge. The base will cup slightly.
2. After Round 16: the bottom band is 2 in (5.1 cm) deep.
3. After Mesh Round 2: still 14 in (35.6 cm) around. If the tube flares, your chains are too loose.
4. After the hole rows: the hole is about 2.25 in (5.7 cm) wide and 1.75 in (4.4 cm) tall.
5. After Mesh Round 21: the mesh measures 12 in (30.5 cm) tall.
If your base is too big, go down one hook size. If it is too small, go up one size. If the mesh rounds come out too short, add 1 or 2 rounds of Round 2 before the top band. Each round adds about 0.6 in (1.5 cm).
Base and Bottom Band
With cream, work in joined rounds. Ch 1 at the start of each round does not count as a stitch. Join each round with a sl st to the first sc.
Round 1: MR, 8 sc in the ring. (8)
Round 2: Inc in each st around. (16)
Round 3: [Sc in next st, inc] 8 times. (24)
Round 4: [Sc in next 2 sts, inc] 8 times. (32)
Round 5: [Sc in next 3 sts, inc] 8 times. (40)
Round 6: [Sc in next 4 sts, inc] 8 times. (48)
Round 7: [Sc in next 5 sts, inc] 8 times. (56)
Eight increases per round make the base cup gently. That gives the rounded bottom seen in the photo.
Rounds 8–16: Sc in each st around. (56)
These 9 rounds measure 2 in (5.1 cm). Change to sage on the final sl st of Round 16. Fasten off cream.
Mesh Body
Round 1: Ch 4 (counts as dc + ch 1), skip next st. *Dc in next st, ch 1, skip next st; rep from * 26 more times. Join with a sl st to the 3rd ch of the beginning ch-4. (28 dc, 28 ch-1 sps = 56 sts)
Round 2: Ch 4 (counts as dc + ch 1). [Dc in next dc, ch 1] 27 times. Join to the 3rd ch of the ch-4. (28 dc, 28 ch-1 sps)
Dispensing Hole (worked in rows)
Row 3 (RS): Ch 4 (counts as dc + ch 1). [Dc in next dc, ch 1] 22 times, then dc in next dc. Turn. (24 dc, 23 ch-1 sps = 47 sts)
This leaves 9 sts unworked: 4 dc and 5 ch-1 sps. That gap becomes the hole.
Rows 4–5: Ch 4 (counts as dc + ch 1). [Dc in next dc, ch 1] 22 times, then dc in the 3rd ch of the turning ch. Turn after Row 4 only. (24 dc each row)
Bridge: At the end of Row 5, ch 9 and sl st to the 3rd ch of Row 5’s beginning ch-4. The 9 chains replace the 9 skipped sts, so the round is back to 56.
Round 6: Ch 4 (counts as dc + ch 1). [Dc in next dc, ch 1] 23 times, which brings you to the bridge. Skip the 1st bridge ch. *Dc in next ch, ch 1, skip next ch; rep from * 3 more times. Join. (24 + 4 = 28 dc, 28 ch-1 sps)
Rounds 7–21: Rep Round 2. (28 dc, 28 ch-1 sps)
The mesh measures 12 in (30.5 cm). Change to cream on the last join.
Hole Edging
Join sage at any corner of the hole. Sc evenly around the hole as follows:
– 9 sc along the bottom edge (1 in each of the 4 dc and 5 sps)
– 6 sc up the side (2 per row end)
– 9 sc into the underside of the bridge chains
– 6 sc down the other side
Join. (30 sc) Fasten off.
Top Band and Hanging Tab (Border)
Border gauge: 16 sc = 4 in (10.2 cm). With the holder flattened, each side has 28 sts: 28 front + 28 back = 56.
Round 22 (conversion): With cream, ch 1. Sc in each dc and in each ch-1 sp around. Join. That is 28 sc in the dc + 28 sc in the sps = 56 sc. (28 per side)
Rounds 23–28: Sc in each st around. (56)
The top band measures about 1.5 in (3.8 cm). Fasten off.
Why the math works: The mesh has 28 dc and 28 sps, which is exactly the base’s 56 sts. The conversion round puts exactly one sc on each of them. The tube stays a straight 14 in (35.6 cm) around from base to top, with no flare or pucker.
Hanging Tab
Flatten the holder with the hole centered on the front. On the back, mark the 20 center sts of Round 28. That leaves 4 back sts unused on each side of the tab.
With sage, work in rows. Ch 1 does not count as a stitch.
Row 1: Join at the right-hand marker. Sc in the same st and in the next 19 sts. Turn. (20)
Row 2: Sc2tog, sc in next 16 sts, sc2tog. Turn. (18)
Rows 3, 5, 7, 9 and 11: Sc in each st across. Turn.
Row 4: Sc2tog, sc in next 14 sts, sc2tog. (16)
Row 6: Sc2tog, sc in next 12 sts, sc2tog. (14)
Row 8: Sc2tog, sc in next 10 sts, sc2tog. (12)
Row 10: Sc2tog, sc in next 8 sts, sc2tog. (10)
Row 12: Sc2tog, sc in next 6 sts, sc2tog. (8)
Rows 13–20: Sc in each st across. (8)
The tab tapers from 5 in (12.7 cm) wide to 2 in (5.1 cm) wide. The tapered part is about 3 in (7.6 cm) tall. Fold Rows 14–20 over the wooden ring toward the inside. Whipstitch Row 20 to the back of Row 13. Fasten off.
Appliqués
Daisy (make 3)
Round 1: With yellow, MR, 10 sc in the ring. Join. Fasten off.
Round 2: Join cream in any st. *(Ch 2, 3 dc, ch 2, sl st) in the same st, sl st in next st; rep from * 4 more times, working the next petal into the next st each time. (5 petals)
Each daisy is about 1.75 in (4.4 cm) across.
Bud (make 3)
With cream, ch 4. Work a bud cluster in the 4th ch from the hook, then ch 1. Fasten off, leaving a tail. Bring the tail down to the base of the bud with green and wrap it 3 times to suggest a calyx.
Leaf (make 6)
With green, ch 7. Starting in the 2nd ch from the hook, work:
– Along the chain: sc, hdc, dc, dc, hdc
– In the last ch: (sc, ch 1, sc)
– Along the other side of the chain: hdc, dc, dc, hdc, sc
Sl st to the first sc. Each leaf is about 1.5 in (3.8 cm) long.
Rose Version (instead of daisies and buds)
- Large rose (make 2, dusty pink): Ch 15. Work 2 dc in the 4th ch from the hook and in each ch across. (24 dc) Roll into a spiral and stitch through the base.
- Small rose (make 1, light pink): Ch 11, then work as for the large rose. (16 dc)
Make 4–6 leaves.
Placement
Upper cluster: Place this 1 in (2.5 cm) below the top band, left of center front. Sew 2 daisies side by side, with 1 bud below them and 3 leaves tucked around.
Lower cluster: Place this just above the hole, slightly to the left. Sew 1 daisy with 2 buds above it and 3 leaves around.
Sew through the mesh dc posts, not the open spaces, so the flowers sit flat.
Final Blocking
- Spray the holder lightly with water until it is damp but not wet.
- Slide a rolled towel or a 4.5 in (11.4 cm) diameter tube inside.
- Straighten the mesh columns so they run vertically.
- Shape the hole into a smooth oval about 2.25 in (5.7 cm) wide.
- Press the petals and leaves flat with your fingers.
- Leave it to dry completely, then remove the form.
Final Quality-Control Checklist
- [ ] Base has 56 sts and cups gently
- [ ] Bottom band is 2 in (5.1 cm) deep
- [ ] Every mesh round has 28 dc and 28 ch-1 sps
- [ ] Hole edging has 30 sc and lies flat
- [ ] Mesh body measures 12 in (30.5 cm)
- [ ] Top band has 56 sc and is about 1.5 in (3.8 cm) deep
- [ ] Tab decreases evenly from 20 to 8 sts
- [ ] Tab is centered opposite the hole and firmly sewn around the ring
- [ ] Appliqués are secure with all tails woven in
Troubleshooting
- Tube flares at the mesh: Your ch-1s are too loose. Tighten them or go down a hook size for the mesh only.
- Mesh columns spiral: Make sure the beginning ch-4 sits directly above the previous round’s join every time.
- Hole edge gapes or ruffles: Use 1 sc per row end instead of 2, or go down a hook size for the edging.
- Holder tilts on the hook: The tab is off-center. Re-count so that 18 sts sit on each side of the tab: the 14 front sts that sit beside the 28-st front, plus the 4 back sts. Re-attach the tab if needed.
- Petals curl: Block them, or work the petal dc slightly looser.
Care
Hand wash in cool water with mild soap, press out the water in a towel and dry flat in shape. Remove the wooden ring before washing, or keep it dry.
Final Notes
The measurement chain is simple. A 56-stitch base at 4 sts per inch gives 14 in (35.6 cm) around. That count carries through the 2 in (5.1 cm) bottom band, the 12 in (30.5 cm) mesh of 28 dc and 28 sps, and the 56-stitch top band. Add the tapered tab and ring, and the holder hangs about 21.5 in (54.6 cm) long. Check your gauge on the base and the rest follows.
Happy crocheting!