

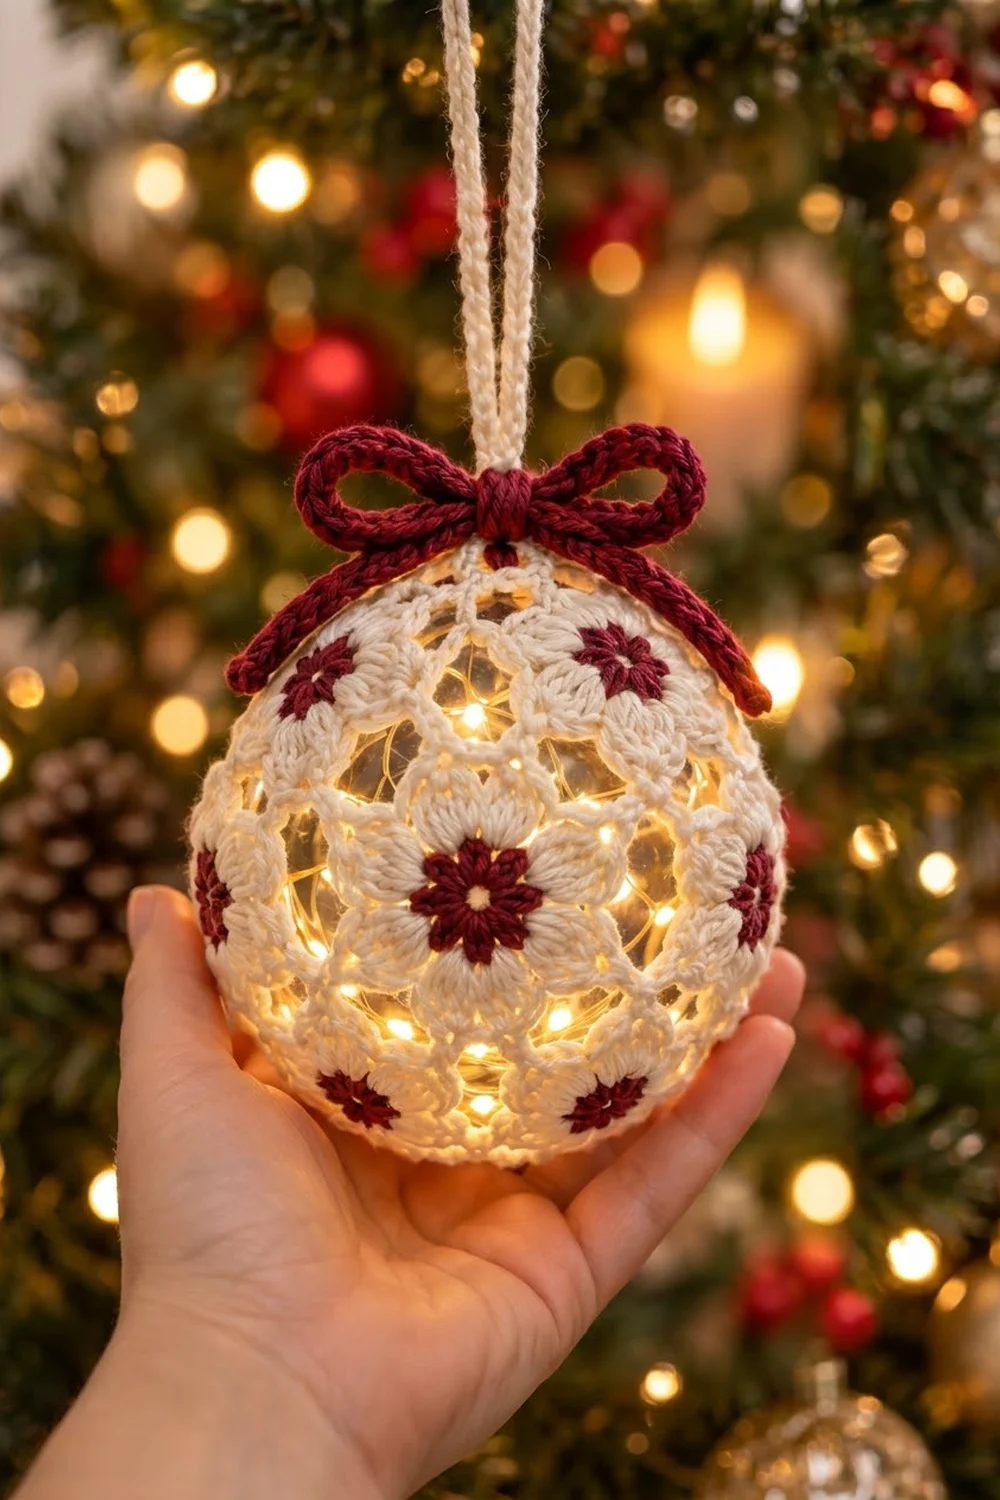
The Winter Berry Lantern is a lace cover for a clear glass ornament. Small cream flowers with deep burgundy centers wrap the whole ball. When you fill the ball with micro fairy lights, the glow comes through the open chain mesh, and each flower looks like it is lit from behind.
The palette is simple: matte cream cotton for the petals and lace, and burgundy cotton for the flower centers and the bow. A cream cord hanging loop finishes the top. The style is classic, warm, and a little vintage. Hang it on the tree, or cluster a few in a bowl.
This pattern uses US crochet terms. The finished cover fits a 3.5 in (8.9 cm) ball, which has a circumference of about 11 in (27.9 cm). Each flat motif measures 2 in (5.1 cm) from point to point.
You make 11 pentagon flower motifs and join them as you go into a dodecahedron shape with the top face left open. You slip the ball inside before joining the last motif. Then a short three-round edging pulls the opening in around the cap. A cream cord hanger and a burgundy bow finish the ornament.
Finished Size and Construction
- Finished size: fits a 3.5 in (8.9 cm) ball; circumference 11 in (27.9 cm)
- Skill level: Intermediate
- Terminology: US crochet terms
- Yarn weight: Sport weight (#2) cotton
- Hook: 2.75 mm (US C-2)
- Number of pieces: 11 motifs, 1 hanging cord, 1 bow cord
- Layout: 1 bottom motif, a lower ring of 5, an upper ring of 5, and the top face left open
- Piece size: 2 in (5.1 cm) point to point; each side 1.2 in (3.0 cm)
- Size before border: top opening perimeter 6 in (15.2 cm)
- Border depth: 0.5 in (1.3 cm)
Materials
Use a smooth, mercerized or matte sport-weight cotton. Cotton holds the lace shape and doesn’t fuzz over the lights. Avoid acrylic near warm bulbs. Micro LED lights stay cool, but cotton is still the safer choice. The amounts below assume about 3.1 m per gram.
- Cream: 25 g (about 78 m)
- Burgundy: 6 g (about 19 m)
These amounts include a margin of about 25 percent for gauge swatches and tails.
Tools:
- 2.75 mm (US C-2) crochet hook
- One clear glass or plastic ball ornament, 3.5 in (8.9 cm), with a removable cap
- Battery micro LED fairy lights on copper wire (optional)
- Tapestry needle
- Scissors
- Stitch marker
- Rustproof pins and a spray bottle for blocking
- Ruler or tape measure
Abbreviations (US Terms)
- ch: chain
- sl st: slip stitch
- sc: single crochet
- hdc: half double crochet
- dc: double crochet
- sc2tog: single crochet 2 together
- sp: space
- st(s): stitch(es)
- RS: right side
- WS: wrong side
Special stitch: Puff stitch (puff). (Yarn over, insert hook in the indicated space, yarn over, pull up a loop to about 0.25 in (0.6 cm) tall) 3 times. You now have 7 loops on the hook. Yarn over and pull through all 7 loops. The puff counts as 1 stitch.
Special technique: Slip stitch cord. Make a chain. Then work a sl st in the back bump of the 2nd ch from the hook and in the back bump of each ch across. Each finished sl st counts as 1 stitch.
Gauge and Checkpoints
Make one complete motif before you start the others. Lace gauge controls how well the cover fits the ball, so check each stage:
- After Round 1: the burgundy center measures 0.5 in (1.3 cm) across.
- After Round 3: the petal flower measures 1.5 in (3.8 cm) across.
- After Round 5: the motif measures 2 in (5.1 cm) point to point, and each side measures 1.2 in (3.0 cm). Measure it laid flat and lightly steamed.
- Single crochet gauge for the edging: 6 sc = 1 in (2.5 cm).
If your motif is bigger than 2.25 in (5.7 cm), go down to a 2.5 mm hook. Otherwise the cover will sag and slide on the ball. If it is smaller than 1.75 in (4.4 cm), go up to a 3.0 mm hook. Otherwise the cover will be too tight to close around the ball.
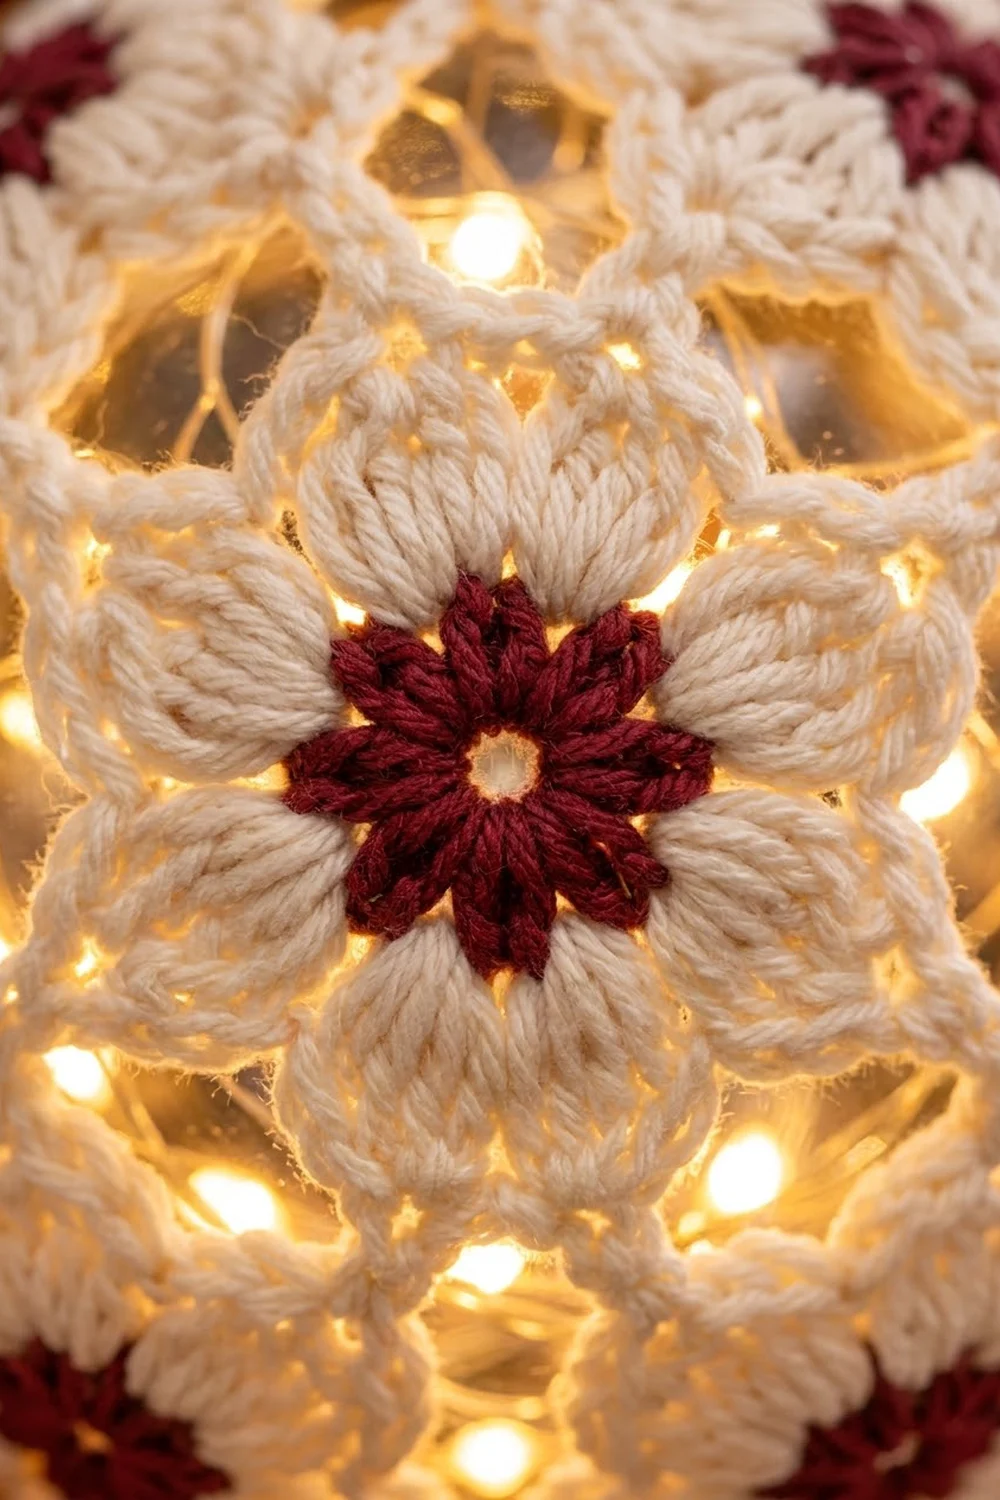
Motif (make 11)
Each motif is a pentagon with 5 petals. Every side has 2 ch-4 loops with a sc between them, and every point has a ch-3 corner loop.
Round 1 (burgundy): Make a magic ring. Ch 3 (counts as dc), work 9 dc in the ring, then sl st to the top of the beginning ch-3. Pull the ring closed. (10 dc)
Fasten off the burgundy and weave in the tail on the WS. These 10 short spokes form the star center.
Round 2 (cream): With the RS facing, join cream with a sc in any dc. Ch 3, skip the next dc. Sc in the next dc, ch 3, skip the next dc. Repeat from * 3 more times. Sl st to the first sc. (5 sc and 5 ch-3 sps; 20 sts)
Round 3 (petals): Sl st into the first ch-3 sp. In each ch-3 sp, work (sc, hdc, dc, puff, dc, hdc, sc). Sl st to the first sc. (35 sts: 5 petals of 7 sts each)
The puff in the middle of each petal gives the plump, rounded tip.
Round 4 (frame): Sl st in the next hdc and the next dc, then sc in the top of the puff. Ch 6. Sc in the next puff, ch 6. Repeat from * 3 more times. Sl st to the first sc. (5 sc and 5 ch-6 loops; 35 sts)
The sc at each petal tip becomes a corner of the pentagon. The ch-6 loops arch across the gaps between the petals.
Round 5 (lace edge): Ch 1. Work (sc, ch 3, sc) in the next sc for the corner. Ch 4, sc in the next ch-6 loop, ch 4. Repeat from * 4 more times. Sl st to the first sc. (70 sts: 15 sc, 5 ch-3 corners, 10 ch-4 loops)
Count check: Each repeat uses 3 sc and 11 chains (3 + 4 + 4), so it has 14 sts. Five repeats give 5 × 14 = 70 sts. Each side runs from corner to corner as ch-4, sc, ch-4.
Work Rounds 1–5 in full on Motif 1 only. On Motifs 2–11, work Round 5 using the joining method below.
Make All Pieces
- Burgundy: 11 centers (Round 1), plus 1 bow cord
- Cream: 11 motifs (Rounds 2–5), plus the edging and 1 hanging cord
Layout grid (number of motifs each one joins to):
TOP:          [ open top - edging ]
UPPER RING:   M7(2)  M8(3)  M9(3)  M10(3)  M11(4)
LOWER RING:   M2(1)  M3(2)  M4(2)  M5(2)   M6(3)
BOTTOM:                  M1(0)
- M1: the bottom motif.
- M2–M6: each one joins to one side of M1 and to the motifs next to it in the lower ring. M6 closes the lower ring by joining to M5, M1, and M2.
- M7–M11: each one sits in the dip between two lower motifs. M7 joins M2 and M3. M8 joins M3, M4, and M7. M9 joins M4, M5, and M8. M10 joins M5, M6, and M9. M11 joins M6, M2, M10, and M7.
That makes 25 seams in total (0+1+2+2+2+3+2+3+3+3+4). A full dodecahedron has 30 edges. The 5 edges around the open top stay free.
Joining
Method: Join as you go on Round 5. Hold the new motif and the finished motif with WS together and both RS facing out. Line up the corners. Each joined side links 1 corner, 2 ch-4 loops, and the next corner. Work the joins in mirror order: your first loop links to the neighbor’s last loop on that side.
Joined corner: Sc in the corner sc, ch 1, sl st in the neighbor’s ch-3 corner sp, ch 1, then sc in the same corner sc. The sl st takes the place of the middle chain, so the corner is still the length of a ch-3.
Joined side loop: Ch 2, sl st in the neighbor’s matching ch-4 loop, ch 1. This gives 2 + 1 + 1 = the length of a ch-4. Then work the sc in the ch-6 loop as usual. Join the second loop the same way.
Three-motif corners: Where a third motif meets a corner that is already joined, sl st into the sl st of the earlier join. Don’t sl st into a corner space. This keeps all three points tight in one spot.
Stitch-to-stitch logic: The chain lengths and the sc count don’t change, so every joined motif keeps its 70-st Round 5 and its 1.2 in (3.0 cm) sides. The joins add nothing extra to the seams.
Tension: Keep the joining sl sts relaxed, about as loose as a chain. Tight joins pucker the points and leave the sphere lumpy.
Insert the ball: After joining M10, remove the cap, add the fairy lights if you’re using them, and replace the cap. Slip the ball into the cover with the cap at the top opening. Work M11 with the ball inside, easing each joined side over the curve of the ball.
Size checkpoint: Once M11 is joined, the cover should wrap the ball snugly with no loose bulges. The 5 free sides at the top should total about 6 in (15.2 cm). If the cover sags, the motifs are oversized, so remake them with a smaller hook.
Border (Top Edging)
Border gauge: 6 sc = 1 in (2.5 cm), worked in cream.
Each top side belongs to one upper motif. In this section, each side “owns” its starting corner only. The corner at the end of a side belongs to the next side, so no corner is counted twice.
Round 1: With the ball facing you, join cream with a sc in the sl st of any top corner join. Ch 3, sc in the next ch-4 loop, ch 3, sc in the next ch-4 loop, ch 3, sc in the next corner join. Repeat from * around, ending with ch 3 and a sl st to the first sc instead of the last sc. (15 sc and 15 ch-3 sps; 3 sc and 3 ch-3 sps per side)
Round 2: Sl st into the first ch-3 sp. Ch 1, then work 2 sc in each ch-3 sp, skipping the sc’s. Sl st to the first sc. (30 sc = 15 sps × 2; 6 sc per side)
Round 3 (decrease): Ch 1, then sc2tog around. Sl st to the first st. (15 sts = 30 ÷ 2; 3 sts per side)
Fasten off, leaving a 6 in (15.2 cm) tail. Weave the tail through the tops of the Round 3 stitches. Pull gently so the edge sits just below the cap’s crimped rim, then secure the tail.
Why the math works: The open top measures 6 in (15.2 cm) around. Round 2 has 30 sc, which at gauge is 5 in (12.7 cm). That eases the edge in slightly, so it hugs the shoulder of the ball. Round 3 has 15 sts, which is about 2.5 in (6.4 cm). A 0.9 in (2.3 cm) cap is about 2.8 in (7.1 cm) around, so the round stretches a little over it and grips without riding up.
Hanging cord (cream): Make a slip stitch cord with 61 ch, for 60 sl st, about 10 in (25.4 cm). Thread it through the cap’s wire loop. Knot the two ends together to make a doubled loop about 4.5 in (11.4 cm) long.
Bow (burgundy, 2 strands held together): Make a slip stitch cord with 61 ch, for 60 sl st, about 12 in (30.5 cm) at 5 sl st per 1 in (2.5 cm). Wrap the cord once around the base of the hanging cord, just above the edging. Tie a bow with two 1.25 in (3.2 cm) loops so it is about 3 in (7.6 cm) wide. Trim the tails to 1 in (2.5 cm) and tack them down with the yarn tails.
Final Blocking
- Before you join any motifs, spritz each one lightly. Pin it flat to 2 in (5.1 cm) point to point, with straight 1.2 in (3.0 cm) sides.
- Let the motifs dry fully, then join them.
- Once the cover is assembled on the ball, mist it lightly with water. Keep the water away from the battery pack.
- With your fingers, center each burgundy star in its face and push each petal tip outward.
- Line up the joined corners so the three-way points meet neatly.
- Let it dry standing upright on a cup.
- Shape the bow loops and steam them lightly from above without touching them.
Final Quality-Control Checklist
- 11 motifs, each with a 10-dc burgundy center, 5 petals, and a 70-st Round 5
- All 25 seams joined, with no twisted corners
- Three-way corners meet at a single sl st
- The cover is snug on the ball with no sagging faces
- Edging rounds total 15, 30, and 15 sts
- The edge grips the cap without covering the wire loop
- The hanging loop is about 4.5 in (11.4 cm) and knotted securely
- The bow is about 3 in (7.6 cm) wide and centered over the cap
- All tails are woven in on the inside and none show through the lace
Troubleshooting
- The motif cups: Your Round 4 chains are too tight. Loosen them, or use ch 7 for that round only.
- The motif ruffles: Your chains are too loose. Go down a hook size for Rounds 4–5.
- The cover won’t close over the ball: The motifs are undersized. Block them to a full 2 in (5.1 cm), or remake them with a 3.0 mm hook.
- Gaps at the three-way points: You joined into a corner space instead of the existing sl st. Redo that corner.
- The edging slides off the cap: Pull the Round 3 tail tighter, or work a second sc2tog round of 8 sts.
- The bow droops: Make sure you used two strands held together, and keep the sl sts firm.
Care
Take out the ball and lights first. Then hand wash the cover in cool water, press out the water in a towel, and reshape it to dry over the ball.
Final Notes
Every measurement in this pattern builds on the one before it. The motif gauge comes first: a 0.5 in (1.3 cm) center, a 1.5 in (3.8 cm) flower, and a 2 in (5.1 cm) motif with 1.2 in (3.0 cm) sides. Eleven of those motifs, joined along 25 seams, wrap a 3.5 in (8.9 cm) ball with an 11 in (27.9 cm) circumference. That leaves a 6 in (15.2 cm) opening at the top, which the 15-30-15 edging draws in to about 2.5 in (6.4 cm) around the cap. Check each stage as you go, and the ornament should fit snugly and glow evenly.
Happy crocheting!