

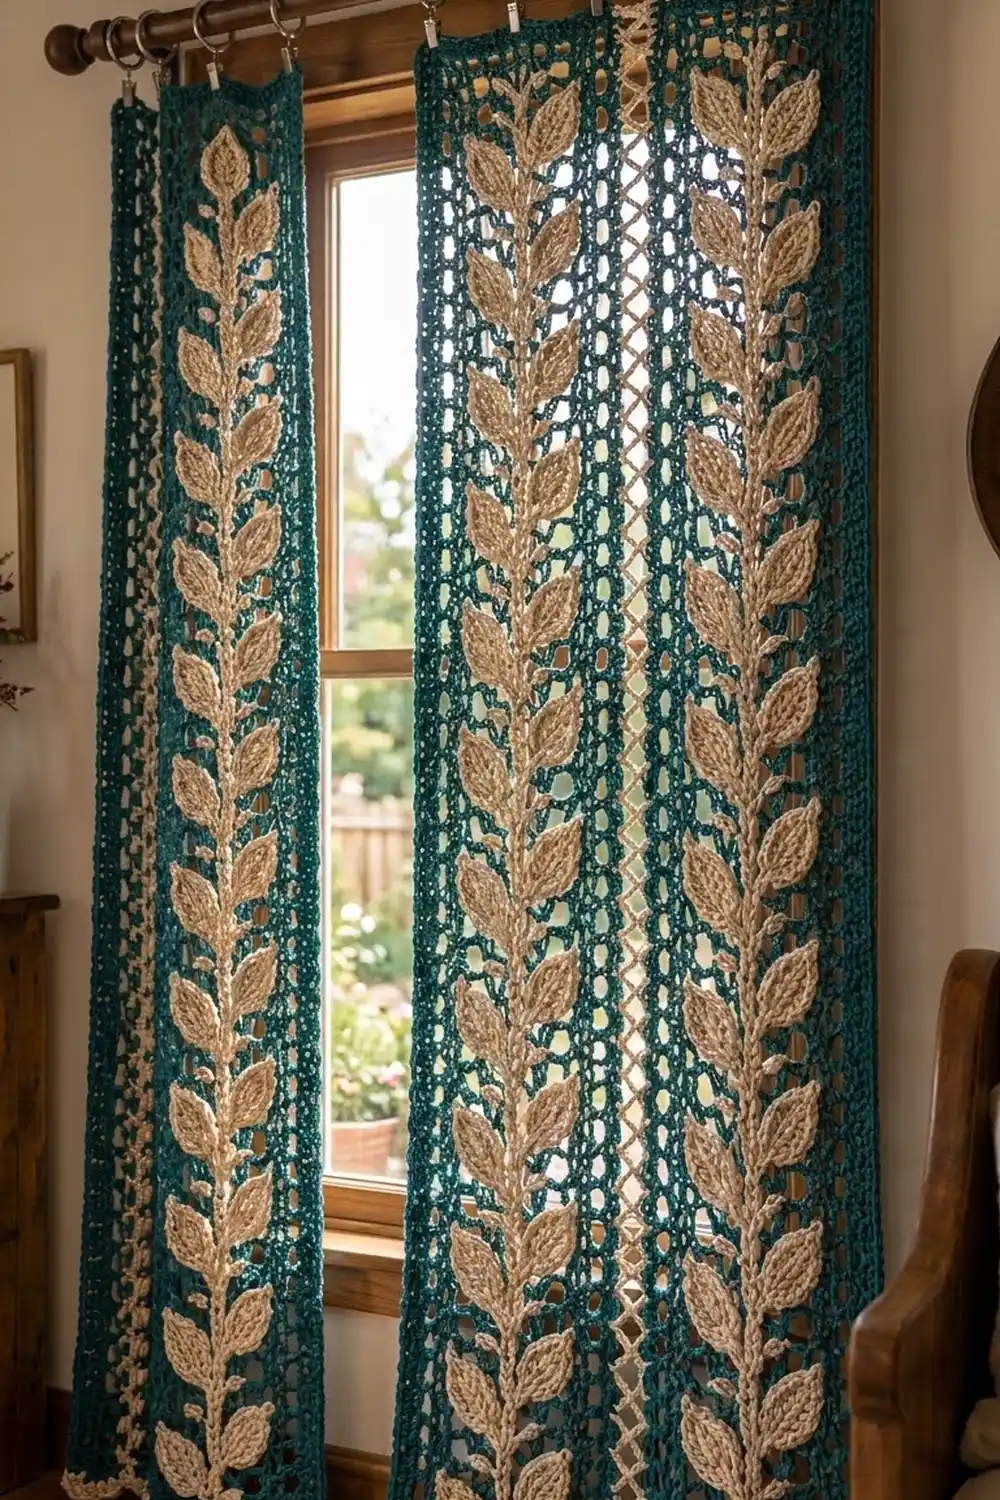
These curtain panels pair an open teal mesh with raised cream leaf vines that climb from hem to top. Each panel is made of three long strips joined side by side. A row of cream scallops finishes the bottom edge, so the vines look like they grow out of a lace hem.
The colors are deep teal and warm cream. The mesh lets soft light through, and the solid leaves and corded stem add texture and weight. The style feels cozy and seasonal, but the panels work all year in a kitchen, living room, or bedroom.
This pattern uses US crochet terms. One finished panel measures 38.75 in wide x 81.75 in long (98.4 cm x 207.6 cm), including the scalloped hem. The photo shows a pair, so make two panels for a standard window.
The construction is modular. You crochet three teal filet-mesh strips, surface-crochet a cream stem up the center of each one, and sew on crocheted leaves. Then you join the strips with a cream ladder join and finish with a scalloped bottom border and a plain top edge.
Finished Size and Construction
- Finished panel size: 38.75 in x 81.75 in (98.4 cm x 207.6 cm)
- Skill level: Intermediate
- Terminology: US crochet terms
- Yarn weight: Worsted (#4)
- Hooks: 5.0 mm (H-8) for strips, joins, and border; 4.5 mm (7) for leaves
- Number of pieces per panel: 3 strips, plus 39 leaves per strip (117 leaves)
- Layout: 3 strips side by side, 1 row high
- Strip size: 12.75 in x 80 in (32.4 cm x 203.2 cm)
- Size before border: 38.75 in x 80 in (98.4 cm x 203.2 cm)
- Border depth: 1.5 in (3.8 cm) at the bottom, 0.25 in (0.6 cm) at the top
Materials
Choose a smooth worsted-weight yarn with good stitch definition. Cotton or a cotton-acrylic blend hangs well and resists stretching. Avoid very fuzzy yarn, which hides the mesh and blurs the leaf shapes. The amounts below assume about 200 yd (183 m) per 100 g.
Per panel:
- Teal (Color A): 1,000 g, about 2,000 yd (1,829 m)
- Cream (Color B): 250 g, about 500 yd (457 m)
Per pair of panels:
- Teal (Color A): 2,000 g, about 4,000 yd (3,658 m)
- Cream (Color B): 500 g, about 1,000 yd (914 m)
These quantities include a margin of about 10% for swatching, tails, and gauge differences. Buy all the teal from one dye lot, because a dye-lot change shows clearly across a wide panel.
Tools:
- 5.0 mm (H-8) and 4.5 mm (7) crochet hooks
- Tapestry needle
- Locking stitch markers (at least 20)
- Measuring tape
- Rust-proof pins and blocking mats or a large clean surface
- Spray bottle
- 10 clip rings per panel for hanging
Abbreviations (US Terms)
- ch – chain
- sl st – slip stitch
- sc – single crochet
- hdc – half double crochet
- dc – double crochet
- sk – skip
- sp – space
- st(s) – stitch(es)
- RS / WS – right side / wrong side
- rep – repeat
Surface slip stitch: Hold the yarn behind the fabric. Insert the hook from front to back through the fabric, pull up a loop, and draw it through the loop on the hook. This makes a raised chain line on the front.
Gauge and Checkpoints
Gauge: 16 sts and 7 rows = 4 in (10.2 cm) in filet mesh with the 5.0 mm hook. Each ch-1 counts as a stitch.
Leaf gauge: One finished leaf measures 3 in long x 1.25 in wide (7.6 cm x 3.2 cm) with the 4.5 mm hook.
Test one piece first. Work Rows 1–14 of a strip and measure before going on. This is also your gauge swatch, so you can keep going if it matches.
Checkpoints:
- Foundation row: 12.75 in (32.4 cm) wide
- Row 7: 4 in (10.2 cm) tall
- Row 14: 8 in (20.3 cm) tall
- Row 70: 40 in (101.6 cm) tall
- Row 140: 80 in (203.2 cm) tall
- After joining: 38.75 in (98.4 cm) wide
- After border: 81.75 in (207.6 cm) long
If your strip is too wide or the rows are too tall, go down one hook size. If it is too narrow or too short, go up one hook size. Being off by just 1 st per 4 in changes each strip by almost 1 in, so fix the width before you commit. If only the row height is off, you can change the total row count in steps of 7 rows (4 in / 10.2 cm). Keep the vine spacing at 7 rows either way.
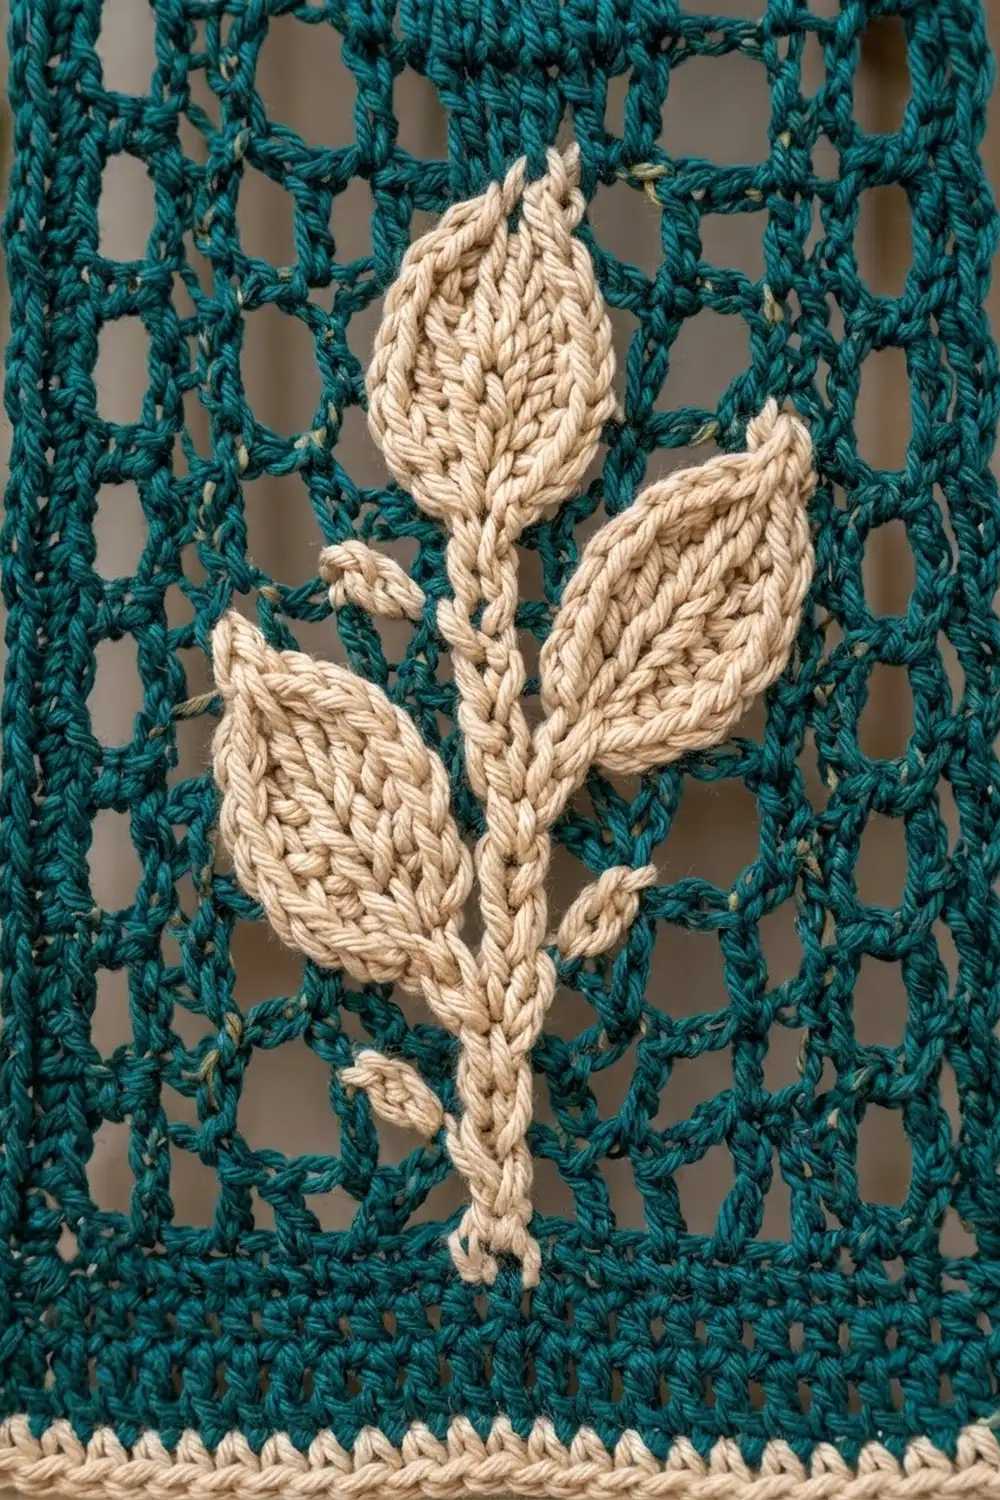
Mesh Strip (Make 3 per Panel)
Use Color A and the 5.0 mm hook. Each strip has a solid band of 3 dc at each edge, with 23 mesh spaces between the bands.
Foundation: Ch 53.
Row 1 (RS): Dc in 4th ch from hook (the skipped chs count as the first dc) and in next ch, ch 1, sk 1 ch, dc in next ch 23 times, dc in last 2 ch. Turn. (51 sts: 28 dc + 23 ch-1)
Check: 3 edge dc + (23 x 2 mesh sts) + 2 final dc = 51. The last mesh dc and the 2 final dc form the 3-dc band on the far edge.
Row 2: Ch 3 (counts as dc throughout), dc in next 2 dc, ch 1, sk ch-1 sp, dc in next dc 23 times, dc in next dc, dc in top of turning ch. Turn. (51 sts)
Rows 3–140: Rep Row 2. (51 sts per row)
Fasten off, leaving a 6 in (15.2 cm) tail. The strip should measure 12.75 in x 80 in (32.4 cm x 203.2 cm). Every row has the same layout, so the 12th mesh space sits at the exact center (stitch 26). These center spaces stack into a straight column for the stem.
Vine Stem
Hold two strands of Color B together and use the 5.0 mm hook. Work with the RS facing you and the bottom edge closest to you.
- Insert the hook through the center (12th) ch-1 space of Row 2 and pull up a loop.
- Each row (Rows 2–133): Surface sl st through the center of the ch-1 that forms the top of the current space, then surface sl st through the ch-1 space directly above.
- That’s 2 surface sl sts per row for 132 rows. (264 sl sts)
Fasten off on the WS and weave in the ends. The stem ends at the top of Row 133, 76 in (193.0 cm) from the bottom edge, which leaves room for the top leaf. Keep the slip stitches loose enough that the strip doesn’t shorten. Lay the strip flat every 20 rows to check.
Leaves (Make 39 per Strip)
Use one strand of Color B and the 4.5 mm hook.
Ch 11.
Side 1: Sc in 2nd ch from hook, hdc in next ch, dc in next 5 ch, hdc in next ch, sc in next ch. (9 sts)
Tip: (Sc, ch 2, sc) in last ch.
Side 2: Working in the bottom loops of the foundation ch, sc in next ch, hdc in next ch, dc in next 5 ch, hdc in next ch, sc in next ch. (9 sts)
Sl st in first sc. (20 sts + 1 ch-2 tip)
Fasten off, leaving a 12 in (30.5 cm) tail for sewing. The foundation chain stays visible down the middle as the leaf vein, and the ch-2 makes a pointed tip. The end where you joined is the rounded base of the leaf.
Attaching the Leaves
The leaves go on in slightly staggered pairs every 7 rows (4 in / 10.2 cm). All of them point upward at about 45 degrees.
- Left leaves: base at the stem on Rows 4, 11, 18, 25, 32, 39, 46, 53, 60, 67, 74, 81, 88, 95, 102, 109, 116, 123, and 130 (19 leaves)
- Right leaves: base at the stem one row higher, on Rows 5, 12, 19 … 131 (19 leaves)
- Top leaf: base at the top of Row 133, pointing straight up (1 leaf)
Total: 19 + 19 + 1 = 39 leaves per strip.
Pin all 39 leaves before you sew. Each leaf reaches about 2.1 in (5.3 cm) out to the side, so the tips stay inside the mesh and the 3-dc edge bands stay clear. Sew around the outer edge of each leaf with its tail, using small stitches through the back loops of the leaf and into the mesh. Don’t pull tight, or the mesh will gather. The tip of the top leaf ends about 79 in (200.7 cm) from the bottom, which is 1 in (2.5 cm) below the top edge.
Make All Pieces
Per panel:
- Color A: 3 mesh strips
- Color B: 3 stems (surface crochet) and 117 leaves
Per pair:
- Color A: 6 mesh strips
- Color B: 6 stems and 234 leaves
Layout (one panel, RS facing):
[Strip 1] | [Strip 2] | [Strip 3]
  vine    |   vine    |   vine
| = cream ladder join. All strips run the same direction, with the foundation chain at the bottom.
Joining
Lay Strips 1 and 2 side by side, RS up, with the foundation edges lined up at the bottom. Each row end is one dc post (or ch-3), so Row 1 of one strip lines up with Row 1 of the other, and so on up to Row 140.
Use Color B and the 5.0 mm hook.
- Join with a sl st around the Row 1 end of Strip 1.
- Ch 1, sl st around the Row 1 end of Strip 2.
- Ch 1, sl st around the Row 2 end of Strip 1.
- Keep going: ch 1, sl st into the matching row end on the other strip, then ch 1 and move up one row.
- Finish with a sl st in the Row 140 end of Strip 2. (140 sl sts on each strip, 279 ch-1)
This makes a narrow cream zigzag ladder about 0.25 in (0.6 cm) wide. Repeat to join Strip 3 to Strip 2.
Tension: The chains should just bridge the gap without pulling the edges together or puckering. Every 20 rows, lay the work flat and check that both strips are the same length at the join.
Checkpoint: Two strips plus one join = 25.75 in (65.4 cm). Three strips plus two joins = 12.75 + 0.25 + 12.75 + 0.25 + 12.75 = 38.75 in (98.4 cm).
Border
You only work the border on the bottom and top edges. The long sides already have neat 3-dc bands and don’t need an edging.
Border gauge: 4 sc = 1 in (2.5 cm), which matches the mesh gauge.
Bottom Edge (Color B, 5.0 mm hook)
Row 1 (RS): With the RS facing, join at the bottom right corner. Working in the bottom of the foundation chain, sc in each of the 51 chs of Strip 3, then Strip 2, then Strip 1. Step straight over each ladder join without adding stitches. Turn. (51 + 51 + 51 = 153 sc)
Row 2: Ch 1, sc in first sc, sk 3 sc, 9 dc in next sc, sk 3 sc, sc in next sc 19 times. Fasten off. (19 scallops; 1 + 19 x 8 = 153 sts used)
Each scallop covers 8 sts, or 2 in (5.1 cm), and is about 1.25 in (3.2 cm) deep. Row 1 adds 0.25 in (0.6 cm), so the bottom border adds 1.5 in (3.8 cm) in total.
Top Edge (Color A, 5.0 mm hook)
Row 1: With the RS facing, sc in each st across Row 140 of all three strips, stepping over the joins. (153 sc) Fasten off. This adds 0.25 in (0.6 cm) and gives the clip rings a firm edge to grip.
Why the Math Works
Each strip has 51 sts per row, so the three strips give exactly 3 x 51 = 153 sts along each edge. No stitches are added at the seams. The scallop repeat is a multiple of 8 sts plus 1, and 153 = 19 x 8 + 1, so the row starts and ends with a sc and the scallops are symmetrical. At 4 sc per inch, 153 sc covers 38.25 in (97.2 cm). The two ladder joins add 0.5 in (1.3 cm), which spreads across the row without strain, so the hem lies flat at 38.75 in (98.4 cm).
Final Blocking
- Weave in all ends along the 3-dc edge bands or behind the leaves, where they stay hidden.
- Lay the panel flat, RS up, on blocking mats or a large clean surface.
- Pin it out to 38.75 in x 81.75 in (98.4 cm x 207.6 cm), starting at the corners.
- Pin the joins straight, using a long ruler as a guide.
- Pin each scallop at its center so the hem forms even curves.
- Mist lightly with water until damp, not soaked.
- Gently shape the leaves so they lie flat and point upward.
- Let the panel dry completely before unpinning, ideally for 24 hours.
Final Quality-Control Checklist
- [ ] Each strip measures 12.75 in x 80 in (32.4 cm x 203.2 cm)
- [ ] Every row has 51 sts with 23 mesh spaces
- [ ] Each stem is straight and centered, with 264 sl sts
- [ ] Each strip has 39 leaves: 19 staggered pairs plus 1 top leaf
- [ ] All strips run the same direction
- [ ] Each join has 140 sl sts on each side and lies flat
- [ ] Panel width is 38.75 in (98.4 cm)
- [ ] Bottom edge has 153 sc and 19 scallops
- [ ] Top edge has 153 sc
- [ ] Finished length is 81.75 in (207.6 cm)
- [ ] All ends are woven in and hidden
Troubleshooting
The strip gets narrower as you go: You’re probably skipping the turning chain. Count to 51 sts every 10 rows and make sure the last dc goes into the top of the ch-3.
The mesh spaces look uneven: Keep each ch-1 the same size as the tops of the dc. If the chains are loose, tighten slightly as you make them.
The stem puckers the strip: The surface slip stitches are too tight. Pull them out and rework them more loosely, or use a 5.5 mm (I-9) hook for the stem only.
The leaves curl: Your leaf tension is tight. Block the leaves before sewing, or switch to the 5.0 mm hook.
The join pulls the strips together: Make the ch-1 a little looser, or work ch 2 instead. Then recheck that the panel is 38.75 in (98.4 cm) wide.
The scallops flare: Check that you skipped exactly 3 sc on each side of every scallop. If they still ruffle, work 7 dc instead of 9.
The panel is too long after hanging: Cotton can stretch under its own weight. Let it hang for 48 hours, and if it’s still too long, take out rows at the top before you work the top edge.
Care
Hand wash in cold water, or machine wash on a gentle cycle in a mesh laundry bag. Dry flat and reshape while damp; don’t hang the panel while it’s wet, because the weight will stretch it.
Final Notes
Here’s how the measurements build. 51 sts make a 12.75 in (32.4 cm) strip, and 140 rows make it 80 in (203.2 cm) long. Three strips with two 0.25 in (0.6 cm) joins make a 38.75 in (98.4 cm) panel. The 153-st edge divides into 19 even scallops. The 1.5 in (3.8 cm) bottom border and the 0.25 in (0.6 cm) top edge bring the panel to 81.75 in (207.6 cm). Check your gauge early and count stitches often, and the panels will hang straight and even.
Happy crocheting!