

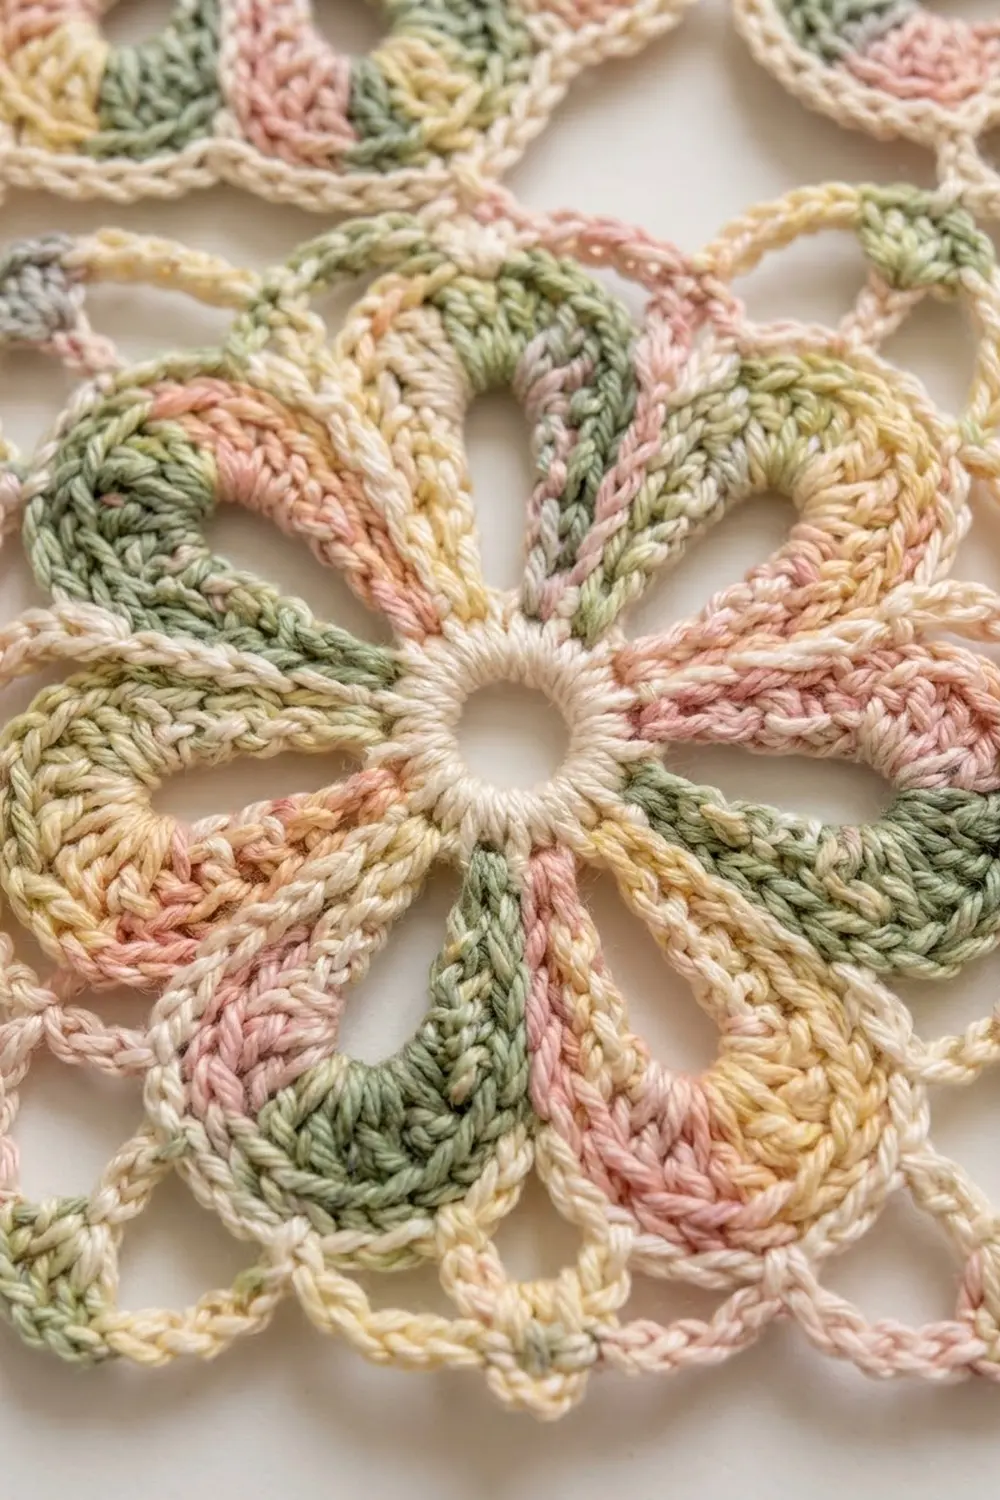
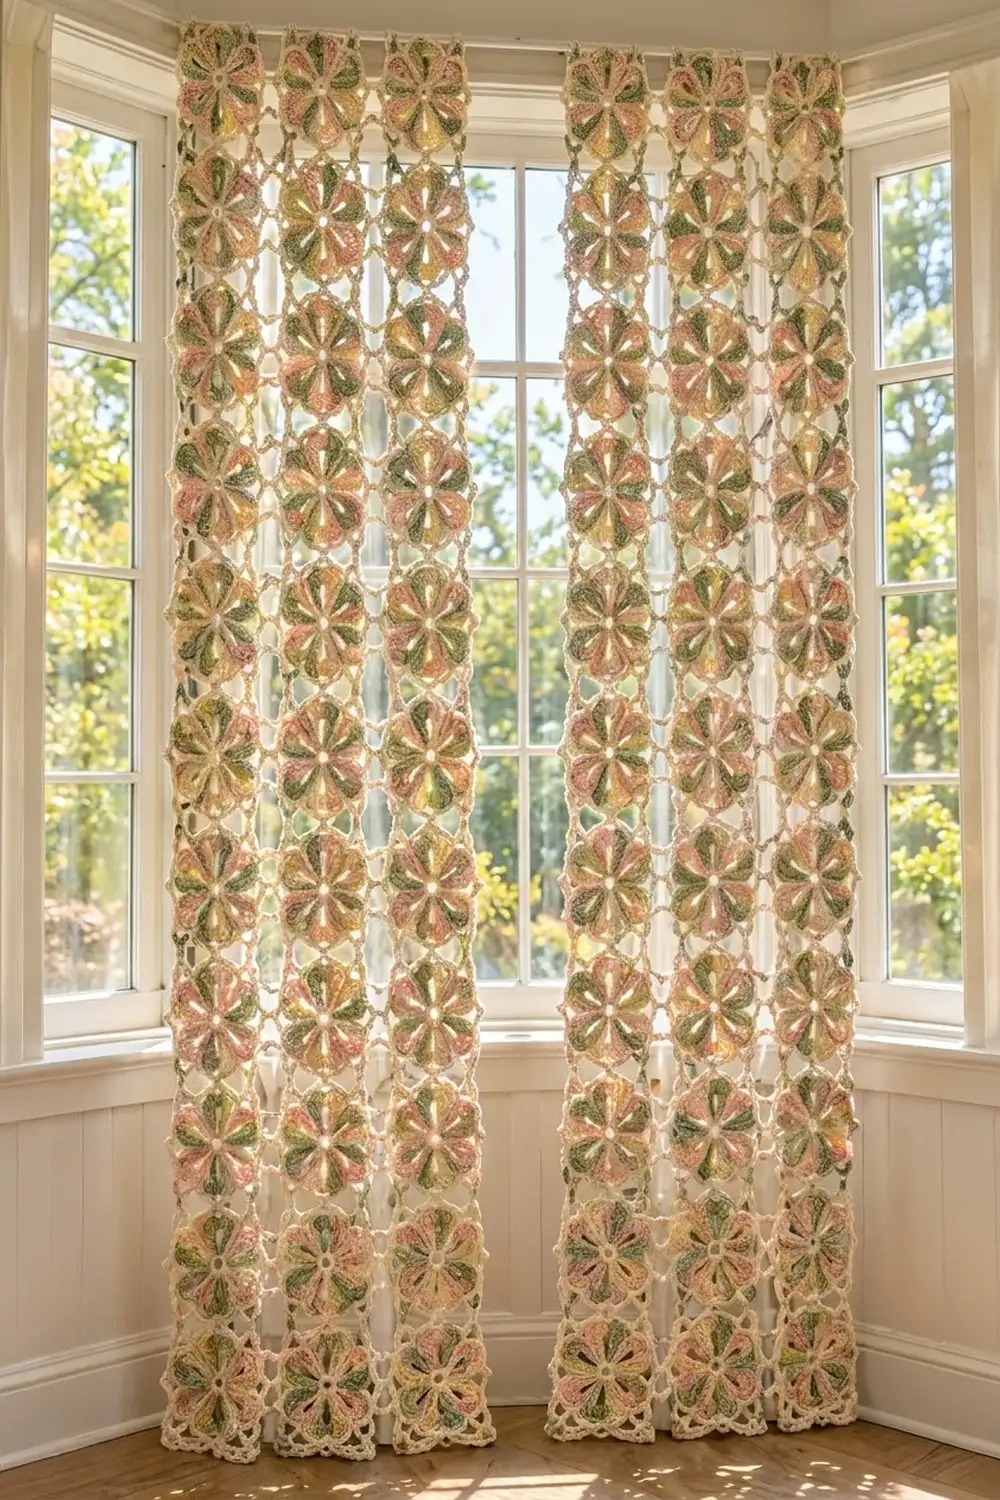
These lace curtain panels are built from one simple flower square, repeated. Each motif has a cream center ring, eight hollow teardrop petals in a soft variegated pastel, a crisp cream outline and an airy chain frame. Once the squares are joined, the flowers float in an open mesh that lets light pour through.
The colors are soft garden shades. Dusty pink, sage green and butter yellow shift naturally through the petals, while cream ties every motif together. The look is cottage-style and romantic, but the construction is neat and geometric.
This pattern uses US crochet terms. Each finished panel measures 25 x 73 in (63.5 x 185.4 cm) after blocking. The pattern makes a matching pair, as shown hanging in the photo.
You will make 96 identical motifs (48 per panel). Each motif is worked in the round in six rounds. From the second motif on, you join the last round to its neighbors as you go. A three-round cream border finishes each panel.
Finished Size and Construction
- Finished panel size: 25 x 73 in (63.5 x 185.4 cm), make 2
- Skill level: Intermediate
- Terminology: US crochet terms
- Yarn weight: DK (light worsted, #3) cotton or cotton blend
- Hook: 3.5 mm (E-4)
- Number of pieces: 96 motifs, joined into 2 panels
- Layout per panel: 4 motifs wide x 12 motifs tall
- Motif size: 6 x 6 in (15.2 x 15.2 cm)
- Panel size before border: 24 x 72 in (61.0 x 182.9 cm)
- Border depth: 0.5 in (1.3 cm) on every side
Materials
Choose a smooth mercerized or matte cotton in DK weight, about 120 m per 50 g. Cotton gives crisp petals and hangs well in sunlight. For Color B, pick a variegated yarn with long color stretches so each petal blends two or three shades, as in the photo.
- Color A, Cream: 850 g (approx. 2,040 m) for centers, outlines, frames and borders
- Color B, Pastel Variegated (dusty pink, sage, butter yellow): 650 g (approx. 1,560 m) for petals
These amounts cover both panels and include about 10 percent extra for gauge swatching and dye-lot safety. Buy all of each color from a single dye lot.
Tools:
– 3.5 mm (E-4) crochet hook
– Tapestry needle
– Scissors
– Stitch markers
– Blocking mats and rust-proof pins
– Spray bottle
– Measuring tape
– 16 to 20 curtain clip rings for hanging
Abbreviations (US Terms)
- ch – chain
- sl st – slip stitch
- sc – single crochet
- hdc – half double crochet
- dc – double crochet
- tr – treble crochet
- sp – space
- st(s) – stitch(es)
- sk – skip
- picot – ch 3, sl st in 3rd ch from hook
Special technique – loop join (used in Round 6): When a ch-5 loop touches a finished motif, work ch 2, sl st into the matching ch-5 loop of the finished motif, ch 2.
Gauge and Checkpoints
Make one complete motif before you start the rest. Block it lightly and measure.
- After Round 1: center ring is 1.25 in (3.2 cm) across.
- After Round 3: petals measure 4.25 in (10.8 cm) from tip to opposite tip.
- After Round 4: outlined flower measures 4.75 in (12.1 cm) tip to tip.
- After Round 6: motif is 6 x 6 in (15.2 x 15.2 cm), edge to edge.
If your motif is larger than 6 in (15.2 cm), go down to a 3.25 mm hook. If it is smaller, go up to a 3.75 mm hook. Being off by only 0.25 in (0.6 cm) per motif adds up to 3 in (7.6 cm) over 12 motifs, so check carefully.
Motif Pattern
Work the first motif completely (Rounds 1–6). For every motif after that, work Rounds 1–5 as written and join during Round 6 (see Joining).
Round 1 (Color A): Ch 6, sl st to first ch to form a ring. Ch 3 (counts as dc), 23 dc in ring. Sl st to top of beginning ch-3. (24 dc) Fasten off A.
The ring keeps an open hole in the middle, just like the photo.
Round 2 (Color B): Join B with sc in any dc. Ch 14, sc in same st as last sc (petal loop made), sc in next 2 dc, sc in next dc; repeat from * 7 more times, ending the last repeat at . Sl st to first sc. (32 sc and 8 ch-14 loops)*
Each repeat uses 3 dc from Round 1 and makes 4 sc: the 2 anchor sc around the loop plus 2 sc between petals.
Round 3 (Color B): Sl st into the next ch-14 loop. *Work the petal in the loop: 2 sc, 2 hdc, 4 dc, 3 tr, ch 1, 3 tr, 4 dc, 2 hdc, 2 sc. Sl st in each of the next 4 sc (the anchor sc, the 2 middle sc and the next anchor sc), then move into the next loop; repeat from * 7 more times. The last sl st lands in the first anchor sc. Fasten off B.
(8 petals of 22 sts each = 176 petal sts, plus 8 ch-1 tips and 32 sl sts)
The ch-14 loop stays hollow inside the stitches, which gives the open teardrop shape. Stretch each petal gently so the tip points away from the center.
Round 4 (Color A): Join A with sc in any ch-1 petal tip. *Ch 2, sc in same tip sp. Sc in next 11 sts down the side of the petal. Sl st in the 2nd of the 4 sl sts between petals (this pulls the dip between petals inward). Sc in next 11 sts up the next petal, sc in next ch-1 tip; repeat from * 7 more times, leaving out the final sc on the last repeat. Sl st to first sc. Fasten off A.
(Per petal: 11 + 11 + 2 tip sc = 24 sc and 1 ch-2 tip. Round total: 192 sc, 8 ch-2 tips, 8 sl sts between petals)
This round is the cream outline that hugs every petal.
Round 5 (Color A, squaring frame): Pick every other petal tip as a corner tip (4 corner tips). The other 4 are side tips. Join A with sc in any corner ch-2 tip. Ch 7, sc in same corner tip (corner ch-7 loop made). Ch 9, sc in next side ch-2 tip, ch 9, sc in next corner tip; repeat from * 3 more times, ending the last repeat at *. Sl st to first sc.
(4 corner ch-7 loops, 8 ch-9 sps, 12 sc)
Round 6 (Color A, chain frame): Sl st into corner ch-7 loop, ch 1. (Sc, ch 5, sc) in corner loop (corner ch-5 loop made). Ch 5, sc in next ch-9 sp, ch 5, sc in side-tip sc, ch 5, sc in next ch-9 sp, ch 5, move to next corner loop; repeat from * 3 more times, ending at *. Sl st to first sc. Fasten off.
(20 sc and 20 ch-5 loops: 4 corner loops plus 4 side loops on each side)
Each side now reads: corner loop, 4 side loops, corner loop. Block the motif square, pinning out the corner loops.
Make All Pieces
For the pair of panels, make 96 motifs in total:
- Color A: Rounds 1, 4, 5 and 6 of all 96 motifs
- Color B: Rounds 2 and 3 of all 96 motifs
Weave in the ends as you finish each motif so you don’t face a long session of it at the end.
Layout for each panel (M = motif, 4 wide x 12 tall):
Row 1:  M  M  M  M
Row 2:  M  M  M  M
Row 3:  M  M  M  M
Row 4:  M  M  M  M
Row 5:  M  M  M  M
Row 6:  M  M  M  M
Row 7:  M  M  M  M
Row 8:  M  M  M  M
Row 9:  M  M  M  M
Row 10: M  M  M  M
Row 11: M  M  M  M
Row 12: M  M  M  M
Because Color B is variegated, simply mix finished motifs at random for a natural spread of pink, sage and yellow.
Joining
Join motifs as you go during Round 6. Work across each panel row from left to right, starting with the top row.
Method: Work Round 6 of the new motif as written until you reach a side that touches a finished motif. On that side, every ch-5 loop becomes a loop join: ch 2, sl st into the matching ch-5 loop of the finished motif, ch 2.
Stitch-to-stitch logic: Each shared side has 6 loops: corner loop, 4 side loops, corner loop. Join the loops in order: corner to corner, side loop 1 to side loop 1, and so on. That gives 6 join points per side. Never skip a loop or join one twice.
Four-way corners: Where four motifs meet, sl st into the corner loop of the diagonal motif, or into the existing join sl st if it is already linked. All four corner loops then meet at one point, with no gaps.
Tension: Keep the ch 2 on each side of every join loose, so the joined loop is as long as a relaxed ch-5 loop. Tight joins will pucker the mesh and shorten the panel.
Size checkpoint: After the first row of 4 motifs, the strip should measure 24 in (61.0 cm) wide. After all 12 rows, the panel should measure 24 x 72 in (61.0 x 182.9 cm) when laid flat without stretching.
Border
Work the border around each panel with Color A.
Border gauge: 26 sc per motif side = 6 in (15.2 cm). The sc sit inside the ch-5 loops, so they lie flat without ruffling.
Per motif side (26 sc): 3 sc in each of its 2 corner loops + 5 sc in each of its 4 side loops = 6 + 20 = 26 sc. These 26 already include that side’s own corner loops.
Round 1: Join A in a side loop near the top right corner. Work 5 sc in each side loop and 3 sc in each motif corner loop along every edge. At each of the 4 panel corners, work 7 sc in the outer corner loop instead: 3 sc for one side, 1 corner sc, 3 sc for the next side. Mark each corner sc. If a corner loop has a join in it, work its 3 sc around the join point. Sl st to first sc.
- Short sides: 4 motifs x 26 = 104 sc between corner sts
- Long sides: 12 motifs x 26 = 312 sc between corner sts
- Round total: 2 x (104 + 312) + 4 corner sts = 836 sc
Round 2: Ch 1. Sc in each sc around, working 3 sc in each marked corner sc. Move markers to the middle sc of each corner group. Sl st to first sc.
- Short sides: 104 + 2 = 106 sc between corners
- Long sides: 312 + 2 = 314 sc between corners
- Round total: 836 sc (1 in each existing st) + 8 extra (2 per corner) = 844 sc
Round 3 (picot edge): Ch 1. *(Sc, picot, sc) in corner st. (Picot, sc in next 2 sts) across the side; repeat from * around. Sl st to first sc. Fasten off.
- Short sides: 53 picots and 106 sc
- Long sides: 157 picots and 314 sc
- Round total: 848 sc and 424 picots
Why the math works: Each motif side gives exactly 26 sc, with no extra stitches at the seams. Round 2 adds 2 sts per side at the corners. That gives side counts of 106 and 314, both even, so the 2-stitch picot repeat fits exactly. The 0.5 in (1.3 cm) border takes each panel from 24 x 72 in (61.0 x 182.9 cm) to 25 x 73 in (63.5 x 185.4 cm).
Final Blocking
- Weave in all remaining ends along the cream outlines, where they hide best.
- Lay the panel flat on blocking mats, right side up. Block it in sections if it doesn’t fit all at once.
- Spray evenly with water until damp, not soaked.
- Pin the outer edge straight to 25 x 73 in (63.5 x 185.4 cm), with a pin every 3 in (7.6 cm).
- Pin each petal tip outward and open the center of every petal with a fingertip.
- Check that every motif row runs straight and every motif is close to 6 in (15.2 cm) square.
- Let the panel dry completely before unpinning, then repeat for the second panel.
Final Quality-Control Checklist
- All 96 motifs have 8 petals, each with an open center.
- Every petal has an unbroken cream outline.
- Each panel is 4 motifs wide and 12 motifs tall.
- Each shared motif side has 6 join points, and all four-way corners meet neatly.
- Border Round 1 has 104 sc on the short sides and 312 sc on the long sides.
- Corners lie flat, without cupping or flaring.
- Both panels measure 25 x 73 in (63.5 x 185.4 cm) after blocking.
- No ends show on the right side.
Troubleshooting
Petal centers close up: Your ch-14 loops are too tight. Chain more loosely, or go up a hook size for Round 2 only.
Petals curl or cup: Round 3 is too tight around the loop. Stretch each loop before working into it, and block with pins at every tip.
Motif is not square: Check that the Round 5 corner loops sit on every other petal. If two corner tips are side by side, the frame will skew.
Mesh between motifs puckers: The loop joins are too tight. Loosen the ch 2 on each side of every sl st.
Border ruffles: You have too many sc per loop. Recount to 5 sc per side loop and 3 per corner loop.
Border pulls in: Your sc are tight. Work Rounds 1–3 with a hook one size larger.
Panels differ in length: Measure each motif row as you join, and block both panels to the same pinned outline.
Care
Hand wash in cool water with a mild detergent, then press the water out in a towel and dry flat. Reshape the petals while damp, and don’t hang the panels while they are wet.
Final Notes
The measurements build step by step. A 1.25 in (3.2 cm) center ring grows into a 6 in (15.2 cm) square motif. Four motifs make a 24 in (61.0 cm) width, and twelve make a 72 in (182.9 cm) length. A 0.5 in (1.3 cm) border finishes each panel at 25 x 73 in (63.5 x 185.4 cm). Check your first motif carefully and keep your joins relaxed, and the rest will fall into place.
Happy crocheting!