

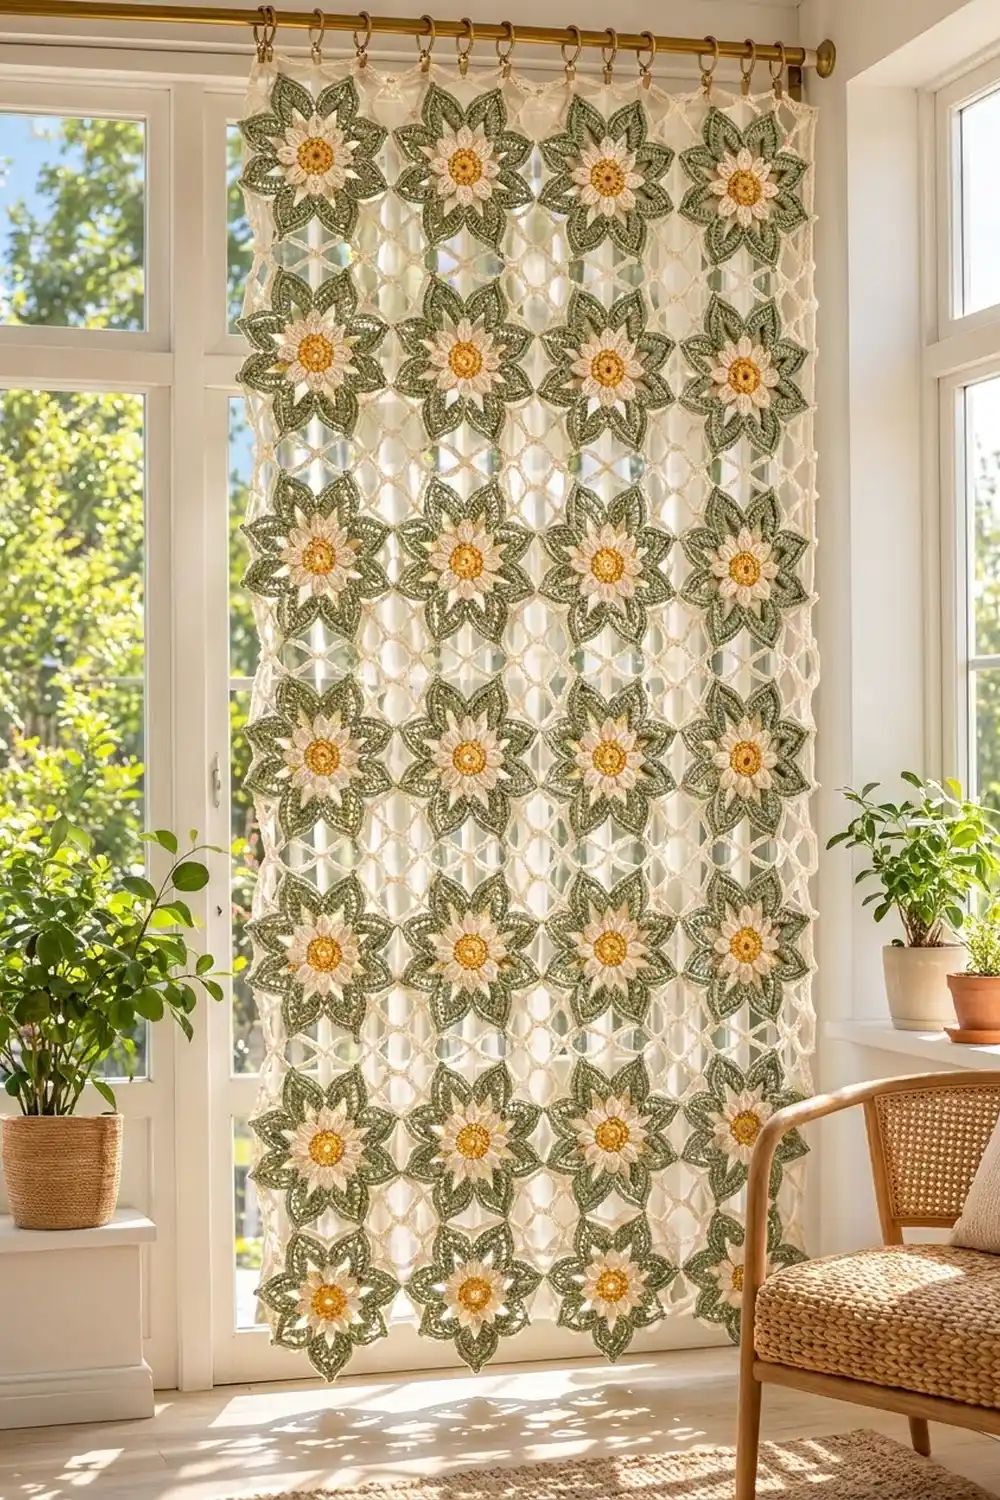
The Meadow Daisy Lattice Curtain is a light, airy panel made from 28 flower motifs joined into an open cream net. Each motif has a golden center, a ring of 12 soft cream petals, and a star of 8 pointed sage-green leaves that reach past the petals. A cream chain lattice links the leaf tips, so light falls through the gaps between the flowers.
The colors are calm and natural: mustard gold, warm cream, and muted sage green. The style is cottage-garden and vintage. It suits a sunny window, a doorway, or a room divider.
This pattern uses US crochet terms. After the border and blocking, the curtain measures 25 in wide x 43 in long (63.5 cm x 109.2 cm).
You crochet each motif in the round, then join the motifs as you go during the last cream round. Small chain fillers close the open spaces where four motifs meet. Two border rounds then neaten the outer edge and keep its pointed shape.
Finished Size and Construction
- Finished size: 25 in x 43 in (63.5 cm x 109.2 cm)
- Skill level: Intermediate
- Terminology: US crochet terms
- Yarn weight: Worsted weight (#4) cotton
- Hook: 4.5 mm (US 7)
- Number of pieces: 28 motifs
- Layout: 4 motifs wide x 7 motifs long
- Motif size: 6 in (15.2 cm) tip to tip after Rnd 6
- Size before border: 24 in x 42 in (61.0 cm x 106.7 cm)
- Border depth: 0.5 in (1.3 cm) on each side
Materials
Choose a smooth mercerized or combed cotton in worsted weight. Cotton holds the pointed tips well after blocking, and it hangs straight in a window. The amounts below are for yarn with about 190 m (208 yd) per 100 g.
- Color A, mustard gold (centers): 100 g, about 190 m (208 yd)
- Color B, sage green (leaves): 200 g, about 380 m (416 yd)
- Color C, cream (petals, lattice, border): 250 g, about 475 m (520 yd)
Tools:
– 4.5 mm (US 7) crochet hook
– Tapestry needle
– Scissors
– Rust-proof pins and a blocking mat or foam tiles
– Stitch markers
– Measuring tape
– 12 curtain clip rings and a rod for hanging
All amounts include a margin of about 15% for gauge swatches and weaving in ends.
Abbreviations (US Terms)
- ch – chain
- sl st – slip stitch
- sc – single crochet
- hdc – half double crochet
- dc – double crochet
- tr – treble crochet
- dtr – double treble crochet
- sp(s) – space(s)
- st(s) – stitch(es)
- Rnd – round
- BPsc (back post single crochet): insert the hook from back to front to back around the post of the stitch, yarn over, pull up a loop, yarn over and pull through both loops.
- Join tip: at a lattice tip, replace the ch 3 with ch 1, sl st in the ch-3 sp of the neighboring motif’s matching tip, ch 1.
Gauge and Checkpoints
Make one complete motif before you start the curtain. Block it, then measure it.
- Base gauge: 18 sc and 18 ch = 4 in (10.2 cm), so 9 ch = 2 in (5.1 cm).
- After Rnd 1: 1 in (2.5 cm) across.
- After Rnd 2: 2 in (5.1 cm) across.
- After Rnd 3: 3.5 in (8.9 cm) across the petal tips.
- After Rnd 5: 5.5 in (14.0 cm) from one leaf tip to the opposite leaf tip.
- After Rnd 6: 6 in (15.2 cm) tip to tip.
If your motif is larger than 6 in (15.2 cm), go down a half or full hook size. If it is smaller, go up a size. Being off by just 0.25 in (0.6 cm) per motif adds up to 1 in (2.5 cm) across the width and 1.75 in (4.4 cm) down the length, so it’s worth checking.
Measure the chain gauge as well as the motif. The lattice, corner fillers, and border all depend on 9 ch = 2 in (5.1 cm).
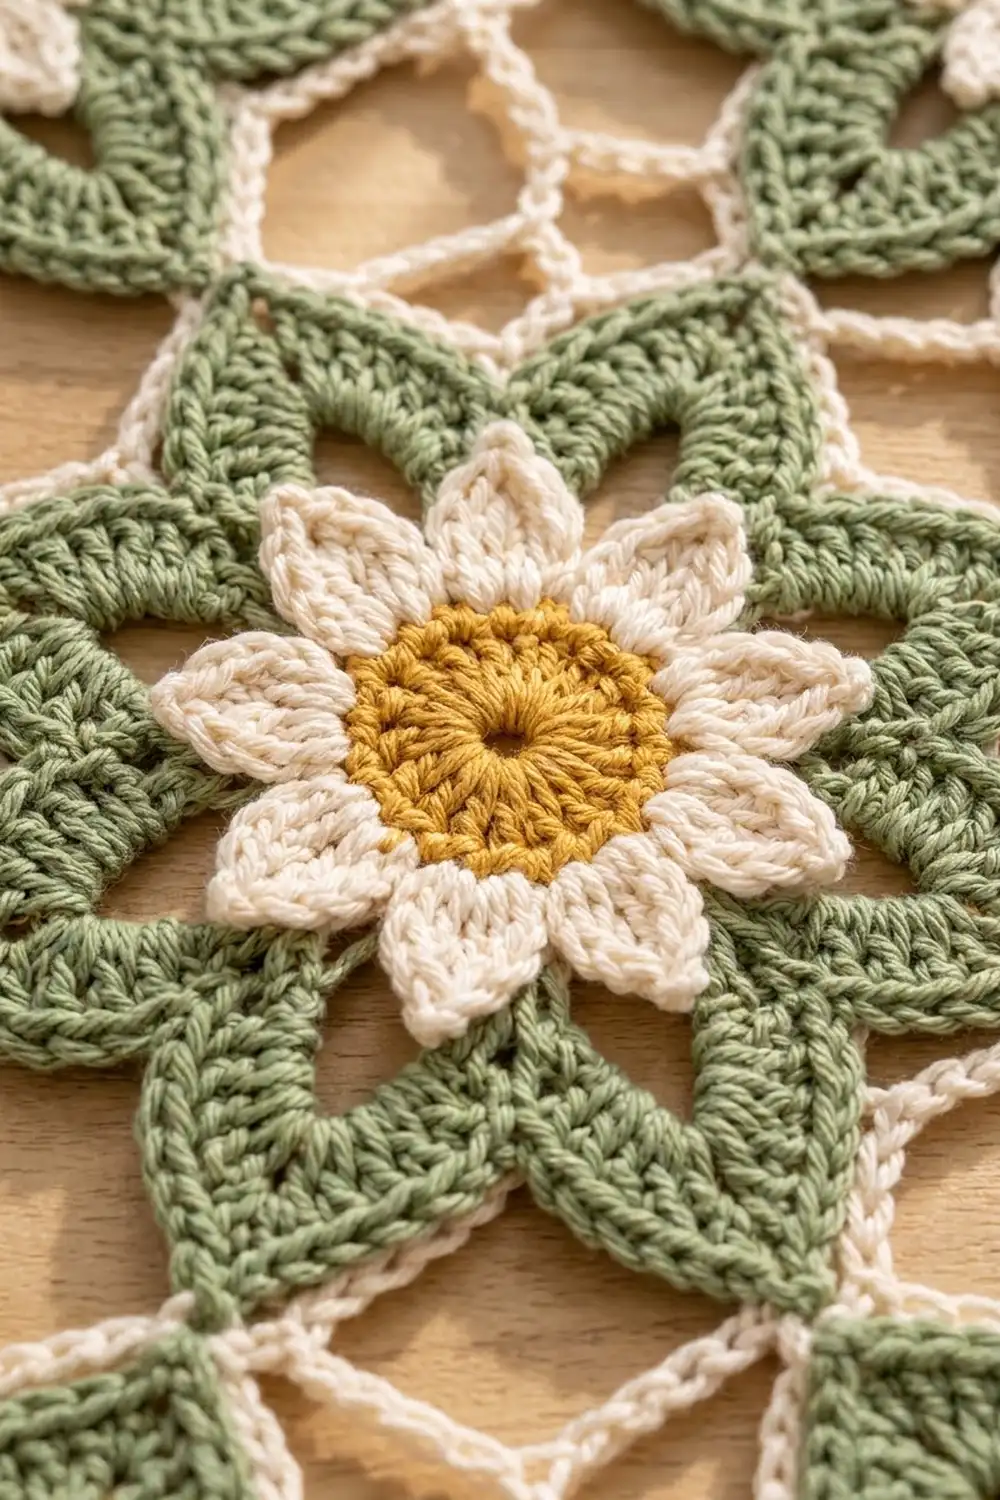
Motif Pattern
Tip positions are named like a clock face when the motif lies flat: 12, 1:30, 3, 4:30, 6, 7:30, 9, and 10:30 o’clock.
Center (Color A)
Rnd 1: Make a magic ring. Ch 3 (counts as dc), 11 dc in ring. Sl st to top of ch-3. Pull the ring closed. (12 dc)
Rnd 2: Ch 3 (counts as dc), dc in same st, 2 dc in each st around. Sl st to top of ch-3. Fasten off. (24 dc)
Petals (Color C)
Rnd 3: Join C with sl st in any dc. (Hdc, dc, ch 2, dc, hdc) in next dc, sl st in next dc; repeat from * around, working the final sl st into the joining st. Fasten off. (12 petals; each petal = 4 sts + 1 ch-2 tip; 12 sl sts between petals)*
Each petal sits on one dc and each sl st anchors the next dc, so 12 repeats x 2 dc = 24 dc used. The ch-2 gives every petal a soft point.
Leaves (Color B)
Rnd 4: Turn the motif to the wrong side. Working behind the petals, join B with BPsc around the post of any Rnd 2 dc. Ch 6, skip next 2 dc, BPsc around next dc; repeat from * 6 more times, ch 6, skip last 2 dc, sl st to first BPsc. (8 BPsc, 8 ch-6 sps)*
Each repeat uses 3 dc, and 8 x 3 = 24, so the spacing is even. This ring stays hidden behind the petals.
Rnd 5: Turn back to the right side. Sl st into the first ch-6 sp, ch 1. In each ch-6 sp, work (sc, hdc, dc, tr, dtr, ch 3, dtr, tr, dc, hdc, sc). Sl st to first sc. Fasten off. (8 leaves; 80 sts + 8 ch-3 tips)
The tall dtr pair shapes a long, pointed leaf that reaches well past the cream petals. Together, the 8 leaves form the green star.
Lattice Round (Color C)
Rnd 6 (first motif only): Join C with sc in any ch-3 leaf tip, ch 3, sc in same sp. Ch 11, (sc, ch 3, sc) in next ch-3 tip; repeat from * 6 more times, ch 11, sl st to first sc. Fasten off. (16 sc, 8 ch-3 tips, 8 ch-11 loops; 128 sts including chains)*
Each ch-11 loop runs straight from one tip to the next, past the dip between the leaves. That makes the open cream lattice around every flower.
Make All Pieces
Work Rnds 1–5 on all 28 motifs first. Then work Rnd 6 on each motif in placement order, joining as you go.
Per-color totals:
– Color A: 28 centers
– Color B: 28 leaf rounds
– Color C: 28 petal rounds, 28 lattice rounds, 18 corner fillers, and the border
Layout grid (4 wide x 7 long), in joining order:
Row 1:  01  02  03  04
Row 2:  05  06  07  08
Row 3:  09  10  11  12
Row 4:  13  14  15  16
Row 5:  17  18  19  20
Row 6:  21  22  23  24
Row 7:  25  26  27  28
Joining
Join-As-You-Go on Rnd 6
Motif 01 gets a normal Rnd 6. On every later motif, work Rnd 6 as written, but use join tip at the shared points:
- Motif with a neighbor to its left: join its 9 o’clock tip to the neighbor’s 3 o’clock tip.
- Motif with a neighbor above: join its 12 o’clock tip to the neighbor’s 6 o’clock tip.
A joined tip reads sc, ch 1, sl st, ch 1, sc. Each motif keeps its own 16 sc and 8 ch-11 loops, and no stitches are added at any seam.
The curtain has 21 horizontal joins (3 per row x 7 rows) and 24 vertical joins (4 per column x 6 gaps), for 45 joins in total.
Tension tip: Keep the ch-11 loops at the same easy tension as your gauge swatch. Tight chains pull the leaf tips inward and make the motifs cup. Lay the work flat after every join and check that the tips meet without stretching.
Corner Fillers
Where four motifs meet, their four diagonal tips sit about 1.75 in (4.4 cm) apart. Fill each of these openings with a chain square.
Name the four motifs Top Left, Top Right, Bottom Left, and Bottom Right.
Join cream with sc in the 4:30 tip of Top Left, ch 8, sc in the 7:30 tip of Top Right, ch 8, sc in the 10:30 tip of Bottom Right, ch 8, sc in the 1:30 tip of Bottom Left, ch 8, sl st to first sc. Fasten off. (4 sc + 32 ch)
At 9 ch = 2 in (5.1 cm), 8 chains measure about 1.78 in (4.5 cm), which fits the 1.75 in (4.4 cm) gap. You need 18 fillers in total (3 across x 6 down).
Size checkpoint: The joined panel should measure 24 in x 42 in (61.0 cm x 106.7 cm) from tip to tip.
Border
Border gauge: 9 sc worked into a ch-9 sp = 2 in (5.1 cm), the same as the chain gauge. This way each chain loop and the sc that cover it are the same length.
The border follows the pointed outline and links only the outer tips that were not joined.
Outer tips per motif: an edge motif that is not at a corner has 3 outer tips, and a corner motif has 5. For example, top-row motifs use their 10:30, 12, and 1:30 tips. The top-left motif uses its 7:30, 9, 10:30, 12, and 1:30 tips. The four corner tips (top-left 10:30, top-right 1:30, bottom-right 4:30, bottom-left 7:30) are shared by two sides.
Rnd 1: With the right side facing, join C with sc in the top-left corner tip. Work around the curtain. Between two outer tips of the same motif, ch 11 and sc in the next tip. Between two neighboring motifs, ch 8 and sc in the first outer tip of the next motif; this bridge skips the joined tip in the dip. Sl st to first sc.
Rnd 1 counts:
– Along a side, each motif adds 3 tip sc + 2 ch-11 loops = 25 sts. Each seam between motifs adds one 8-ch bridge.
– Top and bottom, including both corners: 4 x 25 + 3 x 8 = 124 sts.
– Left and right, including both corners: 7 x 25 + 6 x 8 = 223 sts.
– Between corners only: 122 sts on the top and bottom; 221 sts on each side.
– Total: 62 sc + 44 ch-11 loops + 18 ch-8 bridges = 62 + 484 + 144 = 690 sts.
Check: 2 x 122 + 2 x 221 + 4 corner sc = 690.
Rnd 2: Ch 1. Work 3 sc in each tip sc, 11 sc in each ch-11 loop, and 8 sc in each ch-8 bridge. Sl st to first sc. Fasten off.
Rnd 2 counts:
– Top and bottom, between corners: 10 tips x 3 + 8 loops x 11 + 3 bridges x 8 = 30 + 88 + 24 = 142 sc.
– Left and right, between corners: 19 tips x 3 + 14 loops x 11 + 6 bridges x 8 = 57 + 154 + 48 = 259 sc.
– Corners: 3 sc each.
– Total: 2 x 142 + 2 x 259 + 4 x 3 = 814 sc.
Why the math works: Neighboring tips on one motif are about 2.3 in (5.8 cm) apart. An 11-ch loop measures 2.44 in (6.2 cm), which leaves just enough slack for a gentle curve. The dip between two motifs is about 1.75 in (4.4 cm) across, and the 8-ch bridge measures 1.78 in (4.5 cm). Rnd 2 puts exactly one sc on each chain, so the edge neither ruffles nor pulls in. The 3 sc at each tip keep the points sharp.
Final Blocking
- Weave in all ends along the back of stitches of the same color.
- Soak the curtain in cool water with a little wool wash for 15 minutes.
- Roll it in a towel and press out the water gently. Do not wring.
- Lay it flat on a mat and pin it to 25 in x 43 in (63.5 cm x 109.2 cm).
- Pin the outer edge first, then every joined tip along each row and column.
- Pin each leaf tip and petal tip so the points stand out.
- Check that every motif measures 6 in (15.2 cm) tip to tip and that every corner filler sits square.
- Let it dry completely, for at least 24 hours, before unpinning.
Final Quality-Control Checklist
- 28 motifs, each with 12 petals and 8 leaves
- 45 tip joins and 18 corner fillers, all secure
- Joined panel measures 24 in x 42 in (61.0 cm x 106.7 cm) before the border
- Border Rnd 1 has 690 sts and Rnd 2 has 814 sc
- Finished curtain measures 25 in x 43 in (63.5 cm x 109.2 cm)
- No cupping, rippling, or twisted chain loops
- All ends woven in and trimmed
Troubleshooting
Petals look crowded. Check that Rnd 2 has 24 dc. Work each petal into one dc and the sl st into the next.
Green leaves cup forward. The ch-6 loops in Rnd 4 are too tight. Loosen them, or work ch 7 if needed.
Leaves don’t reach past the petals. Make sure the center pair of each leaf is dtr, not tr.
Lattice puckers. The ch-11 loops are too tight. Rework them more loosely, or go up one hook size for Rnd 6 only.
Corner fillers pull the motifs together. If your chains run tight, work ch 9 instead of ch 8.
Border ripples. Check that Rnd 2 has one sc per chain and only 3 sc at each tip.
Curtain is too long or too short. Measure one motif. Every 0.25 in (0.6 cm) of difference changes the length by 1.75 in (4.4 cm).
Care
Hand wash in cool water and lay flat to dry, reshaping the tips as you go. Don’t hang the curtain while it’s wet, because the weight of the water will stretch it.
Final Notes
The measurements build step by step. A 2 in (5.1 cm) center grows into a 6 in (15.2 cm) motif. Four motifs make 24 in (61.0 cm) across, and seven make 42 in (106.7 cm) down. A 0.5 in (1.3 cm) border brings the curtain to 25 in x 43 in (63.5 cm x 109.2 cm).
To hang the curtain, clip the 12 rings to the 12 tips along the top edge and slide them onto the rod. In a sunny window, light will shine through the cream lattice around every daisy.
Happy crocheting!