

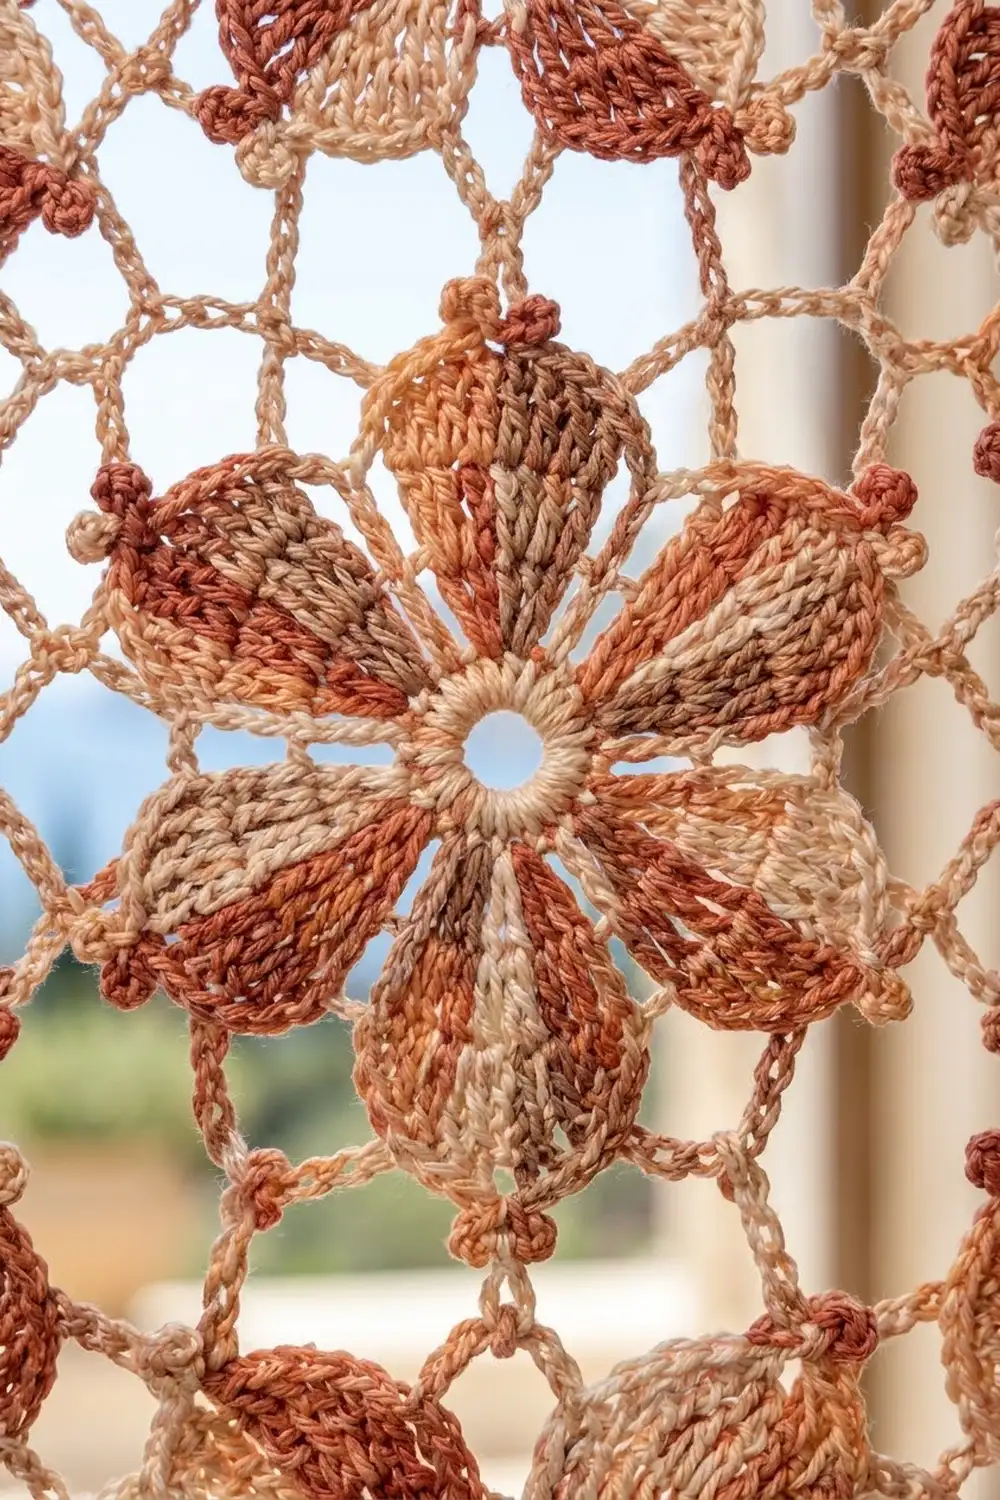
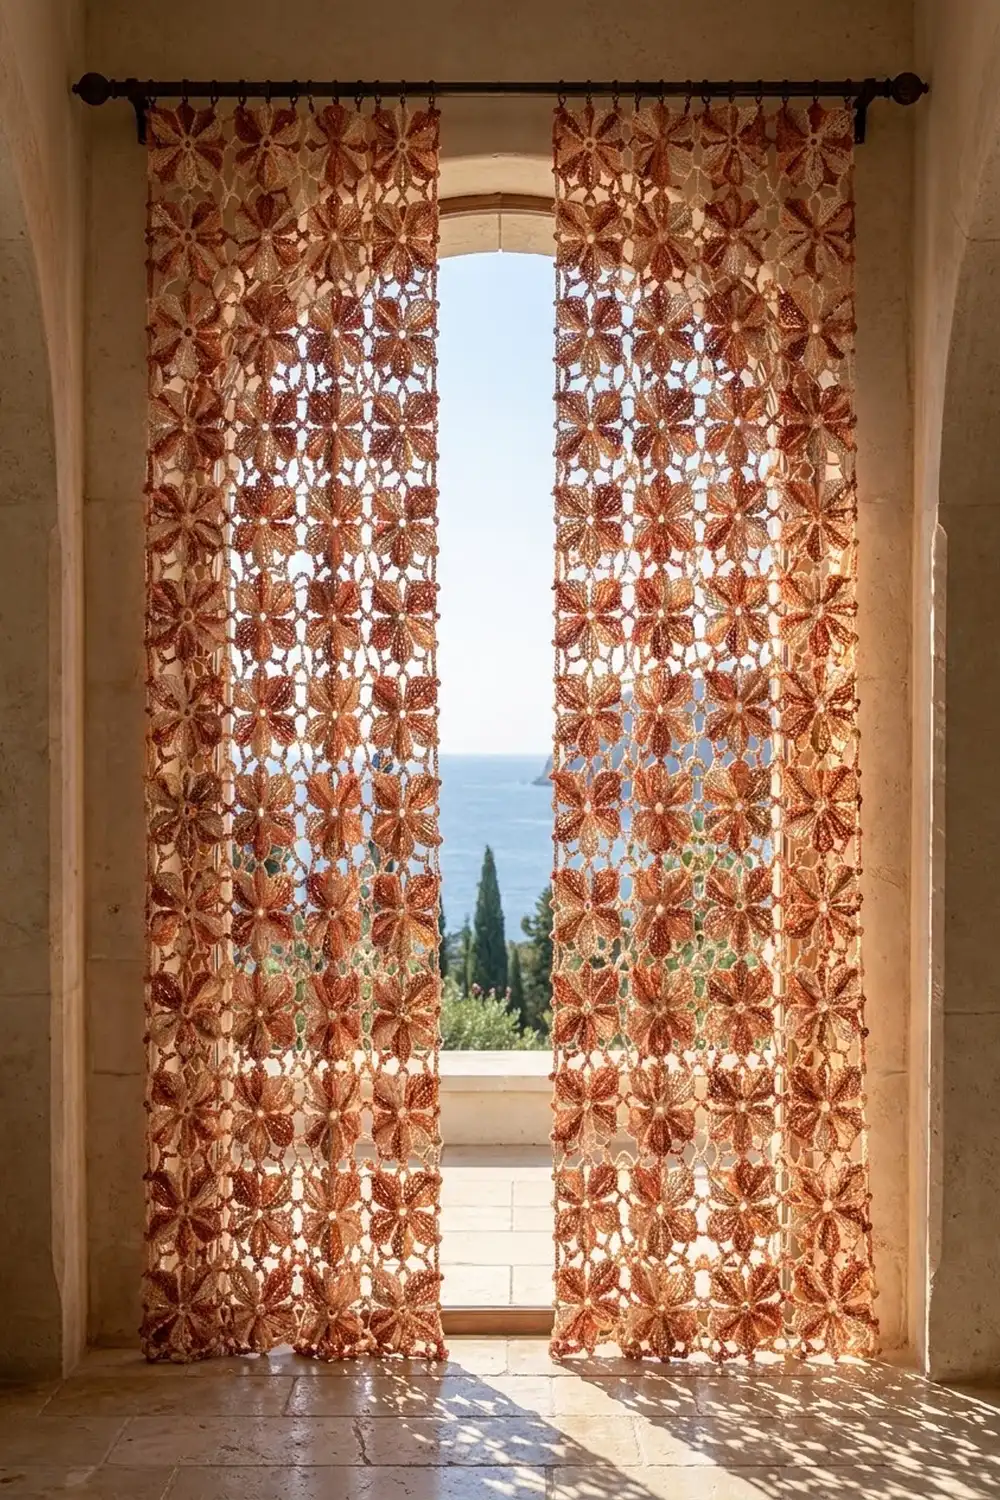
These floor-length lace curtains are built from small six-petal flowers set into an airy picot mesh. When light comes through the window, the petals look like little suns and the mesh around them almost disappears.
All the color comes from one variegated cotton in rust, terracotta, apricot, peach, sand, and cream. Every petal shades a little differently, and you never cut for a color change. The style is warm and Mediterranean, made for an arched window with sea air coming in.
This pattern uses US crochet terms. Each blocked motif is 5 in (12.7 cm) square from picot to picot. Each finished panel measures 32 x 82 in (81.3 x 208.3 cm), and the pattern makes two panels.
Here is the construction in short. Each motif starts with a padded center ring and six pointed petals with trefoil tips. A chain frame turns the flower into a square, and a picot mesh round goes around it. You join the motifs as you go on the mesh round, 6 across and 16 down. A three-round border finishes each panel.
Finished Size and Construction
- Finished size (each panel): 32 x 82 in (81.3 x 208.3 cm)
- Skill level: Intermediate
- Terminology: US crochet terms
- Yarn weight: Sport (#2) cotton
- Hook: 3.25 mm (US D/3)
- Number of pieces: 192 motifs (96 per panel), joined into 2 panels
- Layout per panel: 6 motifs wide x 16 motifs tall
- Motif size: 5 in (12.7 cm) square, blocked
- Panel size before border: 30 x 80 in (76.2 x 203.2 cm)
- Border depth: 1 in (2.5 cm) on each edge
Materials
Use a smooth sport-weight cotton, either mercerized or combed. It shows stitch definition, holds the pointed petals well, and hangs straight without fuzzing. Choose a variegated colorway with short-to-medium color runs.
- Variegated cotton, terracotta mix (rust, terracotta, apricot, peach, sand, cream): 1,400 g / 4,340 m (twenty-eight 50 g / 155 m balls)
Each motif uses about 6 g, and the borders on both panels use about 80 g in total. The quantity above includes a margin of about 12% for swatching and for differences in color runs between balls.
Tools:
- 3.25 mm (US D/3) crochet hook
- Tapestry needle
- Locking stitch markers
- Rust-proof pins and blocking mats
- Spray bottle
- Measuring tape
- 22 curtain clip rings (11 per panel), optional
Abbreviations (US Terms)
- ch – chain
- sl st – slip stitch
- sc – single crochet
- hdc – half double crochet
- dc – double crochet
- tr – treble crochet
- dtr – double treble crochet
- sp(s) – space(s)
- st(s) – stitch(es)
Special stitches:
- Picot: Ch 3, sl st in 3rd ch from hook.
- Trefoil: Ch 4, sl st in 4th ch from hook; ch 5, sl st in same ch; ch 4, sl st in same ch. This makes three small loops. The ch-5 loop in the middle is the center loop.
- P-loop (picot loop): Ch 2, picot, ch 2.
- Joining picot: Ch 2, sl st in the matching picot of the finished motif, ch 1, sl st in the 1st of these ch 2. Use this in place of a picot when joining.
- Standing sc: With a slip knot on the hook, insert the hook in the st or sp and complete a sc.
Gauge and Checkpoints
Make one full motif and block it before you start the other 191. Small size differences add up across 16 rows.
Base gauge: 22 sc = 4 in (10.2 cm), measured along a Round 6 side.
Motif checkpoints (lightly pressed flat):
- After Round 1: ring is 1 in (2.5 cm) across.
- After Round 2: 1.75 in (4.4 cm) across.
- After Round 3: 2.75 in (7.0 cm) across.
- After Round 4: 4 in (10.2 cm) from tip to opposite tip.
- After Round 6: the square is 4 in (10.2 cm) per side.
- After Round 7, blocked: 5 in (12.7 cm) from corner picot to corner picot.
If the motif is too big, go down to a 3.0 mm hook. If it is too small, go up to a 3.5 mm hook. If only Round 6 is off, check the Round 5 chains first (see Troubleshooting).
Motif (Make 192)
Work with the right side facing you throughout.
Round 1: Ch 8, sl st in first ch to form a ring. Ch 1, work 24 sc in ring, sl st in first sc. (24 sc)
Pack the stitches tightly so the ring looks padded and the center hole stays open.
Round 2: Ch 1, sc in same st, ch 5, skip 3 sc, sc in next sc, ch 5, skip 3 sc; repeat from * 4 more times, sl st in first sc. (6 sc, 6 ch-5 sps)
Round 3 (petal base): Sl st in first ch-5 sp. Ch 1, (sc, hdc, 5 dc, hdc, sc) in ch-5 sp; repeat from * in each remaining ch-5 sp, sl st in first sc. (54 sts: 6 petals of 9 sts)
Round 4 (pointed petals): Sl st in the sp between the last petal and the first petal. Skip next sc, sc in next hdc, hdc in next dc, dc in next dc, tr in next (center) dc, trefoil, tr in same center dc, dc in next dc, hdc in next dc, sc in next hdc, skip next sc, sl st in sp before next petal; repeat from * 5 more times. The last sl st is the joining st. Fasten off. (48 sts, 6 trefoils, 6 valley sl sts)
Each petal now rises to a point with a trefoil at the tip. The valley sl sts sit between the petals.
Orient the flower: Turn the flower so one petal points straight up. This is the top tip, and the petal opposite it is the bottom tip. The two valleys at the far left and far right are the only valleys you will use.
Round 5 (squaring frame): Standing sc in the center loop of the top tip’s trefoil. Ch 14, sc in center loop of next tip, ch 4, dtr in the valley sl st, ch 4, sc in center loop of next tip, ch 14, sc in center loop of bottom tip; repeat from * to * once, sl st in first sc. (6 sc, 2 dtr, 4 ch-14 arcs, 4 ch-4 sps)
The ch-14 arcs reach past the flower to form the four corners. The dtr pulls each side valley out to the straight side edge.
Round 6 (square round): Ch 1, sc in same st (top tip). Work the round in this order:
- In next ch-14 arc: (10 sc, ch 2, 5 sc).
- Sc in next sc, 4 sc in ch-4 sp, sc in dtr, 4 sc in ch-4 sp, sc in next sc.
- In next ch-14 arc: (5 sc, ch 2, 10 sc).
- Sc in next sc (bottom tip).
- In next arc: (10 sc, ch 2, 5 sc).
- Sc in next sc, 4 sc in ch-4 sp, sc in dtr, 4 sc in ch-4 sp, sc in next sc.
- In last arc: (5 sc, ch 2, 10 sc).
Sl st in first sc. Fasten off.
Check the count:
- Top and bottom sides: 10 + 1 + 10 = 21 sc.
- Left and right sides: 5 + 1 + 4 + 1 + 4 + 1 + 5 = 21 sc.
- (84 sc, 4 ch-2 corner sps)
In this pattern, the corners are ch-2 spaces, not stitches. Each side has 21 sc between its corner spaces.
Round 7 (picot mesh): Standing sc in any corner ch-2 sp, p-loop, sc in same corner sp (corner loop made). P-loop, skip 2 sc, sc in next sc; (p-loop, skip 3 sc, sc in next sc) 4 times; p-loop, skip last 2 sc, (sc, p-loop, sc) in corner sp; repeat from * 3 more times, leaving out the final corner group on the last repeat. Sl st in first sc. Fasten off.
The anchor sc on each side go in the 3rd, 7th, 11th, 15th, and 19th sc. This keeps the mesh symmetrical: 2 stitches are skipped at each end and 3 between anchors.
Per side: 6 p-loops and 5 anchor sc. Total: 24 side p-loops + 4 corner loops = 28 picots.
Make All Pieces
- Motifs: 96 per panel, 192 in total, all in the variegated cotton.
- Work Rounds 1–6 on all the motifs first. Work Round 7 as you join.
- Start each motif at a different point in the color run so the color looks scattered rather than striped.
Layout per panel (F = flower motif, 6 across x 16 down):
Row 1:  F F F F F F
Row 2:  F F F F F F
Row 3:  F F F F F F
  ...   (repeat)
Row 16: F F F F F F
Joining (Join-As-You-Go)
Work Round 7 completely on Motif 1. On every motif after that, work Round 7 as written. On each side that touches a finished motif, use a joining picot instead of a picot.
Stitch-to-stitch logic:
- Each side has 8 picots: 1 corner picot, 6 side picots, and 1 more corner picot.
- Side picot 1 of the new motif joins to side picot 6 of its neighbor, picot 2 joins to picot 5, and so on.
- Corner picots join to the matching corner picot.
- Where four motifs meet, sl st into the sl st of the first corner join.
Join the motifs in rows, working left to right. Each new motif joins to the motif on its left, the motif above it, or both.
Tension: Work each joining sl st at the same tension as a regular picot. If they are too tight, the seams pucker. If they are too loose, the mesh sags.
Size checkpoint: Row 1 should measure 30 in (76.2 cm) long. After 4 rows, the panel should measure 20 in (50.8 cm) tall. The finished panel measures 30 x 80 in (76.2 x 203.2 cm).
Border
Border gauge: 20 sc = 5 in (12.7 cm) along an edge. That is exactly one motif per 20 sc, so the border lies flat without stretching or easing the mesh.
Per motif, per edge: Work 1 sc in the first corner-loop ch-2 half. Work 3 sc in each of the 6 side p-loops (1 in each ch-2 and 1 in the picot). Work 1 sc in the other corner-loop ch-2 half. That gives 1 + 18 + 1 = 20 sc per motif side.
At each seam, the two corner halves belong to two different motifs, so each gets its own sc. Skip the shared joined picot. No stitches are added or removed at seams.
Round 1: Standing sc in the first ch-2 half after any panel corner picot, then continue as set. At each panel corner, skip the corner picot and ch 2 for the corner space. Sl st in first sc.
- Short edges: 6 x 20 = 120 sc
- Long edges: 16 x 20 = 320 sc
- (880 sc, 4 ch-2 corner sps)
Round 2: Sl st in corner sp, ch 6 (counts as dc + ch 3), dc in same sp. (Ch 1, skip 1 sc, dc in next sc) across the edge, then (dc, ch 3, dc) in corner sp; repeat around, leaving out the final corner group. Sl st in 3rd ch of beginning ch-6.
- Short edges: 60 dc + 60 ch-1 sps = 120 sts
- Long edges: 160 dc + 160 ch-1 sps = 320 sts
- Corners: (dc, ch 3, dc), counted separately
Round 3: Ch 1. Along each edge, sc in each dc and each ch-1 sp, and work a picot after every 4th sc. At each corner, sc in corner dc, (2 sc, picot, 2 sc) in ch-3 sp, sc in corner dc. Sl st in first sc. Fasten off.
- Short edges: 120 sc, 30 picots
- Long edges: 320 sc, 80 picots
Why the math works: Each motif contributes exactly 20 sc per edge. Both 120 and 320 divide evenly by 2 (for the Round 2 mesh) and by 4 (for the picots), so every repeat ends cleanly. The corners are worked separately, so none is counted twice.
Final Blocking
- Weave in all ends along the Round 6 sc or the border stitches, not through the open mesh.
- Soak each panel in cool water for 15 minutes. Press out the water in a towel without wringing.
- Pin the panel to 32 x 82 in (81.3 x 208.3 cm) on blocking mats, starting at the four corners.
- Pin along the seams so the motif rows run straight.
- Open each center ring and pin the trefoil tips so the petals point outward.
- Pin out the border picots.
- Let the panel dry completely, then unpin.
Final Quality-Control Checklist
- Every motif has 6 petals, 6 trefoils, and 28 Round 7 picots.
- Each Round 6 side has 21 sc.
- All join points line up, with no twisted seams.
- Wherever four motifs meet, they join through one central sl st.
- Border Round 1 has 120 sc on each short edge and 320 sc on each long edge.
- Picots: 30 per short edge and 80 per long edge.
- Each panel measures 32 x 82 in (81.3 x 208.3 cm) after blocking.
- Both panels are the same length.
Troubleshooting
- Flower cups after Round 5: The ch-14 arcs are too tight. Chain more loosely, or work ch 15 and still work 15 sc per arc in Round 6.
- Petals ruffle: The tr are too loose. Snug each loop before you finish the stitch.
- Round 6 sides bow inward: The dtr is too short. Work it loosely or use a triple treble.
- Motifs pull into diamonds: The joining sl sts are too tight. Rejoin at picot tension.
- Border ruffles: Recount to confirm 20 sc per motif edge. If the count is correct, go down a hook size for the border.
- Curtain grows when hung: Cotton lace can drop 1–2 in (2.5–5.1 cm). Block lengthwise and let the panel hang for a day before you adjust the rod height.
Care
Hand wash in cool water, or machine wash on a gentle cycle in a mesh bag. Reshape and dry flat. Don’t tumble dry or hang the panels wet, because the weight of the wet cotton will stretch the lace.
Final Notes
Here is the measurement chain:
- Each motif is 4 in (10.2 cm) after Round 6 and 5 in (12.7 cm) after the mesh round.
- Six motifs make 30 in (76.2 cm) across, and sixteen make 80 in (203.2 cm) down.
- The border’s 20 sc per motif side keeps the edges flat.
- The 1 in (2.5 cm) border brings each panel to 32 x 82 in (81.3 x 208.3 cm).
Hang each panel with 11 clip rings spaced about 3 in (7.6 cm) apart. Check your first motif and your first row, and the rest will follow.
Happy crocheting!