

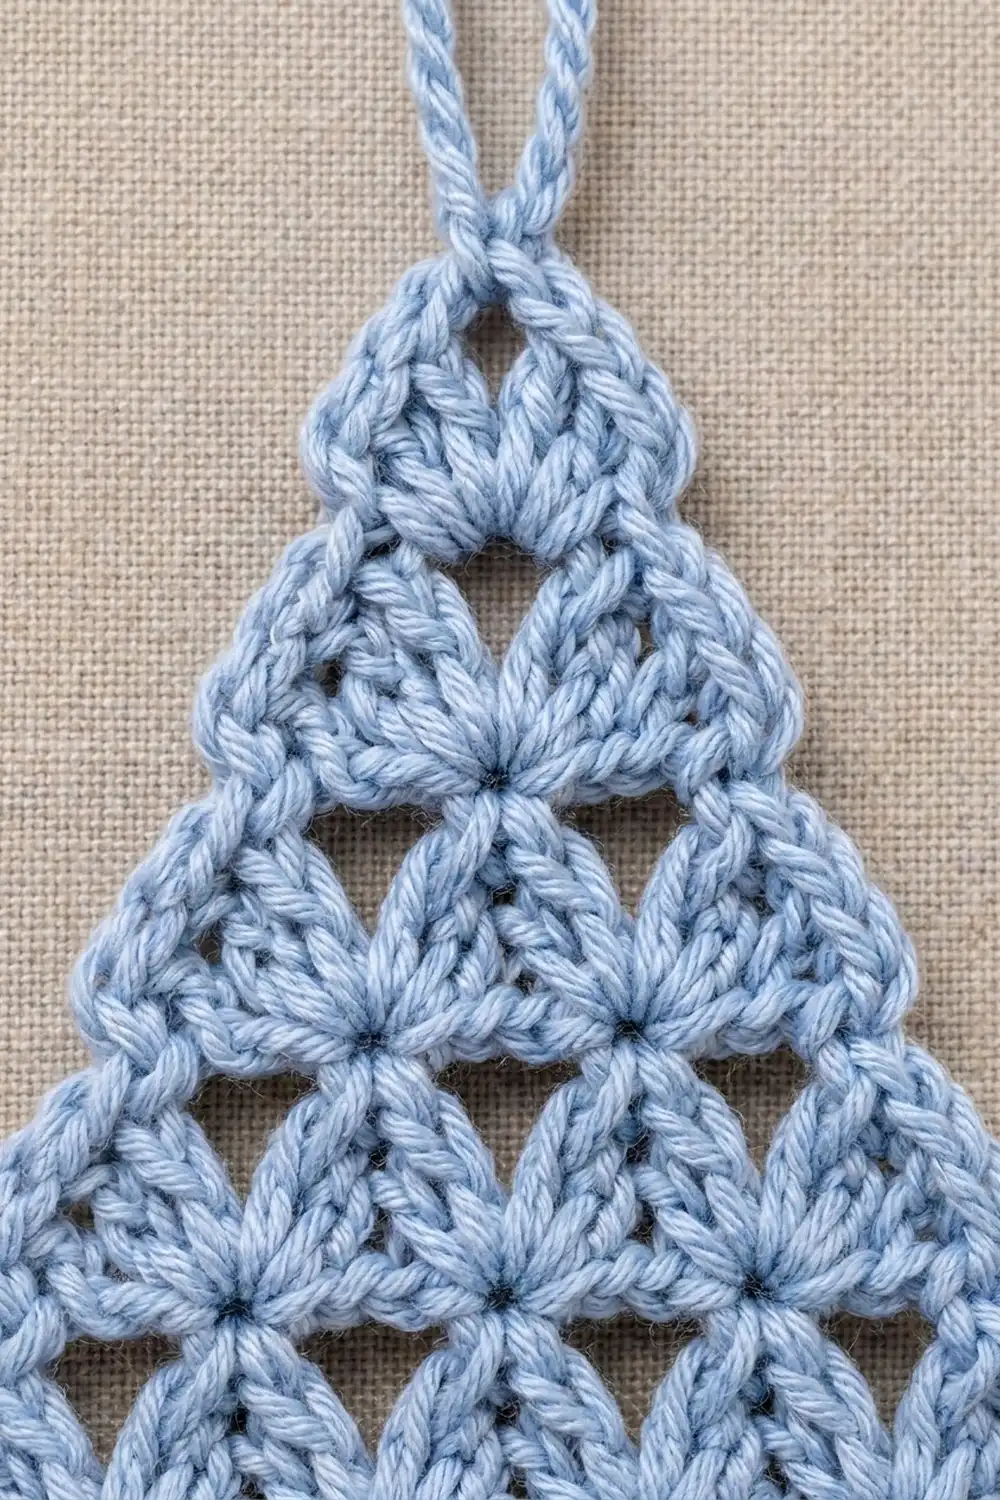
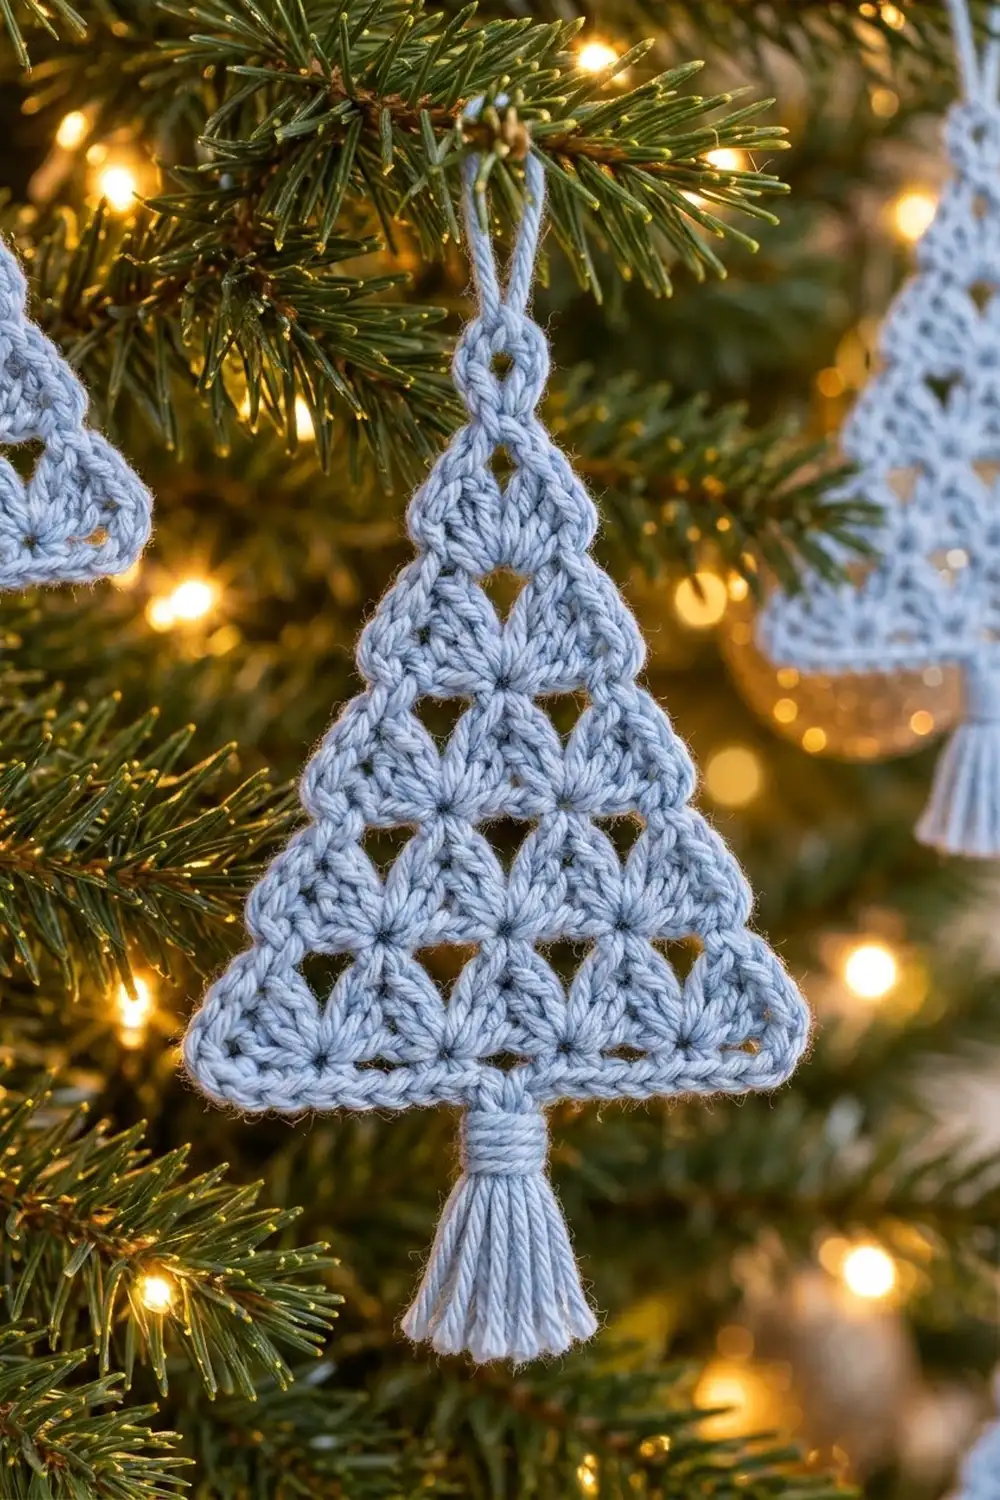
This little tree is one flat triangle of stacked fans. It is worked in a single pale blue cotton that looks like frost on a window. Five rows of double crochet shells step inward toward a single fan at the top, and small triangular windows open up between them. A tidy rope-style border frames the shape. A chain loop at the top and a wrapped tassel trunk at the bottom finish the ornament.
The style is calm and Scandinavian-feeling, a good match for a white, silver or icy-blue tree. One color keeps it simple, and cotton gives crisp stitch definition and a gentle sheen.
This pattern uses US crochet terms. The finished triangle measures 4.5 in (11.4 cm) wide by 3.5 in (8.9 cm) tall. With the hanging loop and tassel, the ornament is about 6.75 in (17.1 cm) from top to bottom.
Construction is straightforward. You work a foundation chain and a first row of 5 shells. Each following row places one fewer shell, so the piece narrows into a triangle on its own. Then you add a two-round border, a hanging loop and a tassel. It is a single piece with no joining.
Finished Size and Construction
- Finished size (triangle): 4.5 in (11.4 cm) wide x 3.5 in (8.9 cm) tall
- Overall length with loop and tassel: about 6.75 in (17.1 cm)
- Skill level: Easy
- Terminology: US crochet terms
- Yarn weight: DK / light (category 3) cotton or cotton blend
- Hook: 3.5 mm (E-4)
- Number of pieces: 1
- Layout: single flat triangle, worked flat in rows from the base up
- Piece size before border: 4 in (10.2 cm) wide x 3 in (7.6 cm) tall
- Border depth: 0.25 in (0.6 cm) on every side
Materials
Yarn: Choose a smooth, mercerized or combed cotton in DK weight. Cotton holds the fan shapes and keeps the windows open after blocking. Avoid fuzzy or very stretchy yarns, because they blur the shells and make the triangle droop when it hangs.
- Pale powder blue: 12 g, about 27 m (30 yd) for one ornament, including the loop and tassel
The quantity includes a margin of about 20% for your gauge swatch, yarn tails and tassel trimming. If you plan a set of several separate ornaments, multiply by the number you want to make.
Tools:
- 3.5 mm (E-4) crochet hook
- Tapestry needle
- Scissors
- A piece of stiff card 3.5 in (8.9 cm) tall, for the tassel
- Rust-proof pins and a foam blocking mat
- Spray bottle with water
- Ruler or tape measure
Abbreviations (US Terms)
- ch – chain
- sl st – slip stitch
- sc – single crochet
- dc – double crochet
- sk – skip
- st(s) – stitch(es)
- RS / WS – right side / wrong side
- BLO – back loop only
- rep – repeat
Special stitch – Shell: Work 5 dc in the same stitch. The 3rd dc of the five is the center dc, and the next row anchors there.
Gauge and Checkpoints
Gauge: One shell repeat (sc + shell, 6 sts) = 0.8 in (2.0 cm) wide. One shell row = 0.6 in (1.5 cm) tall.
Test one piece first. Because the ornament is small, the first ornament is your gauge swatch. Measure at each checkpoint below and adjust before you go on.
Checkpoints:
- After Row 1: 4 in (10.2 cm) wide and 0.6 in (1.5 cm) tall
- After Row 3: 1.8 in (4.6 cm) tall from the foundation edge
- After Row 5: 3 in (7.6 cm) tall, and the base still 4 in (10.2 cm) wide
- After the border: 4.5 in (11.4 cm) wide x 3.5 in (8.9 cm) tall
If your piece is too big: Go down to a 3.25 mm (D-3) hook, or tighten your foundation chain. Shells that flare wider than 0.8 in (2.0 cm) per repeat usually mean loose dc.
If your piece is too small: Go up to a 3.75 mm (F-5) hook. Make sure you are not pulling the sc between shells so tight that the fans pinch closed. The windows should stay open.
Changing the hook keeps the stitch counts the same and changes only the size. Do not add or remove shells, because the triangle shape depends on exactly 5 shells in Row 1.
Pattern: The Tree Triangle
The tree is worked flat from the base upward. Each row begins with slip stitches that carry you to the center of the first shell, so every row starts half a shell further in than the last. That is what forms the stepped triangle.
Foundation
Ch 32, loosely.
The ch closest to the hook is the turning chain. The remaining 31 ch are the working foundation. A loose foundation chain matters, because the bottom edge has to lie straight and reach 4 in (10.2 cm).
Row 1 (RS)
Sc in 2nd ch from hook. Sk 2 ch, shell in next ch, sk 2 ch, sc in next ch. Rep from * 4 more times.
Count: 5 shells and 6 sc = 31 sts.
Check: 1 sc + (5 repeats x 6 ch) = 31 working ch, plus 1 turning ch = 32 ch.
Measure now. The row should be 4 in (10.2 cm) wide.
Row 2 (WS)
Ch 1, turn. Sl st in the first sc and the next 3 dc. You are now in the center dc of the first shell (4 sl sts). Ch 1, sc in the same center dc. Shell in next sc, sc in center dc of next shell. Rep from * 3 more times. Leave the last 2 dc and the last sc of Row 1 unworked.
Count: 4 shells and 5 sc = 25 sts (sl sts not counted).
Each sc sits on the center of a shell below, and each new shell sits on the sc between two lower shells. Where a sc pulls a lower shell’s center up to meet the row above, the outer dc of two neighboring upper fans pull apart and leave the small triangular windows.
Row 2 width: 3.2 in (8.1 cm).
Row 3 (RS)
Ch 1, turn. Sl st in the first sc and the next 3 dc (4 sl sts). Ch 1, sc in the same center dc. Shell in next sc, sc in center dc of next shell. Rep from * 2 more times. Leave the remaining sts unworked.
Count: 3 shells and 4 sc = 19 sts.
Row 3 width: 2.4 in (6.1 cm). The piece should now be 1.8 in (4.6 cm) tall.
Row 4 (WS)
Ch 1, turn. Sl st in the first sc and the next 3 dc (4 sl sts). Ch 1, sc in the same center dc. Shell in next sc, sc in center dc of next shell. Rep from * once more. Leave the remaining sts unworked.
Count: 2 shells and 3 sc = 13 sts.
Row 4 width: 1.6 in (4.1 cm).
Row 5 (RS)
Ch 1, turn. Sl st in the first sc and the next 3 dc (4 sl sts). Ch 1, sc in the same center dc. Shell in next sc. Sc in center dc of the next shell. Leave the remaining sts unworked.
Count: 1 shell and 2 sc = 7 sts.
This single fan is the treetop. Its center dc is the top point of the triangle. Row 5 width: 0.8 in (2.0 cm).
Fasten off and leave a 4 in (10.2 cm) tail to weave in.
Checkpoint: The triangle measures 4 in (10.2 cm) across the base and 3 in (7.6 cm) tall. Each slanted side is about 3.6 in (9.1 cm). The sides look slightly stepped. The border will smooth them.
Border
The border has two rounds. A round of sc squares off the stepped edges, and a round of sl sts in the back loop rolls the edge into the firm, rope-like outline you see in the photo.
Border gauge: 31 sc = 4 in (10.2 cm), which is 7.75 sc per inch (about 3 sc per cm). This matches the foundation chain exactly, so the bottom edge stays straight and does not ruffle.
Corner rule: Each corner gets 3 sc in one stitch. The middle sc of the three is the corner stitch. Every per-side count below runs from corner stitch to corner stitch and includes both corner stitches. Each corner stitch is shared by two sides.
Round 1 (sc)
With the RS facing, join yarn with a sc in the first foundation ch at the bottom right corner (the base of the first sc of Row 1). Work 2 more sc in the same ch, for 3 sc in the corner.
- Bottom edge: Sc in each of the next 29 foundation ch. Work 3 sc in the last foundation ch (bottom left corner).
- Left side: Work 25 sc evenly up the stepped side, about 5 sc along each row’s edge. For Row 5, place the last 2 of those 25 sc in the 2 dc just before the center dc of the top shell.
- Top point: Work 3 sc in the center dc of the top shell.
- Right side: Work 25 sc evenly down the other side, 5 per row. For Row 5, place the first 2 in the 2 dc just after the center dc.
Join with a sl st to the first sc.
Per-side counts (including both corner stitches):
- Bottom: 1 corner + 1 + 29 + 1 + 1 corner = 33 sts
- Each slanted side: 1 corner + 1 + 25 + 1 + 1 corner = 29 sts
Round 1 total: 88 sts (33 + 29 + 29 = 91, minus 3 shared corner stitches = 88). As a direct sum: 3 + 29 + 3 + 25 + 3 + 25 = 88. ✓
Why the math works: The bottom edge has 31 foundation ch, and you place exactly one sc in each. The extra 2 sc at each end are the corner increases. On the sides, 29 sts at 7.75 sts per inch is about 3.7 in (9.4 cm). That is just enough for the 3.6 in (9.1 cm) slanted side plus the slight turn at each corner, so the sides lie flat without pulling in or rippling.
Round 2 (rope edge)
Ch 1. Sl st in the BLO of each st around, including all corner sts. Keep the sl sts relaxed, about the same height as your sc. Join with a sl st to the first sl st.
Round 2 total: 88 sts (88 sl sts worked one per existing stitch + 0 added).
This round adds no width at the corners. Together, the two rounds add about 0.25 in (0.6 cm) on each side.
Do not fasten off. Continue straight into the hanging loop.
Checkpoint: 4.5 in (11.4 cm) wide x 3.5 in (8.9 cm) tall.
Hanging Loop
Work around the edge to the top corner by slip stitching through the BLO of the Round 2 sts along the right side. Alternatively, fasten off and rejoin at the top corner stitch.
At the top corner stitch: Ch 20, then sl st in the same corner stitch. Sl st once more into the next st to lock it.
Fasten off, leaving a 6 in (15.2 cm) tail. Weave the tail down through the top corner and wrap it once around the base of the loop. This makes the small neat knot visible at the top in the photo. The loop hangs about 1.5 in (3.8 cm) above the tree.
Tassel Trunk
- Wrap yarn 24 times around the 3.5 in (8.9 cm) card.
- Slide an 8 in (20.3 cm) strand under the wraps at the top edge of the card and tie it tightly. Leave both ends long, because they attach the tassel.
- Cut through the wraps at the bottom edge of the card.
- About 0.4 in (1.0 cm) below the tie, wrap a separate 10 in (25.4 cm) strand around the bundle 6 to 8 times to form the neck. Knot it, thread the ends onto the needle and bury them inside the tassel.
- Trim the tassel so it hangs 1.75 in (4.4 cm) from the top of the neck.
- Find the center of the bottom edge, which is the 15th of the 29 bottom sc from Round 1. Thread the tie ends through that stitch from front to back, knot them securely on the WS and weave them in.
The tassel should hang straight down from the exact center, like a tree trunk.
Final Blocking
- Weave in all remaining tails along the border on the WS.
- Lay the ornament RS up on the blocking mat.
- Spray it evenly until damp but not dripping.
- Pin the three corners first. The base should measure 4.5 in (11.4 cm) and the height 3.5 in (8.9 cm) from the base to the top corner.
- Pin along each side every 0.5 in (1.3 cm) to keep the edges straight.
- With a fingertip, gently open each triangular window and spread each fan evenly.
- Comb the tassel straight with your fingers and mist it lightly.
- Leave it to dry completely, usually 4 to 6 hours. Unpin it and trim the tassel again if needed.
For a crisper hanging ornament, you can mist it with a light fabric stiffener before it dries.
Final Quality-Control Checklist
- Row 1 has 5 shells and 31 sts, and each row has one fewer shell, ending with 1 shell in Row 5.
- Every sc sits on a shell’s center dc, and every shell sits in a sc.
- The triangular windows are open and even.
- The border has 33 sts along the bottom and 29 sts along each side, including the corner stitches, for 88 sts in total.
- The finished triangle measures 4.5 in (11.4 cm) x 3.5 in (8.9 cm).
- The hanging loop is centered on the top point and firmly anchored.
- The tassel is centered on the base and trimmed to 1.75 in (4.4 cm).
- All tails are woven in invisibly.
Troubleshooting
The triangle leans to one side. You probably skipped or added a sl st at the start of a row. Each row should start with exactly 4 sl sts, ending in the center dc.
The bottom edge curves up. The foundation chain was too tight. Rework it with a hook one size larger, then switch back for Row 1.
The windows have closed up. The sc between shells is pulled too tight. Let those sc stay relaxed, and open the windows again during blocking.
The sides ripple after the border. Too many sc went into the sides. Stay with exactly 25 sc between the corner groups.
The sides pucker or cup. Too few sc, or the sl st round is too tight. Recount Round 1 and loosen Round 2.
The tassel twists sideways. Re-anchor it through the single center stitch, not across two stitches.
Care
Hand wash in cool water with mild soap, press out the water in a towel, and reshape it flat to dry. Store the ornament flat or hanging so the tassel stays straight.
Final Notes
The measurement chain is short and reliable. The 32-ch foundation gives a 31-st Row 1 with 5 shells, which measures 4 in (10.2 cm). The shells step in by one per row to a single fan in Row 5, for a height of 3 in (7.6 cm). The border adds 0.25 in (0.6 cm) all around, using 33 sts on the bottom and 29 on each side for 88 in total. That brings the triangle to 4.5 in (11.4 cm) x 3.5 in (8.9 cm). With the 1.5 in (3.8 cm) loop and the 1.75 in (4.4 cm) tassel, the ornament is about 6.75 in (17.1 cm) long. Make one for a gift tag, or several separate ones for a matching tree.
Happy crocheting!