

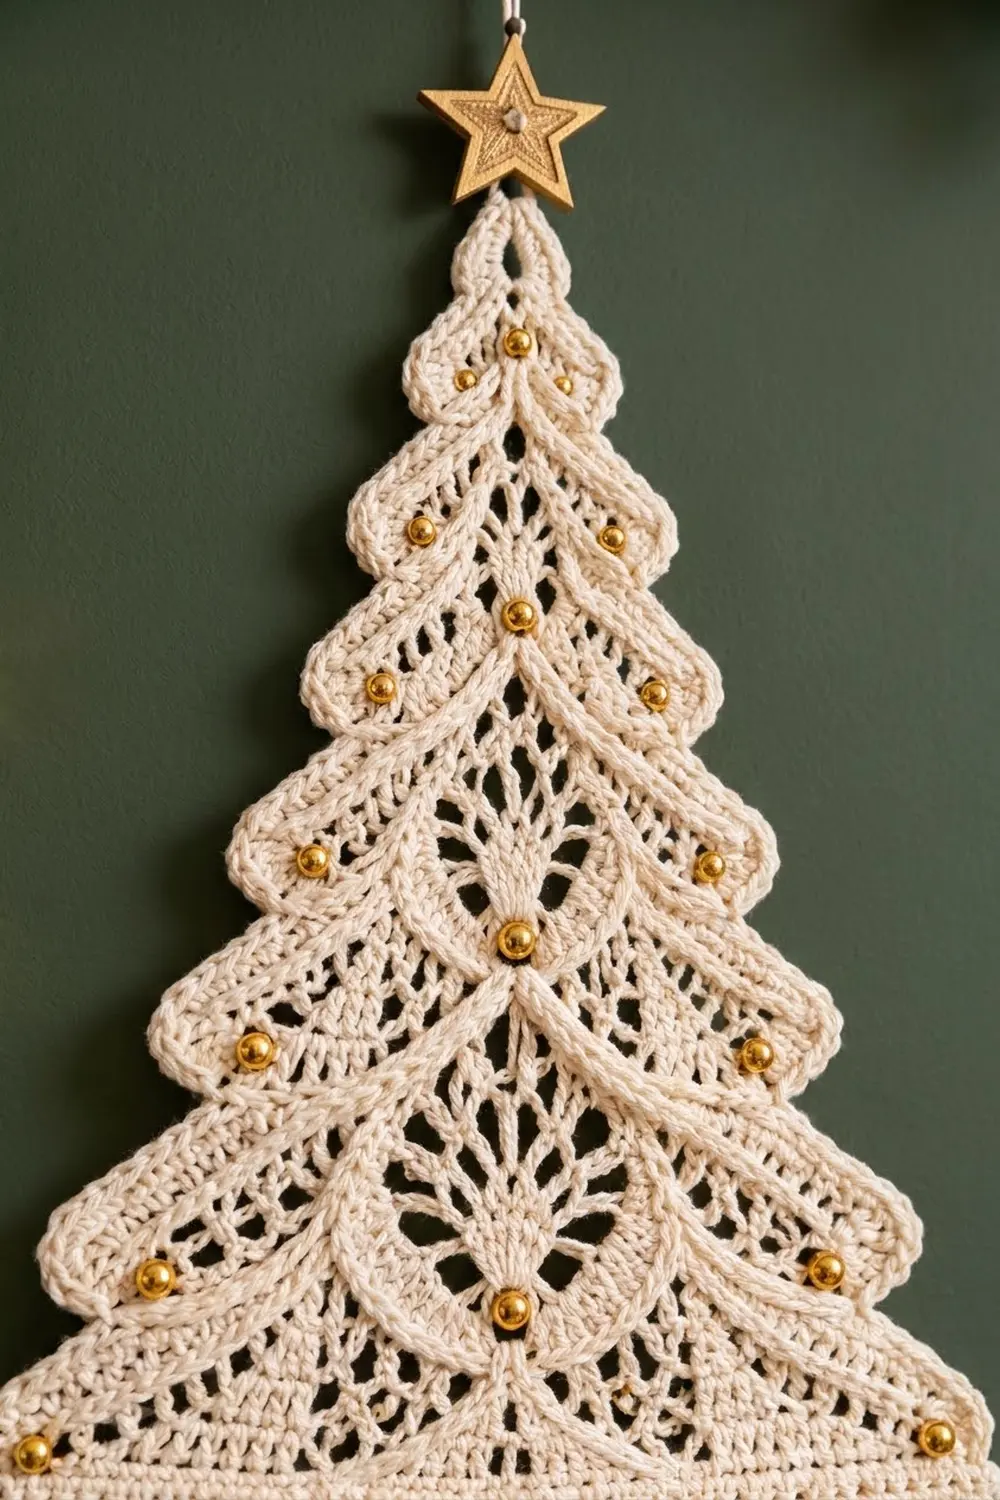
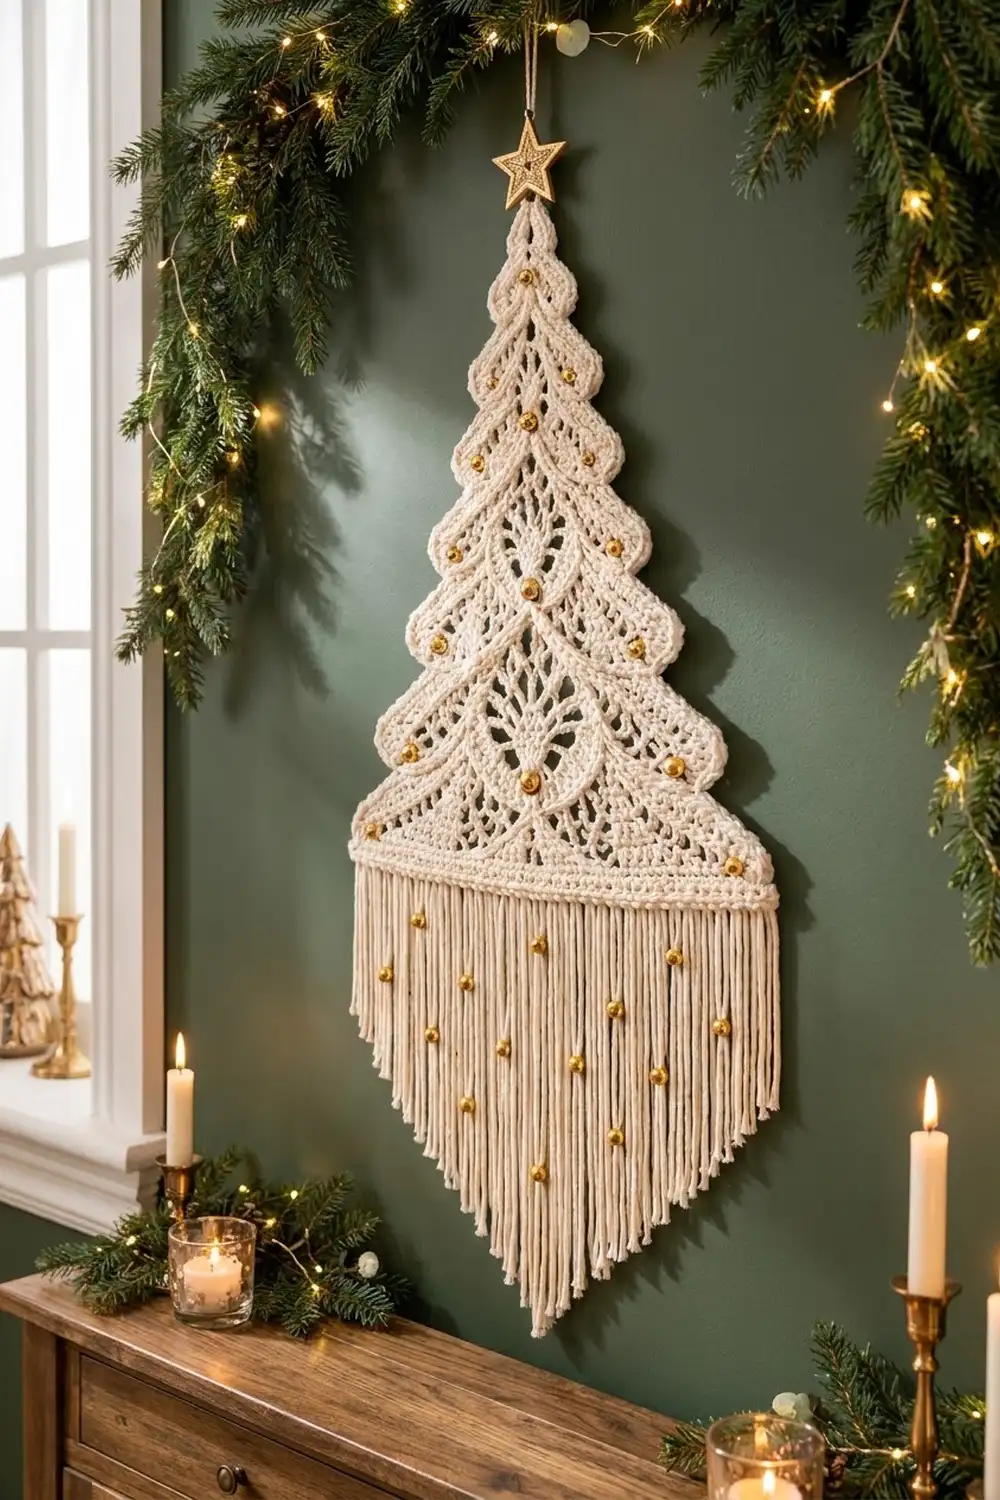
The Golden Spruce is a single lace wall hanging shaped like a tall, tiered Christmas tree. It has five tiers, and each one flares out below the one above it. A raised rope edge outlines every tier. A long fringe hangs from a straight band at the base and is trimmed to a soft V point.
The whole piece uses one cream cotton. Small gold beads sit in the center of every lace fan, along the tier hems and here and there in the fringe. A gold star at the tip and a simple cord finish it. It looks warm and neutral like macramé, but it is crocheted from start to finish.
This pattern uses US crochet terms. The finished hanging is 10.5 in (26.7 cm) wide at the band and 15 in (38.1 cm) tall from tip to band, including the edging. With the fringe, it measures 27 in (68.6 cm) from the tip to the fringe point.
You work the tree in one piece from the tip down, in rows of double crochet. Solid increase rows alternate with mesh rows that have a shell in the center. A step-in row at the start of each tier creates the overhang. Five rows of single crochet form the band. A two-row edging, the fringe and the beads finish the piece.
Finished Size and Construction
- Finished size: 10.5 in (26.7 cm) wide x 15 in (38.1 cm) tall. The fringe adds 8 in (20.3 cm) at the sides and 12 in (30.5 cm) at the center.
- Skill level: Intermediate
- Terminology: US
- Yarn weight: DK / light worsted (#3), cotton
- Hook: 3.5 mm (E-4)
- Number of pieces: 1
- Layout: One tree, worked top-down in rows, with no joining
- Piece size before border: 10 in (25.4 cm) wide x 14.75 in (37.5 cm) tall. That is 13.75 in (34.9 cm) of tree rows plus a 1 in (2.5 cm) band.
- Border depth: about 0.25 in (0.6 cm) along each side and at the tip
Materials
Choose a smooth, firm cotton or cotton blend in DK weight. Mercerized cotton shows the lace clearly and makes crisp fringe that hangs straight. Avoid fuzzy yarns, because the fringe will tangle.
Yarn
- Cream: 100 g, about 230 m (251 yd). The tree, band and edging use about 90 m (98 yd), and the fringe uses about 60 m (66 yd).
All quantities include a margin of about 30% to cover the swatch, fringe trimming and differences in tension.
Tools and notions
- 3.5 mm (E-4) crochet hook
- 40 gold beads, 8 mm, with holes at least 2.5 mm wide (you will use 38)
- One gold star, about 1.5 in (3.8 cm) across
- Gold or cream sewing thread and a sewing needle
- A floss threader for threading beads onto the fringe
- Gold or cream cord, 14 in (35.6 cm) long, for hanging
- Tapestry needle
- Sharp scissors and a strip of cardboard
- Measuring tape, rust-proof pins and a blocking board
- Spray bottle
Abbreviations (US Terms)
- ch: chain
- sl st: slip stitch
- sc: single crochet
- dc: double crochet
- rev sc: reverse single crochet (crab stitch)
- sk: skip
- sp: space
- st(s): stitch(es)
- RS / WS: right side / wrong side
- tch: turning chain
Special stitches
- Shell-5: Sk 2 sts, 5 dc in the next st, sk 2 sts. A Shell-5 uses 5 sts and makes 5 sts.
- Shell-7: Sk 3 sts, 7 dc in the next st, sk 3 sts. A Shell-7 uses 7 sts and makes 7 sts.
- Reverse sc: Without turning, work sc from left to right (if you crochet right-handed). Insert the hook into the next st to the right, pull up a loop, yarn over and draw through both loops.
Counting rule: The ch-3 at the start of a row counts as 1 dc. In mesh rows, each ch-1 sp counts as 1 st. Every stitch count in this pattern includes both.
Gauge and Checkpoints
Gauge: 18 dc and 9 rows = 4 in (10.2 cm). In sc, 18 sts and 20 rows = 4 in (10.2 cm).
Make a swatch first: ch 24 and work 12 rows of dc, with 22 sts in each row. Measure 4 in (10.2 cm) across the center of the swatch. The first tier is a second test, so stop after Row 5 and measure it before you go on.
Checkpoints (measure flat, without stretching):
- After Row 5: 3.8 in (9.7 cm) wide x 2.2 in (5.6 cm) tall
- After Row 11: 5.1 in (13.0 cm) wide x 4.9 in (12.4 cm) tall
- After Row 17: 6.4 in (16.3 cm) wide x 7.6 in (19.3 cm) tall
- After Row 23: 7.8 in (19.8 cm) wide x 10.2 in (25.9 cm) tall
- After Row 31: 10 in (25.4 cm) wide x 13.75 in (34.9 cm) tall
- After the band: 10 in (25.4 cm) wide x 14.75 in (37.5 cm) tall
If your piece is too big, change to a 3.25 mm (D-3) hook. If it is too small, change to a 3.75 mm (F-5) hook. Being off by 1 st per 4 in (10.2 cm) changes the bottom tier’s width by about 0.5 in (1.3 cm). If your rows are too short, the tree will look squat. Try pulling up taller loops before you change hooks.
Row Types
The tree uses three kinds of row that repeat. Learn them first and the row list below will be quick to follow.
Increase row (I): Ch 3 (counts as dc), 2 dc in the same st, dc in each st across to the last st, 3 dc in the last st (the top of the tch). Work 1 dc into each dc, each shell dc and each ch-1 sp. Count: previous row + 4.
Mesh row (M): Ch 3 (counts as dc), [ch 1, sk 1 st, dc in next st] the number of times given, then the shell, dc in next st, then [ch 1, sk 1 st, dc in next st] the same number of times. Count: same as previous row.
Step-in row (S): Sl st in each of the first 4 sts, ch 3 (counts as dc in the 4th st), dc in each st across, leaving the last 3 sts unworked. Count: previous row − 6. The 3 unworked sts at each end form a ledge. Each tier overhangs the tier below it by about 0.7 in (1.8 cm).
Turn at the end of every row.
Tree Body
Tier 1
Row 1: Ch 4. Work 4 dc in the 4th ch from the hook (the 3 skipped ch count as 1 dc). (5 sts)
Row 2 (I): Ch 3, 2 dc in the same st, dc in each of the next 3 sts, 3 dc in the top of the tch. (9 sts)
Row 3 (M): Ch 3, Shell-7, dc in the top of the tch. (9 sts: 1 + 7 + 1)
Row 4 (I): (13 sts)
Row 5 (I): (17 sts)
Tier 2
Row 6 (S): (11 sts)
Row 7 (I): (15 sts)
Row 8 (M): Ch 3, [ch 1, sk 1, dc in next st] 2 times, Shell-5, dc in next st, [ch 1, sk 1, dc in next st] 2 times. (15 sts)
Row 9 (I): (19 sts)
Row 10 (M): Work the bracket 3 times on each side of a Shell-5. (19 sts)
Row 11 (I): (23 sts)
Tier 3
Row 12 (S): (17 sts)
Row 13 (I): (21 sts)
Row 14 (M): Work the bracket 3 times on each side of a Shell-7. (21 sts)
Row 15 (I): (25 sts)
Row 16 (M): Work the bracket 4 times on each side of a Shell-7. (25 sts)
Row 17 (I): (29 sts)
Tier 4
Row 18 (S): (23 sts)
Row 19 (I): (27 sts)
Row 20 (M): Work the bracket 5 times on each side of a Shell-5. (27 sts)
Row 21 (I): (31 sts)
Row 22 (M): Work the bracket 6 times on each side of a Shell-5. (31 sts)
Row 23 (I): (35 sts)
Tier 5
Row 24 (S): (29 sts)
Row 25 (I): (33 sts)
Row 26 (M): Work the bracket 6 times on each side of a Shell-7. (33 sts)
Row 27 (I): (37 sts)
Row 28 (M): Work the bracket 7 times on each side of a Shell-7. (37 sts)
Row 29 (I): (41 sts)
Row 30 (M): Work the bracket 8 times on each side of a Shell-7. (41 sts)
Row 31 (I): (45 sts)
Checking the mesh math: A Shell-5 row has 1 + (4 x brackets per side) + 5 + 1 sts. A Shell-7 row has 1 + (4 x brackets per side) + 7 + 1 sts. For example, Row 30 is 1 + 32 + 7 + 1 = 41. The shell always sits on the center stitch. It switches between Shell-5 and Shell-7 so that the mesh comes out even on both sides. Stacked down the middle of the tree, the shells form the central column of fans.
Base Band
Rows 32–36: Ch 1, sc in each st across, turn. (45 sts in each row)
The band is 1 in (2.5 cm) deep. Fasten off and weave in the end.
Border
The border is one row of sc followed by one row of rev sc. It runs up the right side, around the tip and down the left side. Do not work it along the bottom of the band, because the fringe goes there.
Border gauge: 2 sc per dc row end, 1 sc per sc row end, and 1 sc in each of the 3 unworked sts on every ledge.
Border Row 1: With the RS facing, join the yarn at the bottom right corner of the band. Working up the right side:
- 5 sc along the band row ends
- 16 sc along the row ends of Rows 31–24
- 3 sc in the unworked sts of the Row 23 ledge
- 12 sc along the row ends of Rows 23–18
- 3 sc on the Row 17 ledge
- 12 sc along the row ends of Rows 17–12
- 3 sc on the Row 11 ledge
- 12 sc along the row ends of Rows 11–6
- 3 sc on the Row 5 ledge
- 10 sc along the row ends of Rows 5–1
That gives 79 sc on the right side. Work 3 sc into the base of the Row 1 chain at the tip. Work the left side as a mirror image for another 79 sc. Total: 161 sc.
Border Row 2: Ch 1. Do not turn. Rev sc in each sc back to the start. (161 sts) Fasten off.
Why the math works: Each side has 31 dc row ends x 2 = 62 sc, 5 band row ends x 1 = 5 sc and 4 ledges x 3 = 12 sc. 62 + 5 + 12 = 79. The ledge count matches the 3 sts that each step-in row left unworked, so the edging lies flat at the tier corners without gathering or ruffling. The rev sc rolls into the raised, cord-like rim around each tier.
Fringe
Cut: Wrap the yarn around a 13 in (33.0 cm) strip of cardboard. Cut along one edge to make strands 26 in (66.0 cm) long. Cut 90 strands.
Attach: Hold 2 strands together and fold them in half. With the WS of the band facing, insert the hook into a st of Row 36 and pull the fold through. Then pull the ends through the fold to make a lark’s head knot. Attach one fringe in each of the 45 sts. (45 fringes, 180 ends)
Trim: Lay the hanging flat and comb the fringe straight. Mark 8 in (20.3 cm) down at each side and 12 in (30.5 cm) down at the center fringe, which is the 23rd one. Trim in a straight line from each side mark to the center mark.
Beads and Star
Body beads (20): Sew 1 bead to the center of each of the 10 shells. Then sew 1 bead on the 5th st from each end of Rows 5, 11, 17, 23 and 31, which adds 10 more. Use doubled thread and stitch through each bead twice.
Fringe beads (18): Choose 18 single ends spread across the fringe. Using the floss threader, thread a bead onto each one, at different heights between 2 in (5.1 cm) and 7 in (17.8 cm) below the band. Tie an overhand knot just below each bead to hold it in place.
Star and cord: Sew the star to the front of the tip. Thread the cord through the back of the border at the tip and knot it into a loop about 5 in (12.7 cm) tall.
Final Blocking
- Mist the tree body and band until they are damp but not soaked. Keep the fringe dry.
- Lay the piece RS up on the blocking board.
- Pin the bottom corners of the band 10.5 in (26.7 cm) apart, including the edging.
- Pin the tip on the center line, 15 in (38.1 cm) above the bottom of the band.
- Pin out each ledge corner so the two sides of every tier match.
- Pin each shell open into a fan, and open the mesh spaces with a fingertip.
- Let it dry completely, then unpin it.
- Steam the fringe lightly without touching it, and comb it straight.
Final Quality-Control Checklist
- The bottom rows of the tiers have 17, 23, 29, 35 and 45 sts.
- Every ledge has exactly 3 unworked sts and lies flat.
- Each side of the border has 79 sc, with 3 sc at the tip.
- The piece measures 10.5 in (26.7 cm) x 15 in (38.1 cm) without the fringe.
- There are 45 fringes, and the 12 in (30.5 cm) point is centered.
- All 38 beads and the star are secure.
- All yarn ends are woven into solid areas, not the mesh.
Troubleshooting
The tiers lean to one side: You may be skipping the tch. Count it as 1 dc and work the last increase into it.
The edging ruffles: You are working more than 2 sc per dc row end. Redo that section with exactly 2.
The edging pulls in at a ledge: You missed a ledge stitch. Every ledge needs all 3 sc.
A shell is off-center: Count the brackets again. Each side of the shell needs the same number.
The band flares: Your sc stitches are looser than your dc stitches. Go down one hook size for Rows 32–36 only.
Care
Hand wash in cool water with mild soap. Press out the water in a towel and dry the piece flat with the fringe combed straight.
Final Notes
Each measurement leads to the next. At a gauge of 18 dc x 9 rows = 4 in (10.2 cm), Row 31 has 45 sts and is 10 in (25.4 cm) wide, and the tree rows measure 13.75 in (34.9 cm) tall. The 1 in (2.5 cm) band brings the height to 14.75 in (37.5 cm). The 0.25 in (0.6 cm) edging takes the piece to 10.5 in (26.7 cm) x 15 in (38.1 cm). The fringe grows from 8 in (20.3 cm) at the sides to 12 in (30.5 cm) at the center, for an overall length of 27 in (68.6 cm). Check each tier against its checkpoint and your tree will hang straight and even.
Happy crocheting!