

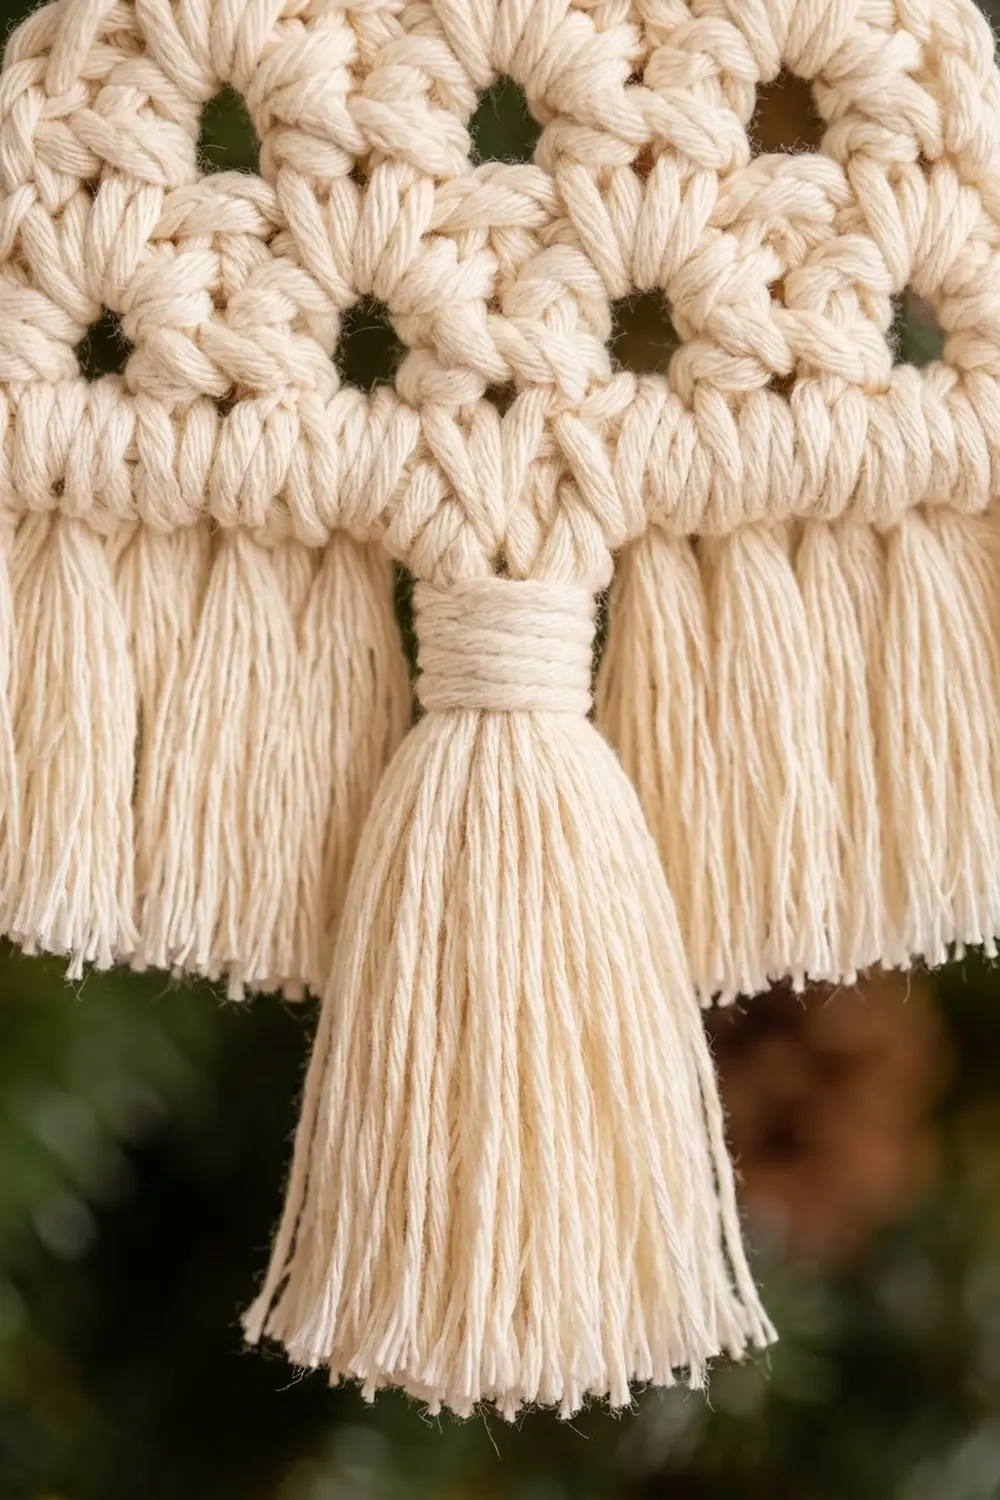
This little tree ornament is all texture and no fuss. Double crochet groups make a lacy triangle, and small round “windows” open up row by row from the tip down. A soft combed fringe and one chunky tassel give it the boho, macramé-style finish that looks so good on a natural-themed tree.
Everything is worked in one color: cream or natural-white cotton. A small wooden star sits at the top of the tree, and a loop of jute twine makes the hanger. The look is calm and Scandinavian, it makes a lovely gift, and you can finish one in an evening.
This pattern uses US crochet terms. The finished crocheted body measures about 5.5 in (14.0 cm) wide at the base and 5.25 in (13.3 cm) tall. The fringe hangs 2 in (5.1 cm) below the base and the tassel hangs 3 in (7.6 cm) below it. That makes the ornament about 8.25 in (21.0 cm) long from tip to tassel end, not counting the star and hanger.
The construction is simple. You work the triangle flat in turned rows from the tip down, adding one double crochet group per row. Then you work a two-round edging around the whole triangle, attach fringe along the bottom, and finish with a tassel and the star.
Finished Size and Construction
- Finished size (body): 5.5 in (14.0 cm) wide x 5.25 in (13.3 cm) tall
- Total length with tassel: about 8.25 in (21.0 cm), not counting the star and hanger
- Skill level: Easy
- Terminology: US crochet terms
- Yarn weight: Worsted (#4) cotton
- Hook: 5.0 mm (US H-8)
- Number of pieces: 1 (one single triangle)
- Layout: single flat triangle, point at the top, fringe and tassel at the base
- Piece size before border: 5 in (12.7 cm) wide x 4.75 in (12.1 cm) tall
- Border depth: about 0.25 in (0.6 cm) on each edge
Materials
Yarn: Choose a smooth, matte worsted-weight cotton or cotton blend. Cotton keeps the lacy holes crisp and combs out into a soft, fluffy fringe. Acrylic will work for the body, but its fringe will not fan out the same way. For a true macramé look, you can use 3 mm single-twist cotton cord for the fringe and tassel instead.
- Cream / natural white: 28 g (approx. 48 m) for one ornament
Quantities include a margin of roughly 20% for the gauge check, tails, and trimming waste.
Tools and notions:
- 5.0 mm (US H-8) crochet hook
- 1 wooden star cut-out, about 2 in (5.1 cm) across
- 12 in (30.5 cm) of jute twine for the hanger
- A piece of stiff card 3.5 in (8.9 cm) tall for the tassel
- Sharp scissors
- Tapestry needle
- Fine-toothed comb or pet brush for the fringe
- Ruler or tape measure
- Blocking mat and rust-proof pins
Abbreviations (US Terms)
- ch – chain
- sl st – slip stitch
- sc – single crochet
- dc – double crochet
- sp – space
- st(s) – stitch(es)
- rev sc – reverse single crochet (crab stitch)
- [ ] – repeat the instructions inside the brackets as directed
Special stitches:
- Group: 3 dc worked into the same stitch or space. At the start of a row, ch 3 counts as the first dc of the edge group.
- Reverse single crochet (rev sc): Work from left to right (right-handers). Insert the hook into the next stitch to the right, yarn over, pull up a loop, yarn over, and pull through both loops. This makes the corded, twisted ridge around the edge.
Gauge and Checkpoints
Gauge is not critical for a hanging ornament, but it controls both the size and how open the holes look. Work Rows 1–4 first as your test piece and measure it. If it matches, keep going.
- Gauge: 4 groups with their ch-1 spaces = 3 in (7.6 cm); 3 dc rows = 2 in (5.1 cm).
- Checkpoint 1 (after Row 4): about 3 in (7.6 cm) wide across Row 4 and 2.75 in (7.0 cm) tall.
- Checkpoint 2 (after Row 7): about 5 in (12.7 cm) wide and 4.75 in (12.1 cm) tall.
- Checkpoint 3 (after border): about 5.5 in (14.0 cm) wide and 5.25 in (13.3 cm) tall.
If your piece is too big: Go down to a 4.5 mm (US 7) hook.
If your piece is too small: Go up to a 5.5 mm (US I-9) hook. If the holes are closing up, relax your grip on the chains.
Pattern: Tree Triangle
You work the triangle in turned rows from the tip down. Each row has one more group than the row before, and each new ch-1 space becomes one of the small round holes. Every row is a growth row, and the count after each row is that row’s own complete count.
Row 1: Ch 4, sl st into first ch to form a ring. Ch 3 (counts as first dc), 2 dc in ring. Turn. (3 dc: 1 group)
Row 2: Ch 3 (counts as dc), 2 dc in first st (the st at the base of the ch-3), ch 1, skip next dc, 3 dc in top of turning ch. Turn. (6 dc: 2 groups, 1 ch-1 sp; 7 sts)
Row 3: Ch 3 (counts as dc), 2 dc in first st, ch 1, 3 dc in next ch-1 sp, ch 1, 3 dc in top of turning ch. Turn. (9 dc: 3 groups, 2 ch-1 sps; 11 sts)
Row 4: Ch 3 (counts as dc), 2 dc in first st, ch 1, [3 dc in next ch-1 sp, ch 1] 2 times, 3 dc in top of turning ch. Turn. (12 dc: 4 groups, 3 ch-1 sps; 15 sts)
Stop here and check Checkpoint 1.
Row 5: Ch 3 (counts as dc), 2 dc in first st, ch 1, [3 dc in next ch-1 sp, ch 1] 3 times, 3 dc in top of turning ch. Turn. (15 dc: 5 groups, 4 ch-1 sps; 19 sts)
Row 6: Ch 3 (counts as dc), 2 dc in first st, ch 1, [3 dc in next ch-1 sp, ch 1] 4 times, 3 dc in top of turning ch. Turn. (18 dc: 6 groups, 5 ch-1 sps; 23 sts)
Row 7: Ch 3 (counts as dc), 2 dc in first st, ch 1, [3 dc in next ch-1 sp, ch 1] 5 times, 3 dc in top of turning ch. Do not fasten off. (21 dc: 7 groups, 6 ch-1 sps; 27 sts)
How the pattern grows: Row n always has n groups (3n dc) and n – 1 ch-1 spaces, for 4n – 1 stitches in total. So Row 7 has 7 x 3 = 21 dc + 6 ch-1 sps = 27 sts. The edge groups step out by half a group on each side every row, which keeps the slanted sides straight. The holes stack in a triangle: 1 hole in Row 2, 2 in Row 3, and so on down to 6 in Row 7.
Check Checkpoint 2 before starting the border.
Border
The border has two rounds. A round of sc squares up the edges, then a round of rev sc makes the corded ridge around the tree and along the base. Row 7 is the last row you worked, so its stitches form the bottom edge of the tree.
Border gauge: Round 1 places 1 sc in each stitch across the base and 2 sc in each dc row-end up the sides. After Round 1, the bottom edge should still measure the same as Row 7: 5 in (12.7 cm). The rev sc round then adds about 0.25 in (0.6 cm) on each edge.
Round 1 (sc): Ch 1, turn. Working across Row 7, sc in each dc and each ch-1 sp across: 27 sc. You are now at the second bottom corner. Rotate to work up the slanted side in the row-ends, and work 2 sc in each of the 7 row-ends to the tip: 14 sc. At the tip, ch 6 for the hanging loop. Working down the other slanted side, work 2 sc in each of the 7 row-ends: 14 sc. Join with sl st to first sc.
- Bottom edge: 27 sc (the first and last sc are the two bottom corner sts)
- Right side: 14 sc
- Left side: 14 sc
- Tip: ch-6 loop (not counted as sts)
- Total: 27 + 14 + 14 = 55 sc
Round 2 (rev sc): Ch 1, do not turn. Working from left to right, rev sc in each sc around: 55 rev sc. When you reach the tip, skip the ch-6 loop so it stays free and continue in the first sc on the other side. Join with sl st to first rev sc. Fasten off and weave in ends.
- Bottom edge: 27 rev sc
- Each side: 14 rev sc
- Total: 55 rev sc
Why the math works: Across the base, 1 sc in each existing st (21 dc + 6 ch-1 sps = 27) keeps the edge exactly as wide as Row 7, so it neither ruffles nor pulls in. Up the sides, a dc row is about as tall as 2 sc, so 2 sc per row-end (7 x 2 = 14) lies flat. The bottom corners are sharp, acute angles, so they need no extra corner increases. The corner sts are already counted inside the 27 bottom sts. Round 2 works 1 rev sc in each sc, so all counts stay the same.
Measure for Checkpoint 3: about 5.5 in (14.0 cm) wide and 5.25 in (13.3 cm) tall, not including the hanging loop.
Fringe
- Cut 28 strands of yarn, each 5 in (12.7 cm) long.
- Hold 2 strands together and fold them in half.
- With the right side facing and the tip pointing up, insert the hook from front to back through the 1st sc of the bottom edge in Round 1, just above the rev sc ridge. Pull the fold through to make a loop, pass the ends through the loop, and tighten. This is a lark’s head knot.
- Repeat in every other bottom stitch (sts 1, 3, 5, and so on through st 27) for 14 fringe bundles.
- Untwist each strand fully and comb it out with a fine comb or pet brush until it is soft and fluffy.
- Trim the whole fringe straight to 2 in (5.1 cm) below the bottom ridge.
Tassel
- Wrap yarn 30 times around the 3.5 in (8.9 cm) card.
- Slide an 8 in (20.3 cm) strand under the wraps at the top edge and tie it tightly. Leave both ends long.
- Cut the wraps along the bottom edge and remove the card.
- To form the neck, wrap a 12 in (30.5 cm) strand firmly around the bundle about 8 times, 0.5 in (1.3 cm) below the top tie. Thread the end onto a needle and hide it inside the tassel.
- Comb out the tassel ends and trim them to 3 in (7.6 cm) from the top fold.
- Thread the two top-tie ends from front to back through the center bottom stitch (st 14) of the base. Knot them securely behind the ridge so the tassel head sits snugly against the edge, then weave in the ends.
Star and Hanger
Thread the 12 in (30.5 cm) jute twine through the ch-6 loop at the tip, then up through the cut-out of the wooden star so the star rests on the tree point. Tie the two twine ends together in an overhand knot about 2.5 in (6.4 cm) above the star and trim.
Final Blocking
- Before adding the star, dampen the triangle (not the fringe) with a spray bottle or a short soak. Press out the extra water in a towel.
- Lay it flat on the blocking mat, right side up.
- Pin the tip and both bottom corners to 5.5 in (14.0 cm) across and 5.25 in (13.3 cm) tall.
- Pin the slanted sides straight, and use a pin or fingertip to open each hole into a neat round shape.
- Comb the fringe and tassel downward so they dry straight.
- Let the ornament dry completely, for at least several hours, before you unpin it and add the star.
Final Quality-Control Checklist
- Row 7 has 7 groups and 6 ch-1 spaces (27 sts).
- The holes run 1, 2, 3, 4, 5, 6 from the tip down.
- Round 1 has 27 sc on the base and 14 sc on each slanted side (55 sc).
- The rev sc ridge is even all the way around, and the ch-6 loop is free.
- The body measures 5.5 in (14.0 cm) by 5.25 in (13.3 cm).
- There are 14 evenly spaced fringe bundles, trimmed to 2 in (5.1 cm).
- The tassel is centered on st 14 and hangs 3 in (7.6 cm).
- All tails are woven in, and the star sits straight on the tip.
Troubleshooting
The sides are curved, not straight: Check that each row starts with 2 dc in the first st and ends with 3 dc in the turning ch. If either half of an edge group is missing, the side leans in.
The triangle curls or cups: Your ch-1 spaces may be too tight. Chain a little more loosely, or go up a hook size.
The base ruffles after Round 1: You may have worked extra sc. Recount to exactly 27 bottom sts.
The sides pull in or wave: Recount to 14 sc per side, with 2 sc in each row-end.
The fringe looks stringy: Untwist the plies fully before combing, then trim again after combing.
The tassel hangs crooked: Retie it so both top-tie ends pass through the same center stitch.
Care
Spot clean only with cool water and mild soap, and lay flat to dry. Store the ornament flat in tissue so the fringe stays straight, and comb the fringe again before hanging if needed.

Final Notes
The measurement chain is short and easy to follow. Rows 1–4 should measure 3 in (7.6 cm) wide. Row 7 should reach 5 in (12.7 cm) wide and 4.75 in (12.1 cm) tall, with 27 sts. The 55-stitch border brings the body to 5.5 in (14.0 cm) by 5.25 in (13.3 cm). The 2 in (5.1 cm) fringe and the 3 in (7.6 cm) tassel finish it at about 8.25 in (21.0 cm) long. If each checkpoint matches, every tree you make will be the same size, which looks lovely when you hang a whole row of them on the branches.
Happy crocheting!