

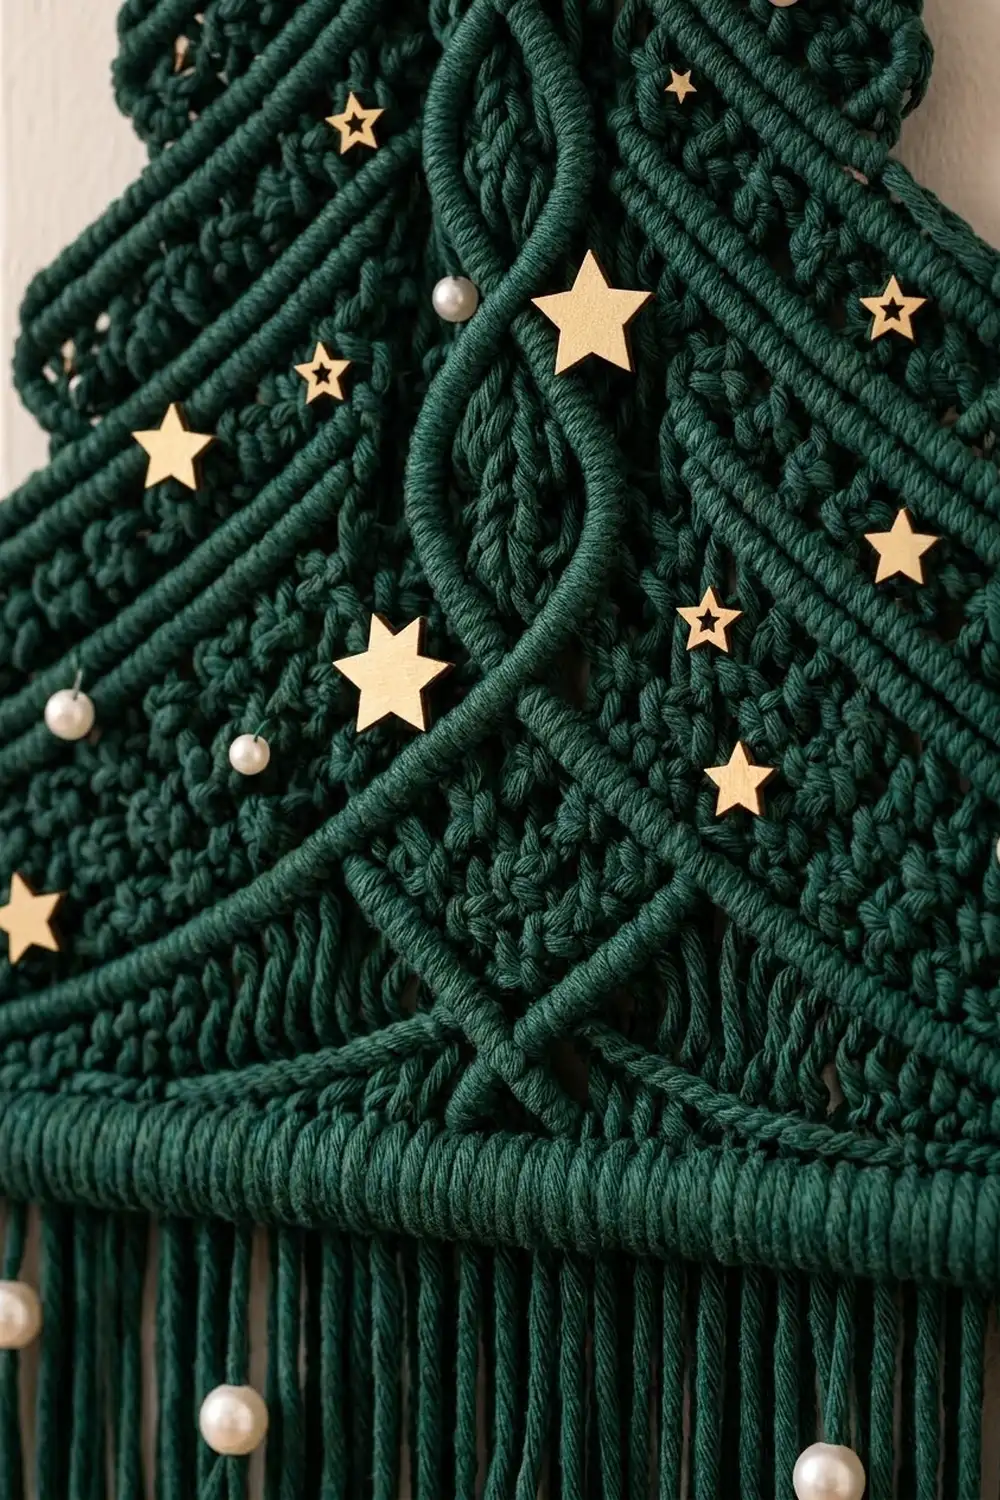
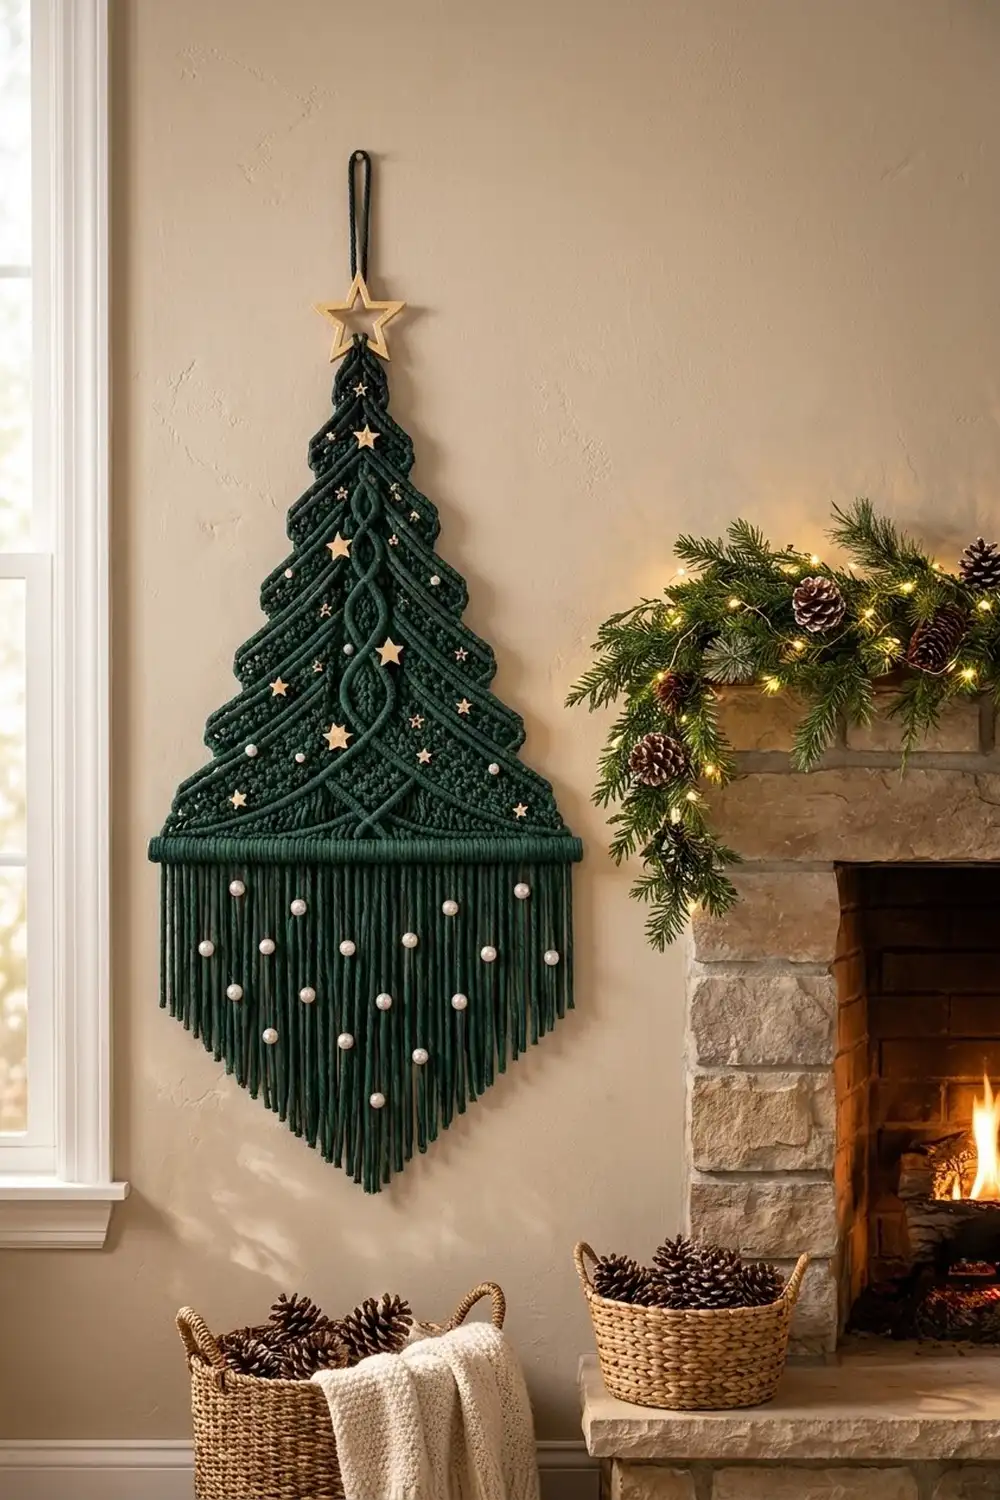
This tall Christmas tree wall hanging has a deep forest-green body, a rope cable twisting down the middle, and stepped tiers that flare out like real branches. Small gold stars and soft white pearls sit on the surface, and a full fringe with pearl beads ends in a neat V point below a covered dowel.
The palette is simple: one forest green yarn with gold and pearl accents. The style is modern and a little Scandinavian. It suits a mantel, a narrow wall, or a front door.
The pattern uses US crochet terms. The finished tree body measures 12 1/2 in (31.8 cm) wide at the base after the edging. It is about 17 1/4 in (43.8 cm) tall from the base to the tip. The total length from tip to fringe point is about 30 in (76.2 cm), not counting the star topper.
You work the tree flat in one piece, from the bottom up, in single crochet rows. A center cable uses front post stitches. Edge decreases shape the triangle, and a flare row at the start of each tier creates the stepped silhouette. Then you add an edging, fold a dowel casing along the bottom, add surface slip-stitch garlands, attach the fringe, and sew on the embellishments.
Finished Size and Construction
- Finished size: 12 1/2 in (31.8 cm) wide at the base × about 30 in (76.2 cm) long, including the fringe
- Skill level: Intermediate
- Terminology: US crochet terms
- Yarn weight: Bulky (#5) cotton or cotton blend
- Hook: 6.0 mm (J-10)
- Number of pieces: 1 (single piece)
- Layout: One standalone tree hanging with no joining
- Piece size before edging: 12 in (30.5 cm) wide × 17 in (43.2 cm) tall
- Edging depth: about 1/4 in (0.6 cm) per side
- Casing: 1 in (2.5 cm) deep when folded
- Fringe: 12 in (30.5 cm) at the center, 7 in (17.8 cm) at the outer edges
Materials
Yarn advice: Choose a smooth, firm bulky cotton or cotton-blend yarn with good stitch definition. Cotton holds the cable crisply, hangs straight without stretching, and makes a heavy fringe that drapes well. Avoid fluffy or brushed yarns, because they blur the cable and the garland lines.
- Forest Green: about 230 g / 170 m
Tools and notions:
- 6.0 mm (J-10) crochet hook
- Tapestry needle
- 6 removable stitch markers
- Wooden dowel, 14 in (35.6 cm) long and 1/2 in (1.3 cm) across, painted green or left natural
- 1 gold wooden star, 2 in (5.1 cm), for the topper
- 16 small gold wooden stars, 3/4 in (1.9 cm)
- 10 white pearl beads, 6 mm, for the tree body
- 24 large-hole white pearl beads, 10 mm, with holes of at least 3 mm, for the fringe
- Gold sewing thread and a sharp needle, or fabric glue
- Dark cord or ribbon, 10 in (25.4 cm), for the hanging loop
- Sharp scissors and a ruler
These yarn quantities include a margin of about 25% for your gauge swatch and tension differences.
Abbreviations (US Terms)
- ch – chain
- sc – single crochet
- sc2tog – single crochet 2 together
- sl st – slip stitch
- st(s) – stitch(es)
- FPdc – front post double crochet
- FPtr – front post treble crochet
- RS / WS – right side / wrong side
Special stitches:
Plain Panel (over 6 sts, RS rows only): Work 1 FPdc around each of the next 6 post sts two rows below. On Row 3, work around the 6 sc of Row 1. Skip the 6 sts behind them on the current row. This keeps 6 sts.
Cross Panel (over 6 sts, RS rows only): Skip the next 3 post sts two rows below. Work 1 FPtr around each of the following 3 post sts. Then, working in front of the sts you just made, work 1 FPtr around each of the 3 skipped post sts. Skip the 6 sts behind them. This keeps 6 sts.
Flare: 2 sc in each of the first 2 sts, sc across to the last 2 sts, then 2 sc in each of the last 2 sts. This adds 4 sts.
Gauge and Checkpoints
Gauge: 12 sts × 12 rows = 4 in (10.2 cm) in sc. That works out to 3 sts and 3 rows per inch.
Test before you start. Ch 13 and work 12 rows of sc on 12 sts, then measure. Next, work Tier 1 of the tree (Rows 1–9) as your real test piece, and check it against the first checkpoint below before you continue.
Checkpoints (before edging):
- After Row 1: 36 sts, 12 in (30.5 cm) wide
- After Row 9: 28 sts, 9 1/3 in (23.7 cm) wide; height 3 in (7.6 cm)
- After Row 18: 24 sts, 8 in (20.3 cm) wide; height 6 in (15.2 cm)
- After Row 27: 20 sts, 6 2/3 in (16.9 cm) wide
- After Row 36: 16 sts, 5 1/3 in (13.5 cm) wide
- After Row 45: 12 sts, 4 in (10.2 cm) wide; height 15 in (38.1 cm)
- After Row 51: 1 st at the tip; height 17 in (43.2 cm)
If your piece is too big, go down a hook size. If it is too small, go up a hook size. Row gauge matters as much as stitch gauge here. If your rows are short, the tree gets squat and the edging will ruffle.
Tree Body
Pattern notes:
- Ch 1 at the start of each row. It does not count as a stitch. Turn at the end of every row.
- Each decrease row has 1 sc2tog at each end: sc2tog, sc across to the last 2 sts, sc2tog. That takes away 2 sts.
- The 6 center sts form the cable panel on every RS (odd) row from Row 3 through Row 45. On those rows, work sc in each side stitch up to the panel, work the panel, then sc in each side stitch to the end.
- Work every WS (even) row in sc only. The posts of the panel stitches still get 1 sc each.
- Each side section always holds (total − 6) ÷ 2 sts, so the cable stays centered.
Foundation: Ch 37.
Tier 1
Row 1 (RS): Sc in the 2nd ch from the hook and in each ch across. (36 sts)
Row 2 (WS): Decrease row. (34 sts)
Row 3: Sc 14, Plain Panel, sc 14. (34 sts)
Row 4: Decrease row. (32 sts)
Row 5: Sc 13, Plain Panel, sc 13. (32 sts)
Row 6: Decrease row. (30 sts)
Row 7: Sc 12, Cross Panel, sc 12. (30 sts)
Row 8: Decrease row. (28 sts)
Row 9: Sc 11, Plain Panel, sc 11. (28 sts)
Tier 2
Row 10 (WS): Flare. (32 sts)
Row 11: Sc2tog, sc 11, Plain Panel, sc 11, sc2tog. (30 sts)
Row 12: Sc across. (30 sts)
Row 13: Sc2tog, sc 10, Cross Panel, sc 10, sc2tog. (28 sts)
Row 14: Sc across. (28 sts)
Row 15: Sc2tog, sc 9, Plain Panel, sc 9, sc2tog. (26 sts)
Row 16: Sc across. (26 sts)
Row 17: Sc2tog, sc 8, Plain Panel, sc 8, sc2tog. (24 sts)
Row 18: Sc across. (24 sts)
The 4-st flare on Row 10 makes the new tier stick out 2 sts, or 2/3 in (1.7 cm), beyond the top of Tier 1 on each side. That overhang is the step.
Tier 3
Row 19 (RS): 2 sc in each of the next 2 sts, sc 7, Cross Panel, sc 7, 2 sc in each of the last 2 sts. (28 sts)
Row 20: Decrease row. (26 sts)
Row 21: Sc 10, Plain Panel, sc 10. (26 sts)
Row 22: Decrease row. (24 sts)
Row 23: Sc 9, Plain Panel, sc 9. (24 sts)
Row 24: Decrease row. (22 sts)
Row 25: Sc 8, Cross Panel, sc 8. (22 sts)
Row 26: Decrease row. (20 sts)
Row 27: Sc 7, Plain Panel, sc 7. (20 sts)
Tier 4
Row 28 (WS): Flare. (24 sts)
Row 29: Sc2tog, sc 7, Plain Panel, sc 7, sc2tog. (22 sts)
Row 30: Sc across. (22 sts)
Row 31: Sc2tog, sc 6, Cross Panel, sc 6, sc2tog. (20 sts)
Row 32: Sc across. (20 sts)
Row 33: Sc2tog, sc 5, Plain Panel, sc 5, sc2tog. (18 sts)
Row 34: Sc across. (18 sts)
Row 35: Sc2tog, sc 4, Plain Panel, sc 4, sc2tog. (16 sts)
Row 36: Sc across. (16 sts)
Tier 5
Row 37 (RS): 2 sc in each of the next 2 sts, sc 3, Cross Panel, sc 3, 2 sc in each of the last 2 sts. (20 sts)
Row 38: Decrease row. (18 sts)
Row 39: Sc 6, Plain Panel, sc 6. (18 sts)
Row 40: Decrease row. (16 sts)
Row 41: Sc 5, Plain Panel, sc 5. (16 sts)
Row 42: Decrease row. (14 sts)
Row 43: Sc 4, Cross Panel, sc 4. (14 sts)
Row 44: Decrease row. (12 sts)
Row 45: Sc 3, Plain Panel, sc 3. (12 sts)
Tip
From here on, work sc only. The cable ends at Row 45.
Row 46: Decrease row. (10 sts)
Row 47: Decrease row. (8 sts)
Row 48: Decrease row. (6 sts)
Row 49: Decrease row. (4 sts)
Row 50: Decrease row. (2 sts)
Row 51: Sc2tog. (1 st)
Do not fasten off. Go straight on to the edging.
The cable crosses every 6 rows (Rows 7, 13, 19, 25, 31, 37, and 43), which makes 7 twists down the center.
Border
The border has three parts: a side edging, a dowel casing, and the fringe.
Border gauge: 1 sc per row end. This matches the fabric because the gauge is 3 sts and 3 rows per inch. Each sc along the edge covers exactly one row, so the edge lies flat without ruffling or cupping.
Edging Round
Ch 1. Work 3 sc in the Row 51 tip st. This is the tip corner. Then work down the first side:
- First side: 1 sc in the end of each of Rows 50 down to 1 (50 sc). At each of the 4 steps, also work 1 sc into the underside of each of the 2 overhanging flare sts (8 sc). Side total: 58 sc.
Fasten off. Join the yarn at the bottom of the other side, at the Row 1 row end, and work up it the same way:
- Second side: 50 row-end sc plus 8 step sc. Side total: 58 sc. Sl st to the first tip sc and fasten off.
Edging total: 58 + 3 + 58 = 119 sc. The 3 tip sc are counted separately from the sides. The bottom corners get no extra stitch, because the casing finishes the base.
Dowel Casing
With the RS facing, join the yarn in the first foundation ch loop at the bottom right.
Rows 1–6: Ch 1, sc in each of the 36 foundation loops (on Row 1) or sts (on Rows 2–6), turn. (36 sts in each row)
The casing is 2 in (5.1 cm) deep before folding. Fold it toward the WS along the line between Rows 3 and 4. Sl st each of the 36 Row 6 sts to the matching foundation loop on the WS (36 sl st). Fasten off. The tube is now 1 in (2.5 cm) deep. Slide in the dowel so 1 in (2.5 cm) sticks out on each side.
Fringe
Cut 72 strands, each 26 in (66.0 cm) long, which is about 47.5 m in total. Hold 2 strands together and fold them in half. Attach them with a lark’s head knot through 1 st of casing Row 3, the folded bottom edge. Repeat in all 36 sts for 36 bundles and 144 ends.
Trim the fringe into a V. Bundles 18 and 19, the center pair, stay at 12 in (30.5 cm). Bundles 1 and 36 are cut to 7 in (17.8 cm), and the bundles in between taper evenly.
Garlands and Embellishments
Garlands: On each tier, use removable markers to mark two curved swags. Each one starts at a side edge on tier row 7 and dips toward the edge of the cable panel at tier row 3. With the yarn held behind the work, surface sl st along each curve, with 1 sl st per stitch or row crossed. Stop at the panel edges so the cable stays clean. That makes 10 half-swags in total.
Stars and pearls: Sew or glue the 16 small stars and 10 pearls (6 mm) randomly across the tiers, keeping them off the cable.
Fringe pearls: Thread 24 pearls (10 mm) onto single fringe ends at different heights, and tie an overhand knot below each one.
Topper: Thread the hanging cord through the tip st and tie it into a loop. Sew the 2 in (5.1 cm) star just above the tip.
Final Blocking
- Before adding the fringe and beads, mist the tree body lightly with water.
- Pin it flat with the RS up. The base should measure 12 1/2 in (31.8 cm) and the height 17 1/4 in (43.8 cm).
- Pin each step out sharply so the overhangs stay horizontal.
- Run your finger down the cable to straighten it.
- Let it dry completely, which takes about 24 hours.
- Add the fringe, then steam it gently and comb it straight before you trim the V.
Final Quality-Control Checklist
- [ ] Row 1 has 36 sts, and the base measures 12 in (30.5 cm) before edging
- [ ] The cable is centered on every tier, with 7 crosses
- [ ] There are 4 crisp steps on each side
- [ ] The edging has 58 sc on each side and 3 at the tip
- [ ] The casing is 36 sts wide and joined flat, with the dowel sticking out 1 in (2.5 cm) on each side
- [ ] There are 36 fringe bundles, and the V runs from 12 in (30.5 cm) to 7 in (17.8 cm)
- [ ] The stars and pearls are secure, and all knots are tight
- [ ] The tree hangs straight from its loop
Troubleshooting
- The cable leans to one side: Check the side stitch counts against the row instructions. Both sides should always be equal.
- The steps look soft: Use the “2 sc in each” increases exactly as written and pin the steps out firmly when you block.
- The edging ruffles: Your rows are shorter than gauge. Skip 1 row end every 10 rows.
- The edging cups: Your rows are taller than gauge. Work 2 sc in 1 row end every 10 rows.
- The casing is too tight for the dowel: Add a 7th row before folding.
- The tree tilts when hung: Center the loop exactly at the tip st.
Care
Spot clean only, and dust the hanging with a soft brush. If you need to, slide out the dowel, hand wash the piece in cool water, and dry it flat.
Final Notes
The measurements build on each other:
- A gauge of 3 sts and 3 rows per inch gives 36 sts, or 12 in (30.5 cm), at the base.
- The 51 rows give a height of 17 in (43.2 cm).
- Four flares create the stepped edges.
- The edging works 1 sc per row end, for 58 sc on each side plus 3 at the tip.
- The 36-st casing holds the dowel.
- The 36 fringe bundles end in a 12 in (30.5 cm) V.
Check gauge first and trust the stitch counts, and your tree will hang straight, sharp, and festive.
Happy crocheting!