

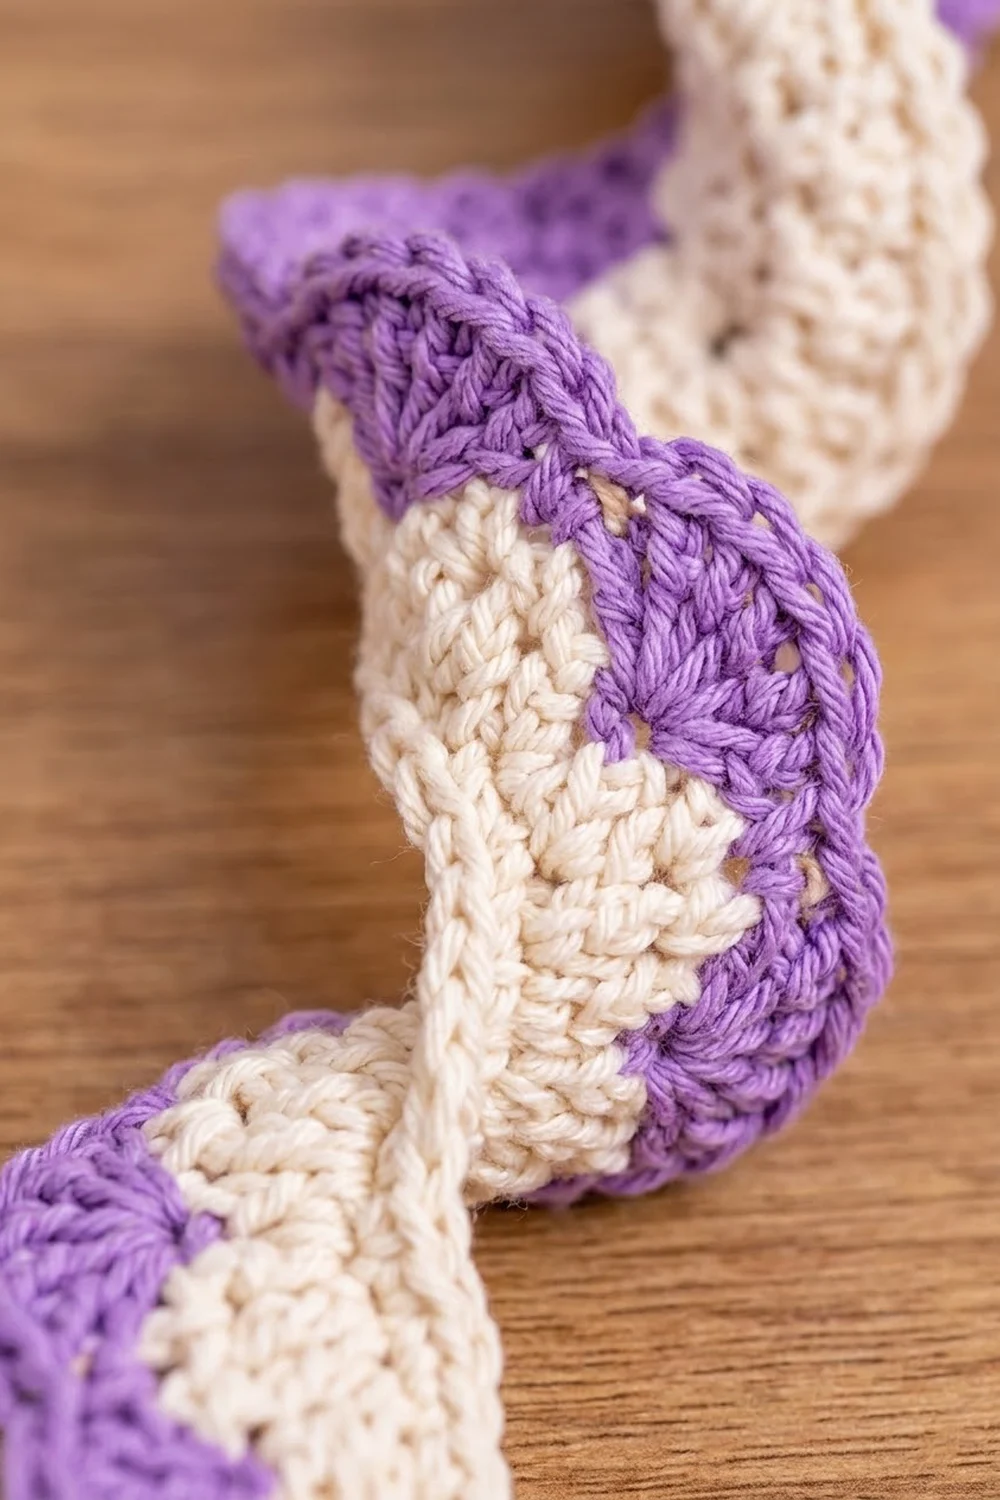
The Lavender Swirl is a hanging spiral ornament. A cream strip with a scalloped lavender edge twists into a corkscrew and hangs on a cream cord, with natural wooden beads above and below the spiral and a soft cream tassel at the bottom.
The palette is two colors: warm cream and lavender purple. Cream makes up the inner part of the spiral, the cord and the tassel. Purple appears only in the shell edging, so it shows as a clean ribbon of color winding down the ornament. The style is calm and Scandinavian-inspired, and it suits natural wood, white lanterns and warm string lights.
This pattern uses US crochet terms. The finished ornament is about 14 in (35.6 cm) long including the hanging loop. The spiral is about 5.5 in (14.0 cm) long and 1.5 in (3.8 cm) across, and the tassel is 3.5 in (8.9 cm) long.
You make one flat strip worked in rows along a foundation chain: one row of single crochet, one heavily increased row of double crochet, and one row of single crochet in cream, then a purple shell edging. The increases make the strip curl naturally. You then twist it around a doubled crochet cord, add the beads and finish with a tassel.
Finished Size and Construction
- Finished ornament: about 14 in (35.6 cm) long including the loop
- Spiral: about 5.5 in (14.0 cm) long, 1.5 in (3.8 cm) across
- Skill level: Easy
- Terminology: US crochet terms
- Yarn weight: DK (weight 3) cotton or cotton blend
- Hook: 4.0 mm (G-6)
- Number of pieces: 1 crocheted strip, plus 1 cord and 1 tassel
- Layout: one vertical spiral on a doubled cord
- Strip size, flat (after edging): 8 in (20.3 cm) long along the foundation, about 1.75 in (4.4 cm) wide
- Strip size before edging: 8 in (20.3 cm) by 1 in (2.5 cm)
- Edging depth: about 0.75 in (1.9 cm)
Materials
Choose a smooth, firm cotton or cotton blend in DK weight. Mercerized or combed cotton gives crisp stitch definition and holds the twist well. Avoid fuzzy or very stretchy yarns, because they blur the shells and let the spiral relax.
- Color A, Cream: 20 g, about 44 m (strip, cord and tassel)
- Color B, Lavender Purple: 10 g, about 22 m (shell edging)
These quantities are for one ornament and include a margin for your gauge swatch and tails.
Tools:
- 4.0 mm (G-6) crochet hook
- 2 wooden beads, 16 mm, with holes at least 5 mm wide
- 1 wooden bead, 20 mm, with a hole at least 5 mm wide
- Stiff card, 4 in (10.2 cm) wide, for the tassel
- Tapestry needle with a large eye
- Scissors
- Stitch marker
- Measuring tape
- Spray bottle for blocking
Abbreviations (US Terms)
- ch – chain
- sl st – slip stitch
- sc – single crochet
- dc – double crochet
- st(s) – stitch(es)
- sk – skip
- rep – repeat
Special stitch: Shell – work 5 dc into the same stitch.
Gauge and Checkpoints
Gauge: 16 sc = 4 in (10.2 cm) with a 4.0 mm hook.
Exact gauge matters less here than in a garment, but it does control how tightly the spiral twists. Make one strip completely before you make several. Measure it at these points:
- After Row 1: the sc row should measure 8 in (20.3 cm) long.
- After Row 2: the strip should be about 0.75 in (1.9 cm) wide and rippling.
- After Row 3: the cream strip should be about 1 in (2.5 cm) wide and rippling hard along the top edge.
- After Row 4: the strip should be about 1.75 in (4.4 cm) wide. Left alone, it should curl into a corkscrew.
If your strip is too long, go down to a 3.5 mm hook. If it is too short, go up to a 4.5 mm hook. A difference of 0.25 in (0.6 cm) along Row 1 is fine. If the twist looks loose and floppy, your increase rows are too relaxed, so go down a hook size for Rows 2 to 4 only.
Main Pattern: Cream Base Strip
Use Color A (Cream).
Foundation: Leaving a 12 in (30.5 cm) starting tail, ch 33.
You will use this starting tail later to tack the spiral to the cord, so do not weave it in.
Row 1: Sc in 2nd ch from hook and in each ch across. Turn. (32 sc)
This straight foundation edge becomes the inner core of the spiral. Keep the chain even and not too tight.
Row 2 (growth row): Ch 3 (counts as first dc), dc in the same st, 2 dc in each of the remaining 31 sc. Turn. (64 dc)
This row doubles the stitch count. The strip will ripple right away. That ripple is the beginning of the twist, so do not try to flatten it.
Checkpoint: The strip is about 0.75 in (1.9 cm) wide.
Row 3 (conversion row): Ch 1 (does not count as a st), 2 sc in the first dc, sc in each of the next 62 dc, sc in the top of the turning ch-3. Fasten off Color A. (64 sc worked 1 per stitch + 1 extra sc = 65 sc)
The single extra stitch gives the 65 stitches the shell edging needs: 1 starting sc plus 16 repeats of 4 stitches.
Checkpoint: The cream strip is about 1 in (2.5 cm) wide. It is 8 in (20.3 cm) long along the foundation edge, and the top edge is much longer and curling.
Edging: Lavender Shells
For this one-piece ornament, the purple shell row works as the border. It runs along the long outer edge only. Do not work it along the short ends or the foundation edge.
Edging gauge: Each shell repeat uses 4 stitches of Row 3 and covers about 1 in (2.5 cm) of the outer edge when you stretch it gently flat. Each shell stands about 0.75 in (1.9 cm) tall.
Row 4 (shell row): With the right side facing, join Color B (Purple) with a sl st in the first sc of Row 3. Ch 1, sc in the same st. Then work sk 1 st, shell in the next st, sk 1 st, sc in the next st. Rep from * 15 more times. The last sc of the final repeat goes in the last sc of Row 3. Fasten off, leaving a 6 in (15.2 cm) tail. (16 shells and 17 sc, 97 sts total)
Why the math works: Row 3 has 65 sts. The first sc uses 1 st, and each of the 16 repeats uses 4 sts (skip, shell, skip, sc), so 1 + (16 × 4) = 65. Every stitch is used and both ends finish on an sc, which keeps the short ends of the strip tidy. At gauge, the 65-stitch outer edge is about 16 in (40.6 cm) long, twice the 8 in (20.3 cm) foundation. That difference in length makes the strip coil.
Checkpoint: Measured gently flat, the strip is about 1.75 in (4.4 cm) wide. It should curl into a corkscrew without any help.
Weave in the purple tails and the Row 3 cream tail along the cream rows. Keep the 12 in (30.5 cm) starting tail free.
Hanging Cord
Use Color A (Cream).
Cord: Ch 96, or chain until the cord measures about 24 in (61.0 cm). Sl st in the back bump of the 2nd ch from the hook and in the back bump of each ch across. Fasten off. (95 sl sts)
Working into the back bumps gives a firm, rounded cord that looks like a braided cord and does not stretch much.
Assembly
- Make the loop. Fold the cord in half. The fold is the hanging loop.
- Add the top beads. Thread both cord ends together through the two 16 mm beads. Slide the beads up until the loop above them is 3 in (7.6 cm) tall.
- Position the spiral. Hold the strip with the foundation edge (Row 1) toward the cord. Place the end of the strip that has the starting tail right under the lower top bead.
- Twist. Wrap the foundation edge around the doubled cord in a tight helix so the cream inner band hugs the cord and the purple shells spin outward. Ease it into 3 to 4 full turns over 5.5 in (14.0 cm).
- Tack in place. Thread the starting tail onto a tapestry needle. Tack the foundation edge to the cord every half turn, working down the spiral. Go through the cord, not around it, so the spiral cannot slide. Secure the bottom end with a few extra stitches, then bury the tail.
- Add the bottom bead. Thread both cord ends through the 20 mm bead and push it up snugly against the bottom of the spiral.
- Leave tails. You should have about 2 in (5.1 cm) of each cord end below the bead to tie the tassel.
Tassel
- Wrap Color A around the 4 in (10.2 cm) card 30 times.
- Pass the two cord ends under the wraps at the top edge of the card and tie them tightly with a square knot. This knot attaches the tassel and gathers the top.
- Cut the wraps along the bottom edge of the card.
- With a 10 in (25.4 cm) length of Color A, wrap the neck tightly 0.5 in (1.3 cm) below the top 6 to 8 times. Knot it, then use the needle to bury the ends down into the tassel.
- Push the knot up so the top of the tassel sits right under the 20 mm bead.
- Comb the strands with your fingers, then trim the tassel evenly to 3.5 in (8.9 cm).
Final Blocking
- Mist the spiral lightly with water until it is damp but not wet.
- Hang the ornament from its loop on a hook or a hanger.
- Pinch each turn gently so the purple shells fan outward evenly and the cream band lies smoothly against the cord.
- Check the spiral length. Push the turns together to shorten it or ease them apart to lengthen it until it measures 5.5 in (14.0 cm).
- Steam the tassel lightly from about 2 in (5.1 cm) away so the strands hang straight. Do not touch the iron to the yarn.
- Let it dry completely while hanging, at least 4 hours.
- Trim any stray tassel strands after drying.
Final Quality-Control Checklist
- Row 1 has 32 sc, Row 2 has 64 dc, Row 3 has 65 sc, and Row 4 has 16 shells and 17 sc.
- The flat strip measured 8 in (20.3 cm) by about 1.75 in (4.4 cm).
- The purple runs only along the outer edge, and both short ends finish on an sc.
- The spiral is about 5.5 in (14.0 cm) long and 1.5 in (3.8 cm) across.
- The tacking stitches go through the cord and do not show from the outside.
- The loop above the beads is 3 in (7.6 cm) tall.
- The tassel is 3.5 in (8.9 cm) long and its neck wrap is neat.
- The finished ornament is about 14 in (35.6 cm) long.
- All tails are woven in securely.
Troubleshooting
The strip lies flat instead of curling. Check that you worked 2 dc into every sc and have 64 dc. If the count is right, your tension relaxed on Row 2, so remake the strip with a smaller hook for Rows 2 to 4.
The shells don’t end evenly. Recount Row 3. You need exactly 65 sc. If you have 64, you missed the extra sc in the first dc.
The spiral slides down the cord. Add more tacking stitches and make sure each one goes through the cord itself.
The beads won’t pass over the doubled cord. Use beads with 6 mm holes, or thread each cord end through separately with a large-eye needle.
The tassel looks thin. Rewrap it with 40 wraps instead of 30.
The spiral looks uneven. Mist it again and spread the turns out evenly by hand while it hangs.
Care
Spot clean with cool water and mild soap, then reshape the ornament and let it dry hanging. Store it flat in tissue paper so the spiral and tassel keep their shape.

Final Notes
Each number in this pattern builds on the one before it. The 32 sc foundation sets the 8 in (20.3 cm) length. Doubling to 64 dc and converting to 65 sc makes the strip curl. Sixteen 5-dc shells add the purple edge and bring the strip to 1.75 in (4.4 cm) wide. The strip twists into a 5.5 in (14.0 cm) spiral that hangs between wooden beads, with a 3 in (7.6 cm) loop above and a 3.5 in (8.9 cm) tassel below. The finished ornament is about 14 in (35.6 cm) long.
Make one, check each number, then make as many as you like for a matching row on a branch or the tree.
Happy crocheting!